
The issue
Once Microsoft released their KB3133977 update for Windows 7 systems, many Asus users who have had this update installed on their machines might have started getting a particularly irritating error that reads Secure Boot Violation. The worst part of this error is that it doesn’t allow the machine to boot into Windows and the users are stuck at the UEFI screen of the computer unable to use their PC.
The reason behind all this has to do with the Secure Boot technology used by Asus machines and the fact that Windows 7 systems do not fully support it. The purpose of the KB3133977 update is to resolve an issue that used to prevent BitLocker from encrypting drives on Win7 machines. And while the KB3133977 resolved the problem, it caused the new Secure Boot Violation for Asus users. As we said, Win7 isn’t exactly compatible with the Secure Boot technology used in Asus motherboards and this is why that Secure Boot wasn’t completely enabled on Win7 machines. However, this changed with the introduction of the new update – the Secure Boot feature got fully enabled with KB3133977 and is now the cause behind the Secure Boot Violation error.
Now, each time an Asus PC with fully enable Secure Boot feature is started, the machine automatically conducts a check and once the OS detected (Windows 7) isn’t recognized as compatible, the machine is prevented from loading further into the OS interface.
How to fix “Secure Boot Violation – Invalid Signature Detected”
There are two main courses of action you can take – the first one is to upgrade to Windows 10 as Win10 is compatible with Secure Boot and should give no error message when you try to start the computer. However, we understand that many of you might not be eager to change your OS and so we will try to give you an alternative way of fixing this problem. Follow the steps below in order to resolve the issue without changing your OS to Windows 10.
Step 1: Once you try to start your Asus PC and it shows you the error message, press the F2 key or the DEL key to enter BIOS.
Step 2: Once in BIOS, press F7 to enter the Advanced Mode. Now, using the keyboard, navigate to Advanced Boot >>> Boot >>> Secure Boot.
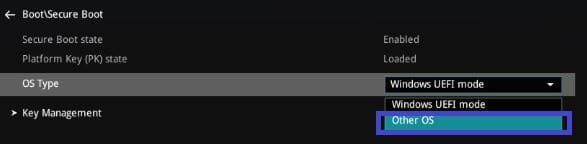
Step 3: Go to the option labeled OS type and change it from Windows UEFI mode to Other OS.

Step 4: Hit F10 in order to save the changes you’ve just made and restart the computer.
Step 5: Repeat the first two steps to get to the Secure Boot menu once again.
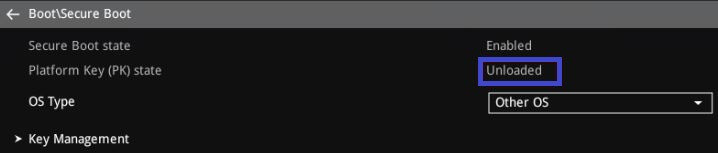
Step 6: Now, look at the Platform Key (PK) state option and make sure it is set to unloaded.

Step 7: Save the changes again (if you have made any) and restart the computer machine. If everything has been done correctly, the problem should no longer be present and the Secure Boot Violation error should no longer appear on your screen preventing you from booting into Windows.


Hi from Brazil! My laptop presented the same problem even having installed win 10. How can I proceed to solve this problem?
Ps: excuse my english level.
i have same problem on windows 10
I have this problem on my laptop but it’s a Windows 10 tho
Same problem as the comments above. Plus, in my Asus Zenbook Secure Boot menu there is no OS type option. The only options appearing are Secure Boot Control (enabled/disabled) and Key Management.
Hi Fi,I’ve got the same problem:no os type option.did you solve the problem and how.
Warmly
Same problem here. Windows 10 and secure boot violation. I don’t find a solution. I disabeled the secure boot menu and i disabeled “fast boot” and enabled “launch CSM”, but nothing works. Every time i come back to the bios menu.
Same issue
I resolved same issue by changing secure boot as ‘disable’
I attached the link with this solution
https://www.asus.com/me-en/support/FAQ/1042711/