

Webdiscover
WebDiscover is a browser hijacker often bundled with freeware (free software downloaded from the Internet). WebDiscover (by WebDiscover Media) will install a customized Chromium browser and change your search engine and start page.
WebDiscover is an unwanted software known for putting lots of obstructive and aggressive ads inside the browser as well as altering different browser elements. WeDiscover will hijack the starting page of your main browser and introduce changes to its default search engine.
One thing to bear in mind about Webdiscover, and the browser hijacker category in general, is that these apps might try to promote other software products in some rather dishonest ways. A common example of that is when an app like Webdiscover shows you ads that are made to look like virus warnings that urge you to buy a certain security program in order to deal with malware that’s probably not on your computer.


The WebDiscover Browser
If you’re certain WebDiscover is the reason behind the unpleasant pop-up adverts and redirects you’re dealing with, you are quite possibly correct. This program is infamous for having such an agenda and many people are searching for a way to remove it. What you’re dealing with is known as a browser hijacker application and such apps have been around for quite some time now. If you do not remember installing this piece of software yourself, it is very likely that it has managed to get in your machine with the assistance of another program you may have willingly installed – the browser hijackers are sneaky like this.


Reasons why you should Remove WebDiscover
One of the most irritating traits of browser hijackers like Webdiscover is when they try to aggressively promote certain software products by displaying fake warnings in your browser. Usually, the warnings that an app like Webdiscover might spam you with tell you about a (non-existent) problem with your computer such as a malware infection and then offer you a solution in the form of the security program that they advertise.


WebDiscover Uninstall Instructions
Another very widespread way of getting invaded by software such as this is through fake emails. Even matter if a letter is not in your spam folder, it can still be a security risk. If you think a newly received e-mail may not be safe, delete it without even accessing it. A surprisingly large number of people get their machines infected by using threatening internet websites such as adult video websites, torrent websites and others. Make sure you keep that in mind. One helpful tip in preserving your computer clean is to consistently scan it for malware so as to be able to ensure maximum protection.

How to Remove Webdiscover?
In fact, quite a few browser hijacker programs offer some sort of real functionality to their users – what makes them truly unwanted is the fact that the ads are extremely annoying to put up with. There could be different opinions on whether a piece of software is indeed a browser hijacker, and it’s all usually as a result of the irritation threshold of the particular person. Some people could regard this program as useful, while others will only ever see the aggravation of its adverts. We’ve created this article to help people get rid of it. Our team believes that removing the browser hijacker applications is certainly much better than trying to get used to the ads and this is the reason why this article exists.
SUMMARY:
| Name | WebDiscover |
| Type | Browser Hijacker |
| Detection Tool | Some threats reinstall themselves if you don't delete their core files. We recommend downloading SpyHunter to remove harmful programs for you. This may save you hours and ensure you don't harm your system by deleting the wrong files. |

How to get rid of WebDiscover
To get rid of WebDiscover, you can try several different manual removal options but you can also use an automatic malware-removal tool to delete the hijacker. We believe the best/most reliable way to get rid of WebDiscover is combining the manual and automatic methods.
In the next guide, we will show you a number of different options that can be tried to get the hijacker removed and we suggest you try them one by one until the you successfully uninstall the unwanted software. We have also included a professional anti-malware tool in this guide that can further assist you with the elimination of the hijacker.
How to delete WebDiscover
To delete Webdiscover, we suggest you first try to remove it from your browser if it is listed under Extensions. If you manage to delete Webdiscover in this way, this will save you time by removing the need to try more complex uninstallation methods.
Here is a quick explanation of how you can check whether you browser has Webdiscover as an extension and remove it from it.
- Open the browser that is affected by this browser hijacker, select Extensions/Add-ons/Plug ins depending on the browser. On Chrome, you must first select More Tools and then the Extensions option will be shown in a submenu.
- Once you get to a page with all the extensions in the browser, try finding WebDiscover among the listed items. If you see it there, click on the Remove/Uninstall/Trashcan button next to the extension to get it removed from the browser.
- If you were unable to find an extension with that goes under the name of WebDiscover (or even if you were), see if there are any other extensions there that seem sketchy or suspicious or that you don’t remember adding yourself and remove them.
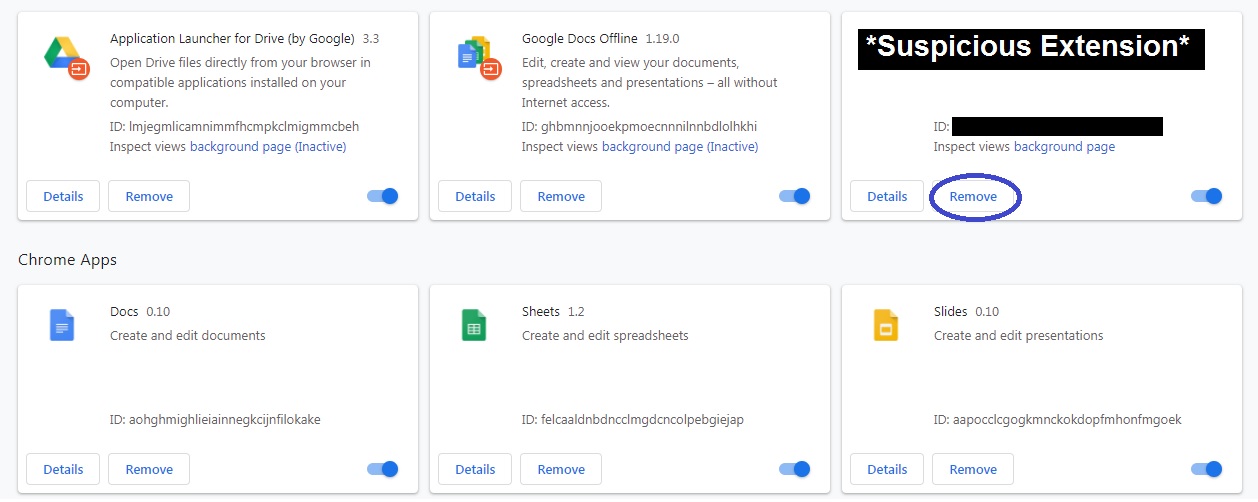
Removing a suspicious extension from Google Chrome.
- In case you are not allowed to directly remove the extension or it comes back instantly after you remove it, first click on the Disable button next to it (on Chrome this is a simply toggle button under the extension) and then select Remove again.
- Finally, restart the whole PC, start the browser again and test it for a while to see if it behaves normally. You can also check the Extensions list again to see if the unwanted extension is truly gone (oftentimes, browser hijacking add-ons tend to return after the computer/browser is restarted in which case additional removal steps need to be performed). If everything seems fine, there is no need to continue further into this guide.

Note that some of these steps may vary depending on what browser you are using. Regardless, the removal of the unwanted extension should still be very similar across most popular browsers, especially Chromium-based ones. Still, if you are not able to figure out how to remove the WebDiscover extension from your browser, you can request our help via the comments section.
How to remove WebDiscover bar
To remove the WebDiscover bar, you can try finding the hijacker app in your computer and uninstalling it. To uninstall the hijacker and to remove the WebDiscover bar, you must go to the Control Panel, find the hijacker there, and delete it.
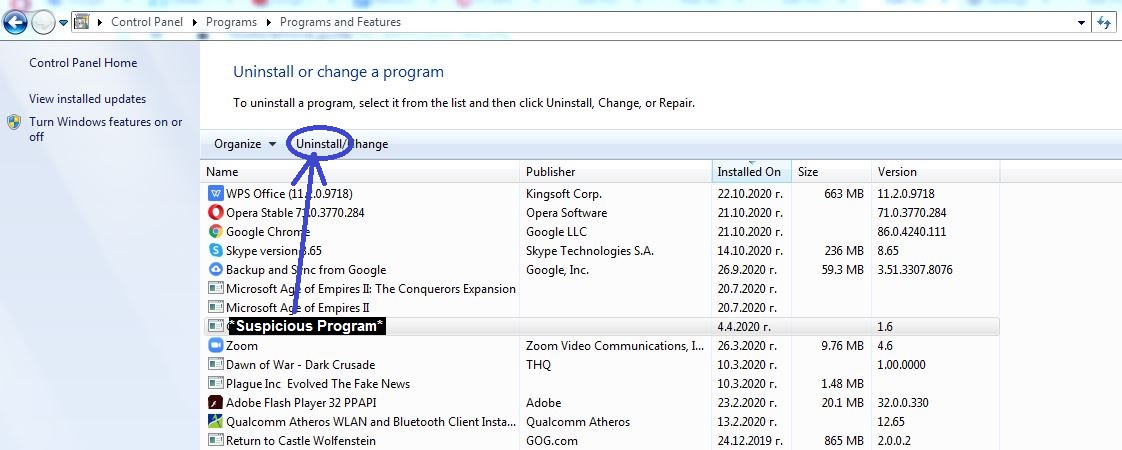
- You can access the Control Panel from your Start Menu and once you are in it, you need to select the Uninstall a Program button.
- Once you are in the Uninstall a Program window, there will be a list of the programs that are on the computer and you must find WebDiscover among them. If you see the hijacker there, select it and then start its uninstallation by clicking on Uninstall (top of the window).
- If there is an uninstallation wizard, follow the steps from it but be careful not to fall for any tricks of the developer of the hijacker intended to keep the unwanted app on the computer or to install more undesirable software/malware. One example of such a trick is a dialog box such as this one:

- In case you haven’t been able to find an item in the Uninstall a Program section that is named WebDiscover, this doesn’t necessarily mean that the hijacker isn’t listed there – it might mean that it has a different name in that list. If you are in this situation, look carefully at the names of the apps and programs and try to single out ones you do not recognize, have never used, or that seem to have been installed without your knowledge or permission. Also, look at the installation dates – something installed right before the problems with your browser started taking place could very well be the hijacker disguised under a different name. If you find anything that you deem suspicious, uninstall it too. Just be careful not to uninstall some system-related app or program – looking up the names of software you deem suspicious can be very helpful when trying to figure out if something isn’t actually related to your OS.
- Once the installation finishes, restart the PC and check to see if there any remaining signs of the hijacker’s presence. If there are, continue forward with the next removal options.


How to take off WebDiscover
To take off WebDiscover from your browser, you can also try to revoke the browser permissions of questionable sites. This is a quick way to take off WebDiscover from the browser but will only work if the hijacker app is not on the computer.
Not all hijackers always need to have an app installed on the computer or a rogue extension added to the browser in order to spam you with ads and to control different aspects of your browsing experience. Some of them only need you to have accidentally given a permission to a certain site from your browser that allows that site to show notifications while you are surfing the web. This is a common and oftentimes unconscious mistake that lots of users make without realizing it and here is how you can fix it.
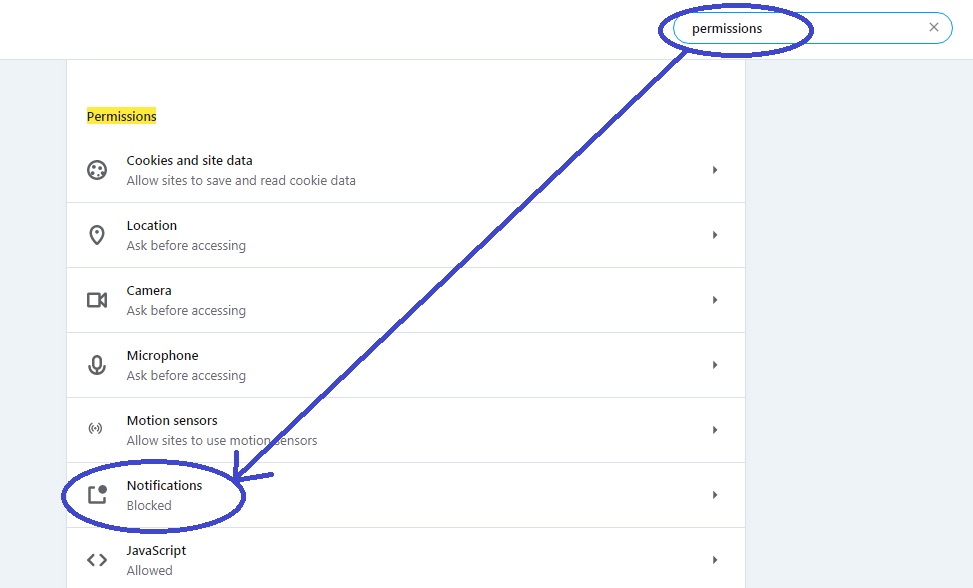
- Open the browser in which you have been experiencing disturbances, go to its menu and select Settings.
- In the settings page, type permissions in the search field at the top.
- Among the settings categories that get found, look for one labeled Notifications and click on it.
- Once you are at the Notification settings, scroll down until you get to a list of sites that are permitted to show notifications inside your browser. Look carefully through the list of sites and if any of them seem questionable or if there are any sites that you don’t want to be allowed to show notifications in your browser, click on the three-dotted icon next to the specific site (this could vary depending on the specific browser) and then select Block.
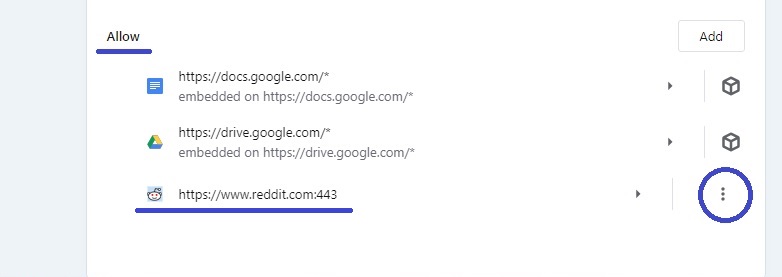
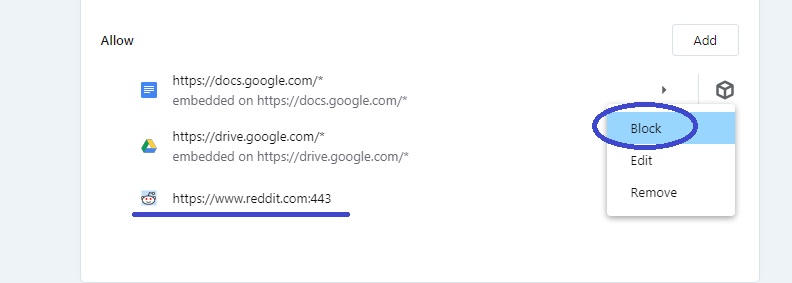
- If you are not certain which site may be responsible for the obstructions in your browser, block all of them from sending you notifications.
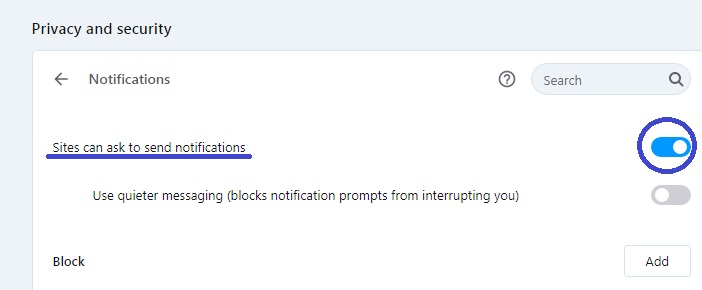
- In general, it is not advisable to allow sites to send you notifications so, if you want, you can prohibit any website from even requesting permission to send you notifications. To do that, scroll back up to the top of the Notifications settings and toggle off the setting labeled Sites can ask to send notifications.


Again, those steps would very from one browser to another but the overall process of revoking site permissions and preventing sites from sending you permission requests in the future should generally be the same for most popular browsers. Like we said before, you can request our help through the comments if you are not able to do this in your preferred browser.
WebDiscover browser uninstall
To uninstall the WebDiscover browser hijacker, you may first need to remove the changes it has made inside your system. Sometimes, this is the only way to uninstall the WebDiscover browser hijacker because the changes it has made in the system hamper any uninstallation attempts.
This last section of our guide contains the most time-consuming steps and we suggest you should only resort to it if none of our previous removal suggestions have allowed you to remove WebDiscover from your computer.
![]()

The first step here is to get your PC into Safe Mode – a mode in which the processes allowed to run on the machine are only ones that are essential to its stable functioning. This will leave out any processes that may otherwise interfere with your attempts to uninstall the hijacker. You can learn about how to enable Safe Mode on your computer from this link.
![]()
In the next step, you should open the Task Manager by using the Ctrl + Shift + Esc or the Ctrl + Alt + Delete key combinations. Once the Task Manager appears on your screen, have a look at the items listed in the Processes tab and see if you can find a process with the WebDiscover name on it. If you don’t see such a process, look for other suspicious ones – such that use up lots of RAM and/or CPU and that don’t seem to be coming from any program on your computer that you are familiar with. However, make sure that you always look up the name of any processes you deem questionable – sometimes regular Windows processes may look odd and could use up lots of resources but you shouldn’t quit them because this may cause problems in the system.


Once you find the WebDiscover process or single out another process that you suspect of being linked to the hijacker, right-click on that process, Open the File Location, and then scan each file from that folder using our free scanner that’s posted on this page.


If any of the tested files are flagged as potentially dangerous, this probably means that the process they are linked to is related to the hijacker. Go to that process in the Task Manager and kill it by right-clicking on it and selecting the End Process Tree option. Then return to its file location and delete the whole folder.
![]()
Now you must check what startup items are enabled on your computer. To do that, type system configuration under your Start Menu, select the first item, and then, in the System Configuration window, open the Startup tab.


If there are suspicious items in there and/or ones that have Unknown manufacturers, you need to disable them by unchecking the checkbox that corresponds to them. Needless to say, you should do that with WebDiscover if you see it in that list as a startup item. Once you have unchecked all suspicious startup apps, select Ok to save the changes and close the window.
![]()
Open the Start Menu once more and place this in its search box: notepad %windir%/system32/Drivers/etc/hosts. Open the file that gets found and look at the text in it. Pay attention to what’s written right under Localhost. Under normal circumstances there should be nothing below Localhost but sometimes malware and junkware programs add their own rules to the this file (the Hosts file) in order to acquire more privileges in the system and to become more difficult to get rid of. If you see any weird-looking IP addresses written below Localhost in the Hosts file, tell us what those IPs are sending them to us through the comments section. Once we have a look at them, we will tell you if they need to be removed. It is possible that a regular program may have also added its own rules to the Hosts file in which case those must not be removed or the program may stop to function properly. That is why we must first have a look at the IPs before we tell you whether you should remove them.


If we conclude that the IPs are from the hijacker and tell you that in our reply, go to the Hosts file again and delete the suspicious IPs, saving the changes to the file after you are done.
![]()
*Read more details in the first ad on this page, EULA, Privacy Policy, and full terms for Free Remover.
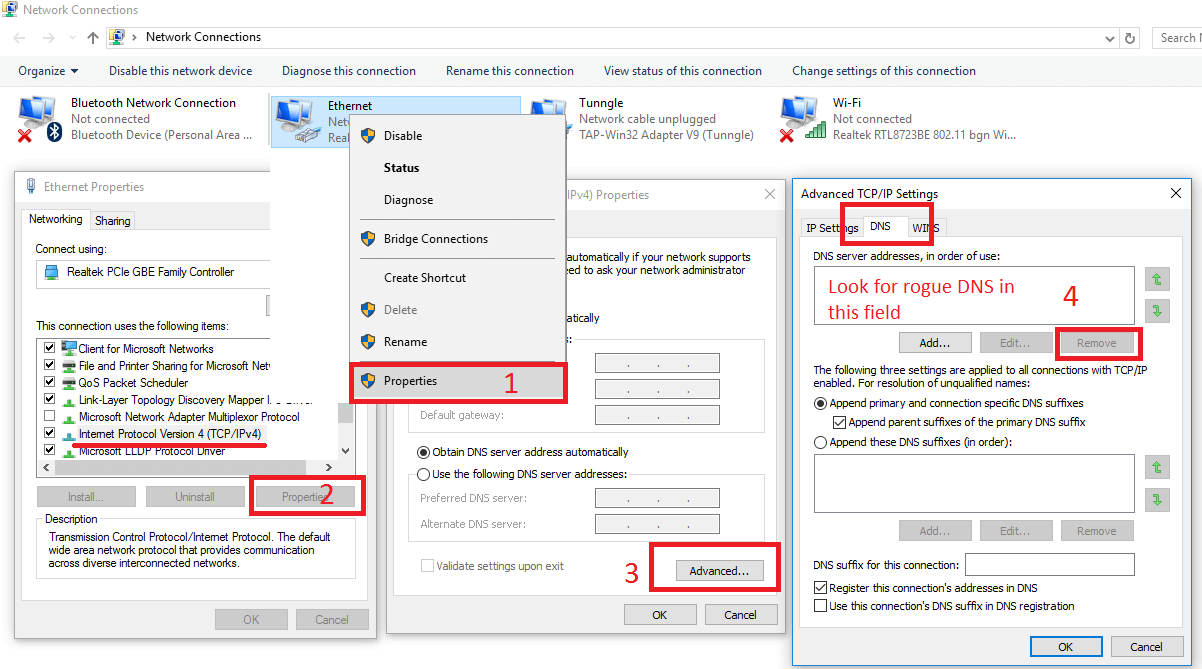
Now, in the Start Menu, type network connections, select the first icon, right-click on the network you are currently connected to, and click on Properties > Internet Protocol Version 4 (ICP/IP)) > Properties. In that window, enable the Obtain DNS server automatically if it isn’t enabled and then go to Advanced. In the DNS tab, remove everything that is listed in DNS server addresses by clicking on each entry and selecting the Remove button. Finally, click on OK on each window to save any changes that you have made.

![]()
For this last step, you will be making changes in the Registry Editor and since your OS has many sensitive settings in there, you should only delete items from the Registry if you are certain that they are related to the hijacker and not to some important system component. If you are unsure about whether you are supposed to delete something from the Registry, be sure to ask us about it in the comments and we will tell you what you should do.
Now, to open the Registry Editor, type regedit in the Start Menu and select the icon that shows at the top of the search results. When asked if you are certain you want to allow the app to make system changes, click on Yes to proceed. When you see the Registry Editor on your screen, click on the Edit menu and select the Find option. Use this search box to find items in the Registry related to the hijacker by typing the hijacker’s name (WebDiscover) and clicking on Find Next. If an item is found, select that item, right-click on it, and select the Delete option. Click on Find Next again to see if there are more items with that name and if there are, delete them too until the search stops yielding any results.
Finally, visit the following Registry locations by navigating to them manually:
- HKEY_CURRENT_USER/Software/*Folder with suspicious name*
- HKEY_CURRENT_USER/Software/Microsoft/Windows/CurrentVersion/Run/ *Folder with suspicious name*
- HKEY_CURRENT_USER/Software/Microsoft/Internet Explorer/Main/*Folder with suspicious name*
In those locations, look for folders that seem out of place – folders that have long names that don’t seem to make any sense (for example, a folder that has a long string of random characters for a name). If you notice anything that fits this description, delete it. However, if you are uncertain about a given folder, it is better to first ask us about whether you should delete it.
Final Notes
This was our guide in how to remove WebDiscover and we hope that it has helped you uninstall this unwanted browser-hijacking app from your PC. If any of the steps presented above confuses you and you are having trouble completing it or if completing the guide was not enough to rid you of this hijacker, feel free to request our assistance by commenting down below.


Leave a Comment X