

*Source of claim SH can remove it.
The Searchesmia.com virus
The Searchesmia.com virus is an example of software that can cause frustration and disruption for internet users. This application is specifically designed to generate intrusive advertisements by installing hidden and stubborn add-ons in web browsers. The main objective behind programs like Searchesmia.com virus is to generate revenue through pay-per-click advertising, forcing users to click on the ads and thereby increasing the profits for the creators. The constant bombardment of pop-ups, messages, and banners, however, can make it challenging to use the web browser effectively, leading some users to mistakenly believe that their system is infected with a virus while, in fact, this application falls under the category of unwanted software known as browser hijackers.


What is Searchesmia.com?
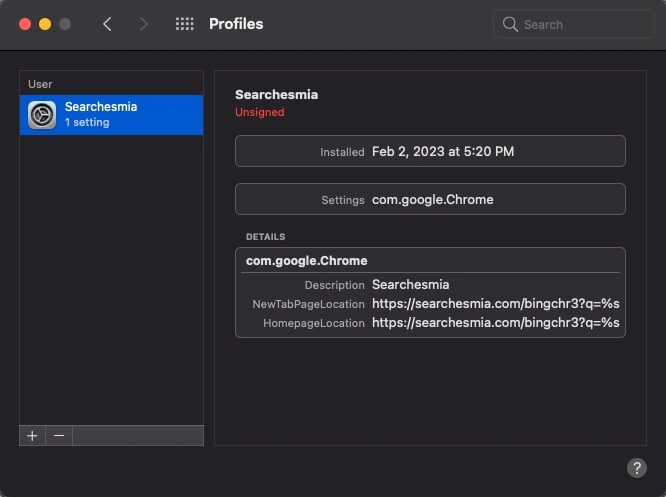
Searchesmia.com is a potentially unwanted search engine that may replace your default search engine and modify your browser settings without your consent. It may redirect your searches to its own search results page, display sponsored search results, and show intrusive ads. Searchesmia.com is considered a browser hijacker, as it can interfere with your browsing experience and privacy. It is advisable to remove it if you did not intentionally install it or find it unwanted.
How to get rid of Searchesmia?
To remove Searchesmia from your computer, you can follow these general steps:
1. Open your web browser (e.g., Google Chrome, Mozilla Firefox, etc.) and access the browser’s settings or preferences.
2. Look for the section related to extensions or add-ons and locate the Searchesmia extension or any suspicious extensions in the list of installed extensions.
3. Click on the remove or uninstall button next to the extension(s). Confirm the removal when prompted.
4. Additionally, it’s recommended to clear your browser’s cache and cookies to ensure any traces of Searchesmia are eliminated.
Searchesmia
If you have encountered an application called Searchesmia, which belongs to the category of browser hijackers, you are probably tired of being bombarded with annoying banners and pop-ups that disrupt your browsing experience. Unfortunately, such apps can be troublesome as they may redirect your webpages and modify your browser’s settings, such as the starting page and search engine. However, on this page, we have compiled a thorough guide on how to remove unwanted browser add-ons like Searchesmia in no time. This guide will provide you with all the necessary steps and information to permanently eliminate the intrusive program from your system, ensuring a smoother browsing experience.

What is Searchesmia?
Searchesmia is an aggressive browser extension that forcefully inserts advertisements into the user’s browsing activities by taking control of the search engine and starting page. Classified as a browser hijacker, Searchesmia raises significant concerns regarding security and privacy. These types of ad-driven programs may pose a serious risk as they may monitor and track the user’s online behavior to deliver personalized ads. This invasion of privacy becomes even more alarming when considering the possibility of selling this sensitive information to third parties. Furthermore, the ads themselves can be misleading and deceptive, potentially leading users to click on them and land on unsafe websites. In such cases, it is crucial to immediately close any redirected pages and avoid engaging with them further.
Searchesmia.com removal
As far as the Searchesmia.com removal is concerned, it’s important to note that most browser hijackers are legal as they offer free services while displaying ads. Having such software on your computer can be bothersome, but it is typically not malicious like ransomware or Trojan horses. Instead, the main purpose of a browser hijacker is to generate intrusive pop-up advertisements that can disrupt your online activities. This is usually achieved by installing plug-ins or toolbars that display ads and banners. However, the constant intrusion of ads and pop-ups can be frustrating, leading users to seek effective Searchesmia.com removal methods. To protect your privacy and ensure a smoother browsing experience, we recommend you to check our comprehensive guide on how to remove Searchesmia and similar unwanted browser extensions.


SUMMARY:
*Source of claim SH can remove it.
How to remove Searchesmia
To try and remove Searchesmia quickly you can try this:
- Go to your browser’s settings and select More Tools (or Add-ons, depending on your browser).
- Then click on the Extensions tab.
- Look for the Searchesmia extension (as well as any other unfamiliar ones).
- Remove Searchesmia by clicking on the Trash Bin icon next to its name.
- Confirm and get rid of Searchesmia and any other suspicious items.
If this does not work as described please follow our more detailed Searchesmia removal guide below.
If you have a Windows virus, continue with the guide below.
If you have a Mac virus, please use our How to remove Ads on Mac guide.
If you have an Android virus, please use our Android Malware Removal guide.
If you have an iPhone virus, please use our iPhone Virus Removal guide
Some of the steps may require you to exit the page. Bookmark it for later reference.
Next, Reboot in Safe Mode (use this guide if you don’t know how to do it).


The first thing you must try to do is look for any sketchy installs on your computer and uninstall anything you think may come from Searchesmia. After that, you’ll also need to get rid of any processes that may be related to the unwanted app by searching for them in the Task Manager.
Note that sometimes an app, especially a rogue one, may ask you to install something else or keep some of its data (such as settings files) on your PC – never agree to that when trying to delete a potentially rogue software. You need to make sure that everything is removed from your PC to get rid of the malware. Also, if you aren’t allowed to go through with the uninstallation, proceed with the guide, and try again after you’ve completed everything else.
- Uninstalling the rogue app
- Killing any rogue processes
Type Apps & Features in the Start Menu, open the first result, sort the list of apps by date, and look for suspicious recently installed entries.
Click on anything you think could be linked to Searchesmia, then select uninstall, and follow the prompts to delete the app.


Press Ctrl + Shift + Esc, click More Details (if it’s not already clicked), and look for suspicious entries that may be linked to Searchesmia.
If you come across a questionable process, right-click it, click Open File Location, scan the files with the free online malware scanner shown below, and then delete anything that gets flagged as a threat.


After that, if the rogue process is still visible in the Task Manager, right-click it again and select End Process.

It’s possible that Searchesmia has affected various parts of your system, making changes to their settings. This can enable the malware to stay on the computer or automatically reinstall itself after you’ve seemingly deleted it. Therefore, you need to check the following elements by going to the Start Menu, searching for specific system elements that may have been affected, and pressing Enter to open them and see if anything has been changed there without your approval. Then you must undo any unwanted changes made to these settings in the way shown below:
- DNS
- Hosts
- Startup
- Task
Scheduler - Services
- Registry
Type in Start Menu: View network connections
Right-click on your primary network, go to Properties, and do this:


Type in Start Menu: C:\Windows\System32\drivers\etc\hosts


Type in the Start Menu: Startup apps


Type in the Start Menu: Task Scheduler


Type in the Start Menu: Services


Type in the Start Menu: Registry Editor
Press Ctrl + F to open the search window


- Delete Searchesmia from Chrome
- Delete Searchesmia from Firefox
- Delete Searchesmia from Edge
- Go to the Chrome menu > More tools > Extensions, and toggle off and Remove any unwanted extensions.
- Next, in the Chrome Menu, go to Settings > Privacy and security > Clear browsing data > Advanced. Tick everything except Passwords and click OK.
- Go to Privacy & Security > Site Settings > Notifications and delete any suspicious sites that are allowed to send you notifications. Do the same in Site Settings > Pop-ups and redirects.
- Go to Appearance and if there’s a suspicious URL in the Custom web address field, delete it.
- Firefox menu, go to Add-ons and themes > Extensions, toggle off any questionable extensions, click their three-dots menu, and click Remove.
- Open Settings from the Firefox menu, go to Privacy & Security > Clear Data, and click Clear.
- Scroll down to Permissions, click Settings on each permission, and delete from it any questionable sites.
- Go to the Home tab, see if there’s a suspicious URL in the Homepage and new windows field, and delete it.
- Open the browser menu, go to Extensions, click Manage Extensions, and Disable and Remove any rogue items.
- From the browser menu, click Settings > Privacy, searches, and services > Choose what to clear, check all boxes except Passwords, and click Clear now.
- Go to the Cookies and site permissions tab, check each type of permission for permitted rogue sites, and delete them.
- Open the Start, home, and new tabs section, and if there’s a rogue URL under Home button, delete it.


Leave a Comment X