“Options” Extension
“Options” Extension is Browser hijacking software that may annoy you by filling the screen of your computer with pop-ups, advertisements, and auto-redirects. In addition to exposing you to various types of promotional content, “Options” Extension may alter the homepage, the search engine, and browser settings of your default browser with the idea to promote specific sponsored sites on the screen.

When users first encounter a browser hijacker like “Options” Extension , many believe that this program is a virus that can cause computer damage. In reality, however, “Options” Extension poses no threat to a computer’s operating system or data. When a browser hijacker gets installed on a computer, its primary purpose is to use the screen to promote paid advertisements on it. Frequently, hijackers are bundled with legitimate software installations. This practice of integrating third-party applications into popular software is also known as software bundling.
When a browser hijacker is installed on a computer, it typically attaches itself to the system’s default web browser. This could be Chrome, Firefox, Opera, Internet Explorer, or another browser. After doing so, the invasive software starts to bombard the user’s screen with advertisements and pop-ups for various online services, products and applications. Very often, the browser hijacker may automatically redirect a user to a sponsored website while the user is browsing the Internet. This activity often causes users to want to remove the potentially unwanted software as soon as possible to avoid further auto-redirects and exposure to aggressive ads.
The hijacking of your browser may begin with the “Options” Extension website replacing your default homepage. In addition to that, the settings of your browser may be modified without your knowledge or consent, and you may notice a change in your default search engine. Intruding pop-up advertisements that appear on your screen and disturbing your browsing experience is another way that the browser hijacker may interrupt you. Sometimes, you may even be faced with false alerts about computer problems that attempt to sell you software to solve system problems you do not have. All of the above are instances of browser disruptions you may experience.
This pattern is typical of most hijackers, and “Options” Extension and Poshukach are no exception. So, if you start experiencing any of the above symptoms, then uninstalling “Options” Extension and removing any hijacker components it may have installed is the best course of action that can save you from the ads invasion. If you’ve never dealt with a program of this type before, you can find detailed uninstallation instructions just below this paragraph.
Keep yourself protected.
Even if you don’t think the hijacker is a source of unbearable irritation and don’t mind the ads and the redirects, it’s still a good idea to remove “Options” Extension because, despite the fact that the program isn’t a virus or some dangerous malware, it may still be used as a gateway to far more dangerous malware.
To be on the safe side, we recommend that you avoid interacting with clickbait adverts, pop-up ads and banners that show up on your screen as this type of web content is frequently employed by criminals to spread viruses and malware, such as Ransomware, Trojan horses, and more. In addition to exposing you to potential carriers of Ransomware cryptoviruses and spyware applications, a hijacker like “Options” Extension may also redirect you to dubious websites, some of which may be phishing pages intended to steal your information or spread other dangerous software.
SUMMARY:
| Name | “Options” Extension |
| Type | Adware/Browser Hijacker |
| Detection Tool |
Some threats reinstall themselves if you don’t delete their core files. We recommend downloading SpyHunter to remove harmful programs for you. This may save you hours and ensure you don’t harm your system by deleting the wrong files. |
Remove “Options” Extension Virus
To try and remove “Options” Extension quickly you can try this:
- Go to your browser’s settings and select More Tools (or Add-ons, depending on your browser).
- Then click on the Extensions tab.
- Look for the “Options” Extension extension (as well as any other unfamiliar ones).
- Remove “Options” Extension by clicking on the Trash Bin icon next to its name.
- Confirm and get rid of “Options” Extension and any other suspicious items.
If this does not work as described please follow our more detailed “Options” Extension removal guide below.
If you have a Windows virus, continue with the guide below.
If you have a Mac virus, please use our How to remove Ads on Mac guide.
If you have an Android virus, please use our Android Malware Removal guide.
If you have an iPhone virus, please use our iPhone Virus Removal guide

Some of the steps will likely require you to exit the page. Bookmark it for later reference.
Reboot in Safe Mode (use this guide if you don’t know how to do it).

WARNING! READ CAREFULLY BEFORE PROCEEDING!
*Read more details in the first ad on this page, EULA, Privacy Policy, and full terms for Free Remover.
Press CTRL + SHIFT + ESC at the same time and go to the Processes Tab (the “Details” Tab on Win 8 and 10). Try to determine which processes are dangerous.

Right click on each of them and select Open File Location. Then scan the files with our free online virus scanner:


After you open their folder, end the processes that are infected, then delete their folders.
Note: If you are sure something is part of the infection – delete it, even if the scanner doesn’t flag it. No anti-virus program can detect all infections.

Hold together the Start Key and R. Type appwiz.cpl –> OK.

You are now in the Control Panel. Look for suspicious entries. Uninstall it/them.
Type msconfig in the search field and hit enter. A window will pop-up:

Startup —> Uncheck entries that have “Unknown” as Manufacturer or otherwise look suspicious.

Hold the Start Key and R – copy + paste the following and click OK:
notepad %windir%/system32/Drivers/etc/hosts
A new file will open. If you are hacked, there will be a bunch of other IPs connected to you at the bottom. Look at the image below:

If there are suspicious IPs below “Localhost” – write to us in the comments.
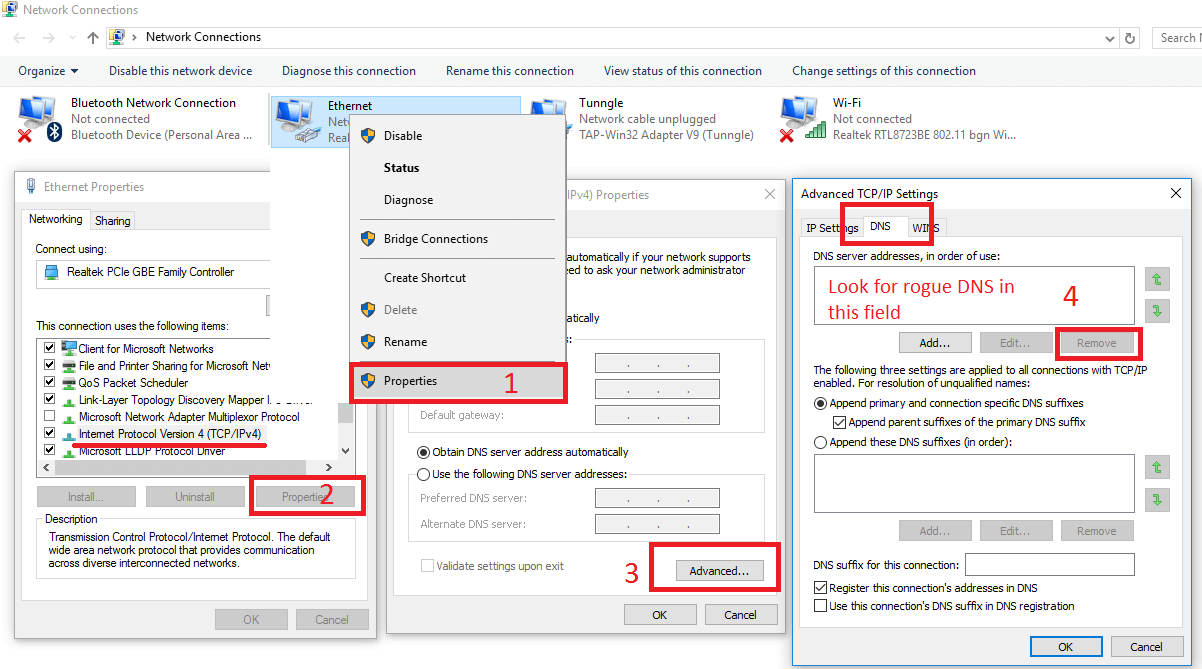
Open the start menu and search for Network Connections (On Windows 10 you just write it after clicking the Windows button), press enter.
- Right-click on the Network Adapter you are using —> Properties —> Internet Protocol Version 4 (ICP/IP), click Properties.
- The DNS line should be set to Obtain DNS server automatically. If it is not, set it yourself.
- Click on Advanced —> the DNS tab. Remove everything here (if there is something) —> OK.

- After you complete this step, the threat will be gone from your browsers. Finish the next step as well or it may reappear on a system reboot.
Right click on the browser’s shortcut —> Properties.
NOTE: We are showing Google Chrome, but you can do this for Firefox and IE (or Edge).

Properties —–> Shortcut. In Target, remove everything after .exe.

![]() Remove “Options” Extension from Internet Explorer:
Remove “Options” Extension from Internet Explorer:
Open IE, click ![]() —–> Manage Add-ons.
—–> Manage Add-ons.

Find the threat —> Disable. Go to ![]() —–> Internet Options —> change the URL to whatever you use (if hijacked) —> Apply.
—–> Internet Options —> change the URL to whatever you use (if hijacked) —> Apply.
![]() Remove “Options” Extension from Firefox:
Remove “Options” Extension from Firefox:
Open Firefox, click ![]() ——-> Add-ons —-> Extensions.
——-> Add-ons —-> Extensions.

![]() Remove “Options” Extension from Chrome:
Remove “Options” Extension from Chrome:
Close Chrome. Navigate to:
C:/Users/!!!!USER NAME!!!!/AppData/Local/Google/Chrome/User Data. There is a Folder called “Default” inside:

Rename it to Backup Default. Restart Chrome.

Type Regedit in the windows search field and press Enter.
Inside, press CTRL and F together and type the threat’s Name. Right click and delete any entries you find with a similar name. If they don’t show up this way, go manually to these directories and delete/uninstall them:
- HKEY_CURRENT_USER—-Software—–Random Directory. It could be any one of them – ask us if you can’t discern which ones are malicious.
HKEY_CURRENT_USER—-Software—Microsoft—-Windows—CurrentVersion—Run– Random
HKEY_CURRENT_USER—-Software—Microsoft—Internet Explorer—-Main—- Random
If the guide doesn’t help, download the anti-virus program we recommended or try our free online virus scanner. Also, you can always ask us in the comments for help!
Leave a Reply