The infamous Bing redirect “virus” has to be one of the most prevalent and long-lived types of browser hijacker. You install something on your PC that tricks you (likely through file-bundling) into giving the hijacker permission to tamper with your browser and that’s how you get infected. The result is that your browser’s homepage and default search engine are changed to some sketchy URL that pretends to be the legitimate Bing search engine.
The changes are an annoyance, but the bigger issue here is that they can make the system more vulnerable. It’s, therefore, critical that you free your browser from the Bing Redirect hijacker and the next guide can help you with that.
How to Remove Bing Search Redirect (Full Guide)
Most iterations of the Bing Redirect hijacker, like bimq.co and Your Search Bar me, will leverage the Policies feature of Chromium browsers like Google Chrome and Microsoft Edge to stop you from removing them. This makes dealing with such hijackers really frustrating because it’s often not obvious what you must do to delete them.
The good news is that we really did our homework here and compiled the most comprehensive removal guide for Bing redirect that you’ll find on the Internet. So if you currently have this hijacker on your PC, we have high confidence that the following instructions will let you get rid of it.
SUMMARY:
| Name | Bing Redirect |
| Type | Browser Hijacker |
| Detection Tool | Some threats reinstall themselves if you don’t delete their core files. We recommend downloading SpyHunter to remove harmful programs for you. This may save you hours and ensure you don’t harm your system by deleting the wrong files. |
Remove “Managed by Your Organization” from Chrome
You won’t be able to get rid of the Bing redirect hijacker until you first remove any foreign policies that lock your browser and prevent you from making changes to its settings.
There are several working methods to remove the “Managed by your organization” policy from Chrome (and other Chromium browsers). Each method is explained below, and we recommend performing them all for the best results.
Clean the Policy Editor
The Policy Editor lets you introduce custom policies to various parts of your system, including your browsers. Too bad rogue software can also do that and enforce its own policies to stop you from removing hijackers like the Bing redirect. Here’s what you must do to clean your Policy Editor.
- Type Edit Group Policy in the Start Menu and hit Enter.
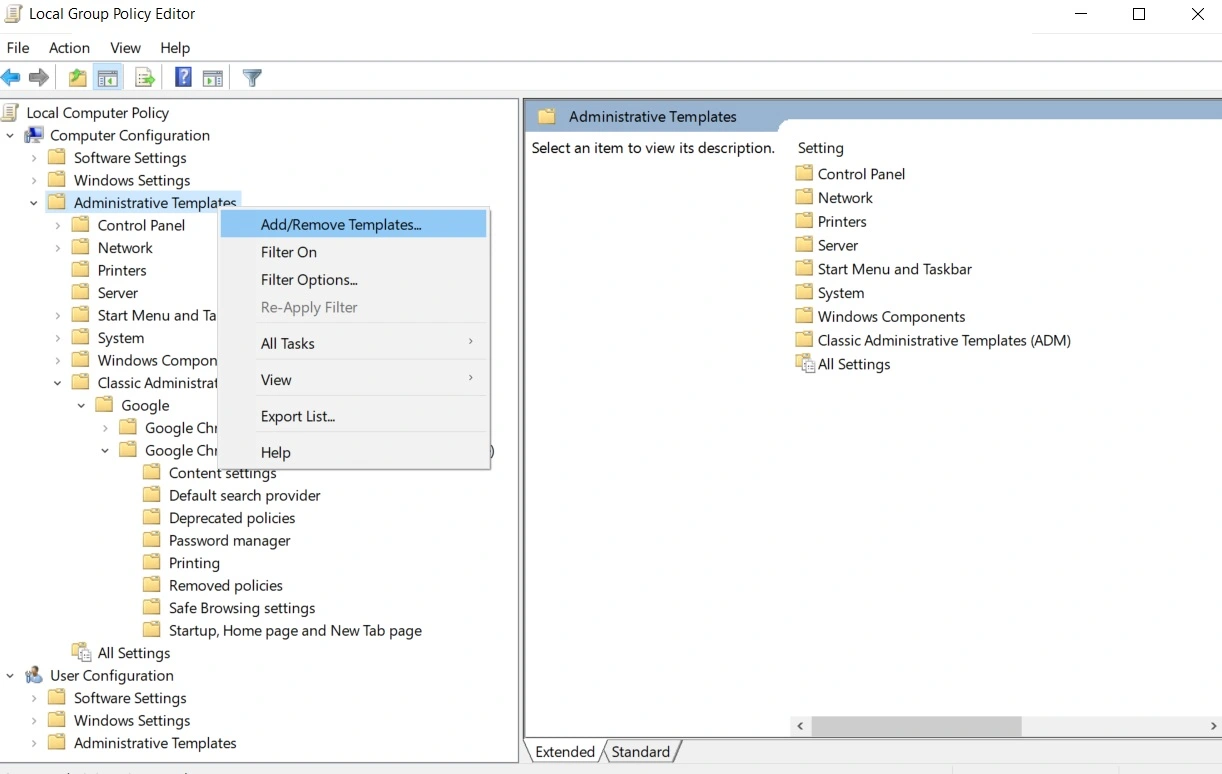
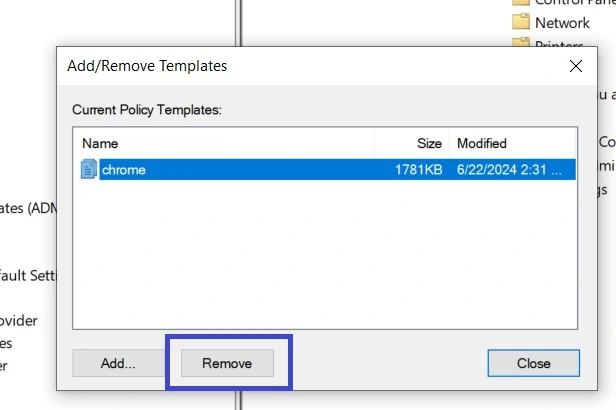
- Expand Computer Configuration, right-click on Administrative Templates, and select Add/Remove Templates.

- See if there are any policies shown in the window that opens. If you see a policy with the name of the affected browser, select it and click Remove.

- Also, if you see any other sketchy-looking policies, delete them too.
- Then restart your machine to apply the changes.
This might solve your problem, but it’s just as likely that the hijacker has made changes elsewhere, so be sure to perform the next methods also.
Clean the Registry
The Registry is where you are most likely to find settings and instructions introduced by the Bing virus, so it’s critical to clean it from any rogue entries. However, deleting the wrong thing here can mess up your PC, so you must know exactly what you are looking for.
We’ll show you how to figure out what to delete but be warned, you’ll still be performing the next steps at your own risk, so be careful.
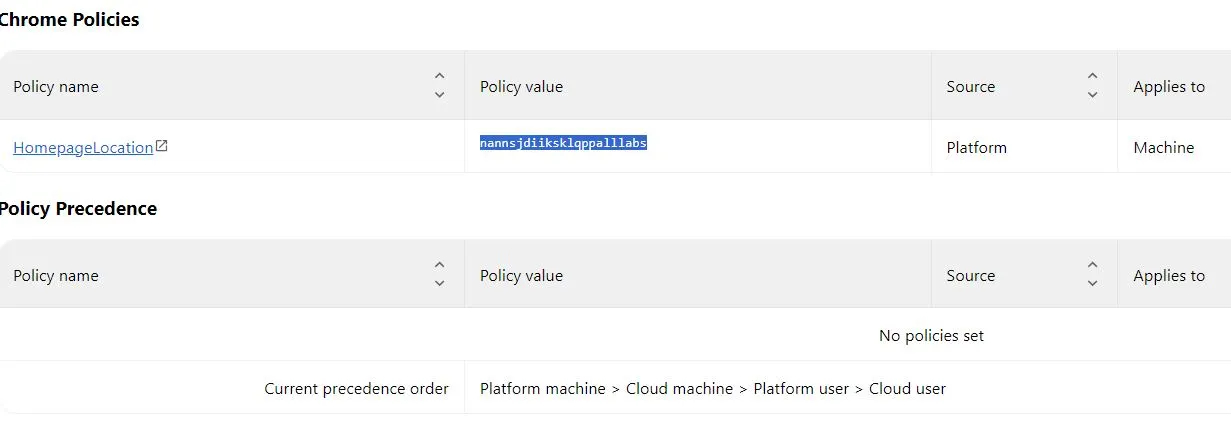
- Open the affected browser and if you are on Chrome, enter the copy-paste “chrome://policy” in the URL bar and hit Enter. For Edge or Brave, enter “edge://policy” or “brave://policy/” respectively.
- Now look for the rogue policy that has hijacked your browser by paying attention to the Policy Value column. If you see one or more policies that have random letters (or letters and numbers) as their values, those are the ones that must be removed.

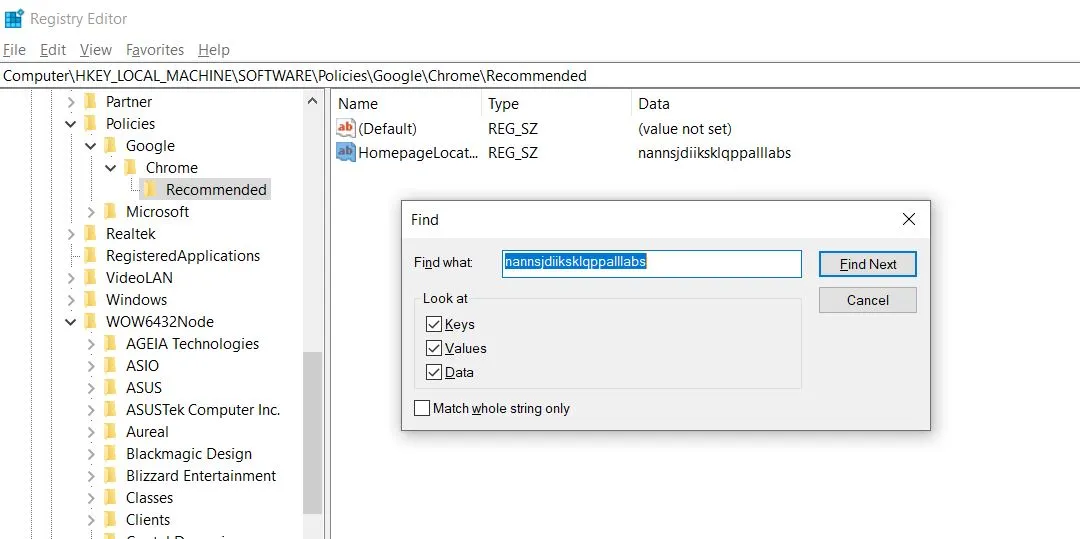
- Copy the value of the rogue policy, then type regedit in the Start Menu, right-click the Registry Editor, and select Run as Administrator.
- Then press Ctrl + F and paste the copied policy value into the search bar.
- Hit Enter to look for related Registry entries and if you find anything, delete it. Then search again for more entries and keep deleting and searching until there are no more results left.

- Next, you should also navigate to the following Registry keys (folders) and delete all of their sub-keys. “HKEY_LOCAL_MACHINE\SOFTWARE\Policies\Google\Chrome” and “Computer\HKEY_LOCAL_MACHINE\SOFTWARE\WOW6432Node\Policies\Google\Chrome\“. This will get rid of all Chrome policies that are currently active:
- If you are on Edge, the Registry path is “\HKEY_LOCAL_MACHINE\SOFTWARE\Microsoft\Edge“. For Brave users, the path is “HKEY_LOCAL_MACHINE\SOFTWARE\Policies\BraveSoftware\Brave“.
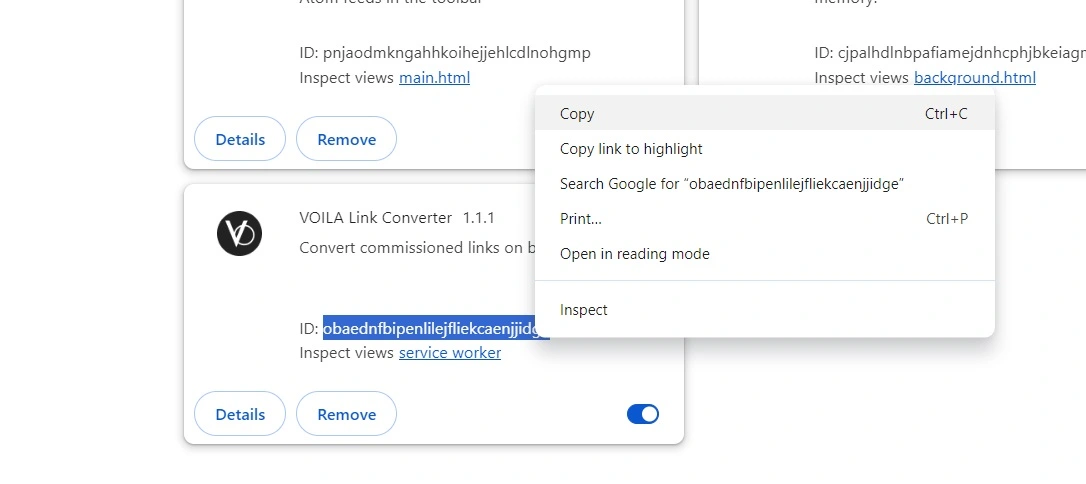
- Finally, if you also have a rogue extension in the browser that you are unable to remove, open the browser, go to its menu, and open the Extensions Manager.
- Then turn on the Developer Mode from the top-right, look at the ID of the rogue extension, and copy it.

- Then go back to the Registry Editor, search for items that are linked to the copied ID, and delete them.
Hopefully, once you’ve done all that, there should be no traces of the third-party policy in the Registry, and your browser should now be unblocked.
Use the Chrome Policy Remover app
In case you’ve missed anything in the previous two steps and your Chrome browser is still locked by the hijacker, this free tool will help you unlock it. Note this only works for Google Chrome.
- Download the Chrome Policy Remover from here.
- If your antivirus flags the tool and deletes or quarantines it, temporarily disable the AV and then download the tool again.
- Right-click the Chrome Policy Remover and select the Run as Administrator option.
- When a CMD window opens, hit Enter to perform its script and wait for it to complete.


Once the tool does its job, all policies should be gone from your Chrome browser, and you can finally proceed to the next section of this guide.
Bing Redirect Virus Removal
Getting rid of the “Managed by your organization” policy is only half the battle. You still need to go into your browser and clean it now that it’s no longer blocked by the hijacker. We’ll show you how to do that with Chrome and Edge, but it’s a very similar process with Brave and any other Chromium-based browsers.
Remove Bing Redirect From Chrome
Chrome is the browser most commonly targeted by the Bing virus and there are several important settings you must check in it:
- Open Google Chrome, click the three-dot menu, and click Settings.
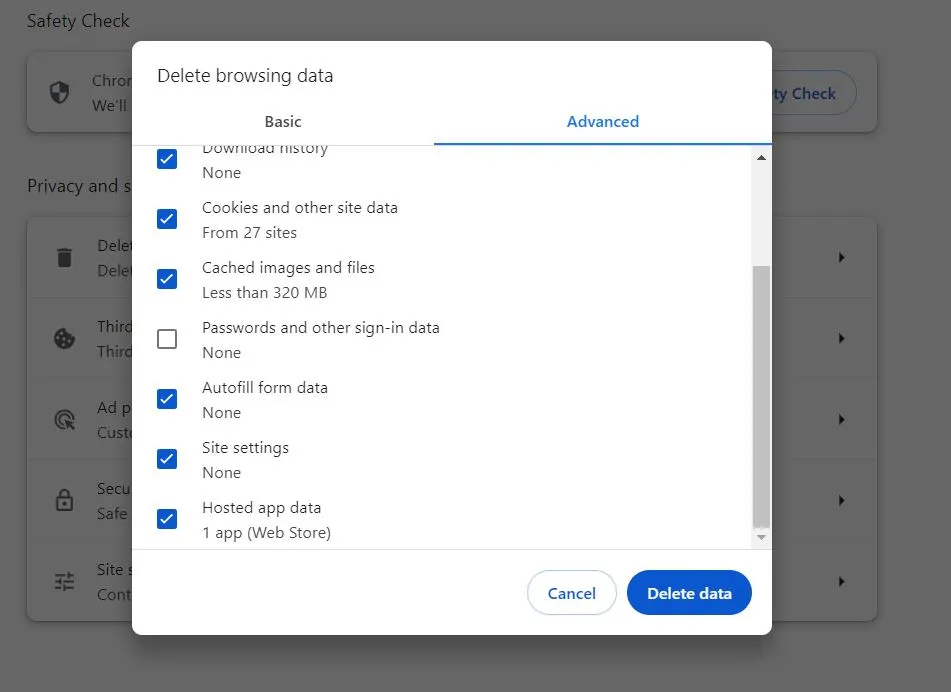
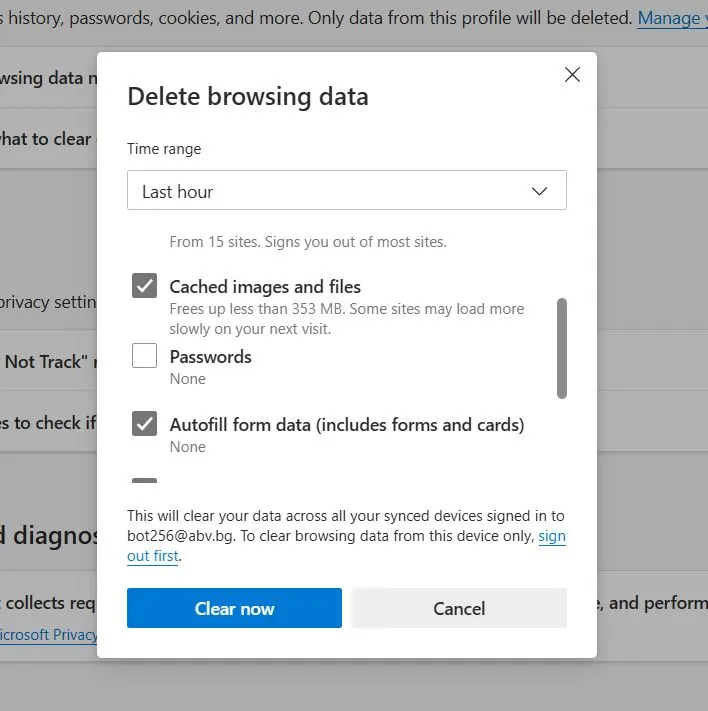
- Go to Privacy and Security from the left, then click Delete browsing data > Advanced. Leave only Passwords unchecked, and then clear the browsing data.

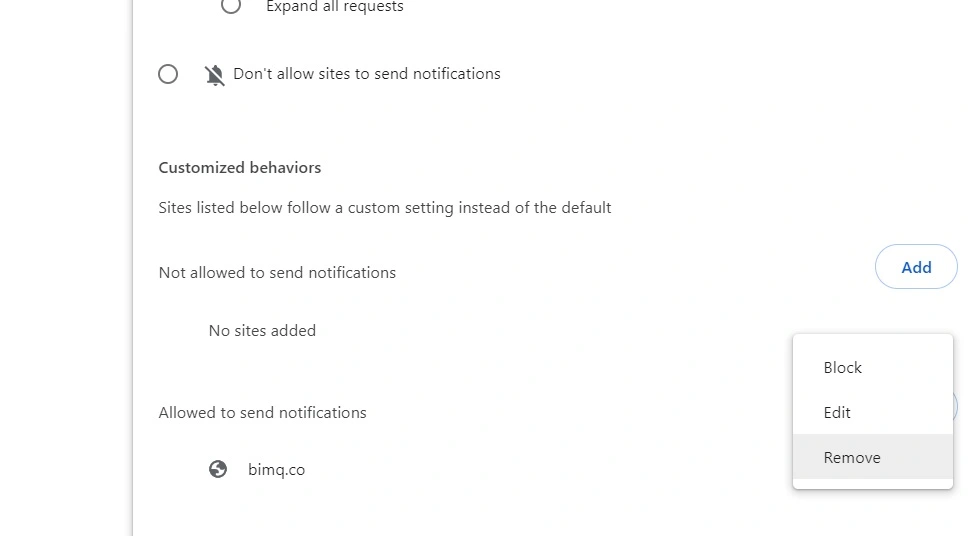
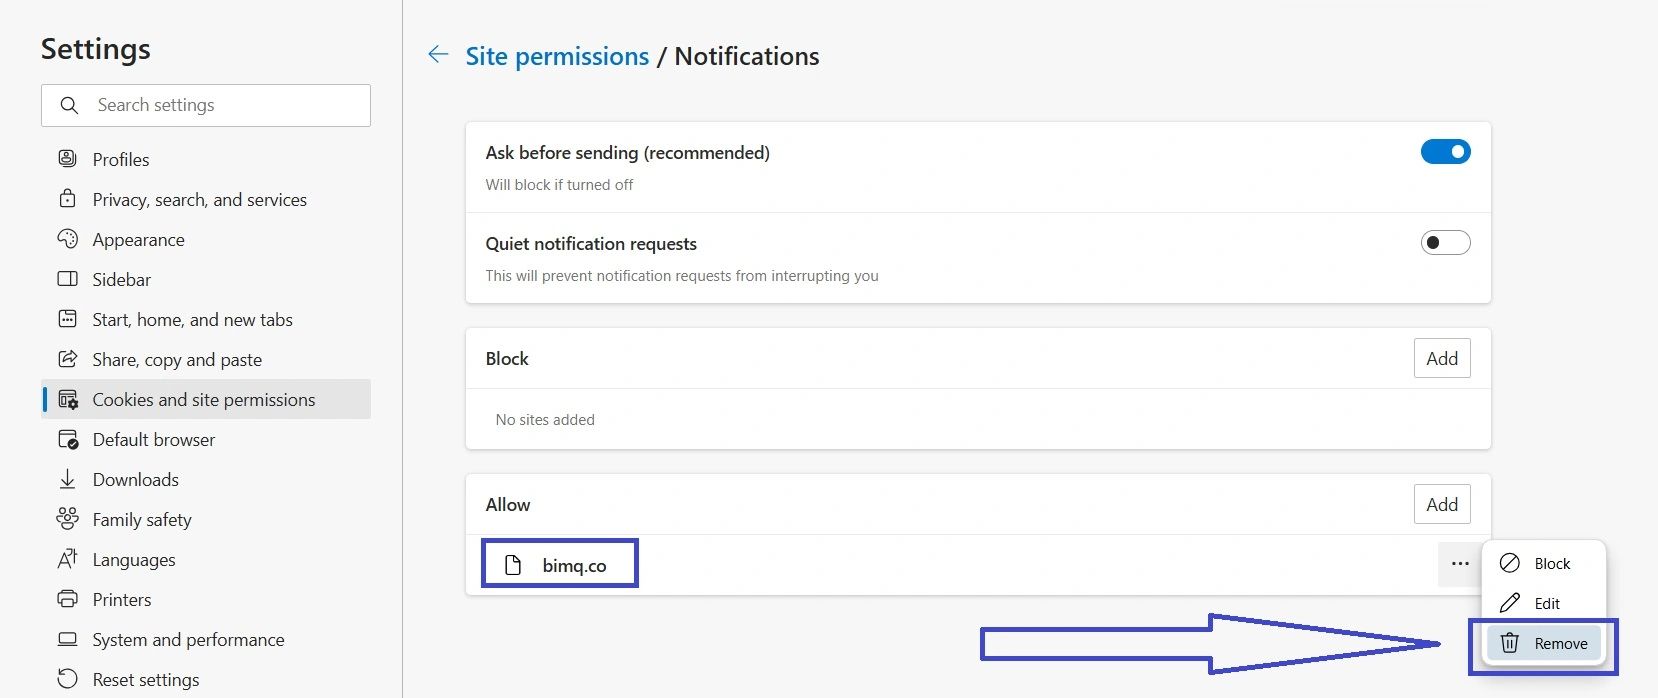
- Move on to Site Settings, scroll to Permissions, and open each type of permission to see if any sketchy sites are listed there.
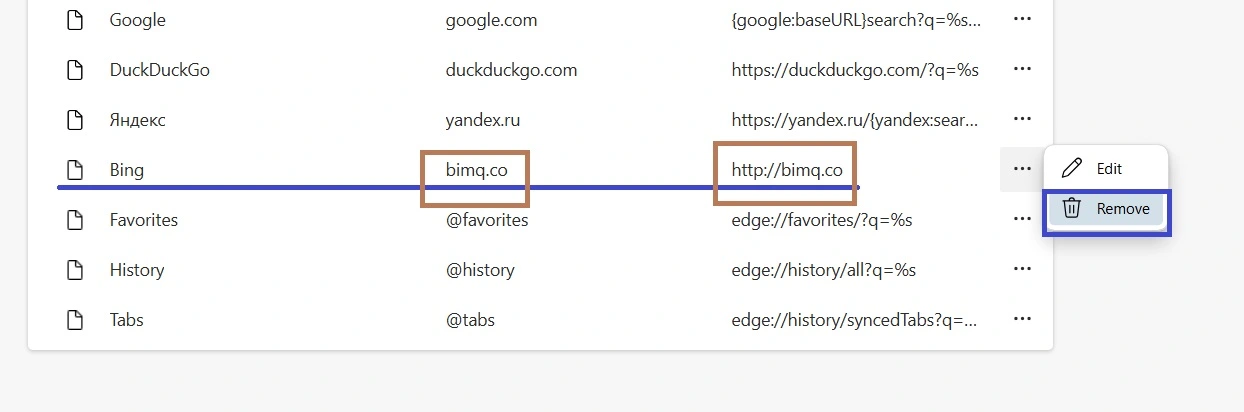
- If you see an unknown site listed under any of the permissions, click the three dots next to it, and select Remove. The example rogue site shown in the image is Bimq.co which is a commonly encountered iteration of the Bing redirect hijacker.

- Go to Appearance and if the Home button is set to some strange site, change it to something normal or simply delete it and select the New Tab Page option.
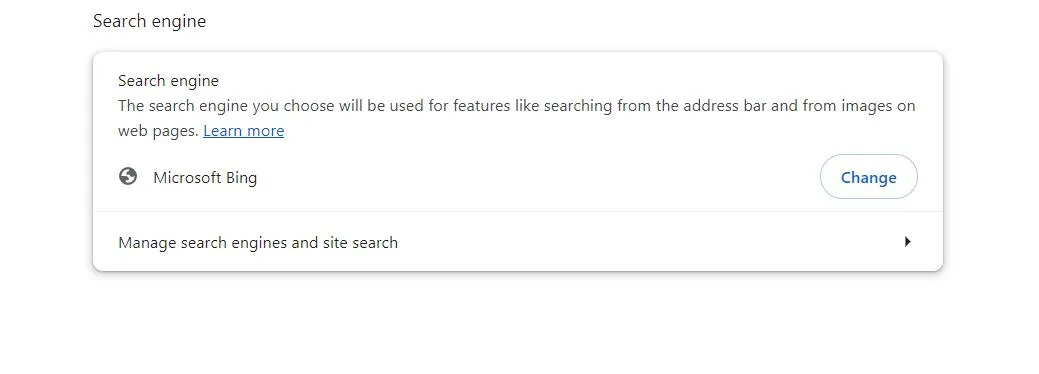
- Open the Search Engine, make sure that the default search engine is the one you want, and then click Manage Search Engines. There, delete any search engines you don’t recognize or trust.

- Also check the On Startup tab and if there’s a sketchy URL shown there, delete it.
- Last but not least, open Extensions, toggle off any rogue/unfamiliar ones and then click the Remove button to delete them.
After you are done here, restart your PC and open Chrome again to confirm the hijacker is fully gone. If it’s still there, consider using SpyHunter – the removal tool posted on this page – which will take care of everything for you.
Get Rid of Bing Redirect on Edge
Edge is based on Chromium which means it has very similar functions to Google Chrome and can also be hijacked in a similar manner. Here are the exact steps to clean it:
- Open the browser, select its menu, and open Settings.
- Start with the Privacy, search, and services section from the left – there you must scroll to Delete Browsing Data and click Choose what to clear. Like with Chrome, leave only passwords unchecked and clear all the other data.

- Scroll further down until you find Address bar and search. Then click on it and change the default search engine if it’s not the one you want.
- Then click Manage Search Engines and delete any unfamiliar ones listed on the next page.

- In the Start, Home, and New Tabs section from the left, check if there are any suspicious URLs in set as your Home Button and Startup pages and delete them.
- Next, go to Cookies and Site Permissions, explore the different types of permissions and delete from them any sites you don’t trust.

Lastly, you need to also click Extensions in the Edge menu and then click the Manage Extensions button that shows up. Look at the extensions in your Edge browser and delete anything that could be linked to the Bing redirect virus.
Why Does Google Redirect to Bing?
If you try to search for something in Google but get redirected to a Bing page, this is another sign that your browser has been taken over by the Bing redirect virus. There are several reasons hijackers do this type of redirect.
In some cases, they will rapidly reroute your browser through several other URLs until landing on Bing, which generates artificial traffic for those other sites. It all happens in less than a second so you’ll likely not notice it, but the visits still count. The redirect also lets these other sites collect data from your browser and use it for targeted ads. Finally, the Bing page you may land on could be a fake version of the real Bing search engine. One that is designed to push certain sites in its search results and spam you with potentially unsafe ads.
In any case, you do not want to interact with anything on the Bing page that the hijacker reroutes you to. It’s simply not worth the risk of landing on some phishing site or even one that can get you infected with malware. The best course of action is to complete the guide we gave you above should stop this from happening.
What Got You The Bing Redirect Virus
If we had to guess, the most likely reason you got this Bing “virus” on your PC is some sort of file bundle. You likely installed something sketchy and didn’t pay attention to the setup settings, where there was a clause that allows changes to be made in your browser. You either didn’t opt out of this clause or there wasn’t such an option to begin with, which is how you got your browser hijacked.
There are two key things to remember if you don’t want to end up in this situation again. The first is to be careful what you download and where you download it from. Let’s be fair – going to torrent sites and downloading cracked software is a recipe for trouble and a hijacker is the least you can get from it. Steamunlocked is a prime example of a shady site for pirated software from where people often get hijackers and worse malware.
The second important thing is to check the installation settings of any new software you are about to add to your system. Read the fine print, untick anything you do not agree with and the chances of landing a hijacker again will go down significantly.
A final bonus, if rather obvious, tip is to install dependable protection software on your PC. Our recommendation here is SpyHunter, which specializes in dealing with this exact type of rogue components that will often evade the detectors of other security solutions.
Leave a Reply