Apparently, there’s a new browser hijacker on the rise that goes under the name Violent Shark. But this one seems different from the other ones we’ve dealt with recently.
Violent Shark is a rogue extension, similar to SwiftSeek and ZoomFind, that hijacks the browser (usually Chrome or Edge) and then automatically opens new tabs with random YouTube videos. Some users report that it does this even when the browser itself is closed – it forcefully opens it only to start playing some YT video.
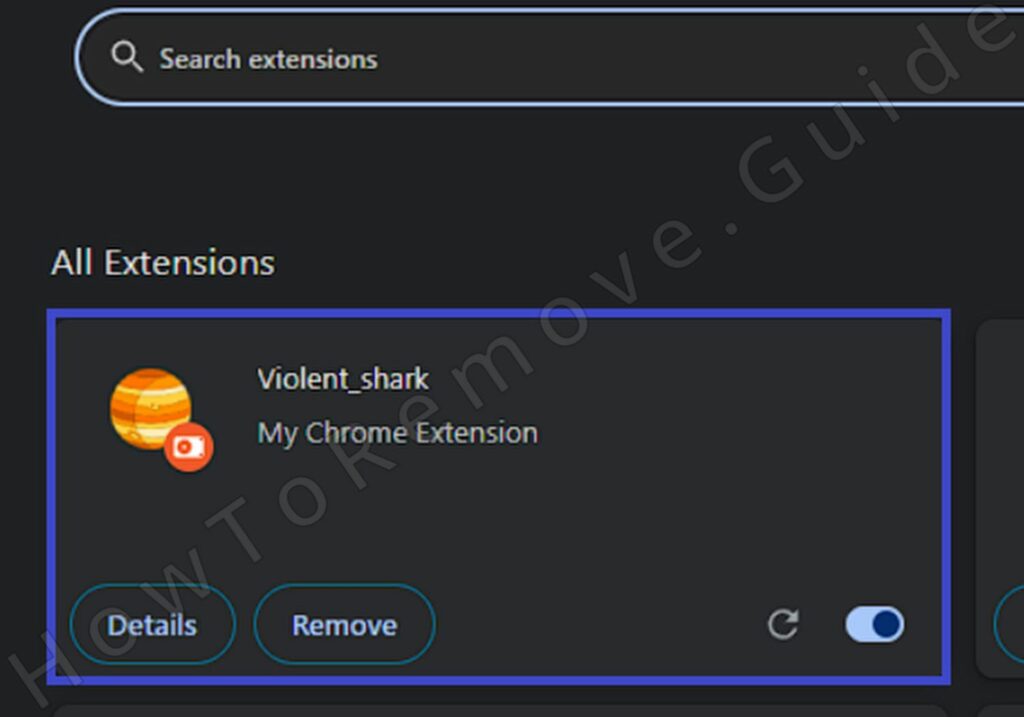
It’s a very jarring and unnerving type of behavior and the worst part is that, even after you remove Violent Shark from the Extensions Manager of the browser, it automatically reinstalls without your permission. The reason is a malware process called zbrain or zbrain_desktop.exe that runs in the background and restores the hijacker in case the user deletes it.

This is a more complex type of browser hijacker, which requires even more advanced removal steps than usual, but worry not, I’ve got you. This next guide is the product of extensive research into the issue and will let you get rid of both the Violent Shark hijacker extension and the zbrain malware almost certainly within your PC at this moment.
Violent Shark Extension Removal Guide
Although the manual removal process of Violent Shark is usually lengthy, I still suggest you first try to delete it the normal way and see if this does anything:
- Go to the affected browser, open its menu, and go to the Extensions Manager.
- Look for Violent Shark in there. If you see it, disable it by clicking the toggle button and then click Remove.
- Then go to Settings > Privacy and Security > Site Settings (Chrome) or Settings > Cookies and Site Data (Edge), and check the Pop-up and Notifications permission categories.
- If you see any unfamiliar sites there, listed under Allow, click the three dots next to them, and click Block.
- Restart the system and re-open your browser. Use it for some time to see if the rogue extension returns.
Most users say that this conventional way of removing unwanted extensions and site permissions doesn’t work and the hijacker returns. If this doesn’t work for you either, then simply proceed to the advanced steps you’ll find below.
SUMMARY:
| Name | Violent Shark |
| Type | Browser Hijacker |
| Detection Tool |
We tested that SpyHunter successfully removes Violent Shark* and we recommend downloading it. Manual removal may take hours, it can harm your system if you re not careful, and Violent Shark may reinstall itself at the end if you don’t delete its core files. |
The detailed manual removal process explained below can take upwards of an hour to complete and will require you to have at least some basic troubleshooting experience.
If you don’t think you can spare the time or if you lack the necessary experience, you also have the alternative to use a professional removal program, such as SpyHunter 5. This tool, which you’ll find on the current page, is great at dealing with rogue extensions as well as the malware that has brought them into your PC in the first place.
If you think you are ready to proceed with the full removal guide, let’s proceed:
How to get Rid of Violent Shark
If the quick instructions above didn’t rid you of the hijacker, this means that there’s malware inside your system – zbrain/zbrain_desktop.exe – that is providing Violent Shark with persistence. You must first deal with that malware before going after the hijacker itself.
But to deal with the zbrain, you’ll first need to perform two preparatory steps:
- Search for Folder Options in the Start Menu, open it, open View, enable Show Hidden Files and Folders, and Apply the changes. This lets you see any files that the malware might have made hidedn.
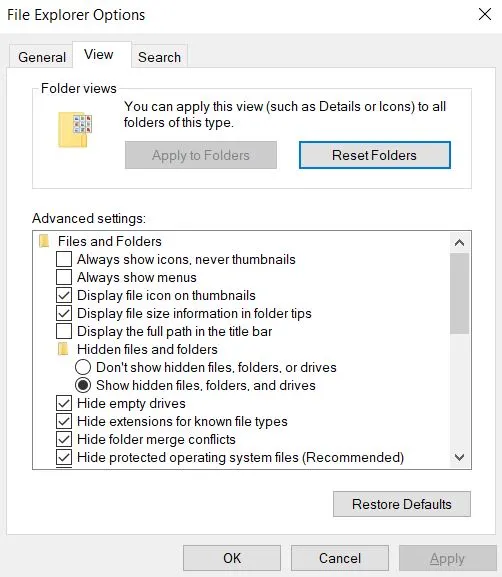
How to Show Hidden Files and Folders
- Download LockHunter and install it. It’s a free tool that lets you delete files that are currently in use by other software. Since some of the zbrain files might be blocked this way, you’ll need LockHunter to get rid of them.
You are now ready to hunt down the malware.
Delete the Violent Shark Virus Through the Task Manager
First, once more try to remove the Violent Shark extension from the Extensions Manager in the affected browser, and then restart your PC.
Press Ctrl + Shift + Esc to access the Task Manager. If it opens in compact mode, click More Details to reveal all active processes.
Sort the processes by name and look for a process named zbrain or zbrain_desktop.exe. It might not appear immediately, so wait for a bit if you have to.
Also, look for processes with the following names:
- yzsx_zsync
- ralvonder
- ralvonder_desktop.exe
Once you find one or more of the mentioned processes, do the following for each:
Right-click it, click Open File Location, and minimize the folder that opens.
Back in the Task Manager, click the zbrain process, and then click End Task.
Now bring back up the minimized folder, and delete all of its contents. Then delete the folder itself.
If, at any point, you are prevented from deleting a given file or folder, use LockHunter to erase it in the following way:
- Make sure LockHunter is already installed on your PC.
- Right-click the item you aren’t allowed to delete, and select the “What’s locking this file/folder?“ option.
- Click the “Delete it!” option that you’ll see in the new window.
Once you’ve ended all rogue processes and deleted their data, go to this directory in your system and delete everything there:
- C:\Users\*Your Username*\AppData\Local\yte670b5bc7f3ed4\
After you’ve done that, proceed to the next step.

Video walkthrough for this step:
How to Delete Persistent Files with Lock Hunter
Delete Violent Shark Scheduled Tasks
It’s important to check the Task Scheduler in case the hijacker extension or the zbrain malware have created any tasks that allow them to automatically reinstall themselves.
Use the Start Menu to search for the Task Manager and open it.
Click on Task Scheduler library (top-left) and check each task in the list.
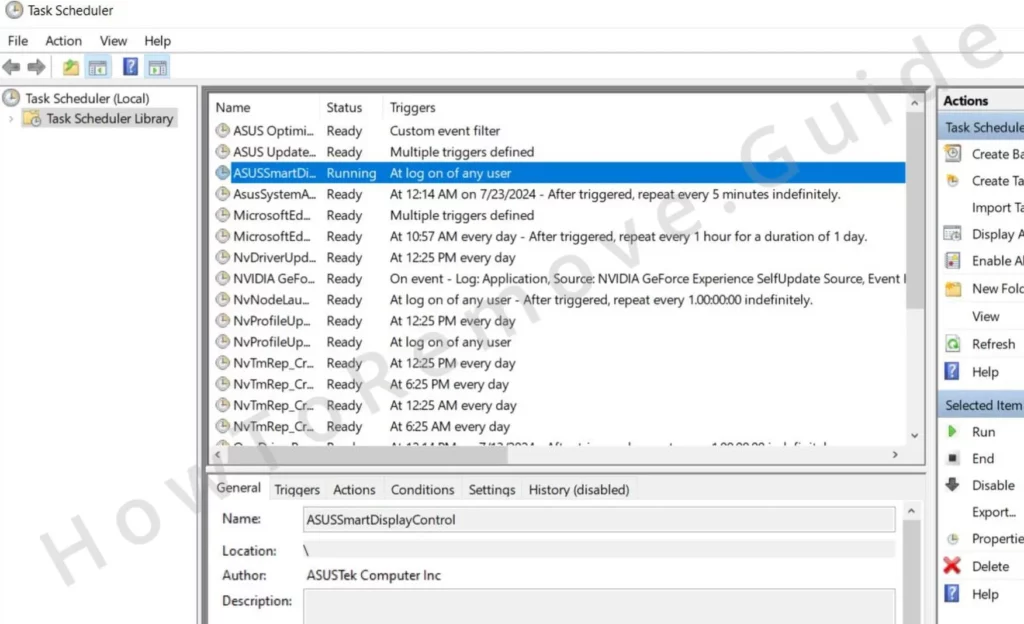
One by one, select the tasks, open the Actions tab, and see what action is performed by the respective task.
If the action is to run an unfamiliar executable or script, to visit a suspicious site, or to download something, you need to delete that task.
However, if the task runs a particular file, first remember the path to that file and later go there and delete it.
After you’ve checked all tasks and deleted the rogue ones, you can move on to the next section.
Video walkthrough for this step:
How to Remove Violent_Shark Virus Policies
There could be a secondary persistence mechanic used by the Violent_Shark extension, which lets it stay in your browser despite your attempts to remove it.
If there’s a “Managed by your organization” note/message at the bottom of your browser’s menu or the top of your Settings page, this means the browser’s settings are blocked by a rogue third-party policy.
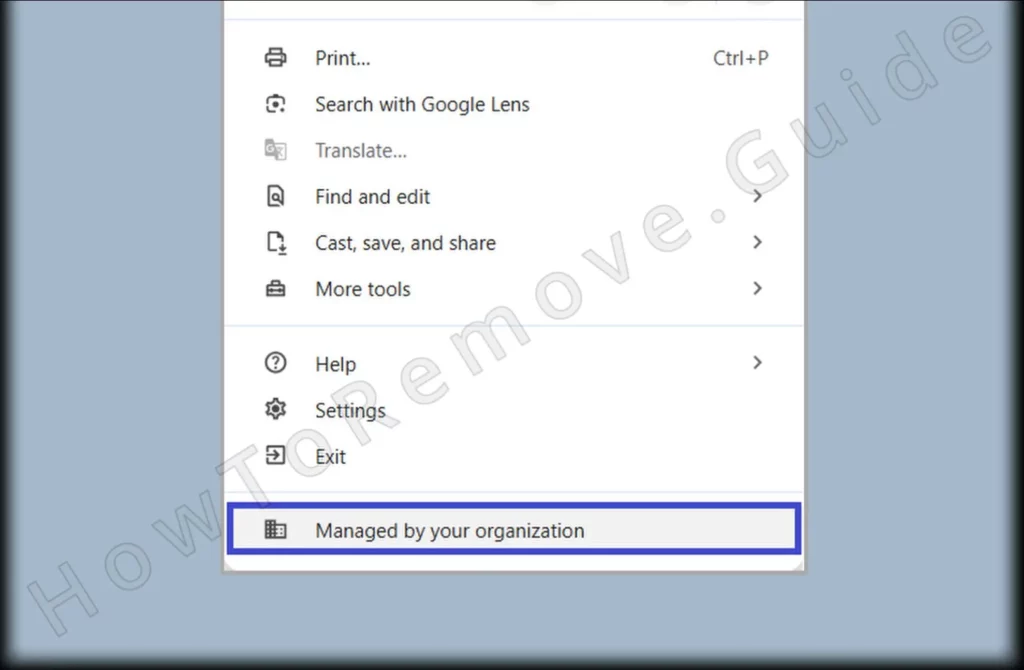
You must take care of it first before being allowed to get rid of the Violent_Shark hijacker. Here’s how to do that:
Open your browser and type *Browser Name*://policy in the URL bar, where *Browser Name* is replaced by the name of your browser. For instance, Chrome://policy for Google Chrome or Edge://policy for MS Edge.
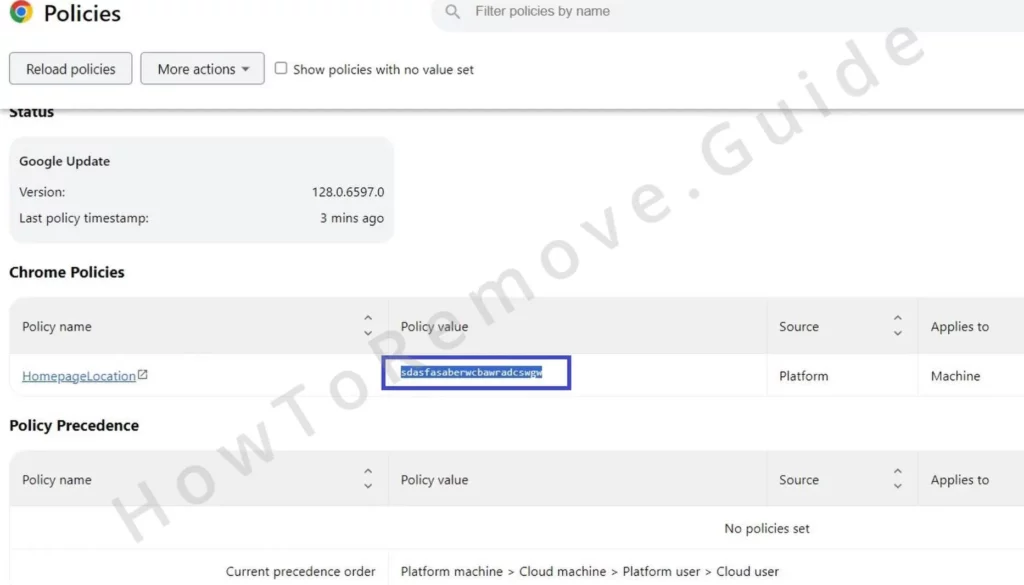
Go to that address, and check the Value column for any values made of random letters. Copy such values and save them in a text file.
Then go to the Extensions Manager, turn on Developer Mode, copy the ID of Violent_Shark, and save it in the same file.
If the ID doesn’t show up when you enable Developer Mode, click the extension and you’ll see it on the next page.
Now use the gathered info to delete the rogue policies from the System Registry like so:
- Type regedit in the Start Menu and open it (the Registry Editor) with admin rights.
- Press Ctrl + F, search for the first saved value, and delete the key (folder) to the left that shows up.
- Search again, delete again, and keep doing this until no more results are shown for that search.
- Then search for the other recorded values and the rogue extension ID and delete their keys too.
If you are trying to clear Google Chrome, I also recommend downloading and running with admin rights the free Chrome Policy Remover tool. It automatically deletes all policies installed in the Chrome browser.
If you download it and you get a Windows Security warning, just ignore it by clicking More Info and then click Run Anyway to launch the tool. Don’t worry, the Chrome Policy Remover is perfectly safe.
Video walkthrough for this step:
Manual Group Policy Removal
Automatic Group Policy Removal
Uninstall Violent Shark From Chrome, Edge, and Other Browsers
It’s finally time to get rid of this rogue extension and reverse any changes made by it in your browser.
First, go to the browser’s Extensions Manager and remove Violent Shark as well as any other suspicious or unfamiliar items.
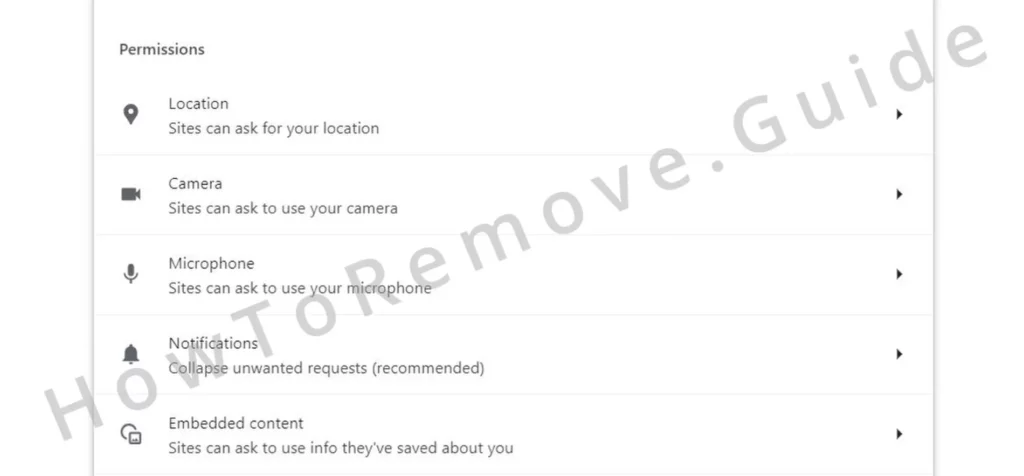
Once again, go to Privacy and Security > Site Settings (or Cookies and Site Data for Edge users), and now check every single permission type. If you notice any questionable URLs allowed there, block them.
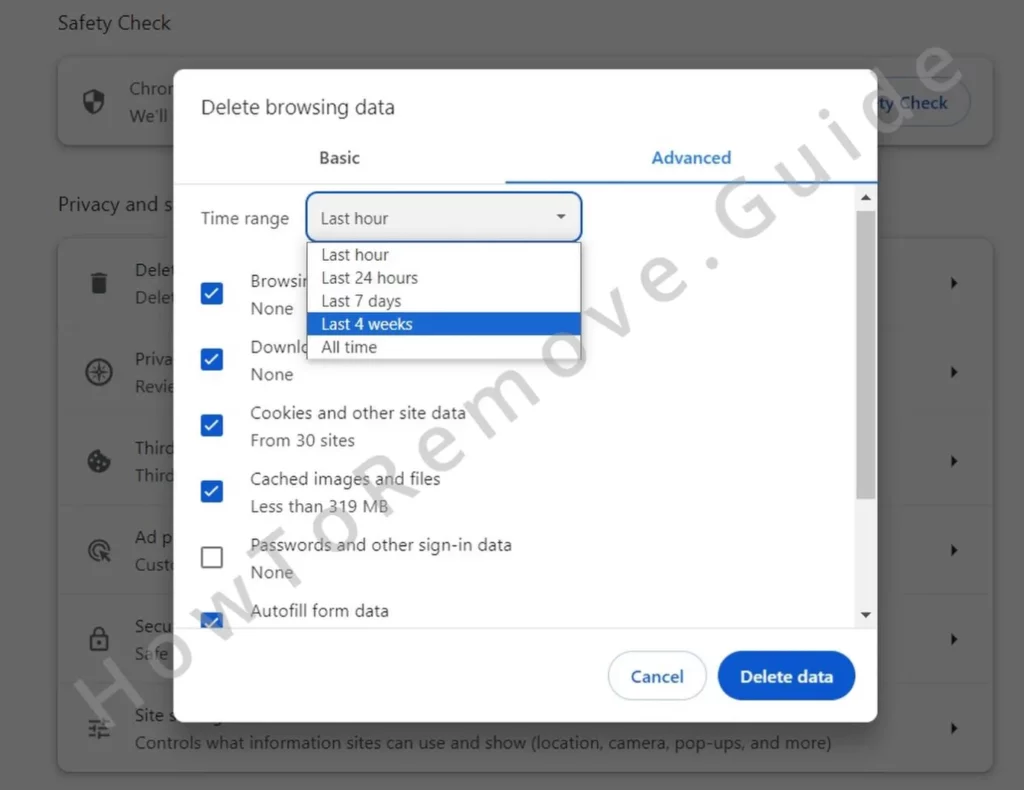
Back in the Privacy and Security section, click the Delete browsing data button and delete everything except passwords using the “All Time” range.
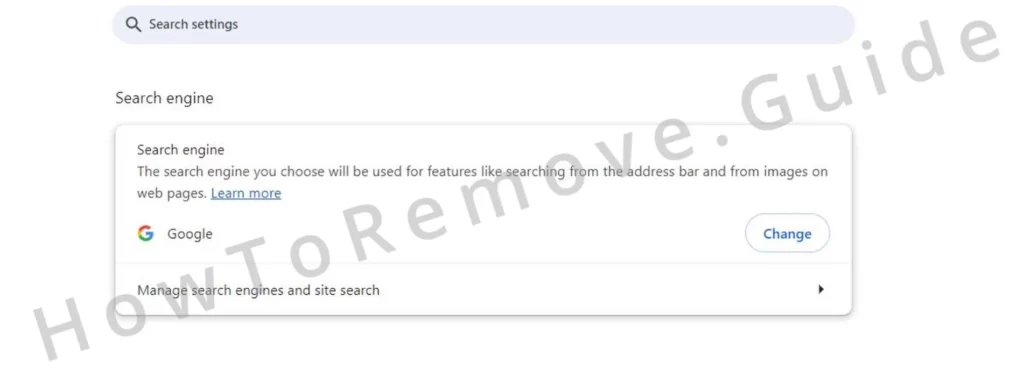
Next, go to the Search Engine tab, choose a reputable search engine as your browser’s default, and then open Manage Search Engines to delete any unknown or suspicious ones that might be listed there.
Lastly, check the Appearance and On Startup settings for rogue URLs and remove them.
Chrome
Microsoft Edge
Mozilla Firefox
With this, your browser and system should now be fully clean from the Violent Shark hijacker and the zbrain malware associated with it.
But if you are still encountering problems or if you have more malware on your PC that you can’t remove manually, be sure to try out SpyHunter 5. It will clean your system in no time and keep it protected in the future.

Leave a Reply