Memory-protection-layer2.cc is classified as a malware. While it doesn’t directly damage files, the content it promotes can be unsafe, exposing you to scams, phishing pages, or unwanted downloads. When this happens alongside constant blank pop-ups, ads and alarming security alerts, the culprit is often a browser hijacker like Memory-protection-layer2.cc. This type of threat , similar to Parent-control.cc, Holiday-forever.cc and System-monitor.cc, is a destructive virus and it specializes in control. That’s why ignoring the problem isn’t wise. Removing the hijacker requires restoring browser settings and revoking permissions, which the guide below explains clearly stepwise.
We tested that SpyHunter successfully removes Memory-protection-layer2.cc* and we recommend using it. It will block Memory-protection-layer2.cc from reinstalling itself and it will make sure your device is clean from any malware.
Buy now15% OFF if you buy straight without trial.
Step-by-Step Removal Guide for a Browser Hijacker
Go through the steps in order and note what you disable or remove so you can track changes without guessing later. This structured sweep targets Memory-protection-layer2.cc, reduces repeat pop-ups, and helps restore your usual search provider, startup pages, and permissions without wiping settings you still rely on for everyday browsing.
Roll Back Unwanted Browser Changes
- 1.1Open your browser’s Settings and undo the changes that showed up after Memory-protection-layer2.cc appeared.
In Chrome, use the ⋮ menu (top right); in Firefox, open the ≡ menu for the matching options.
Go to Extensions or Add-ons, review what is installed, and flag anything you do not recognize. - 1.2Check each add-on by its name, icon, requested permissions, and full description.
If the wording is generic or the add-on behaves differently than advertised, click Remove.
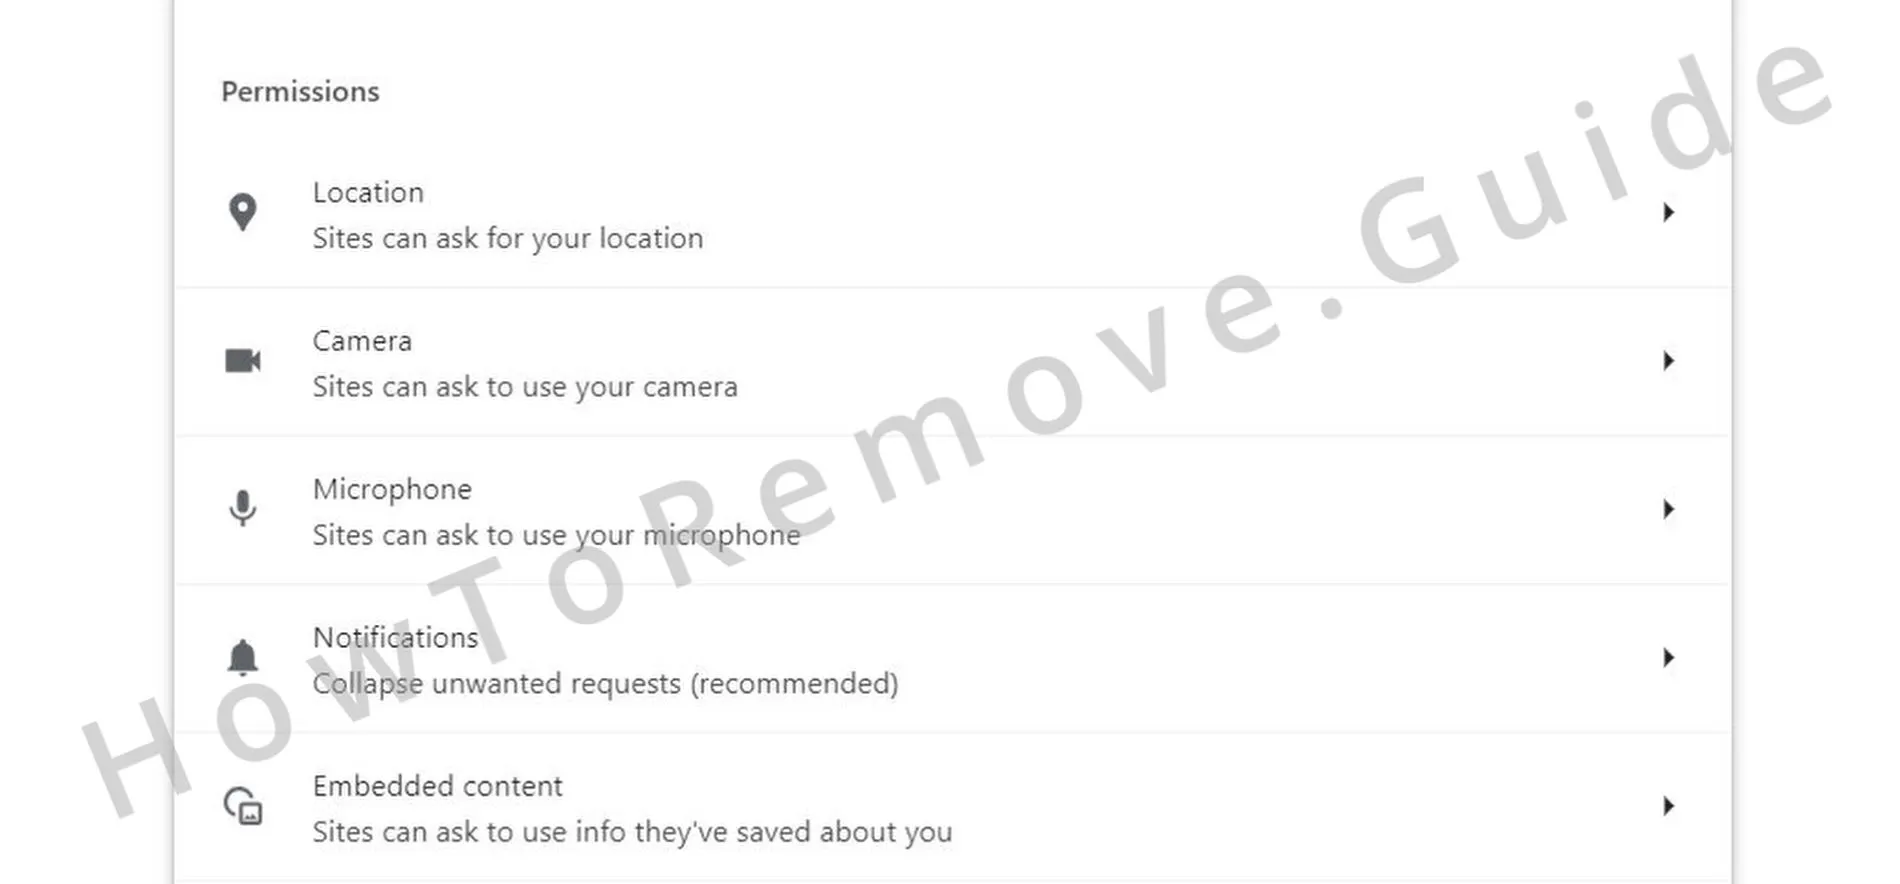
If you are unsure, search the exact “extension name” to compare the publisher and user reports. - 1.3Open Privacy and security, then Site permissions.
Review which sites can access your microphone, camera, location, and notifications.
Block unfamiliar entries and keep only the small allowlist you actually use. - 1.4Under Site permissions, remove approvals you did not mean to grant.
This helps stop repeated prompts, loud notifications, and redirect loops caused by permission abuse.
When you are done, restart the browser so the changes apply and confirm the behavior is gone.
If the redirects and pop-ups stop at this point, the immediate trigger is likely removed. If the issue keeps returning, a startup policy may be restoring settings tied to Memory-protection-layer2.cc in the background after you fix them. Continue below to clear remaining enforcement without resetting everything or losing saved browser data.
OVERVIEW:
| Threat name | Memory-protection-layer2.cc |
| Type | Browser hijacker |
| Scanner |
Some threats reinstall themselves if you don’t delete their core files. We recommend downloading SpyHunter to remove harmful programs for you. This may save you hours and ensure you don’t harm your system by deleting the wrong files. |
If you are on Windows, continue with the steps below.
If you are on Mac, use our How to remove Ads on Mac guide.
If you are on Android, use our Android Malware Removal guide.
If you are on iPhone, use our iPhone Virus Removal guide
Manual Removal Steps for the Browser Hijacker
When a browser displays “Managed by your organization,” a policy is enforcing settings behind the scenes, so a normal reset may not remove the lock. The tasks below help you locate and delete the entries that allow Memory-protection-layer2.cc to reapply changes after you correct them. Work carefully, verify each edit, and note what you changed before restarting Windows.

1. Identify Browser Policies Currently Enforcing Settings
- 1.1
 Open the built-in policy page to see rules that Memory-protection-layer2.cc may have applied.
In Chrome: chrome://policy
In Edge: edge://policy
Let the list load, then review anything unfamiliar; use Reload policies to refresh or export a copy for reference. - 1.2Scan each policy for random strings or values that do not fit your usual setup.
Write down anything suspicious so you can compare it to folders or extension IDs later.
Record the exact policy Name and Value; these often point to the paths or keys you remove next. - 1.3Open the browser’s Extensions page and turn on Developer mode.
This view shows extension IDs and install paths that are useful during cleanup.
Copy each questionable ID into a text file so you can match it to folders on disk. - 1.4If Extensions will not open or is blocked, use File Explorer instead.
Profile folders let you continue even when the browser UI is restricted.
Enable View > Show > Hidden items so the AppData directories are visible. - 1.5
 Use File Explorer to open:
C:\Users[Your Username]\AppData\Local\Google\Chrome\User Data\Default\Extensions
Each subfolder name is an extension ID; match them to your notes, avoid removing known-good folders, and make a quick desktop backup before deletion. - 1.6
 In other Chromium-based browsers (e.g., Brave, Opera), extensions live under a similar AppData path.
Confirm the extension ID and location before deleting any folder tied to an unwanted add-on.
Open the browser’s About page to verify it is fully closed so files unlock for removal. - 1.7After deleting the suspicious folder, go back to Extensions with Developer mode still enabled.
Confirm the add-on no longer appears; if it returns, repeat cleanup and look for leftovers that can reinstall it.
Click Update in Developer mode to refresh the list and spot reinstalls.
Clear Enforced Browser Policies in Windows
Some browser controls are stored in the Windows Registry, and careless edits can create real problems for Windows and installed software. Focus only on entries that clearly connect to Memory-protection-layer2.cc, and avoid broad deletions that might impact unrelated programs. This removes policy hooks that can survive browser resets while keeping the system stable.
2. Delete Browser Policy Keys in the Windows Registry
- 2.1Press Win + R, type regedit, and press Enter to open Registry Editor and start tracing policy keys linked to Memory-protection-layer2.cc.
Before changing anything, use File > Export to create a full registry backup.
Select All under Export range and save the file in Documents or another easy location. - 2.2Use Ctrl + F or Edit > Find to search for the policy names you noted or the related extension IDs.
Select Find Next and delete only exact matches that clearly belong to the unwanted changes.
Press F3 until no related values remain under HKCU and HKLM. - 2.3
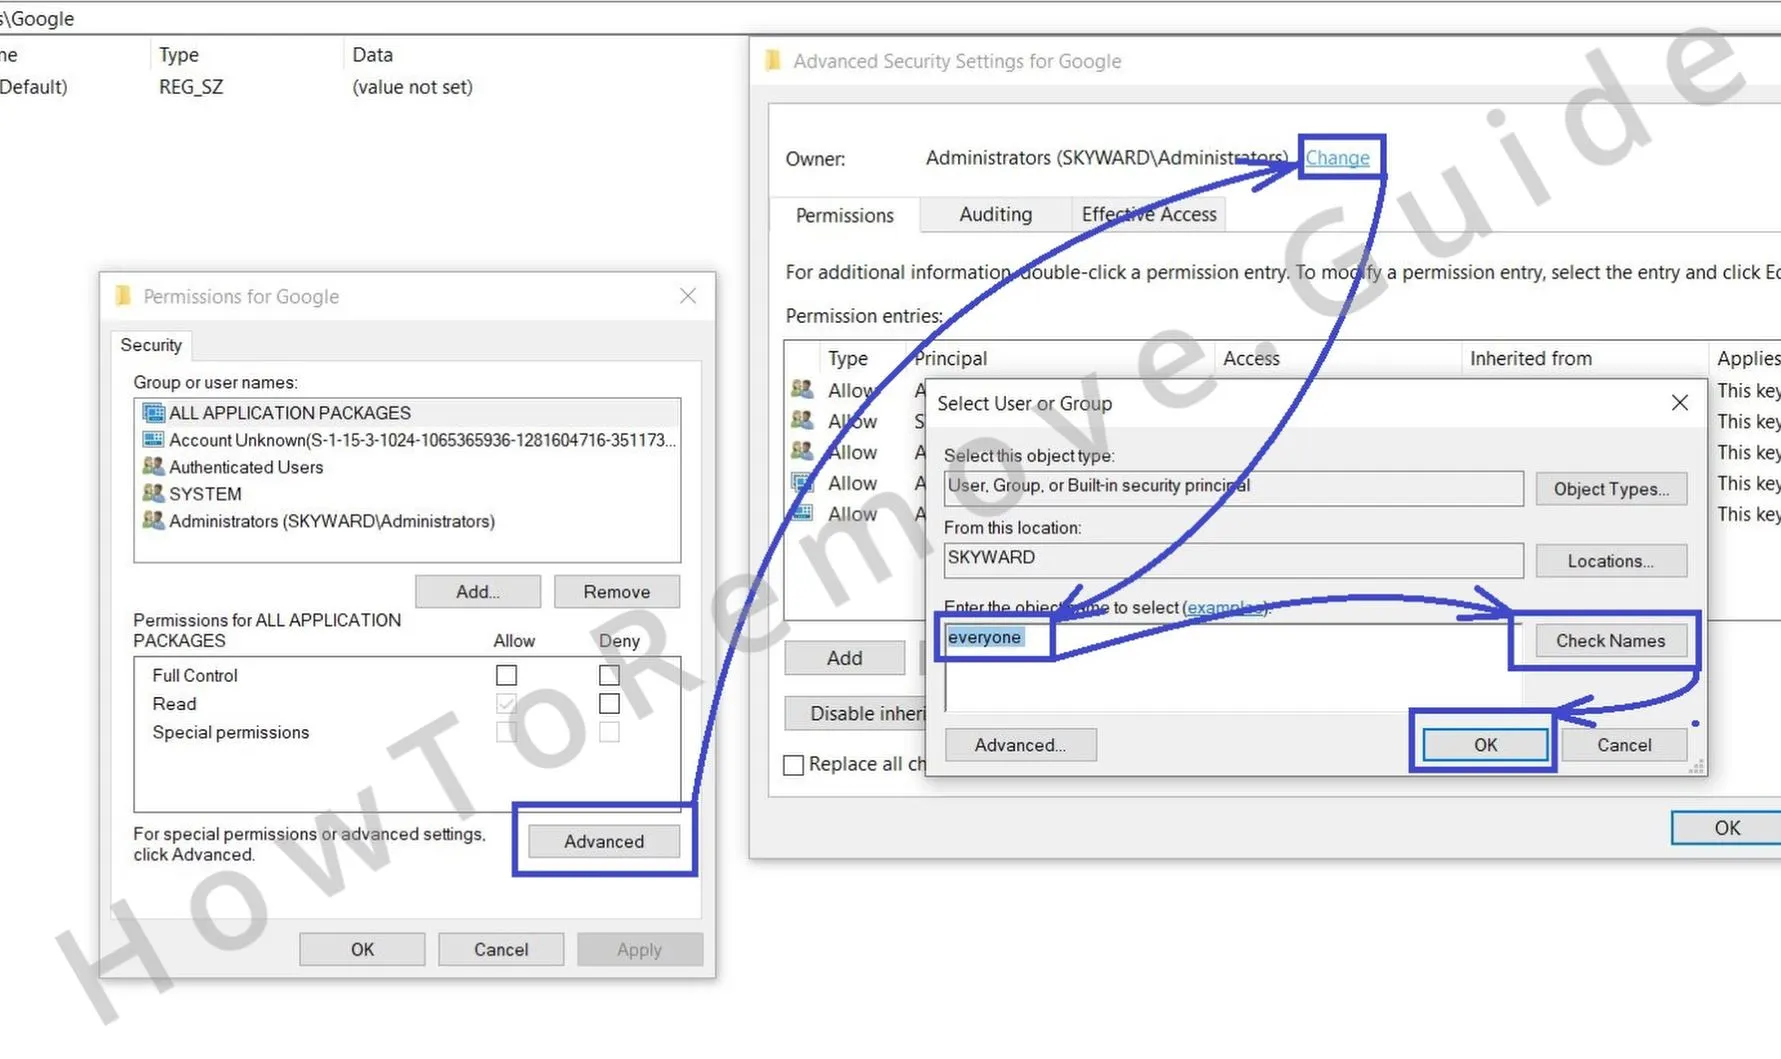 If a key will not delete, right-click it, choose Permissions, then Advanced.
Under Owner, select Change, type Everyone, click Check Names, and confirm with OK.
Grant Full Control to Administrators and Users so the key and subkeys can be removed. - 2.4
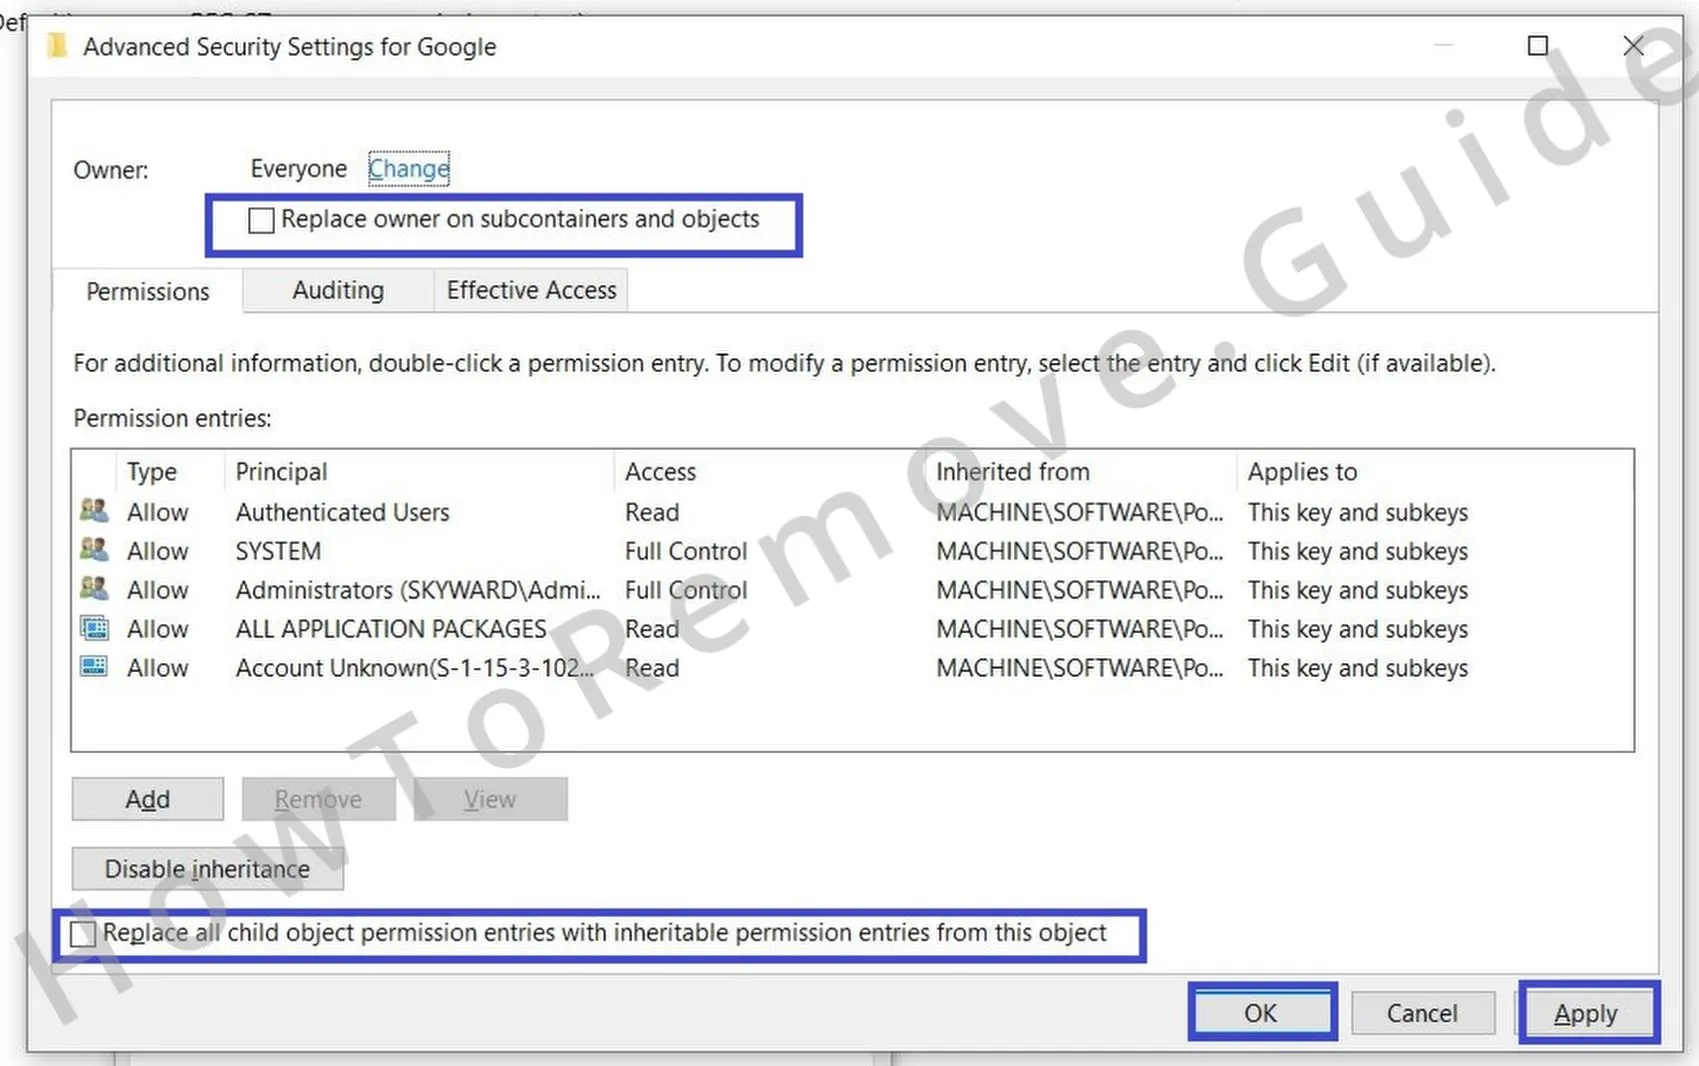 After taking ownership, enable Replace owner on subcontainers and objects and Replace all child object permission entries.
Click Apply, then OK, Reboot, and check whether the Managed by your organization banner is still present.
If it is gone, open regedit again and rerun searches to confirm no related values have returned.
Even after the visible settings are corrected, something on the system can reapply them after a restart, profile switch, or sign-in. The checks below focus on the parts that keep forcing the same preferences back, including items associated with Memory-protection-layer2.cc, without requiring a broad reset. If the managed banner or unwanted search/homepage keeps returning, run through these items and then verify the browser again.
Other Ways to Clear Enforced Browser Policies
3. Other Ways to Remove Policy Enforcement
- 3.1
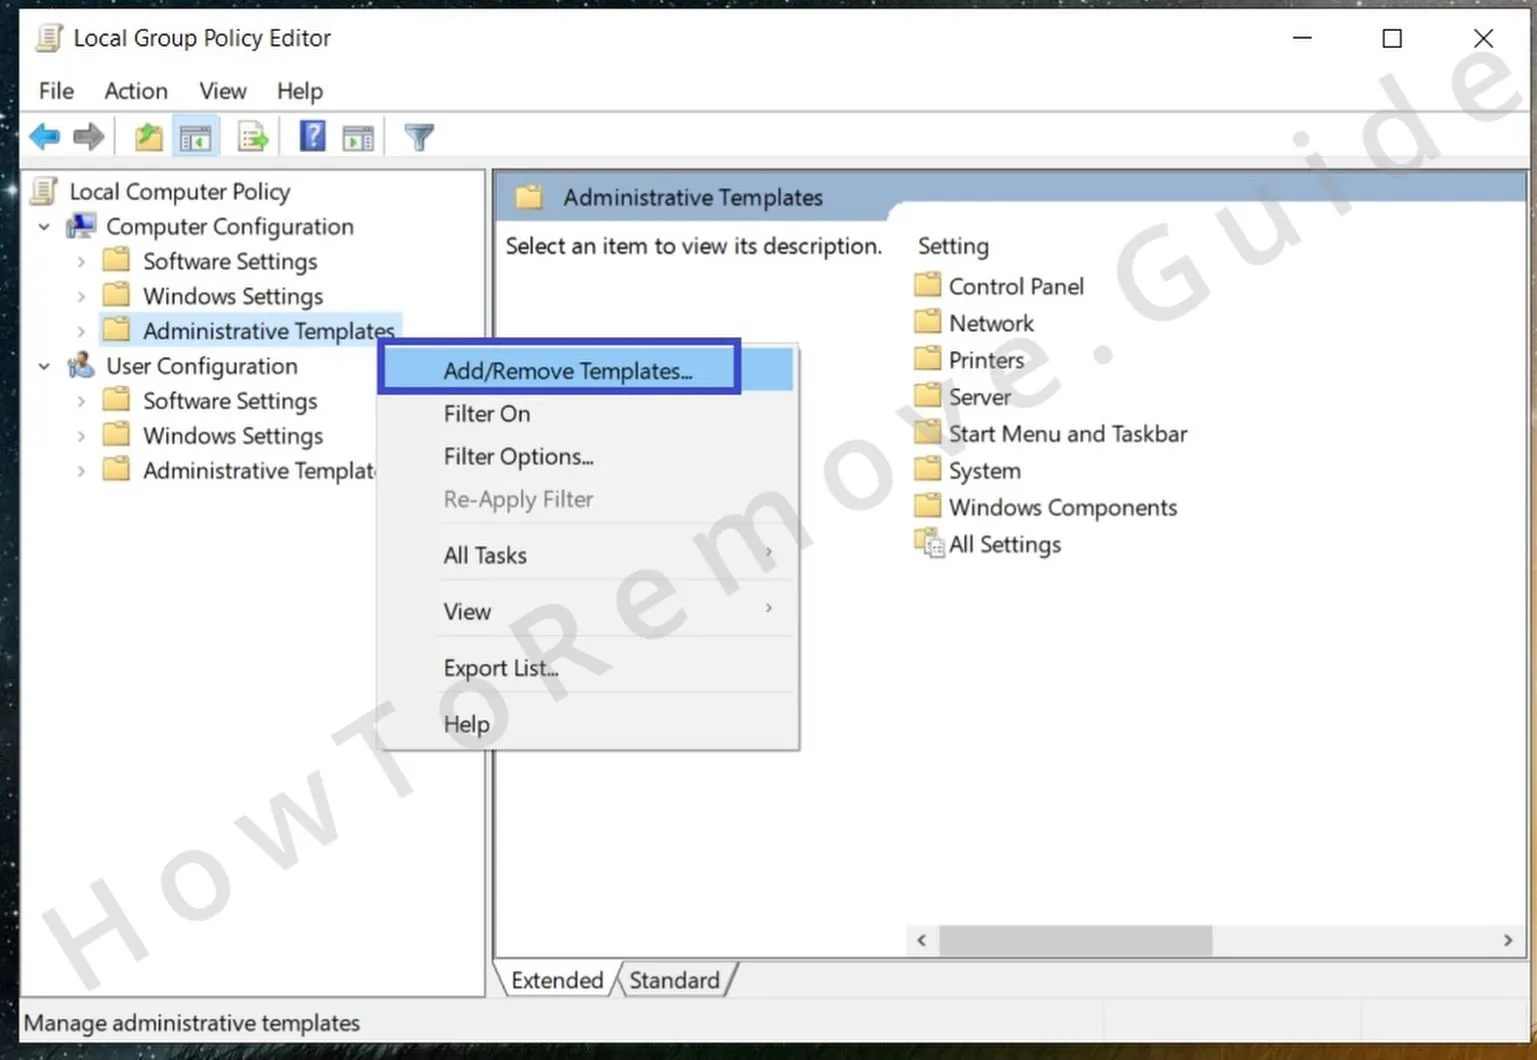 Open Local Group Policy Editor (Win + S → Edit Group Policy) and check for rules that Memory-protection-layer2.cc may have added.
Expand Administrative Templates under both Computer Configuration and User Configuration so you cover system-wide and user-only settings. - 3.2
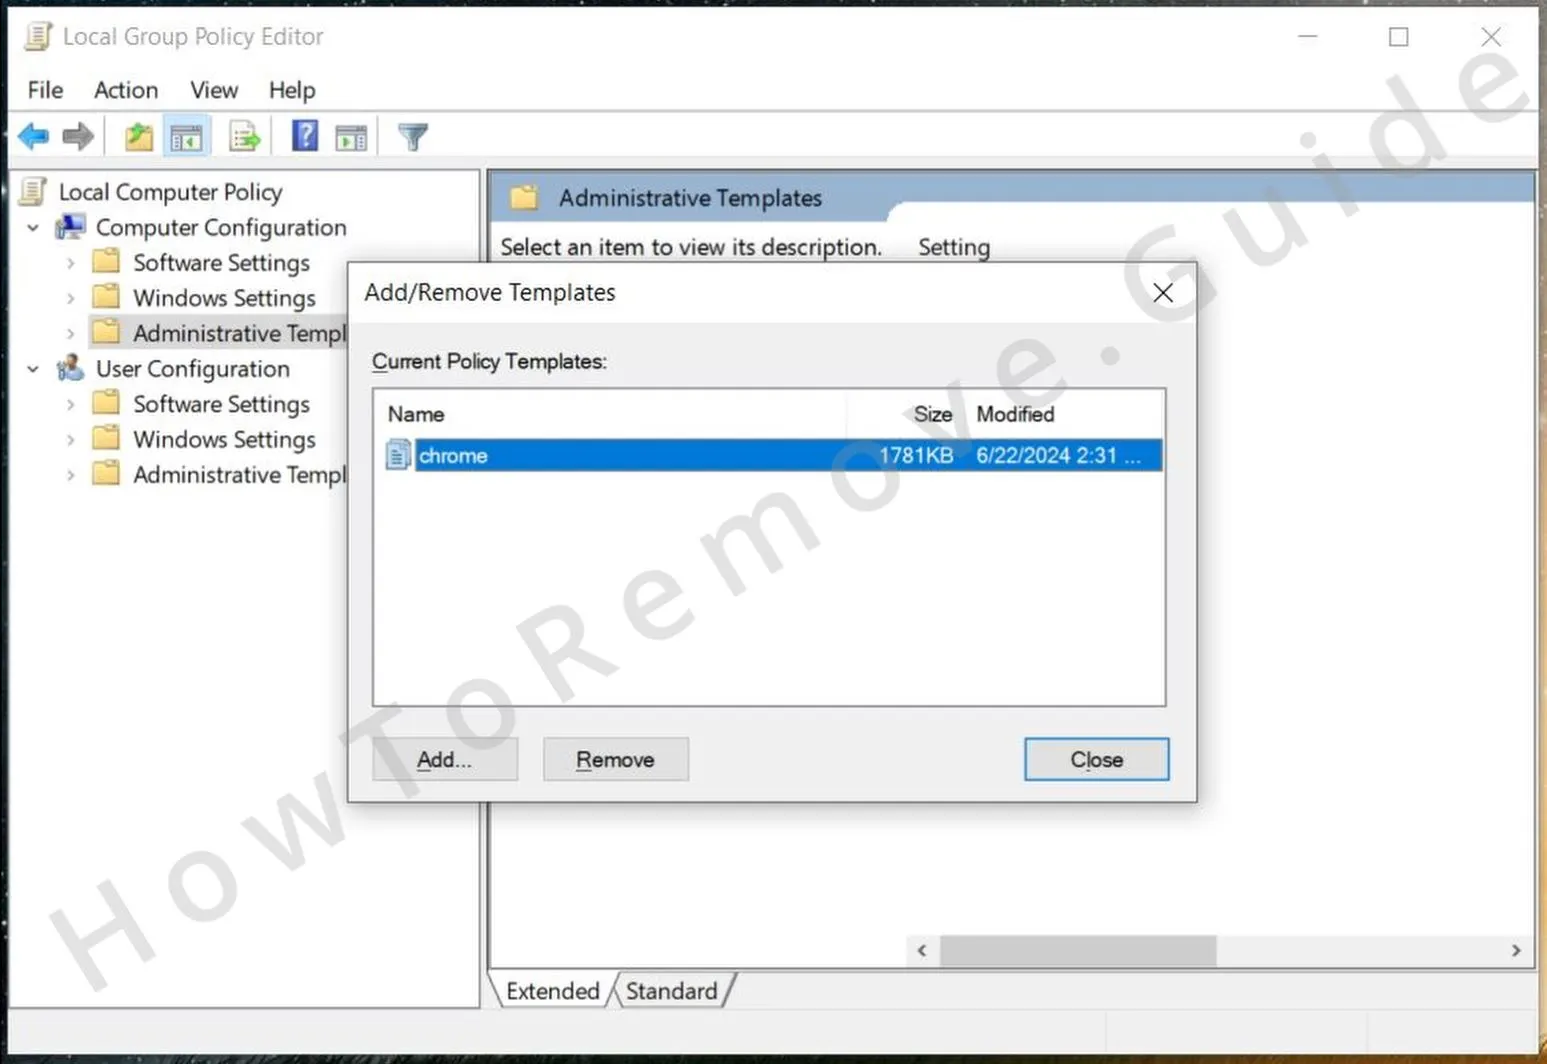 Right-click Administrative Templates → Add/Remove Templates.
Remove templates you never added, then open Windows Components → Microsoft Edge or Google Chrome and set suspicious items to Not Configured. - 3.3On Chrome, utilities like Chrome Policy Remover can reveal hidden policy folders.
Download only from a trusted source, choose Run as administrator, then open chrome://policy → Reload policies to confirm the list is cleared. - 3.4Open Task Scheduler → Task Scheduler Library and remove tasks that launch unknown scripts, CMD/PowerShell, or policy loaders at sign-in.
Check Services for recently added entries from unfamiliar publishers and disable/remove them only when the connection is clear.
Undo Hijacker Changes in Chrome, Edge, and Other Browsers
Browser profiles, sync, and saved site data can quietly restore altered preferences after you sign in or switch profiles. To prevent Memory-protection-layer2.cc from returning after restarts or profile changes, verify your defaults and permissions are clean in every active profile. The steps below help keep search, startup pages, and site access consistent across all browsers you use.
4. Clear Remaining Browser Settings
- 4.1Open Extensions/Add-ons again and remove any entry linked to Memory-protection-layer2.cc or clearly out of place.
Use direct pages like chrome://extensions so a themed interface cannot hide items. - 4.2
 Open Clear browsing data and set Time range to All time.
Remove cache, cookies, hosted app data, and site settings; keep Saved passwords if needed.
Repeat for each profile you use; consider Clear data on exit if the issue returns quickly. - 4.3
 Go to Privacy and Security > Site settings.
Remove or block unknown entries for notifications, camera, microphone, and location.
Use View permissions and data stored across sites to bulk-remove noisy domains. - 4.4
 Under Search engine → Manage search engines and site search, delete untrusted providers and restore a known one (e.g., Google, Bing, DuckDuckGo).
Remove custom site-search entries added by hijackers. - 4.5Open On startup and Appearance.
Remove unfamiliar URLs set for startup, homepage, or new tab.
Switch back to the browser’s Default theme.