Blinkweb.net
Blinkweb.net belongs to the software class of so-called browser hijackers and is among its latest representatives. Blinkweb.net causes obvious changes to your main browser’s interface and behavior, hence the name of this software type.

When you are trying to get to a certain website or page with information you are looking for, the last thing that you would like to deal with is a stream of ads, pop-ups, banners, and automatic page redirects to other sponsored pages. Unfortunately, web ads are almost impossible to escape nowadays and no matter how hard you try to keep away from them and the sites that stream them, sooner or later you may unknowingly install a browser hijacker like Blinkweb.net inside your PC and may get swarmed by a flow of unstoppable third-party adverts and other aggressive promotional messages. They may take over your Chrome, Firefox, Explorer or some other browser that might be used as default.
The real problem with these apps such as Poshukach, iStart Search Bar, however, comes when they start to redirect the actual web searches to specific sponsored web locations and impose some potentially unwanted changes (such as homepage or search engine replacements) which force the users to use some third-party tools, toolbars, and components, without asking for their approval.
Most browser hijackers are widely regarded as potentially unwanted due to these activities and some people may even mistake them for viruses or some form of malware (probably ransomware or Trojans) because they can be extremely aggressive in their attempts to take over the main browser and to turn it into a platform for sponsored ads positioning and paid redirects. Blinkweb.net, in particular, is from this category of applications which uses advertising channels and, in the next lines, we will tell you more about it.
Thankfully, neither this app nor any other browser hijacker can be accused of any actual computer harm or criminal actions. That’s why we won’t refer to it as a virus. This is because, despite being highly irritating and even aggressive in its attempts to promote things, Blinkweb.net is actually a legal piece of software that serves the needs of the online marketing industry and is not used for any form of cyber crime.
Still, we do advise you to follow the instructions in the removal guide below and remove the browser hijacker from your system because such an app may heavily disturb your web browsing and may expose you to insecure web locations where real threats (including viruses, spyware and ransomware) may hide. Besides, if you don’t uninstall the changes that the hijacker has imposed to your browser, every time you start a new browsing session you may automatically get redirected to different sites, third-party platforms, links and messages with questionable origin and unreliable content.
And if the annoyance of the page redirects and pop-ups is not enough for you to remove Blinkweb.net, the frequent screen freezing, browser unresponsiveness and sluggishness, which such software may cause as a result from its ad-generating activity in the background may add up to that decision. For fast and optimal results we suggest you follow the instructions below or use the professional Blinkweb.net removal tool which can scan your system and uninstall not only potentially unwanted program like this one but also much more serious infections.
SUMMARY:
| Name | Blinkweb.net |
| Type | Browser Hijacker |
| Danger Level | Medium (nowhere near threats like Ransomware, but still a security risk) |
| Detection Tool |
Some threats reinstall themselves if you don’t delete their core files. We recommend downloading SpyHunter to remove harmful programs for you. This may save you hours and ensure you don’t harm your system by deleting the wrong files. |
Remove Blinkweb.net Virus
If you have a Windows virus, continue with the guide below.
If you have a Mac virus, please use our How to remove Ads on Mac guide.
If you have an Android virus, please use our Android Malware Removal guide.
If you have an iPhone virus, please use our iPhone Virus Removal guide

Some of the steps will likely require you to exit the page. Bookmark it for later reference.
Reboot in Safe Mode (use this guide if you don’t know how to do it).

WARNING! READ CAREFULLY BEFORE PROCEEDING!
Press CTRL + SHIFT + ESC at the same time and go to the Processes Tab (the “Details” Tab on Win 8 and 10). Try to determine which processes are dangerous.
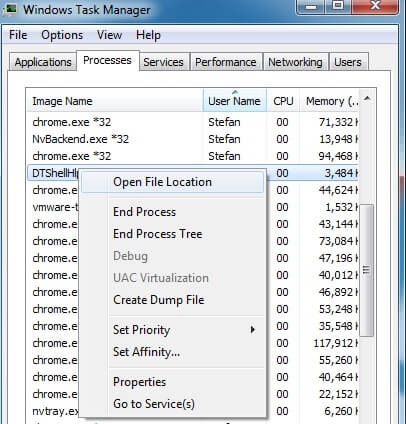
Right click on each of them and select Open File Location. Then scan the files with our free online virus scanner:

After you open their folder, end the processes that are infected, then delete their folders.
Note: If you are sure something is part of the infection – delete it, even if the scanner doesn’t flag it. No anti-virus program can detect all infections.

Hold together the Start Key and R. Type appwiz.cpl –> OK.
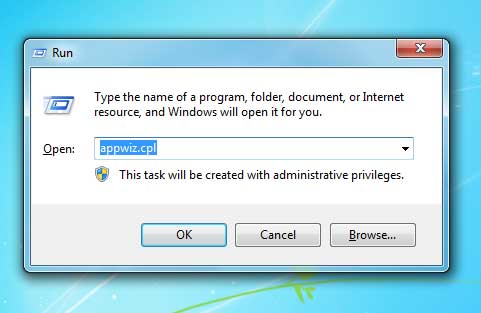
You are now in the Control Panel. Look for suspicious entries. Uninstall it/them.
Type msconfig in the search field and hit enter. A window will pop-up:
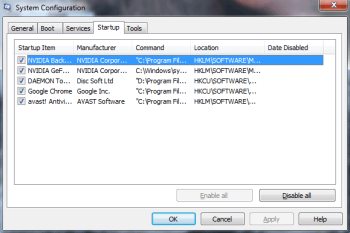
Startup —> Uncheck entries that have “Unknown” as Manufacturer or otherwise look suspicious.

Hold the Start Key and R – copy + paste the following and click OK:
notepad %windir%/system32/Drivers/etc/hosts
A new file will open. If you are hacked, there will be a bunch of other IPs connected to you at the bottom. Look at the image below:
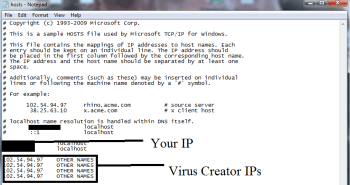
If there are suspicious IPs below “Localhost” – write to us in the comments.
Open the start menu and search for Network Connections (On Windows 10 you just write it after clicking the Windows button), press enter.
- Right-click on the Network Adapter you are using —> Properties —> Internet Protocol Version 4 (ICP/IP), click Properties.
- The DNS line should be set to Obtain DNS server automatically. If it is not, set it yourself.
- Click on Advanced —> the DNS tab. Remove everything here (if there is something) —> OK.
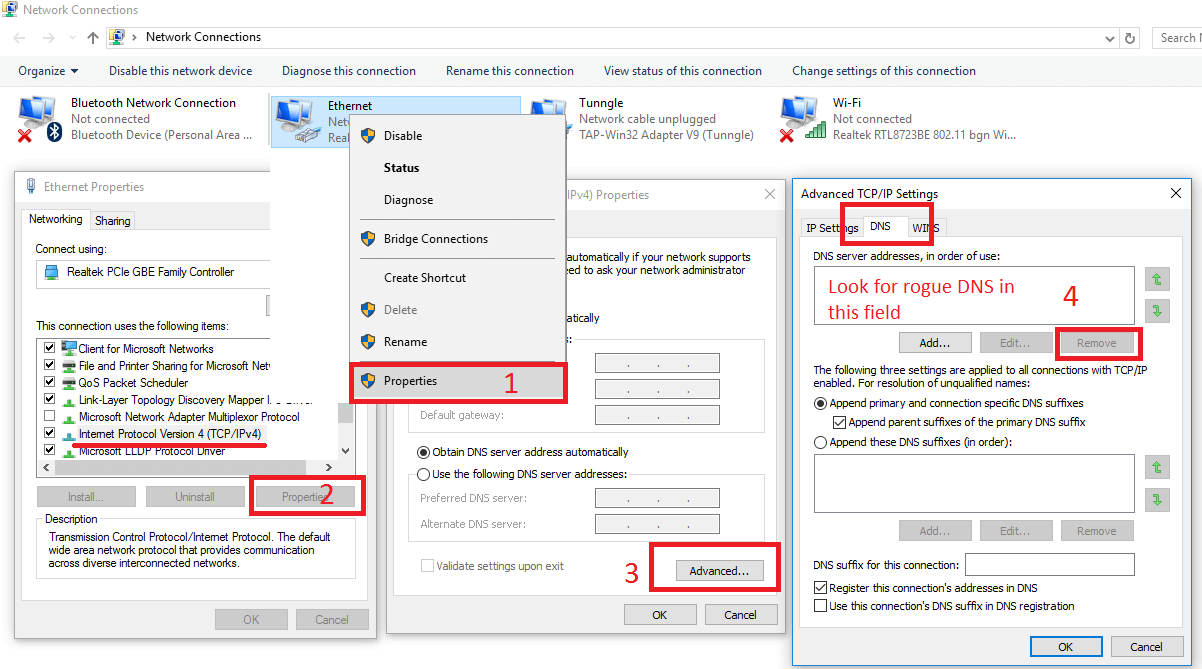

- After you complete this step, the threat will be gone from your browsers. Finish the next step as well or it may reappear on a system reboot.
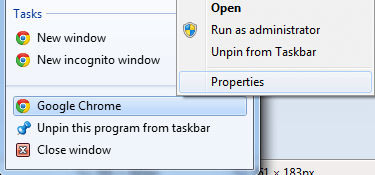
Right click on the browser’s shortcut —> Properties.
NOTE: We are showing Google Chrome, but you can do this for Firefox and IE (or Edge).
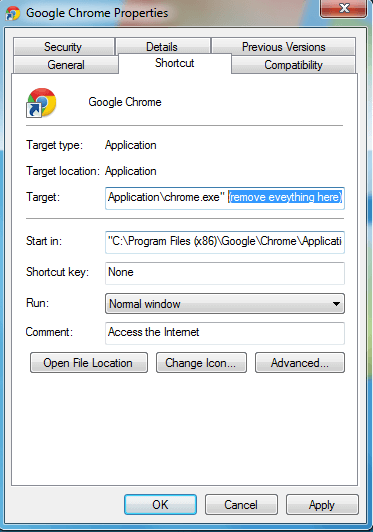
Properties —–> Shortcut. In Target, remove everything after .exe.
![]() Remove Blinkweb.net from Internet Explorer:
Remove Blinkweb.net from Internet Explorer:
Open IE, click ![]() —–> Manage Add-ons.
—–> Manage Add-ons.
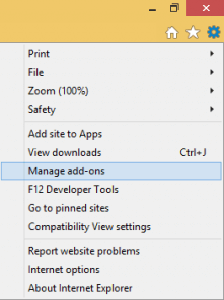
Find the threat —> Disable. Go to ![]() —–> Internet Options —> change the URL to whatever you use (if hijacked) —> Apply.
—–> Internet Options —> change the URL to whatever you use (if hijacked) —> Apply.
![]() Remove Blinkweb.net from Firefox:
Remove Blinkweb.net from Firefox:
Open Firefox, click ![]() ——-> Add-ons —-> Extensions.
——-> Add-ons —-> Extensions.

![]() Remove Blinkweb.net from Chrome:
Remove Blinkweb.net from Chrome:
Close Chrome. Navigate to:
C:/Users/!!!!USER NAME!!!!/AppData/Local/Google/Chrome/User Data. There is a Folder called “Default” inside:

Rename it to Backup Default. Restart Chrome.

Type Regedit in the windows search field and press Enter.
Inside, press CTRL and F together and type the threat’s Name. Right click and delete any entries you find with a similar name. If they don’t show up this way, go manually to these directories and delete/uninstall them:
- HKEY_CURRENT_USER—-Software—–Random Directory. It could be any one of them – ask us if you can’t discern which ones are malicious.
HKEY_CURRENT_USER—-Software—Microsoft—-Windows—CurrentVersion—Run– Random
HKEY_CURRENT_USER—-Software—Microsoft—Internet Explorer—-Main—- Random
If the guide doesn’t help, download the anti-virus program we recommended or try our free online virus scanner. Also, you can always ask us in the comments for help!

Leave a Reply