On some occasions, simply removing the extension that is causing the display of ads on your Mac could be enough to solve the problem so we will start with this and if it doesn’t work in your case you can always proceed with the more complex and time-consuming steps from the main section of this removal guide.
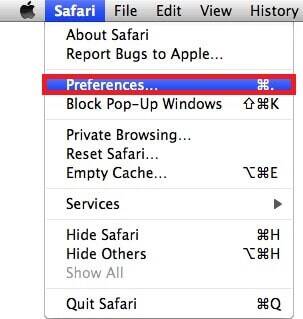
- Start your Safari browser, go to Preferences > Extensions and explore the different add-ons that your browser has.

- Look for extensions that look like they could be linked to the uncontrolled display of ads that you have been experiencing. For example, if a given extension has been added to your browser without your informed approval and/or if that extension has appeared in the browser not long before the ads started to spam you, then you are advised to delete said extension by clicking on its Uninstall button.
- In case you are not sure which of the extensions in Safari may be responsible for the ads, you can safely uninstall all of them without fear that this will affect the stability of your browser – no Safari extension is essential to the regular functionality of the browser. We would, however, suggest that you don’t uninstall them all at once and instead remove the extensions one by one so that you can determine which one is messing with the browser and causing ads and redirects to be generated in it.
- The last step from this troubleshooting method is to restart the computer as this is sometimes necessary for some changes in the system to take place. If after this nothing has changed and the ads are still bothering you and/or if the unwanted extension has returned to the browser without your permission, then it’s best to finish the rest of this guide manual.
![]()
On some occasions, the adware/hijacker app that’s spamming your browser with advertisements wouldn’t let you close the browser and will keep ad-displaying pages/browser tabs open on your screen. Since this may interfere with your attempts to remove the source of the, you should first close the browser before you move on to the next steps.
If you are unable to shut down Safari normally, you will have to Force Quite it. To do this, go to the Apple Menu and click on Force Quit. This will bring to your screen a window where all active apps are listed. From that list, click on Safari and then on the Force Quit option.
If even this fails to close the browsing program, restarting your Mac should do the trick.
![]()
WARNING! READ CAREFULLY BEFORE PROCEEDING!
Next, you must go to Finder/ Applications/ Utilities/ Activity Monitor and explore the different processes listed in there. Your goal is to find the process that is triggering the display of ads inside the browser. This may be tricky to accomplish but certain red flags such as a suspicious-looking process name or high amounts of Processor and RAM getting used by a certain unknown process may give away the one that is responsible for the ads. It may help if you Google the names of processes that you suspect in order to figure out if they are legitimate system-related ones or such that may be linked to the ongoing browsing disturbances.
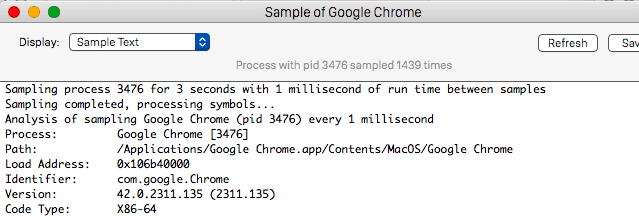
One other thing that you should try in order to find out if a given process is not supposed to be running is to highlight that process by selecting it and then click on the “i” button located at the top of the Activity Monitor window. This will show you a new window with information about the process and it it you must select the Sample option.

When a Sample file similar to the one below shows up on the screen, click on Save and save the file on your Desktop for quick access to it.

Next, drag the sample file to the scanner tool you will see below to scan it for malicious code. If our free online scanner flags the file as potentially dangerous, you must then return to the Activity Monitor and kill the process you sampled by selecting it and clicking on the Quit Process (or X) button at the top. After the process is stopped, delete the sample file by dragging it to Trash.

![]()
Now it is time to clean Safari from any data which may be linked to the ad-displaying app/process but before you do that, you must first Safe launch the browser. This means to start the browser without any previously opened sites loading in it. The easiest way you could do that is by holding the Shift button from your keyboard when normally opening the browser. If this doesn’t work and when Safari starts the ad-displaying pages load again, do the following:
First, Force Quit the browser in the same way you did in the first step and then disconnect the computer from the Internet. If your Mac’s Internet connection is through an Ethernet cable, simply plug out the latter. If you are using Wi-Fi, press and hold the Option Key, select the Wi-Fi located at the top of your screen, and click on Turn Wi-Fi Off. When you are done with the guide and want to bring back your Wi-Fi Internet connection, go back to that menu and this time select the Turn Wi-Fi On option. Another way of stopping your Wi-Fi is to turn off the router for the wireless network that you are connected to but we understand that you may not always have access to it or be permitted to turn it off.
After you are disconnected from the web, Safe Launch the browser again as we explained above.
![]()
Now, with Safari save-launched, you can proceed to clean the browser from any remnants of the ad-generating software. First, go to Preferences > Extensions and take another look at the items there. If the extension(s) that you have removed earlier has been automatically reinstalled in the browser, uninstall it again.

The next thing that must be done is to select the Privacy section in Preferences and then click on Remove All Website Data. In the next window, select Remove Now and wait for the deletion process to be completed. Data such as cached files and site cookies will get deleted but this will also log you out of your web accounts so before you delete the site data, be sure that you can later relog into your accounts.

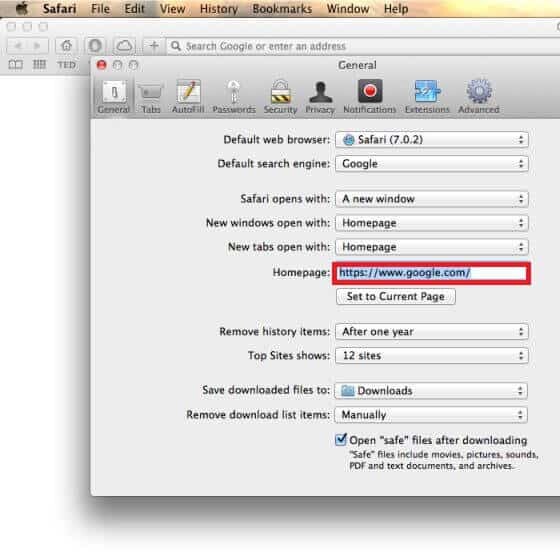
You must also check the homepage settings of Safari and restore you regular homepage if the latter has been replaced without your permission. You can do that by going to Preferences > General. In there, you will see the current address of your homepage and if it isn’t the one that you prefer, change it to what you want it to be.

Note that oftentimes the browser’s homepage is used to increase the number and frequency of the ads that users get spammed with and so if your homepage has been hijacked, this may be one of the reasons why you are constantly getting your browser’s screen covered by aggressive advertising messages and pop-ups.

Finally, select the History menu from the top and click on the Clear History button. A small box will open with history-clearing settings and there it is suggested that you choose the longest time period (from the beginning) so that all data that may be linked to the ad-generation would be removed from the browser. Click on Clear Browsing History and patiently wait for the procedure to be finalized – if you have never done this before, it might take a while so don’t get frustrated if you have to wait for a couple of minutes.
![]()
The ads that are bothering you may have also “infected” other browses that you may have on your Mac so it is important to clean those browsers as well.
![]() Removing ads From Firefox for Mac:
Removing ads From Firefox for Mac:
When in Firefox, open the browser’s menu and go to Add-ons/ Extensions. On that page, do the same like you did in Safari and find and delete all extensions (by clicking on their respective Remove buttons) that may be responsible for the unwanted spam with ads that you have been experiencing.

Next, you must clear the browser from any unwanted data related to the ad-triggering software and you can find more detailed instructions on that on this page.
![]() Removing ads From Chrome for Mac:
Removing ads From Chrome for Mac:
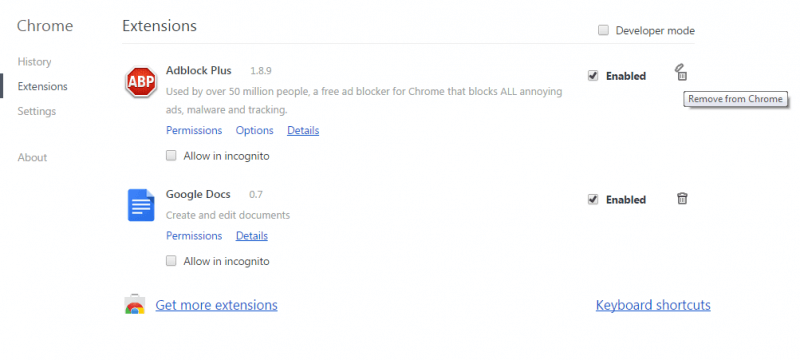
If you also have Google Chrome, open it, select the browser’s menu, click on More Options and go to Extensions. Once more, you need to find the extension items in the browser that could be behind the obstructive ads spam. Do the same like you did with the other browser(s) and remove the extensions that you suspect of having something to do with the disturbances you’ve been experiencing lately while browsing the web. To delete an extension from Chrome, simply click on this button ![]() next to the extension you want to remove.
next to the extension you want to remove.

After you are done with the Chrome extensions, open the main menu again, go to Settings/ Search/ Manage Search Engines and check what the browser’s current main search engine is. If it is some obscure and unfamiliar one, change it back to the search engine you’d like to be the browser’s default one. Otherwise, the search engine that has been installed without you permission may redirect you to sites and ads that are unsafe and you may eventually get the whole system exposed to very harmful and problematic threats if you accidentally click on a piece of web content that is intended to mislead you.
Finally, you must refresh Chrome by following the steps from this page – it should take only a couple of minutes to do that.
Final Notes
Hopefully, after you complete all of the instructions we’ve posted on this page for you, there should no longer be aggressive and obstructive ads inside your browser. However, remember that even if you didn’t manage to stop the ads with the help of our guide, you can always ask us to assist you by telling us about your problem in the comments. We will do our best to reply to you in a way that will help you resolve the problem that you are having with unwanted ads in your Mac browser.

Leave a Reply