![]()
*Source of claim SH can remove it.
Idle Buddy
Idle Buddy is a malware file, part of the malicious Idle Buddy Trojan that seeks to use the system resources of your PC for illegal cryptocurrency mining. The folder where Idle Buddy is normally found is either C:\Program Files or C:\Program Files (x86).
Usually, users don’t initially learn about the presence of Idle Buddy on their computer because this virus, unlike many other threats, doesn’t seek to cause direct damage to the system or do anything else that would immediately draw the victim’s attention. The goal of this Trojan is to secretly and silently operate on your computer and generate cryptocurrency without raising any red flags. In many cases, the thing that makes most people realize that they have the idle Buddy Trojan within their system is the slow-down of the computer performance caused by the excessive use of CPU, RAM, and GPU resources. One thing to note about Idle Buddy, however, is that it will typically use your computer’s resources only when the machine isn’t being used (while still turned on). In theory, this means that the malware could be in your PC for months and you won’t know about it unless you notice its process running in the Task Manager’s processes tab. Still, it is possible that idle Buddy tries to mine cryptocurrency even when your machine is being used by you, thus causing slow-downs and performance issues that may draw your attention to the malware’s presence in the system.
It is also worth noting that some users find out about the presence of Idle Buddy right away, as soon as it gets installed. In those cases, the user may think that Idle Buddy would be mining cryptocurrency for them and that they could benefit from it. The truth, however, is that there’s little to no benefit to be had from this app – any cryptocurrency it makes goes to its creators and even if there are any rewards for the user (the Trojan app promises the users rewards), those would certainly not be worth keeping this malware on the computer and allowing it to use up its resources while also, potentially, exposing it to additional malware threats (more on that in a moment).
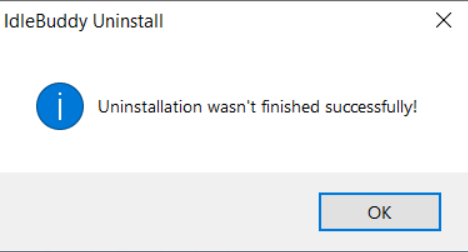
Idle Buddy won’t uninstall
If Idle Buddy won’t uninstall on your computer when you try to remove it from the computer, this means that the malware has made some changes in the system that prevent its removal. To uninstall Idle Buddy, you’d first need to revoke those changes.

One of the main problems users have once they already know Idle Buddy is in their system is successfully removing the malware. Uninstalling it from its uninstallation wizard (if it has one in your case) or from the Control Panel may not always work because malware apps like it tend to introduce various changes to different parts of the system in order to stay active on the computer for longer and make their removal as difficult as possible for the user. Making such changes in the system is behavior typical for unwanted software and malware and one additional reason why you should do your best to eliminate Idle Buddy ASAP.
After the current article, you will find a guide where you will be presented with detailed removal steps that should help you rid your PC of the Idle Buddy Trojan. However, it’s preferable if you already have some experience troubleshooting malware problems if you want to go for the manual removal steps. If you don’t think you can complete the guide on your own, there’s another removal option – an advanced and powerful anti-malware program linked inside the guide. This tool can greatly quicken and ease up the process of revoking any changes that Idle Buddy may have made in the system and then deleting it so go ahead and give it a try if you are interested.
The Idle Buddy virus
The Idle Buddy virus is the part of the Idle Buddy app that operates without your permission and drains your PC’s resources for the benefit of its creators. The Idle Buddy virus must not be removed ASAP to restore your system’s security and avoid damage.
In addition to exploiting the resources of your PC, this virus can have other adverse effects on your system if allowed to stay in it. Even though we mentioned that Idle Buddy isn’t supposed to damage your computer, it could expose it to harm in other ways. Its presence in the system could lead to the installation of other malware on the computer without your knowledge. For instance, Idle Buddy may get a browser hijacker or an adware extension added to your browser, which is why we have also added instructions for how to clean your browsers in addition to the ones that show how to delete Idle Buddy from your PC.
Additionally, Idle Buddy could collect personal data about you from your PC and transmit it to the hackers and there’s no telling how the latter may use the data they’ve gathered. The very fact that Idle Buddy is able to execute tasks and make changes in your machine that you have not permitted is enough of a reason to want to remove this threat even if we ignore the fact that it is also continuously exploiting the system’s resources.
What is Idle Buddy?
Idle Buddy is a malware program that seeks to use the resources of your computer for cryptocurrency mining. If Idle Buddy is on your computer, it would consume large amounts of RAM, CPU, and GPU in order to mine Bitcoins, Dask, Monero, and other cryptocurrencies.

Idle Buddy’s main goal is to make money for its makers by creating a huge network of machines that are all mining a certain type of cryptocurrency that goes to the people behind the Trojan. Again, it is unlikely that this activity will directly harm your system but the fact is that there’s a malware app installed on the computer and it is doing something that it hasn’t been allowed to which is why it’s removal is the only viable course of action. Speaking of removal, it is now time to show you our detailed guide on how to remove Idle Buddy and we suggest you follow it if you currently have this Trojan in your system.
SUMMARY:
*Source of claim SH can remove it.
How to Uninstall Idle Buddy
To uninstall Idle Buddy, you can try finding it and removing it from your Control Panel in the following way:
- Select the Control Panel icon from the Start Menu.
- Click on the Uninstall a Program button from the Control Panel window.
- Find Idle Buddy in the list of programs that appears on your screen and select it.
- Select Uninstall from the top of the window and follow the uninstallation prompts.
- If the uninstaller asks you if you want to keep the personalized settings, select No.
If you are lucky, this should get Idle Buddy removed and you won’t need to spend more time trying to get rid of it. If you aren’t allowed to uninstall it, cannot find its entry in the Uninstall a Program list, or still notice the symptoms of the malware, please follow the next steps.
Before you begin, we suggest you bookmark this page to find it easier later because some of the next steps will require that you restart the computer or the browser. You can also open the page on your phone so that you can look at the instructions from another device while completing them on your PC.

For this first step, you must enter Safe Mode on your computer to prevent the malware from interrupting its uninstallation. Follow the link we’ve provided to go to a guide where you can learn how to access Safe Mode.

WARNING! READ CAREFULLY BEFORE PROCEEDING!
*Source of claim SH can remove it.
- Go to your Task Manager (Ctrl + Shift + Esc) and open Processes – there, you must find the Idle Buddy process. 2.
- If you don’t see a process with that name, look for other processes that have unusual and/or unfamiliar names. A big red flag that should tell you that a given process may be from the malware is if the process is using up lots of RAM and CPU as shown in the Task Manager.

- If you find the Idle Buddy process or another suspicious process, right-click on it and select Open File Location.
- Use the next online scanner to test the files in the file location folder for malware:
Each file will be scanned with up to 64 antivirus programs to ensure maximum accuracyThis scanner is free and will always remain free for our website’s users.This file is not matched with any known malware in the database. You can either do a full real-time scan of the file or skip it to upload a new file. Doing a full scan with 64 antivirus programs can take up to 3-4 minutes per file. Drag and Drop File Here To Scan
 Analyzing 0 sEach file will be scanned with up to 64 antivirus programs to ensure maximum accuracyThis scanner is based on VirusTotal’s API. By submitting data to it, you agree to their Terms of Service and Privacy Policy, and to the sharing of your sample submission with the security community. Please do not submit files with personal information if you do not want them to be shared.
 - If a file is detected as malicious, it likely means that the process is also harmful so right-click on it again, and select End Process Tree.
- Delete all files in the File Location folder and then the folder itself. If one or more files cannot be deleted, delete the rest and go to the next step.
After you have completed all of the steps from this guide, you must remember to go to the File Location folder again and delete it alongside the remaining files in it if you weren’t able to delete that folder earlier.
How to remove Idle Buddy?
To remove Idle Buddy, you must run its uninstallation wizard and follow its prompts.
- Press the Windows key and the R key from your keyboard.
- Type appwiz.cpl in the Run box and hit Enter.

- Find the entry for Idle Buddy, select it, and click on Uninstall.
- Follow the on-screen steps and make sure that you set the uninstaller to delete everything (including the personalized settings).
- Restart your PC after the uninstallation process is complete.
- Even if Idle Buddy didn’t get removed after the first time you tried to uninstall it from the Control Panel, it is important to try that again once you are in Safe Mode and have deleted the files in the process file location.

- Open the Run window again, type mscongif and press the Enter key.
- Go to the Startup section and look for suspicious items in it or ones that are named Idle Buddy.
- Remove the ticks from all items you deem suspicious and click on Apply.

- If there are startup items that have a manufacturer listed as unknown, uncheck them too unless you know they are from trusted programs.
- Lastly, click on OK to confirm the changes and to exit the System Configuration window.

*Source of claim SH can remove it.
- Paste the following line under the Start Menu and open the first file that shows up in the results: notepad %windir%/system32/Drivers/etc/hosts.
- If there are any strange IP addresses, rules, or other lines of text written right below LocalHost in the notepad that opened (“Hosts”), copy those lines of text and place them down below in the comments.
- After we examine the text, we will tell you if it’s from the virus and in case it is, you will have to delete that text from your Hosts file.

- After you have deleted the malicious IPs from Hosts, press Ctrl + S to apply and save the changes and then exit the file.
- Next, type Network Connections in your Start Menu and press the Enter key.
- With the right button of the mouse select the network that is currently in use and go to Properties.
- In the Properties window, from the list of items, select Internet Protocol Version 4 (ICP/IP) and click on Properties.
- Check the Obtain DNS server address automatically if it’s currently not checked and then go to Advanced.
- Open the DNS tab in Advanced and, if there are items in the list of servers, select them one by one and click on Remove to delete them.
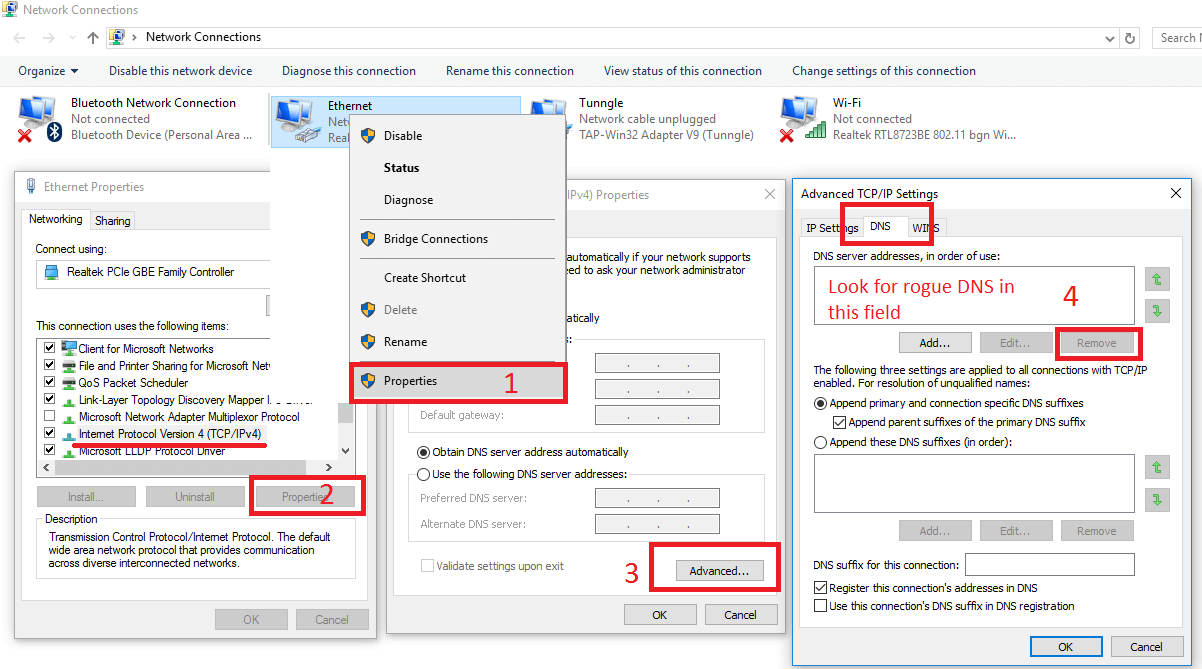
- Finish this step by clicking on OK on all the windows that are currently open on your screen.

If Idle Buddy has made any changes in your browser or has installed in it a browser hijacker or an adware extension, then you must clean the affected browser. Here is how can do that for the Google Chrome, Firefox, and IE browsers.
- Go to the icon of the main browser and right-click it.

- Select Properties and go to the Shortcut tab.

- Click in the Target field and delete anything written in it after “.exe“.
- Click on OK and repeat these steps for all other browsers installed on your PC.
The next steps are browser-specific so apply them to the respective browser if you have that browser on your computer.
![]() Remove Idle Buddy from Internet Explorer:
Remove Idle Buddy from Internet Explorer:
- Open IE and select the small gear button
 in the upper-right corner.
- Go to Manage Add-ons and look at the different attachments the browser has.
- If any of the attachments there seem unwanted or related to Idle Buddy, delete them.
- Next, from the gear icon menu , select Internet Options.
- If the current address of the browser’s homepage has been enforced by Idle Buddy and it isn’t the homepage address you’d prefer, change it to an address that you’d like to be your browser’s homepage.
- Click on Apply, exit the browser, and start it again to see if the problem is resolved.
![]() Remove Idle Buddy from Firefox:
Remove Idle Buddy from Firefox:
- Start Mozilla Firefox, select the three parallel lines
 in the top-right, and go to Add-ons.
- Remove the unwanted or unfamiliar Firefox add-ons as well as those that you don’t remember installing yourself.
- From the three lines menu , go to Options, type clear in the search bar in the options page, and click on Clear Data.
- Make sure that the two checkboxes are ticked and click on Clear.
![]() Remove Idle Buddy from Chrome:
Remove Idle Buddy from Chrome:
- In the Chrome browser, click on the three dots below the exit button and go to More Tools > Add-ons.
- In the Add-ons page, find and delete any unwanted, unneeded, or unfamiliar add-ons.
- If an add-on refuses to get removed, first click on the toggle button below it to disable that add-on and then quickly select Remove again to delete the add-on.
- Close the browser and go to the following folder on your computer: C:\Users\*Username folder*\AppData\Local\Google\Chrome\User Data.

- In that location, find a folder named Default and rename it to Backup Default.
- Exit everything, restart your PC, open Chrome and check to see if the issues have been resolved.
- Open Run for a third time during this guide and type regedit.
- You will be asked to allow the next program to make changes in the system so click on Yes (you must logged in with an Admin profile).
- Press Ctrl + F in the Registry Editor and type Idle Buddy.
- Click on the Find Next button and wait for the search to find the first item with that name.
- If an item with the Idle Buddy name is found, select that item, press Del, and click on Yes.
- Repeat substeps 4 and 5 until the Registry is cleaned and there are no more items with the name of the malware.
- From the left panel of the Registry Editor, navigate to the following directiories:
- HKEY_CURRENT_USER/Software/Random Directory.
- HKEY_CURRENT_USER/Software/Microsoft/Windows/CurrentVersion/Run/Random
- HKEY_CURRENT_USER/Software/Microsoft/Internet Explorer/Main/Random
- In those directories, look for odd-looking folders that have names that stand out from the rest – names that consist of long strings of randomized letters and/or numbers – if you find any such folders, delete them.
- Important!: If you don’t know if you should delete an entry in the Registry Editor because you are not sure it is linked to the Trojan, we strongly advise you to tell us about it in the comments so that we can give you information about that entry and let you know if it should indeed be deleted. Do not delete anything you are not certain about or you’d risk damaging your system!
Once this final step is complete, remember to go to the file location from Step 2 and delete the folder along with any files that may have been left in it.
Leave a Reply