Doktox.com is a browser hijacker engine that takes over user settings and enforces a ‘managed by organization’ state. This page is dedicated to removing it and any other rogues extensions/apps associated with it. The only thing we can confirm is that the guide will work. But you have to follow it to the letter. Good luck!

Doktox Removal Tutorial
Begin with basic fixes. These will typically not rid you of the hijacker, but it’s still worth the shot. You might end up getting lucky and saving yourself some 30 to 60 minutes of going through the advanced steps we’ve provided below:
- Open your browser. Access its menu and open Settings.
- Navigate to the Extensions/Add-ons manager and examine the list for unfamiliar or suspicious extensions.
- Remove any dubious extensions if they have a Remove button (it’s possible that they don’t).
- Proceed to the Privacy and Security > Site Settings. Check the Pop-ups and Notifications permission categories.
- Search for them for URLs related to Doktox or any unknown websites and delete anything you find.
- Restore your preferred default browser search engine from the Search Engine settings.
Now restart your PC, re-open the browser, and evaluate the situation. Is Doktox still there? No worries – just move on to the next steps.
SUMMARY:
| Name | Doktox.com |
| Type | Browser Hijacker |
| Detection Tool |
Some threats reinstall themselves if you don’t delete their core files. We recommend downloading SpyHunter to remove harmful programs for you. This may save you hours and ensure you don’t harm your system by deleting the wrong files. |
The main distribution vector for hijackers like Doktox is other rogue apps that users install on their PCs. These apps may reintroduce the hijacker to your browser, so they must be deleted too. However, we have no idea what particular application got you Doktox, so we can’t offer you instructions on how to delete it.
For this reason, we advise you to use a reliable anti-malware tool in combination with the current guide to ensure that Doktox isn’t allowed to return after you remove it. The tool we choose for this task is SpyHunter 5 and you can find it on the current page if you are interested in giving it a try.
How to Get Rid of the Doktox Virus
A rogue third-party policy introduced by Doktox into your browser is what’s probably stopping you from directly removing the hijacker. If you see the “Managed by your organization” message anywhere in the browser, this means such policy is indeed present and you must remove it:
If you are a Google Chrome user, type chrome://policy into the browser’s address bar and go to the address.
For other Chromium-based browsers, just replace “chrome” with the appropriate name, like edge://policy for Microsoft Edge.
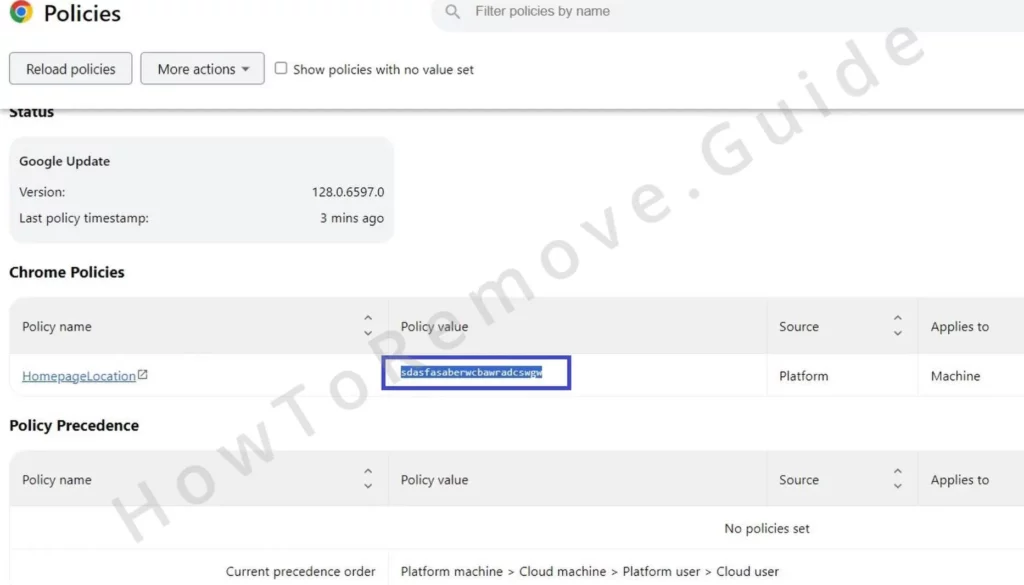
This page reveals policies affecting your browser’s behavior. Look for ones with values that look like random sequences of letters.
Policies with such values are likely introduced by the hijacker. Copy these values into a Word file or a sticky note because you’ll need them shortly.
Now you must revisit the Extensions Manager to gather more relevant information. The problem is that Doktox may prevent you from going there by redirecting you to Google or another site. Here’s the workaround:
Locate the extensions folder for your browser: For Chrome on Windows, it’s found at C:\Users\[Your Username]\AppData\Local\Google\Chrome\User Data\Default\Extensions.
The paths for other popular browsers are as follows:
- Microsoft Edge:
C:\Users\[Your Username]\AppData\Local\Microsoft\Edge\User Data\Default\Extensions - Opera:
C:\Users\[Your Username]\AppData\Roaming\Opera Software\Opera Stable\Default\Extensions - Brave:
C:\Users\[Your Username]\AppData\Local\Brave Software\Brave-Browser\User Data\Default\Extensions
Once you get to the respective extensions folder for your browser, delete all subfolders contained in it. They hold the data for your various extensions, including the rogue one(s).
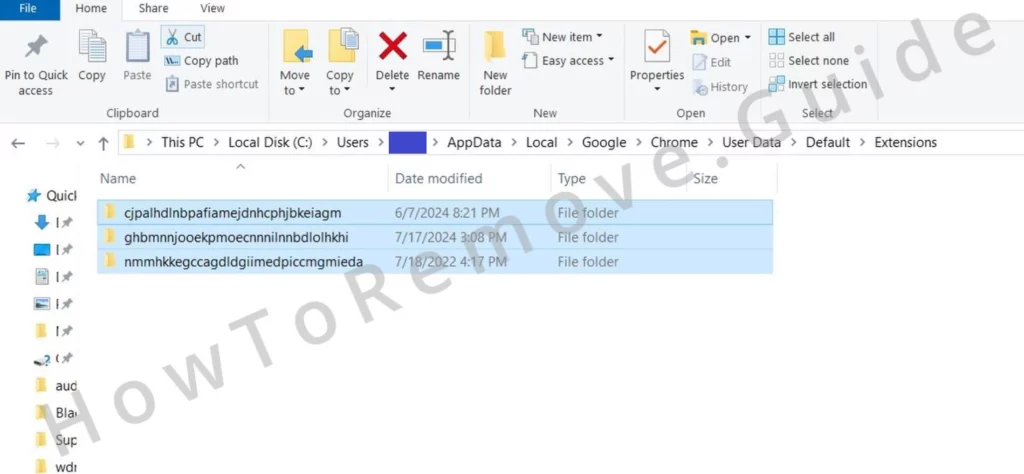
Once you delete it, all extensions will get corrupted, but don’t worry about the ones you want to keep. You can restore them very easily by simply clicking the Repair button that will appear under them the next time you try to use them.
Once all extensions folders are deleted, the Extensions Manager should now be accessible, so go to it. Toggle on the Developer Mode button to reveal the IDs of the different extensions. Now copy the ID for the hijacker add-on and save it in the same file as the rogue policy values from earlier.
Delete Doktox Malware Registry Keys
You must now go to the Registry Editor and clean it from hijacker keys using the info you gathered during the previous stage of the removal guide. Here’s how to do that:
Bring up the Run dialog using the Win + R keyboard combination, then type regedit, and press Enter. This opens the Registry Editor, where you must be careful not to delete something you aren’t supposed to because this can cause further problems in the system.
You must now search the registry for the policy values and extension IDs from earlier. Press Ctrl + F to open up the search bar, paste the first saved value in it, and click Find Next.
Delete the entire key containing the item that gets found. The registry keys are the folders you see in the left panel of the Editor’s window.
Perform multiple searches for each search query. The registry may contain several related entries, but a single search will only show one relevant key. So, after deleting a key, search again to ensure no remnants remain. Thoroughness is key in this process.
You must do this for all of the values and IDs that you noted down earlier and ensure nothing linked to them is left in the Registry.
The hijacker might try to block your attempts at cleaning the registry by restricting access to the keys it has created. This is why you may be forbidden from deleting certain keys, but there’s an easy fix:
Right-click the parent key of the one with the restricted access and open “Permissions“.
Click Advanced, then click Change, and type Everyone in the text field. Click the Change Names button and then click Apple and OK.
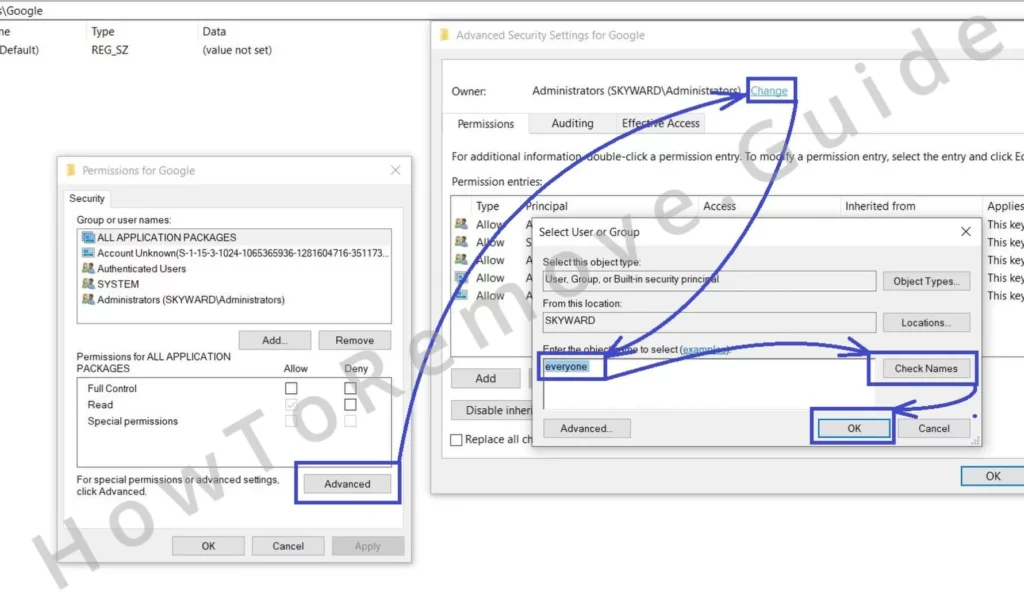
There should be two new “Replace…” options in the previous window. Check them both, then click Apply and OK again.
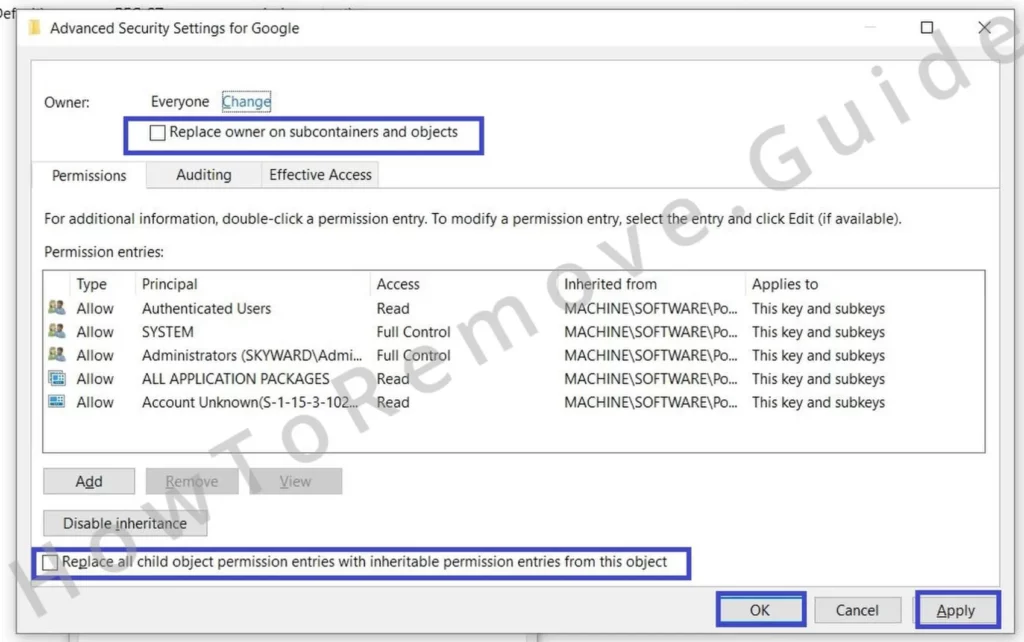
This will grant you access to the problematic key and allow you to delete it.
Other Methods to Get Rid of Doktox Browser Policies
If registry cleanup isn’t enough, try the Group Policy Editor. Just search for it in the Start Menu search bar and open it.
Find the Administrative Templates folder under Local Computer Policy > Computer Configuration, and right-click it.
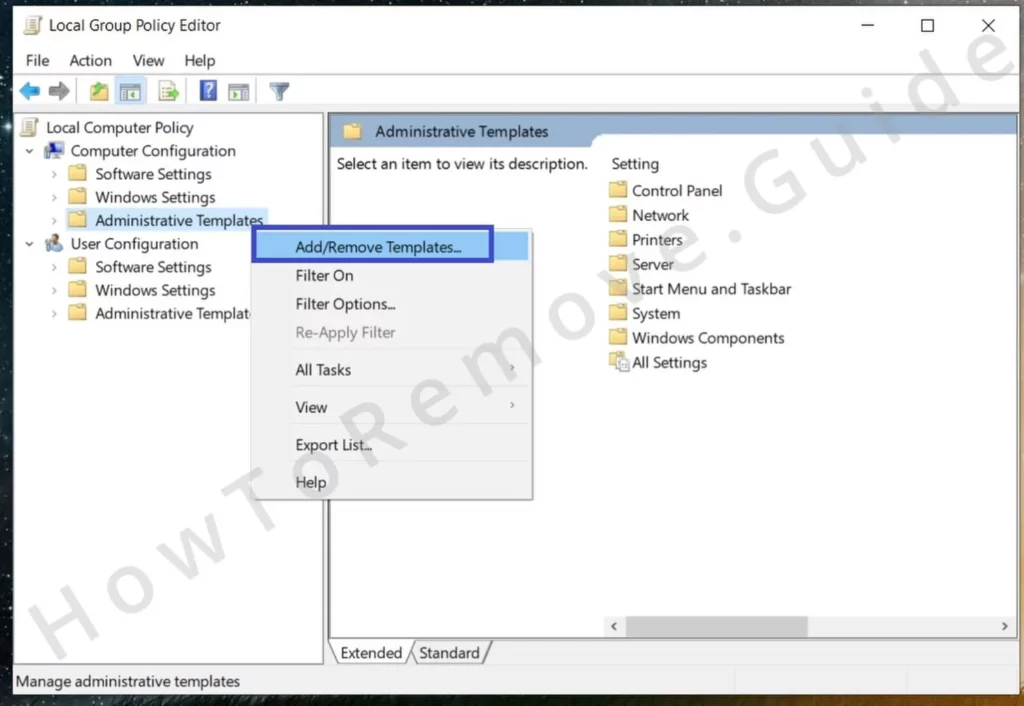
Select the Add/Remove Templates option and delete any policies not added by you.
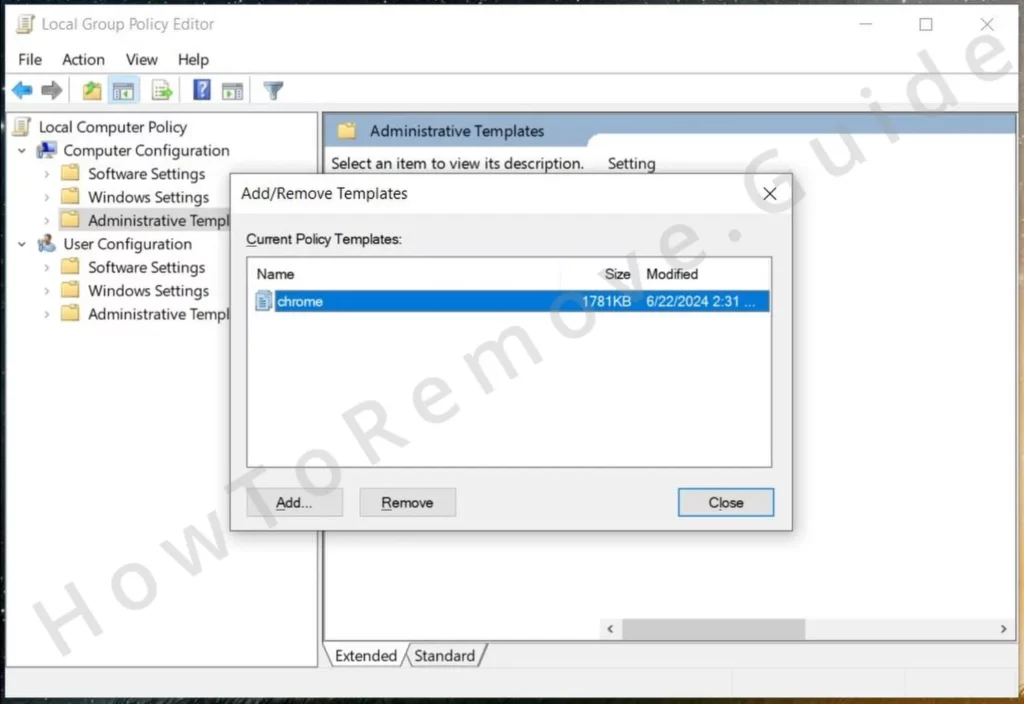
If you are struggling to clear the Chrome browser, there’s an extra option. Download the free Chrome Policy Remover utility and run it with administrative rights.
This might trigger a warning from Windows but no need to worry – the program is safe. Click on More Info =in the warning window and this will give you the option to run the Chrome Policy Remover.
The tool will then proceed to automatically reset Chrome’s policy settings and will delete any remaining policies.
How to Uninstall the Doktox Extension From Chrome, Edge, and Other Browsers
Once you’ve successfully dealt with the rogue policies, deleting Doktox from your browser and restoring it to its normal state is actually very easy.
First, reopen the extensions page and ensure all unwanted extensions are finally removed.
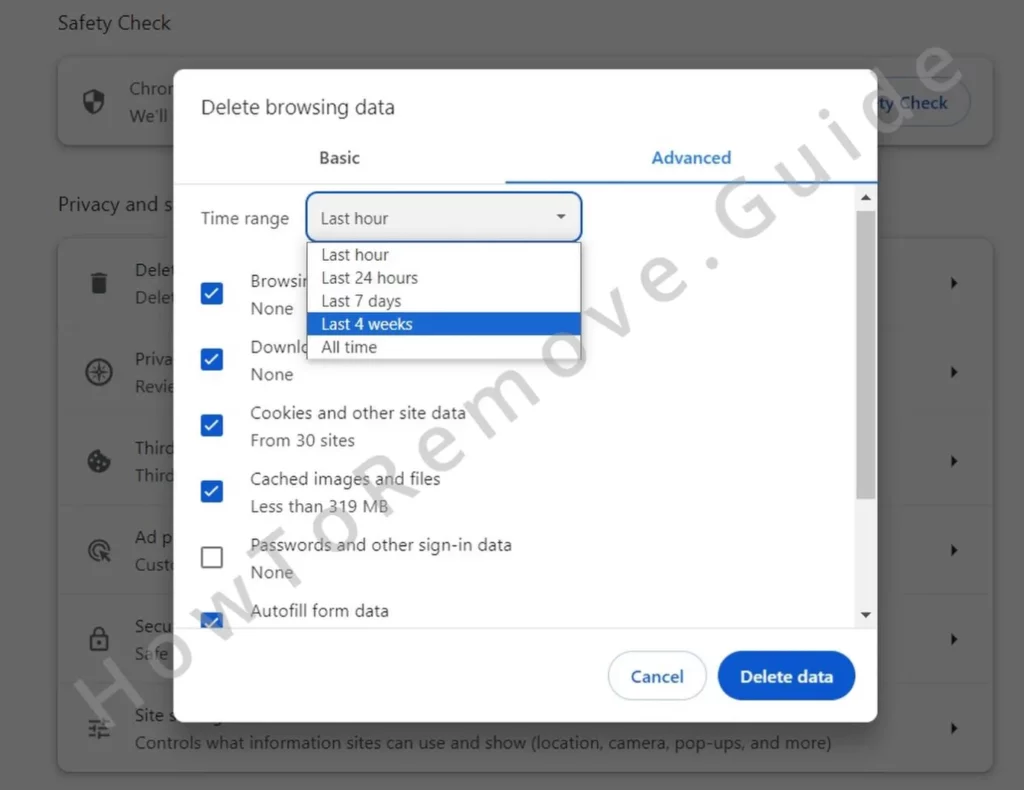
Then navigate to the browser’s settings page and open the Privacy and Security tab. From there, clear your browsing data. All data, including cached images, cookies, and site settings must be deleted. Leave only your saved passwords intact so you won’t have to manually re-enter them later.
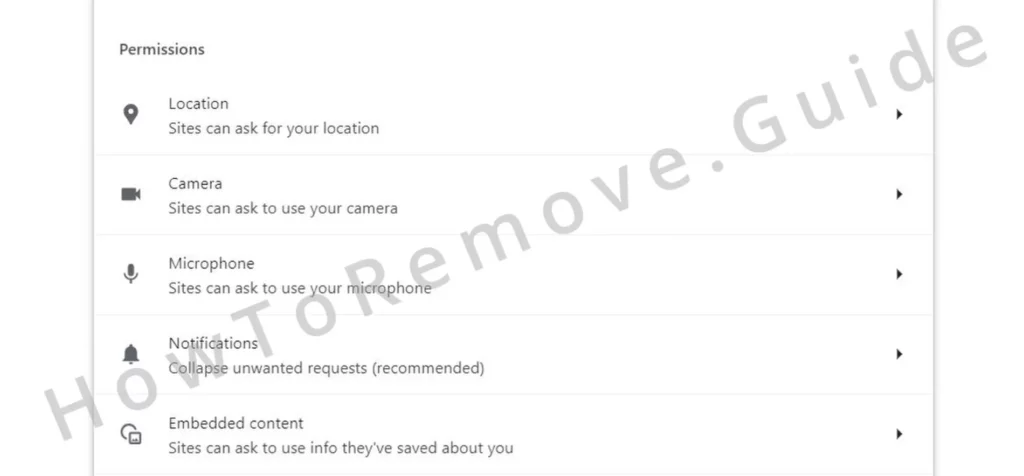
Also, review the Site Settings in the Privacy and Security tab. Check each permission category and look out for unfamiliar URLs listed under Allow. If you notice any, click the three dots next to them and select Block.
You must also check the Search Engine section and reset your default search engine to a trusted provider like Google, Bing, DuckDuckGo, etc. Hijackers often change this setting to redirect searches through their platforms.
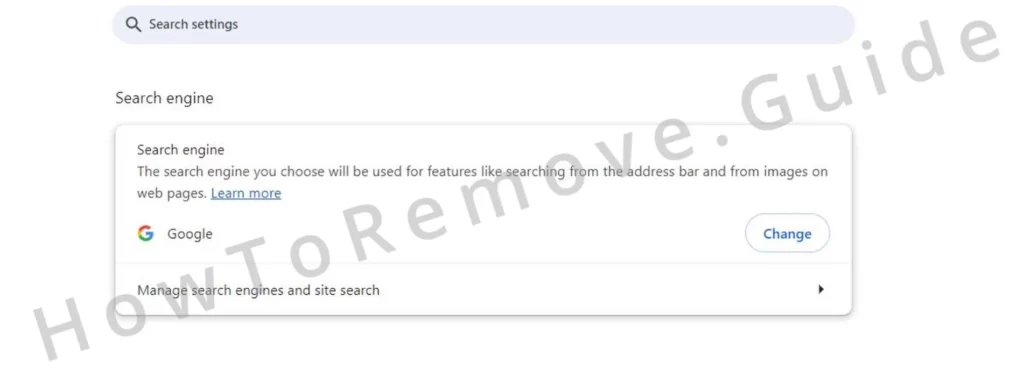
To ensure there are no rogue search engines left in the browser, also click the Manage Search Engines button, and then delete everything suspicious or unfamiliar that you find on the other side.
Finally, you must also pay a visit to the Startup and Appearance settings. Again, if you see any untrusted or unfamiliar addresses in them, delete those without hesitation.

Leave a Reply