HyperSearch is yet another example of an unwanted extension for Chrome, Edge, and other Chromium browsers. Like the Loungoo Extension, Mobility Search, and other similar browser hijackers, it changes the settings of the browser and introduces a rogue third-party policy without the user’s permission.
This rogue extension will often change the default search engine and redirect your searches to modified SERPs that are designed to promote various sites, potentially including ones that may be unsafe.
A “Managed by your organization” message in the browser often accompanies the HyperSearch hijacker extension. This message indicates that a third-party policy was added to the browser that will prevent you from reversing any changes made to its settings by the rogue app. We can help you deal with this obstacle and remove HyperSearch, together with anything else it may have introduced into your browser.
HyperSearch Removal Tutorial
We don’t want to waste your time, so if there’s any chance to get rid of HyperSearch quickly, we suggest you give it a try. The following quick instructions won’t work in most cases but if they do for you, this can save you a lot of time:
- Open your browser, navigate to its menu, and open Settings.
- Go to the Extensions page where you should find the HyperSearch extension or some other rogue add-on linked to the hijacker.
- Click the Remove button of any unwanted add-ons you see if such a button is available.
- Close the browser and re-open it to see if everything’s back to normal.
As we said, most of the time you’ll either be unable to perform these steps or they will simply not be enough. Still worth the shot.
SUMMARY:
| Name | HyperSearch |
| Type | Browser Hijacker |
| Detection Tool |
We tested that SpyHunter successfully removes HyperSearch* and we recommend downloading it. Manual removal may take hours, it can harm your system if you re not careful, and HyperSearch may reinstall itself at the end if you don’t delete its core files. |
What makes the HyperSearch hijacker difficult to get rid of is mainly the fact that it has likely introduced a rogue “Managed by Your Organization” policy into your browser as well as made changes in several system locations.
All this allows it to gain persistence and either reinstall itself after you’ve seemingly taken care of it or outright block the option to remove it. In either case, a thorough browser and system cleanup is in order before you can hope to eradicate this annoyance.
If the hijacker continues to bother you, you must perform the next steps exactly as they are shown and not skip any of them. Otherwise, HyperSearch may manage to evade your removal attempts.
How to Get Rid of the HyperSearch Virus Policies in Chrome
The HyperSearch hijacker injects rogue policies into your browser as its main persistence mechanism. These don’t just tweak settings, but seize control of the browser and prevent you from modifying many of its settings (the ones that HyperSearch has already changed). If you see “Managed by your organization” anywhere in the browser, it means there’s a rogue policy. To remove it, you must first gather some info:
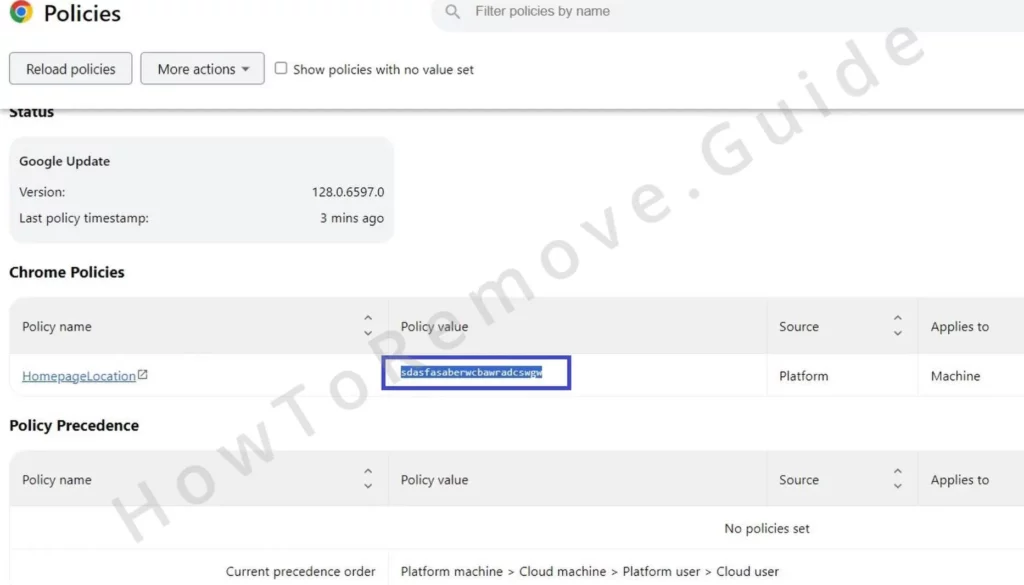
Open the compromised browser and go straight to the policy management page. Use the correct URL for your respective browser: “chrome://policy” for Chrome, "edge://policy” for Edge, “brave://policy” for Brave, etc.
On the policies page, look closely at what’s listed there. If there are any values that look like strings of random characters, they are likely linked to HyperSearch.
You must copy and save them somewhere because you’ll need them in a bit.
Next, you’ve got to visit the browser’s Extensions Manager (browser menu > Settings > Extensions).
It’s possible that the hijacker tries to block you from going there by redirecting you to a different page (for example, Google).
If that happens, directly go to the Extensions folder in your file system, located in C:\Users\[Your Username]\AppData\Local\Google\Chrome\User Data\Default\Extensions. Once there, delete the entire contents of the folder.
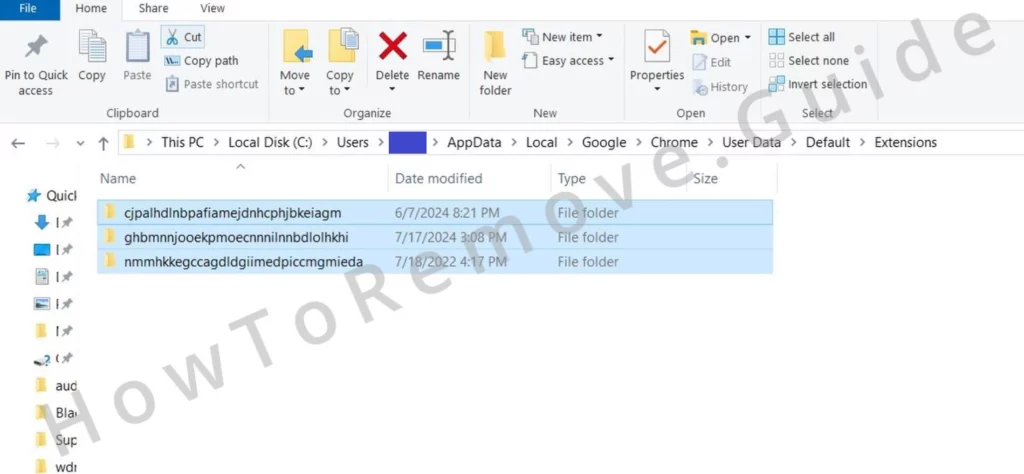
This action will “break” all your extensions, but the ones you want to keep can be restored easily.
After you’ve cleared out the extensions folder, return to the Extensions Manager.
Enable Developer Mode. This will show you the IDs of all extensions. Copy and save the IDs of the ones you want to delete, including the HyperSearch extension.
IMPORTANT NOTE!
The hijacker might not be working alone. Another piece of malware has likely brought it to your PC, so deleting rogue extensions might not be enough. If the original malware lingers, the hijacker could return.
We don’t know the exact source of HyperSearch because it could be anything, and we can’t provide specific instructions for every possible threat. For this reason, we recommend using a trusted anti-malware tool like SpyHunter. You can find SpyHunter on this page and use it to hunt down and delete any hidden malware.

How to Delete HyperSearch Entries From the Registry
Now it’s time to delve into the system’s registry. You can access by searching for it in the Start Menu. Just make sure to open it with Admin privileges.
Once inside, search for each rogue policy value and ID. Delete corresponding registry keys on the left-hand side. Every entry, every key.
After each deletion, search again. Make sure nothing lingers.
It’s possible the hijacker blocks access to certain registry keys, but there’s an easy fix:
Right-click on the parent key. Open Permissions > Advanced > Change. Type “everyone” as the user.
Click Check, then OK.
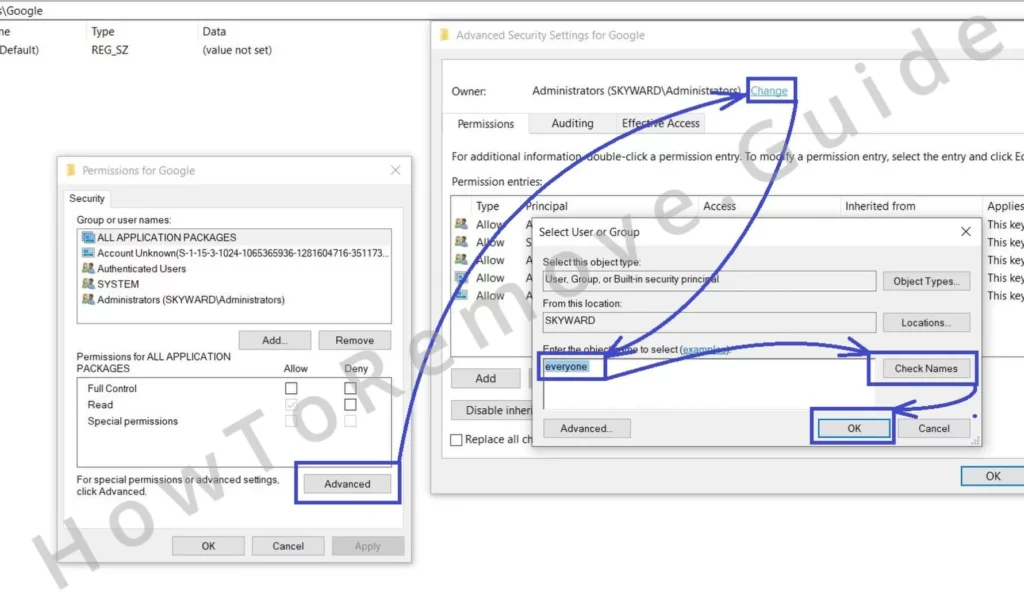
Enable the two “Replace…” options and apply the changes.
Now you can delete those sub-keys – go ahead and eliminate them.
Bonus Ways to Delete Rogue Browser Policies
If the “Managed by Your Organization” message is still in the browser, you can do this to get rid of it:
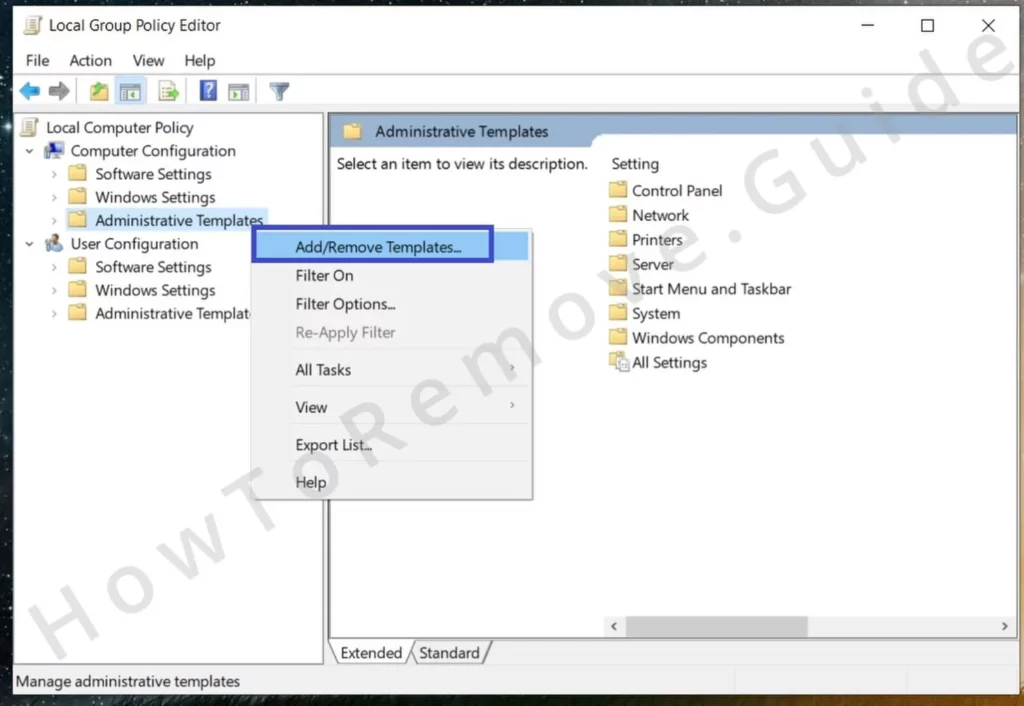
Search “Edit Group Policy” in the Start Menu and then right-click on Administrative Templates.
Click the Add/Remove option and delete everything unfamiliar. If you’ve never added any policies to your browsers, just delete everything.
If you are a Google Chrome user, we also recommend using the Chrome Policy Remover. This free tool automatically removes all Chrome policies, including rogue ones introduced by hijackers like HyperSearch.
Download and run it with administrative privileges. Windows might warn you, but don’t worry, the tool is safe.
Just click the More Info option and then the Run option if you get a warning. The tool will automatically run a policy removal script, after which your browser should be free from any rogue policies.
How to Uninstall the HyperSearch Extension From Your Browser
Finally, you should now be able to clean your browser without facing any resistance.
Open the browser and first revisit the Extensions tab. Delete any extensions linked to the hijacker.
Then clear your browsing data by going to Settings > Privacy and Security > Delete Browsing Data. Adjust the timeframe so that it includes the date when the hijacker first appeared.
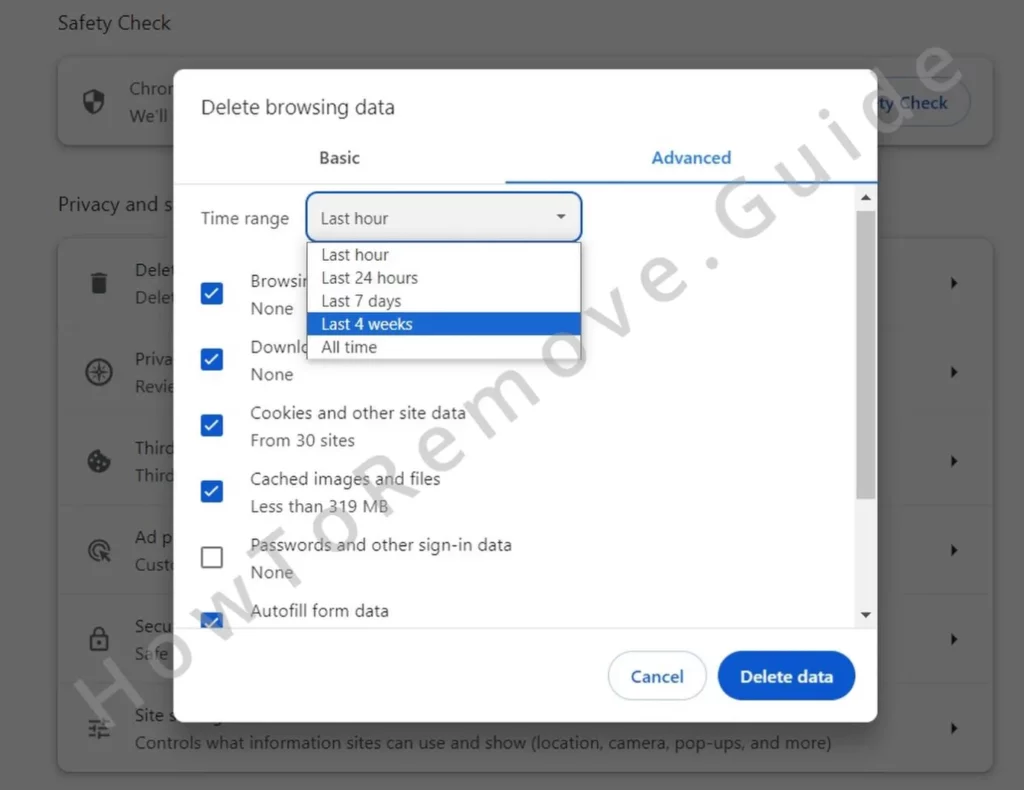
Delete all data types shown in the Advanced tab: Cached images, cookies, site data, etc. Leave only Passwords untouched if you don’t want to re-enter them manually the next time you visit a site where you are registered.
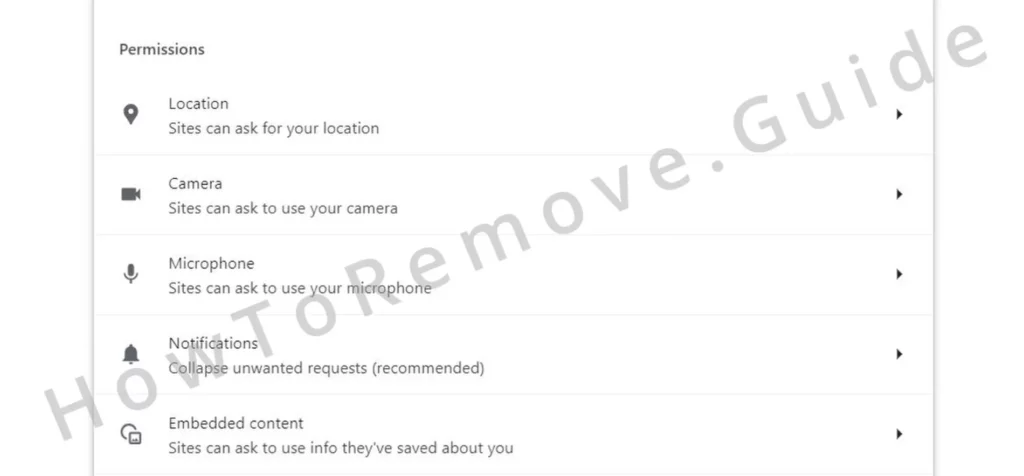
Review Site Settings in Privacy and Security. Remove unfamiliar URLs from the Allowed section of each permission type (you must check all permissions for rogue URLs).
Next, visit the Search Engine tab to make sure your default search engine is a trusted one like. Google or Bing are good options.
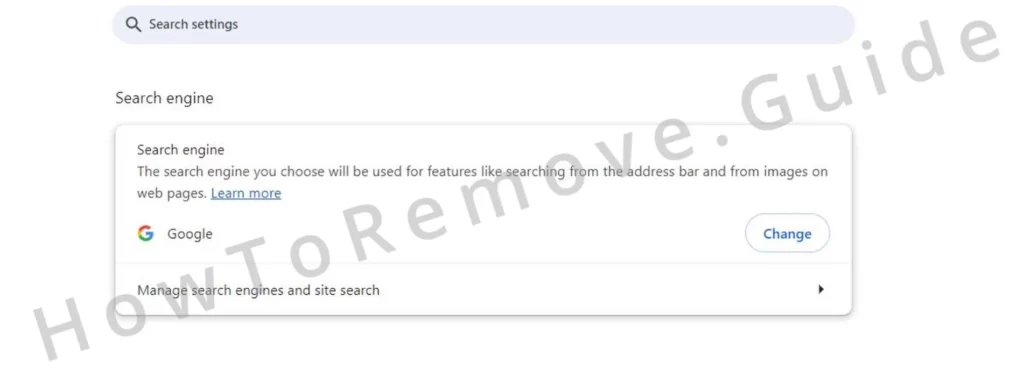
Click Manage Search Engines and delete suspicious entries. Boyu.com.tr is a common one you might see here.
The last places to visit are Appearance and On Startup. Remove any URLs added by the hijacker there.
And with this final step, your preferred browser should no longer be plagued by the rogue HyperSearch hijacker.
Is HyperSearch a Virus?
HyperSearch isn’t a virus. Not officially. It doesn’t destroy your system outright. Its danger lies in the pop-ups and redirects. These can lead you to sites filled with real threats. Viruses, malware, phishing components. You can’t trust anything it brings to your screen.
Avoid any interaction with content related to HyperSearch and focus solely on removing the hijacker.
For extra protection, revisit your browser’s Site Settings in Privacy and Security. In each permission type, deny all requests. For example, in Chrome’s Notifications section, choose “Don’t allow sites to send notifications”.
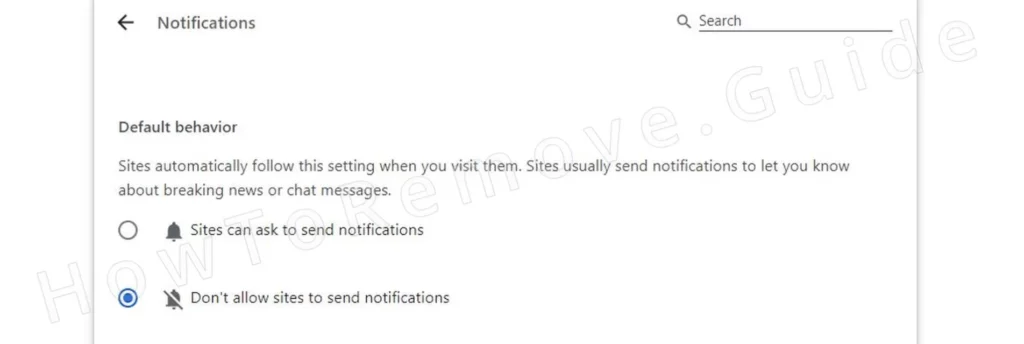
This prevents any site from requesting access. Stops future hijackers like HyperSearch in their tracks. It’s like putting up a wall around your browser. You decide who gets in.

Leave a Reply