If you’ve noticed something unfamiliar called “Kaseek” in your browser that seems to have brought about a bunch of unwanted changes into your browser, you aren’t the only one.
This is a rogue extension for Google Chrome and Chromium browsers (Edge, Opera, Brave, etc.), developed by findflarex.com. It changes the default search engine to the infamous boyu.com.tr. This is a fake search engine that is designed to generate profits through paid promotions for various sites (including unsafe ones) instead rather than help you find what you are looking for.
Like with other similar hijackers like AISEARCHS and the Funny Tool Redirect Extension, the issue is that Kaseek can’t be easily removed, and it also doesn’t allow you to restore the regular settings of your browser.
Kaseek Extension Removal Tutorial
Extensions like Kaseek are notorious for their stubborn nature and thus often require a strategic approach in order to fully eliminate.
If you are lucky, you may be able to simply click the “Remove” button of the extension and thus get rid of it, so we suggest you try that first:
- Launch Chrome (or whatever browser you are trying to clean), open its menu.
- Go to Extensions > Extensions Manager.
- Once there, click the Remove button under the Kaseek extension to delete it.
- Also, remove any other unfamiliar or unwanted extensions.
This hijacker usually doesn’t give up so easily. The “Remove” button may not work or, in many cases, may not even be there. This is because Kaseek and other findflarex.com extensions are notorious for introducing a third-party policy into the affected browser which prevents the user from making changes in its settings and deleting the extension.
However, we know the exact ways to circumvent this and other obstacles that the hijacker puts in front of you. Therefore, if the easy removal method didn’t work, make sure to follow the next steps to get rid of the Kaseek virus extension.
SUMMARY:
Removing Kaseek isn’t just necessary; it’s urgent. Yet, be warned, it might resurface. If other rogue software lingers in your PC, you’re not in the clear, because it could reinstall the hijacker even after you remove it.
Unfortunately, there’s no one-size-fits-all solution for this issue. Too many programs could carry this hijacker. Therefore, our advice is to use SpyHunter in combination with our guide for a thorough sweep. This is the safest, most surefire way to get rid of this hijacker and any software that may be linked to it.
Get Rid of Kaseek Extension Chrome Policies
As already mentioned Kaseek will often embed a rogue policy in your browser, which is indicated by a “Managed by your organization” message in the browser menu and at the top of the Settings page. That’s Kaseek flexing its muscle. It’s crucial to address this head-on or you won’t be able to remove the hijacker.
Start by going to the policy management page in your browser. Here’s the path you need for different browsers:
- Chrome:
chrome://policy - Edge:
edge://policy - Brave:
brave://policy
Other browsers? Just modify the URL as needed.
Now look closely at the list of policies. Focus on their values. Spot a string of letters and numbers? Those likely belong to the hijacker, so note them down. We recommend saving them in a notepad or a sticky note.

Next, move to the Extensions Manager in your browser’s menu.
It’s possible that obstructs you here by redirecting you to Google or some other page when you try to go to your Extensions. Don’t let that throw you off. Instead, navigate to the Extensions folder on your computer:
C:\Users\[Your Username]\AppData\Local\Google\Chrome\User Data\Default\Extensions.

Inside it, delete all folders. This will corrupt and thus disable all your extensions, but the ones you actually want can easily be repaired once you’ve cleaned the browser.
Now you should be able to visit the Extensions page in your browser.
Enable Developer Mode in the Extensions Manager (the button for that is usually in the top-right).
This reveals the IDs of all installed extensions. Identify the ID of the Kaseek extension and note it down too.
At the moment of writing, the Kaseek extension ID is fdaibolnjkbfigjlhjcegaaioncpilek
Also save the IDs of any other browser add-ons you wish to remove but aren’t allowed to.
![]()
Delete the Rogue Policies
Time to tackle those rogue policies. You’ve got the IDs and policy values. Now it’s time to delete them.
Start by opening the Registry Editor with admin rights – you can search for it in the Start Menu.
Once in it, click the Find option in the Edit menu.
Copy-paste the rogue policy value in the search box and click Find Next. Delete the corresponding registry key. Repeat the search to see if there are other related items. You need to delete everything linked to the Kaseek policy.
Then do the same thing with all other values and extension IDs you collected in the previous steps.
Another trick used by hijackers like Kaseek is to deny you access to its registry keys and thus prevent you from deleting them, but we know of an easy fix:
- Right-click the parent key of the one you are trying to delete.
- Go to Permissions, then Advanced, then Change from the top.
- Type “everyone”, then click Check Names > OK.
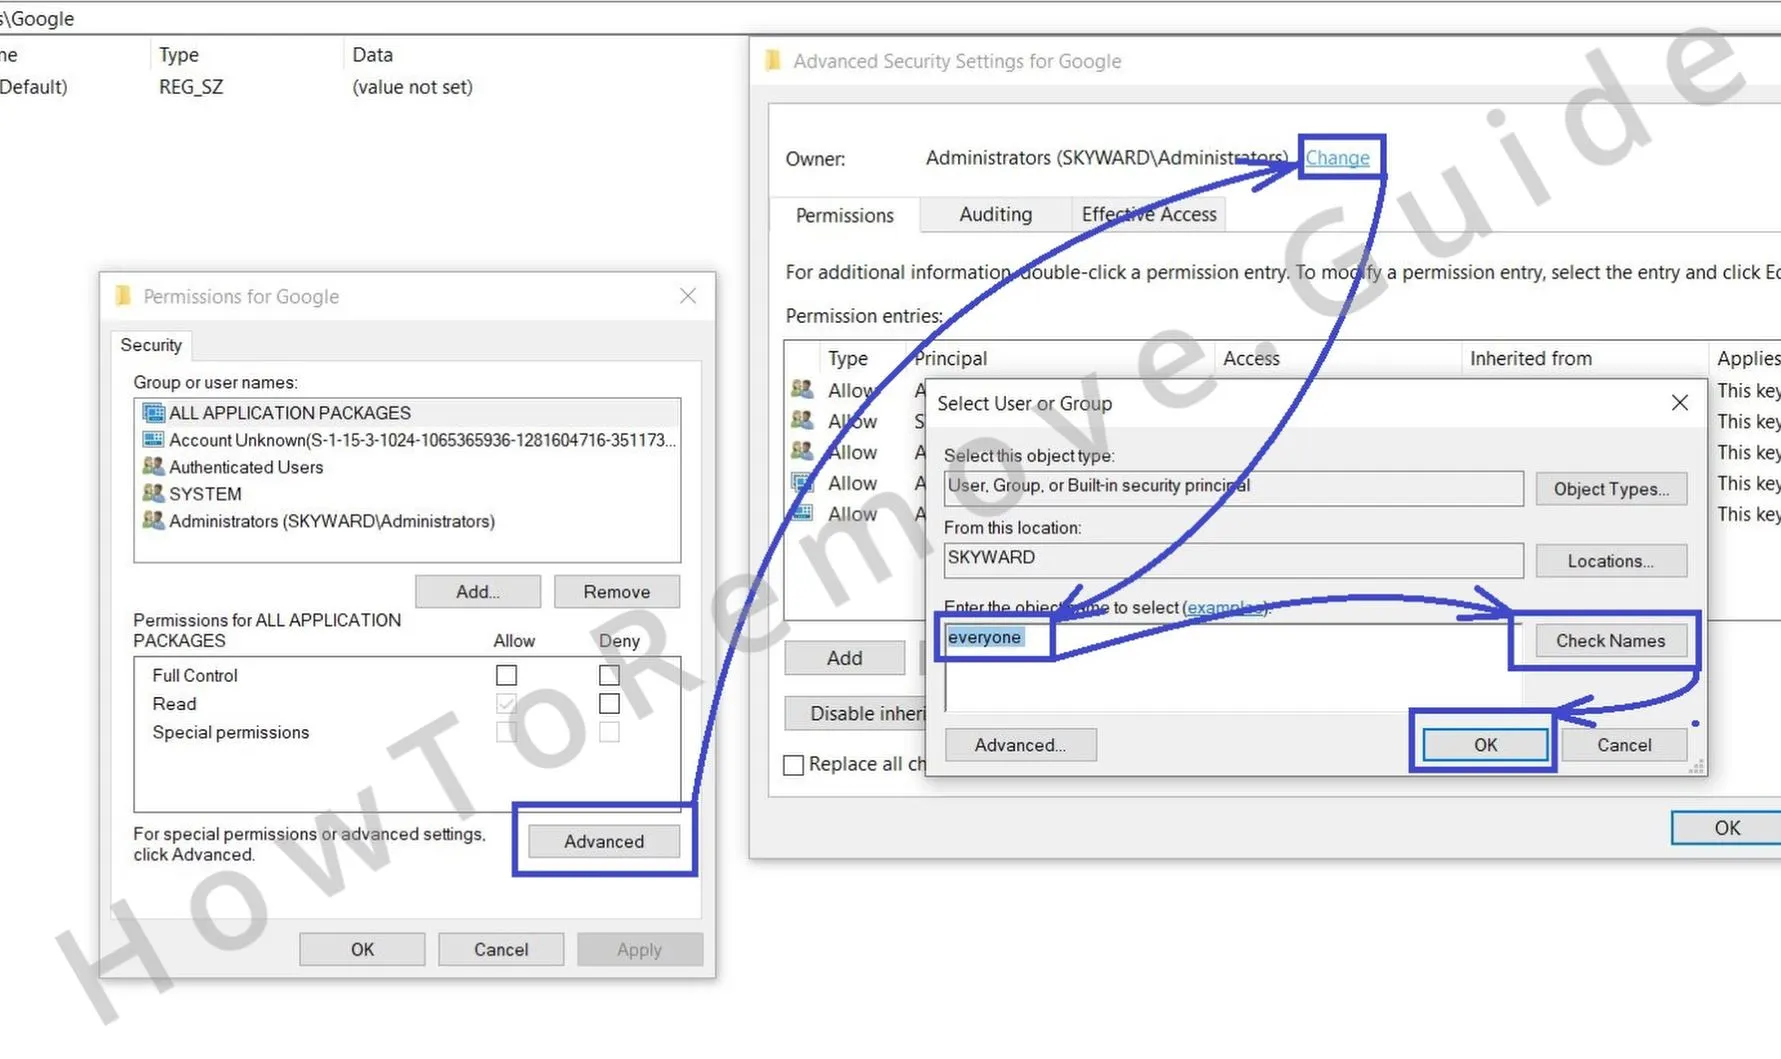
- Enable the two “Replace…” options.
- Now, delete the stubborn key. Problem solved.
Additional Kaseek Policy Cleanup Steps
You’ll want to be thorough when eliminating this hijacker, so we recommend you perform these two additional policy removal steps to make sure Kaseek no longer has a hold over your browser.
Search for “Edit Group Policy” in the Start Menu. Open it.
Right-click Administrative Templates (under Computer Configuration).
Select Add/Remove Templates. Remove any that seem suspicious.

If unsure what to delete, just remove everything shown in that list.

One more step: Use the Chrome Policy Remover. It’s a totally free tool. Download it and run it with admin rights. If Windows warns you, don’t fret. Click Show More Info and the Run option will appear. The tool is perfectly safe at the time of writing, so don’t worry about the warning.
The Chrome Policy Remover does its job automatically. Just let it run its script and close the window.
How to Uninstall the Kaseek From Chrome, Edge, and Other Browsers
Now, with rogue policies out of the picture, you should finally be able to remove the Kaseek extension and restore your preferred browser settings:
Go back to the Extensions tab again. There should now be a working Remove button for the Kaseek extension. Click it.

Any others that resisted before? They must go too. This is the point where things start to feel lighter and cleaner.
Next, you must deal with your browsing data. Go to Privacy and Security settings and click the Delete browsing data option. In the Advanced tab, select a timeframe before Kaseek appeared, and wipe out everything, except passwords. Cached images, cookies, site data? Delete it all.

While you’re at it, check Site Settings (available at the bottom of the Privacy and Security page). Visit every type of permission and check it for unfamiliar URLs. If there you see boyu.com.tr, findflarex.com, or another unfamiliar and questionable address, remove it.
Next, check your search engine settings. Make sure your default search engine is something trustworthy. Then, in the Manage Search Engines section, delete anything suspicious.

Last but not least, move to the Appearance and then to the On Startup settings. Closely examine both of them for suspicious URLs and get rid of anything that doesn’t belong. Your browser needs to be pristine, free from any hijacker traces.
Follow these steps, and your browser should be completely free of the Kaseek hijacker. It’s a long road, but the end result is worth it. The last thing you want is to go through all this, only to have the hijacker worm its way back in. To prevent that, consider installing a robust security tool.
We already told you about how, if there’s some potentially unwanted or rogue app in your system, it could reinstate the hijacker and bring it back to your browser. Therefore, it’s still a good idea to get SpyHunter or another reliable tool and scan your system with it in order to ensure there’s no malware present there.
Leave a Reply