Today I came across a new hijacker extension for Chromium browsers called RapidFinder and apparently, a lot of users got it in their browsers and are looking for a way to remove it. This is a rogue extension, similar to SwiftSeek and ZoomFind, that enforces unwanted changes in the browser’s settings and grants various unsafe sites notification and pop-up permissions. Furthermore, it blocks you from reversing the unwanted changes by introducing a custom third-party policy.
RapidFinder installs silently through file bundling when you download and install another software that has the hijacker attached to it. Often, the carrier program is something rogue in and of itself, or at least something that’s being illegally distributed (like a pirated game). Often, though, hijackers like RapidFinder can also be found in legitimate apps like console game emulators (NoxPlayer, Cemu, etc.), mods for popular games like Roblox, or in other well-known programs like uTorrent and Cheat Engine.
But no matter what got you RapidFinder, you must remove it, because, otherwise, it will keep tampering with your browser’s settings, spamming you with ads and pop-ups, and being an overall nuisance as well as a security hazard.
RapidFinder Removal Guide
Before diving into more complex procedures, why not first try the more conventional removal steps? Sure, they won’t always work, but they take about 5 minutes and can save you up to an hour:
- Begin by opening your browser, then navigate to the settings menu.
- Look for the section dedicated to extensions or add-ons. Within this area, search for any entries related to RapidFinder or other unfamiliar extensions.
- If you locate RapidFinder or any other extensions that don’t belong there, attempt to remove them directly.
- Next, visit the Privacy and Security settings, open Site Settings, and take a look at the permissions, focusing on notifications and pop-ups.
- Unrecognized URLs or sites you’ve never visited might be listed here. If you see anything you don’t trust, block that address so it’s not allowed to spam you with pop-ups or notifications.
Now restart the browser to check if the problem is resolved. Often it won’t be, but that’s fine – this was only a warmup. The actual removal of RapidFinder is yet to begin.
SUMMARY:
| Name | RapidFinder |
| Type | Browser Hijacker |
| Detection Tool |
We tested that SpyHunter successfully removes RapidFinder* and we recommend downloading it. Manual removal may take hours, it can harm your system if you re not careful, and RapidFinder may reinstall itself at the end if you don’t delete its core files. |
If the quick fixes didn’t yield results, it’s likely that RapidFinder is more deeply embedded in your system. Often, such hijackers hitch a ride with software downloaded from unverified sources. They can alter system settings and establish policies that make them resistant to standard removal methods. They can also reinstall the hijacker after you successfully remove it.
The guide below will let delete RapidFinder, but not the software that brought it to you. Since we can’t pinpoint the exact program, we can’t provide exact instructions to remove it. For this reason, it’s advisable to use a reputable security tool to scan your system for unwanted applications. One tool that has proven effective in detecting and removing such threats is Spy Hunter 5, which you’ll find linked on this page.
How to Get Rid of RapidFinder (Advanced Steps)
RapidFinder introduces rogue policies to the browser and that’s what’s probably preventing you from deleting it. These policies basically take away the control of your browser from your hands and now you can only use it but not make changes to it. A telltale sign of such interference is a message in the browser menu that reads “Managed by your organization”. You’ll see the same message at the top of the Settings page.
We won’t lie to you, it takes some tinkering to get rid of the hijacker policies, but the good news is once this is done, the rest is pretty easy. Here’s where to start:
Open the affected browser and go to the policies page. For Chrome, you can view active policies by typing chrome://policy into the address bar.
Other Chromium-based browsers have similar URLs, you just need to change their specific names in the URL.
That page shows a list of all policies that are currently influencing your browser’s behavior. The hijacker one should be easy to spot – it will usually have a value made of randomized letters. Look for that value, then copy it and save it somewhere – a text file or a sticky note, for example.
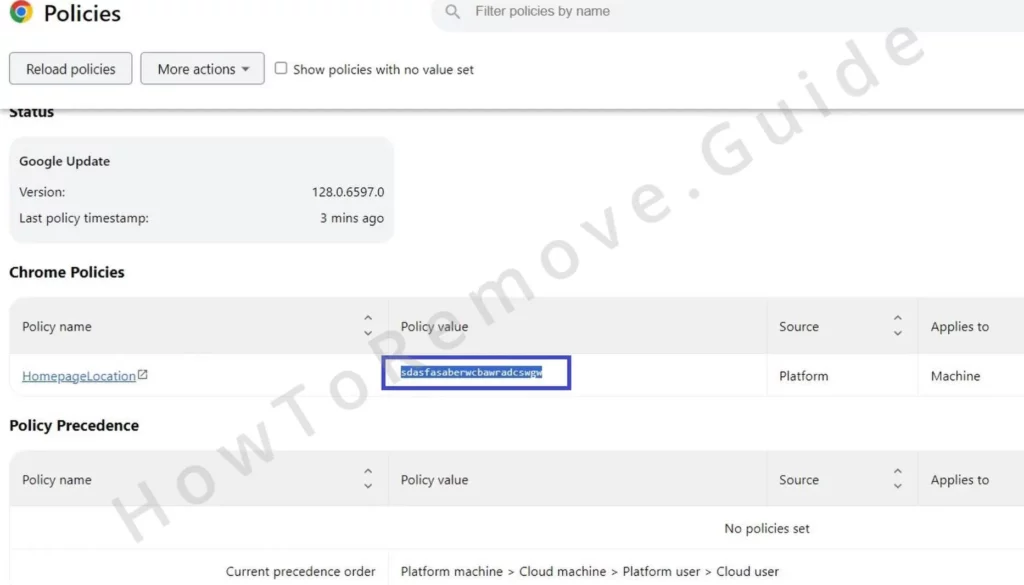
The next place to go is the browser’s Extensions Manager. but some trickier hijackers will redirect you to Google or another random page whenever you try to go there.
In such situations, your counteraction should be to go to the browser’s extensions folder and delete everything there.
The folder location differs depending on the browser. For Chrome, it is: C:\Users\[Your Username]\AppData\Local\Google\Chrome\User Data\Default\Extensions.
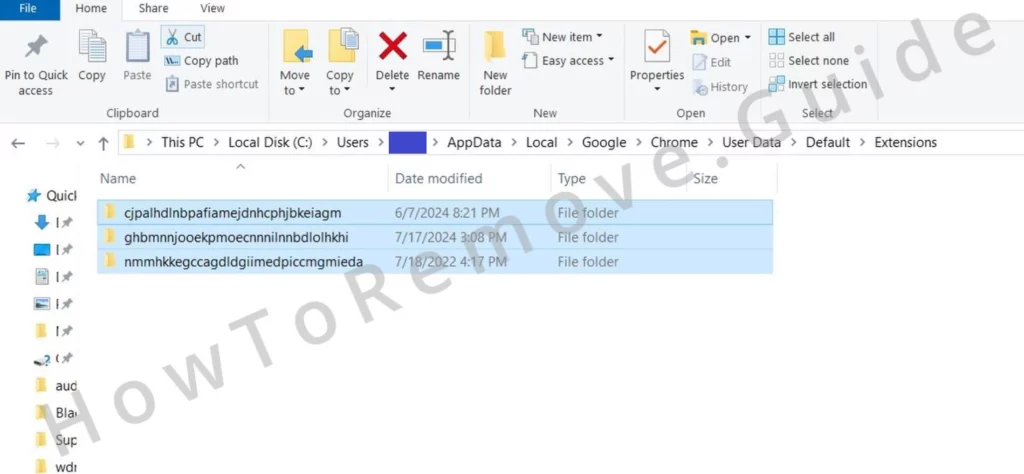
Here are the extension folder paths for a couple of other popular Chromium browsers:

While this will disable all your extensions, including the ones you trust, you can reinstall the legitimate ones later. The important thing is you can now access the Extensions Manager, which is what you should do now.
Enable the Developer Mode in your Extensions Manager. See if the ID of the RapidFinder extension is now visible under the extension. If not, click on the extension and you’ll see this ID on the next page.
You must copy that ID and place it next to the rogue policy value(s). Save the IDs of any other rogue or unwanted extensions too.

Video walkthrough for this step:
Remove RapidFinder Virus Keys From the Registry
Now you have the suspicious policy values and extension IDs at hand and you can use them to clear your system’s registry from rogue policy keys.
Press the Windows key, type “Registry Editor”, right-click the first item, and open it with Admin rights.
You must now search in the Registry for the first of the policy values you saved. Press Ctrl + F, copy-paste the value into the search bar, and click Find Next.
The search should find a registry value that you’ll see in the right panel. However, you must delete the entire key that contains it in the left panel (the keys are basically registry folders and the values are their files).
Remember to delete all keys associated with all values and extension IDs you noted down earlier. Run a new search after each deletion, because there might be other rogue keys that you must delete. Only move on to the next value/ID once there are no more results for the current one.
Occasionally, you might encounter registry keys that resist deletion due to permission restrictions. This is another trick of the hijacker but we know how to handle it:
First, right-click on the parent key that contains the undeletable entry. Then select Permissions and go to the Advanced section. Click the Change option at the top and type Everyone into the field in the next window. Confirm by clicking Check Names, then click Apple and OK.
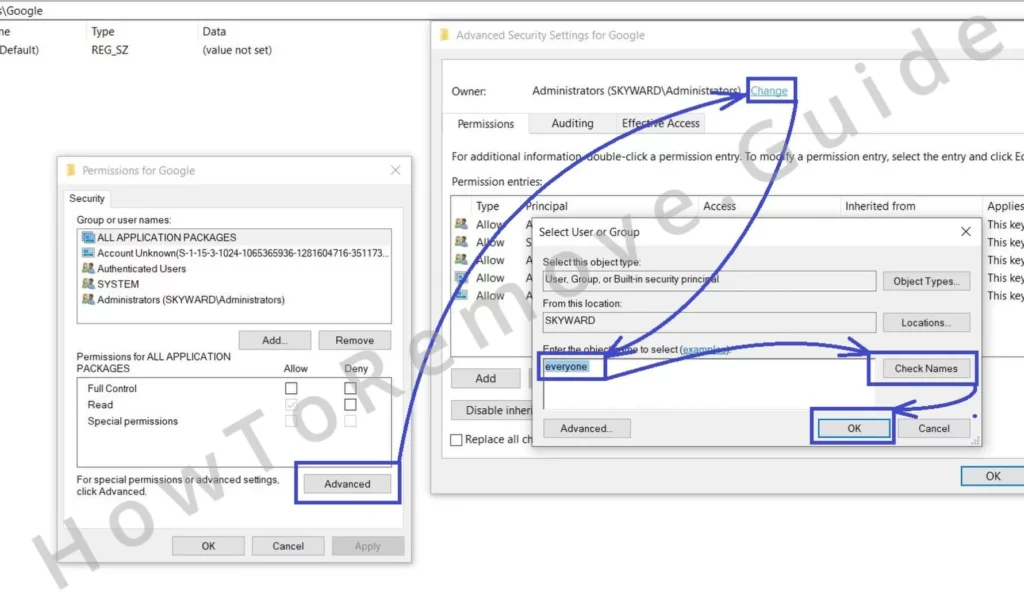
Back in the permissions window, enable the options that replace existing permissions and ownership on subkeys.
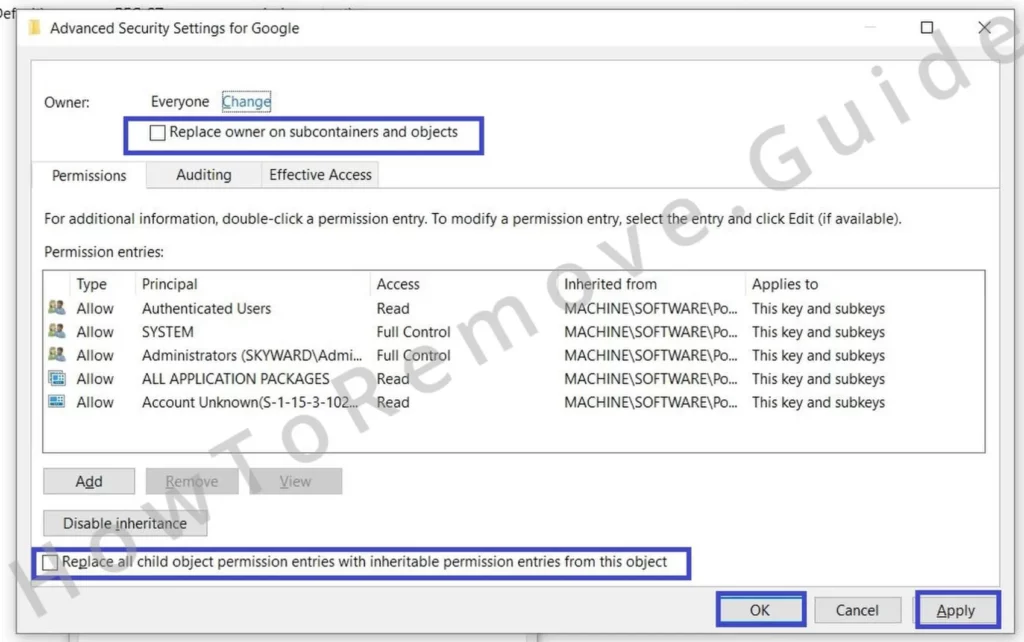
Apply these changes, and you should now be able to delete the previously protected key.
Video walkthrough for this step:
Other Ways to Delete RapidFinder Malware Policies
There are additional strategies you can employ if the rogue policies aren’t gone yet:
Open the Start menu and search for “Edit Group Policy“. Open the first shown result and then navigate and right-click on Administrative Templates.
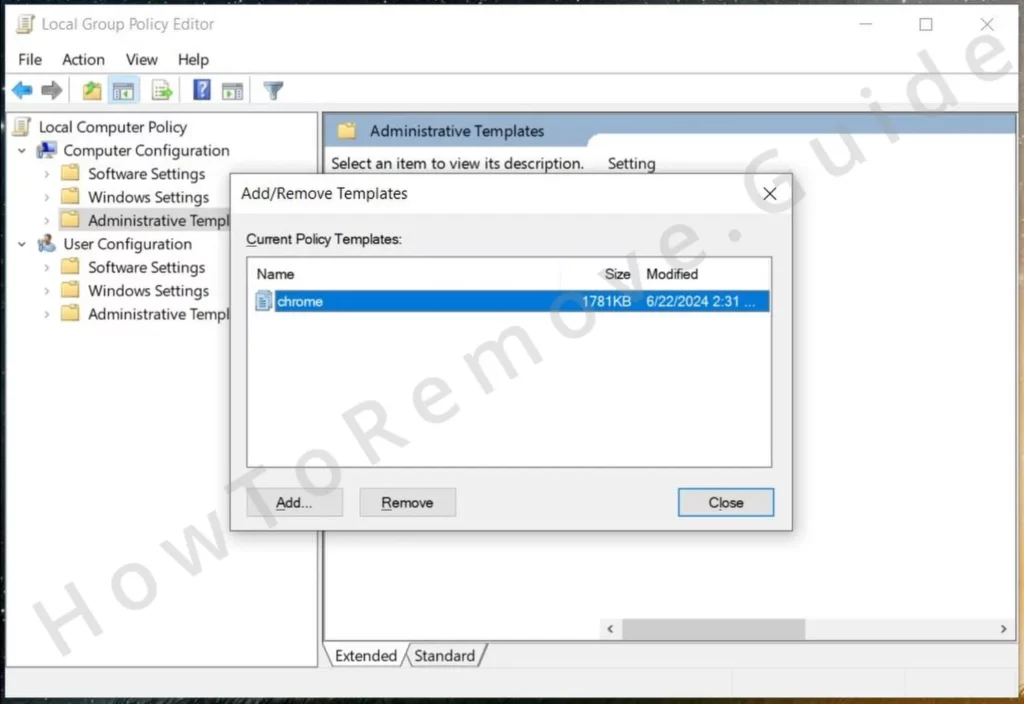
Select the Add/Remove option and then delete all entries in the next list.
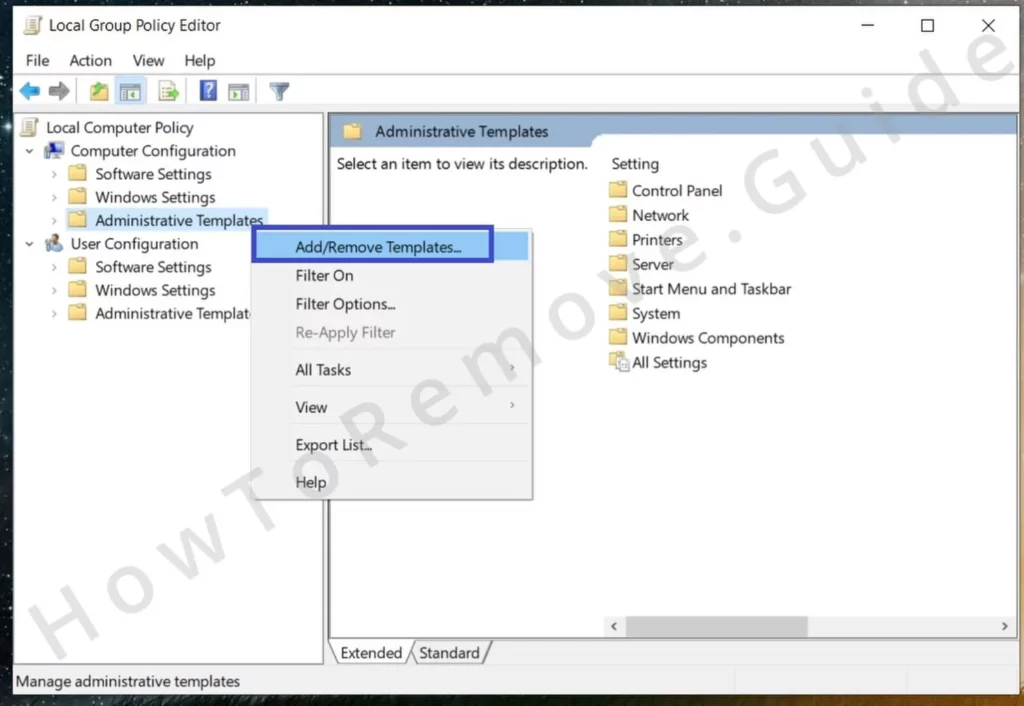
This should get rid of any remaining policies that you weren’t able to delete through the Registry.
For Chrome users, there’s a free Chrome Policy Remover tool that can automate the process. Download it, run it as an administrator, and it will scan and remove any policies that shouldn’t be present.
Be aware that your system might flag the tool as unrecognized, but if it’s a safe app, so you can ignore the warning, whitelist it in your AV if needed, and then run it. Once the tool starts, its policy-removal script runs automatically.
Manual Group Policy Removal
Automatic Group Policy Removal
Uninstall the RapidFinder Malware Extension
We just gave you the most detailed instructions on how to remove rogue policies from your browser that you’ll find on the Internet. If you followed them correctly, your browser should no longer be controlled by RapidFinder and you can proceed to restore its regular settings.
Start the browser, go to its menu, open Settings > Extensions.
Remove anything that looks linked to RapidFinder. It’s also a good time to restore any broken extensions you want to keep.
Click the Repair button underneath them to restore the corrupted extensions. If no such button is available, first try to use the extension and the button will appear.
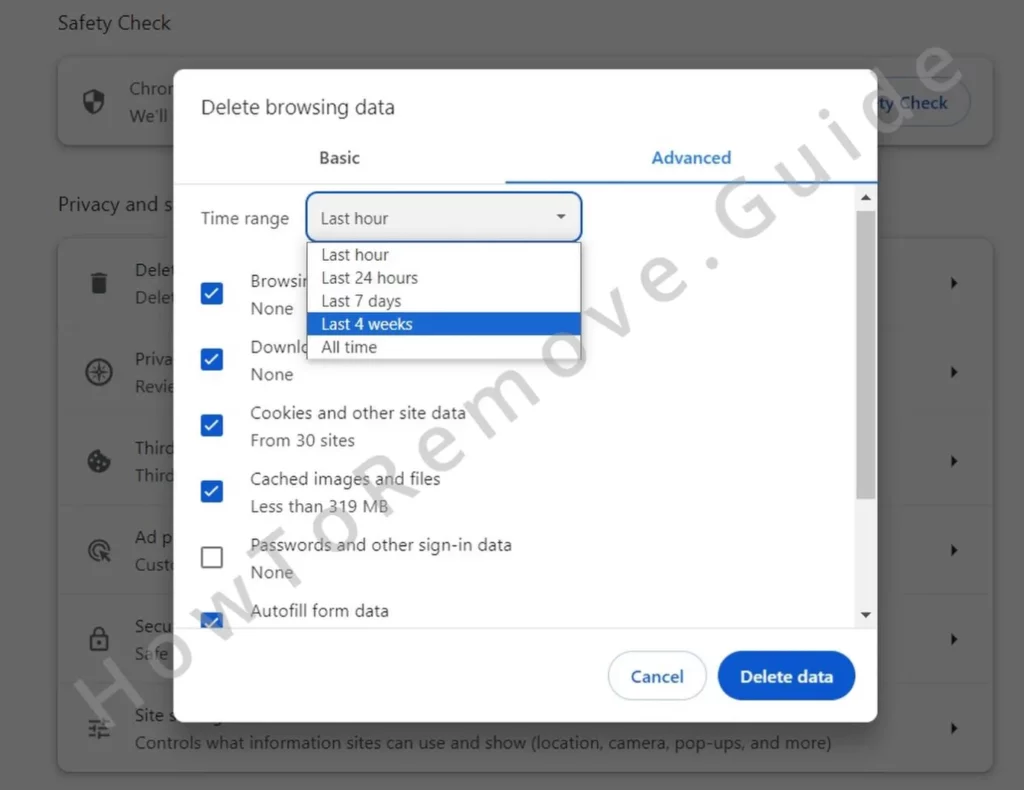
Next, you must clear your browsing data to eliminate any residual traces of RapidFinder.
In the Privacy and Security settings, find the option to clear browsing data and click it. Go to the Advanced tab, tick all categories except for passwords, set an appropriate time period, and click Delete.
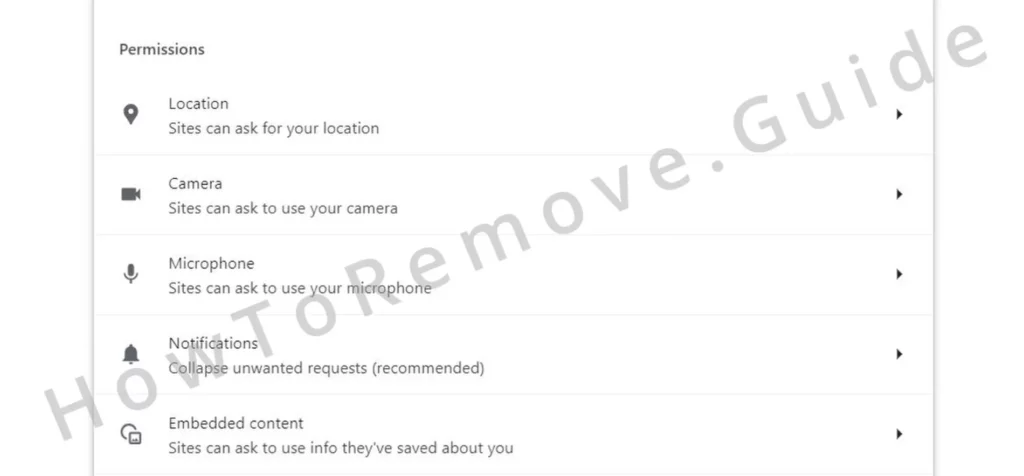
Also, check the site permissions once more. This time check all permission types and not only the notifications and pop-ups. Remove any sites that you did not intentionally allow.
In the Search Engine settings tab, reset your default search engine to one you trust.
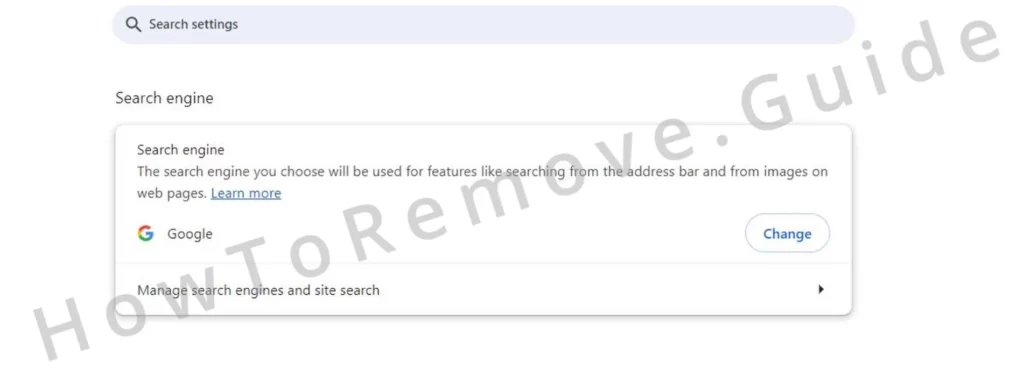
Then review the Manage Search Engines section. If there’s a search tool listed there you don’t recognize or trust, delete it from the list.
The last two settings sections you must check are “On Startup” and “Appearance“. If you see any questionable addresses in either section, delete them.
Chrome
Microsoft Edge
Mozilla Firefox
We have very high confidence that, if you complete the steps in this guide in the exact way they are shown, the hijacker will be fully removed from your PC.
However, if RapidFinder or similar hijackers reappear despite your efforts, it may be necessary to use an anti-malware program that specializes in removing such threats. Tools like SpyHunter 5 can perform deep scans and remove persistent malware that manual methods might miss.

Leave a Reply