Search-great is a rogue search engine site that hijacks browsers like Chrome and Edge and redirects users to questionable sites and modified Bing/Yahoo SERPs. This hijacker is very similar to other ones like Secure Search and Maxask that I’ve covered on this site.
Aside from obstructing your regular browsing experience, the presence of Search-great in the browser can lead to potential security hazards. Its redirects can lead you to phishing sites or pages filled with malware which is why you shouldn’t let this hijacker stay.
Search-great typically gets inside the system after the user installs a program that had the hijacker bundled with it. For example, I’ve come across reports that a rogue software called PCApp is often responsible for the introduction of this hijacker to the browser. Therefore, I recommend checking your installed programs (Start Menu > Settings > Apps) and removing anything unfamiliar or suspicious.
Uninstalling suspicious programs, however, will likely not be enough which is why I’ve prepared the following guide. The steps below explain in detail how to remove Search-great, but if you want a quicker solution, you can also use SpyHunter 5 – a powerful removal tool which you can find linked down below.
Search-great Removal Steps
Even if you’ve uninstalled any unwanted/rogue programs from your PC, your browser still needs to be cleaned up from the changes made to it by the hijacker. This often takes some time to do manually, but in some rare cases, you may be able to remove Search-great through some quicker steps.
Before we get into the heavy lifting, let’s try a few simple methods that might just do the trick:
- First, open your browser and head over to the Settings menu.
- Once you’re there, look for the Extensions or Add-ons section.
- If Search-great (or anything that looks remotely fishy) is hanging out there, remove it.
- After cleaning up your extensions, hop over to the Privacy and Security area of your settings.
- Check which sites can send you notifications, display pop-ups, or redirect you without your permission.
- If you see anything that screams “suspicious” or reminds you of Search-great, block it.
Then, give your computer a quick restart. Sometimes, a simple reset is enough to shake off the hijacker. If it’s still lurking, don’t fret – the actual removal is about to begin.
SUMMARY:
| Name | Search-great |
| Type | Browser Hijacker |
| Detection Tool |
Some threats reinstall themselves if you don’t delete their core files. We recommend downloading SpyHunter to remove harmful programs for you. This may save you hours and ensure you don’t harm your system by deleting the wrong files. |
Here’s the deal: Secure Search didn’t just appear in your browser—it likely came bundled with a rogue app you recently installed. If you don’t remove that app too, it could reinstall the hijacker and undo all your hard work.
The problem? There are thousands of possible culprits, so giving you specific instructions for every one isn’t realistic. That’s why I recommend using SpyHunter 5. It’s a reliable removal tool that scans your system, identifies rogue apps, and eliminates them. Pair it with the manual steps I’ve outlined, and you’ll wipe out both the hijacker and its source for good.
How to Remove the Search Great Browser Hijacker
The most likely reason the quick steps I showed above may have failed is a rogue policy added by Search Great to your browser. Such policies block your ability to make alterations to the browser’s settings in order to restore them to their pre-hijacker state.
Open the browser, click its menu and look at the bottom – if there’s a “Managed by your organization” note there, this means your browser is controlled by the hjacker’s policy and you need to deal wit that.
To investigate these policies, type the right URL into your browser’s address bar:
- Chrome:
chrome://policy - Edge:
edge://policy - Brave:
brave://policy
Otehr Chromium browsers (excapet Opera and Opera GX) have similar policy page URLs – you just need to change the name in the URL.
Once you open the policy page, look at the Values column. You might spot odd entries that seem randomly generated or just plain weird.
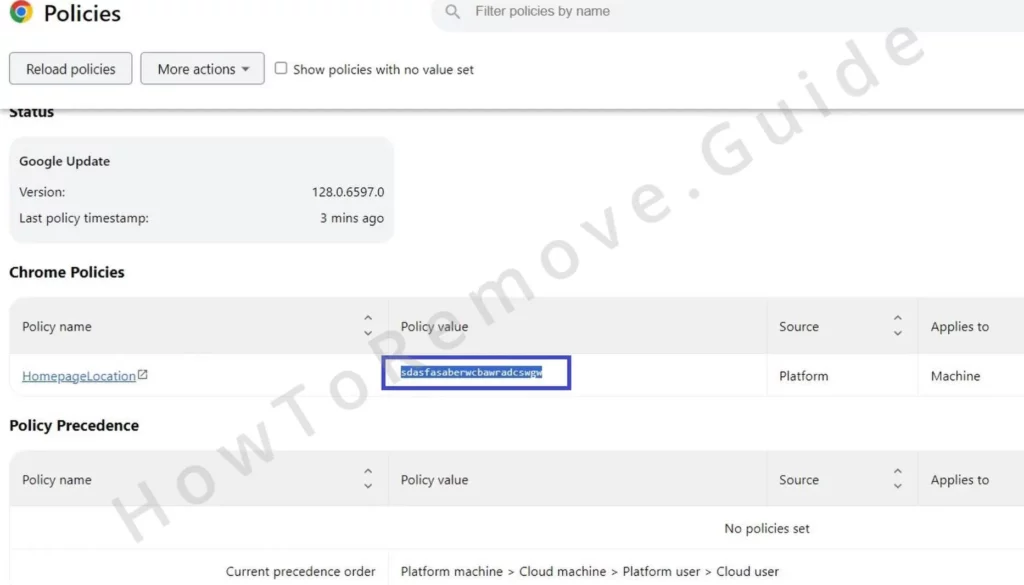
Copy those suspicious values into a text file—you’ll need them soon.
Then re-visit the Extensions page to gather more similar data.
If Search great prevents you from even checking your Extensions Manager, don’t give up. Simply navigate to your browser’s installation folder and delete the entire contents of the extensions folder.
For Chrome, that folder is usually at:C:\Users\[Your Username]\AppData\Local\Google\Chrome\User Data\Default\Extensions
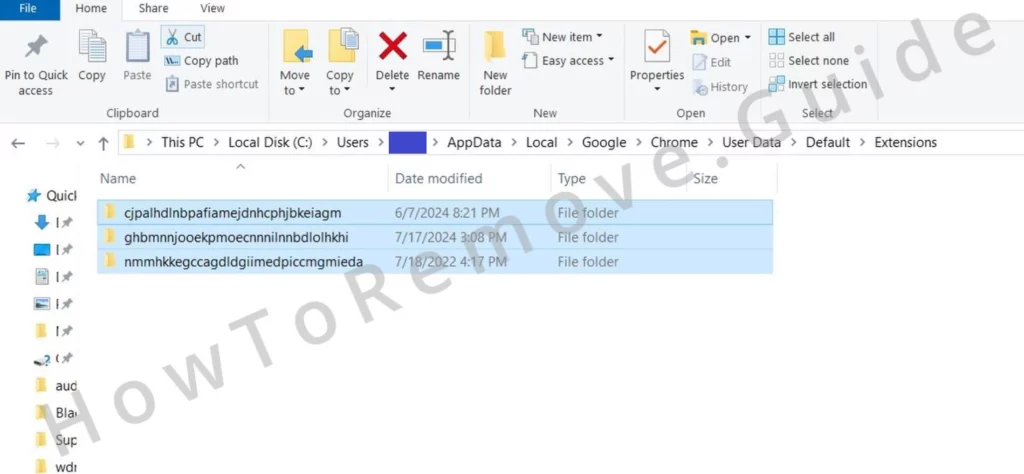
Extension paths for other browsers:

Clearing out the Extensions folder may feel drastic, but trust me, it’s worth it.
Now you can go back to the Extensions Manager, so do that. Once there, turn on Developer Mode, copy the ID of any rogue extensions, and save it next to the hijacker policy values.
Video walkthrough for this step:
Get Rid of Search-great Browser Policies
The System Registry is where the settings for the rogue policy are stored. You must go there, look for them, and delete them. Here’s how to do that:
Open the Registry Editor by typing “regedit” in your Start menu, and run it as an administrator.
Use Ctrl + F to search for the suspicious values or extension IDs you saved earlier. When you find a match, delete the corresponding key (left panel). Keep hitting “Find Next” until no traces remain.
Some keys might put up a fight, but you’re in charge here. If a key refuses to budge because of permission issues, right-click its parent key, select Permissions, then Advanced, then Change. Set the owner to “Everyone” and save the changes.
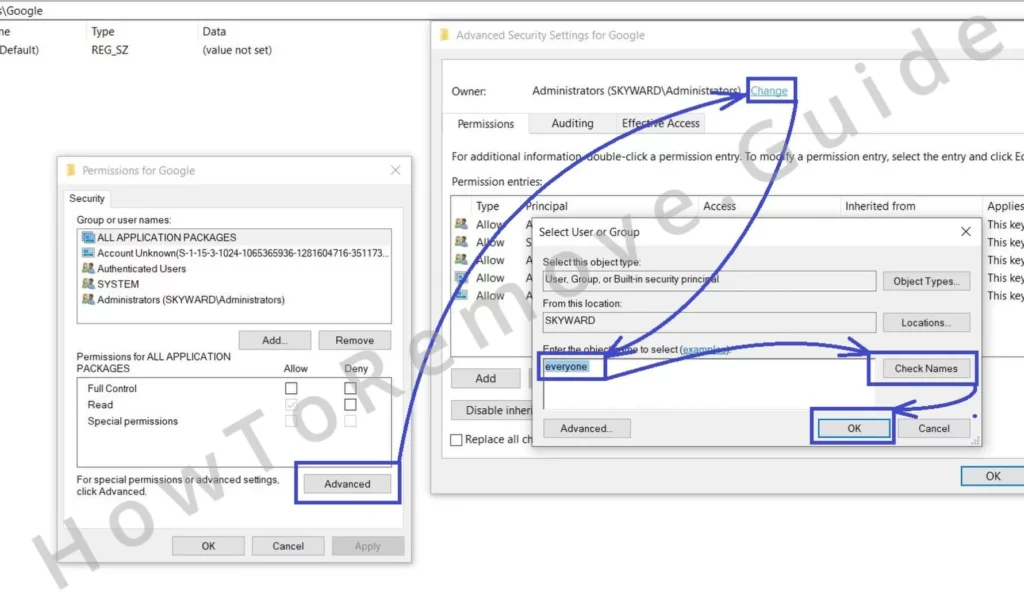
Nw you’ll be able to delete the stubborn key, so go ahead and do that.
Video walkthrough for this step:
Other Ways to Delete of Search-great Policies
If the Registry cleanup didn’t get the job done and you are still seeing the “Managed by your organization” note in your browser, don’t worry, I can show you two alternative options to clear out any remaining rogue policies:
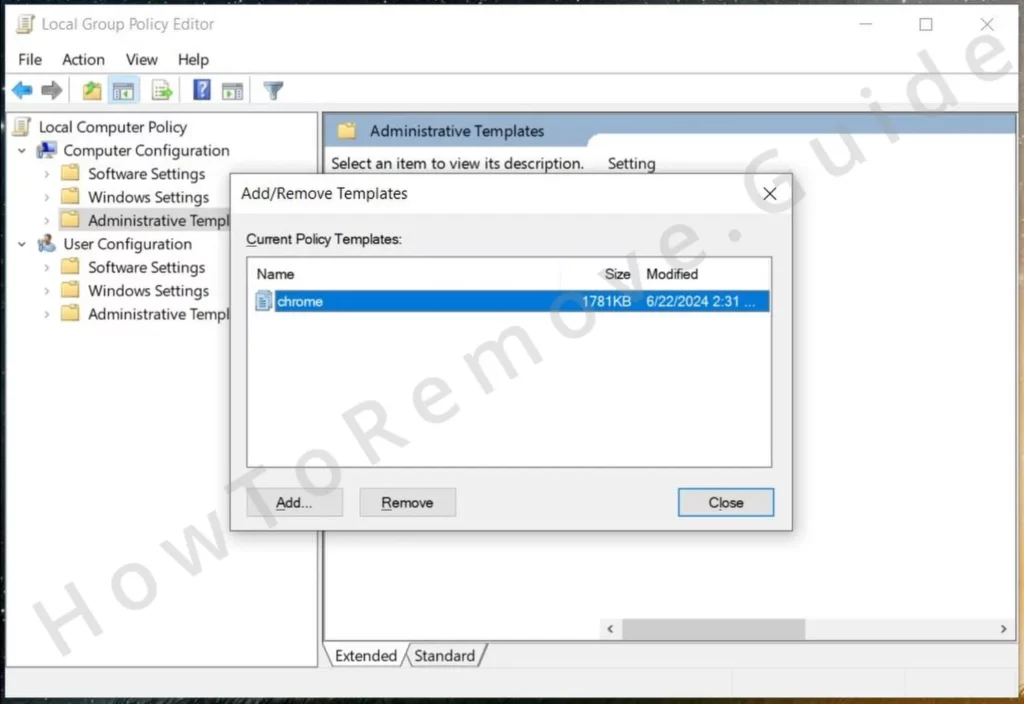
One is the Group Policy Editor. Press Win + R, type gpedit.msc, and hit Enter.
Once inside, navigate through Local Computer Policy > Computer Configuration > Administrative Templates. Right-click the last one, open Add/Remove Policies and look for anything unusual.
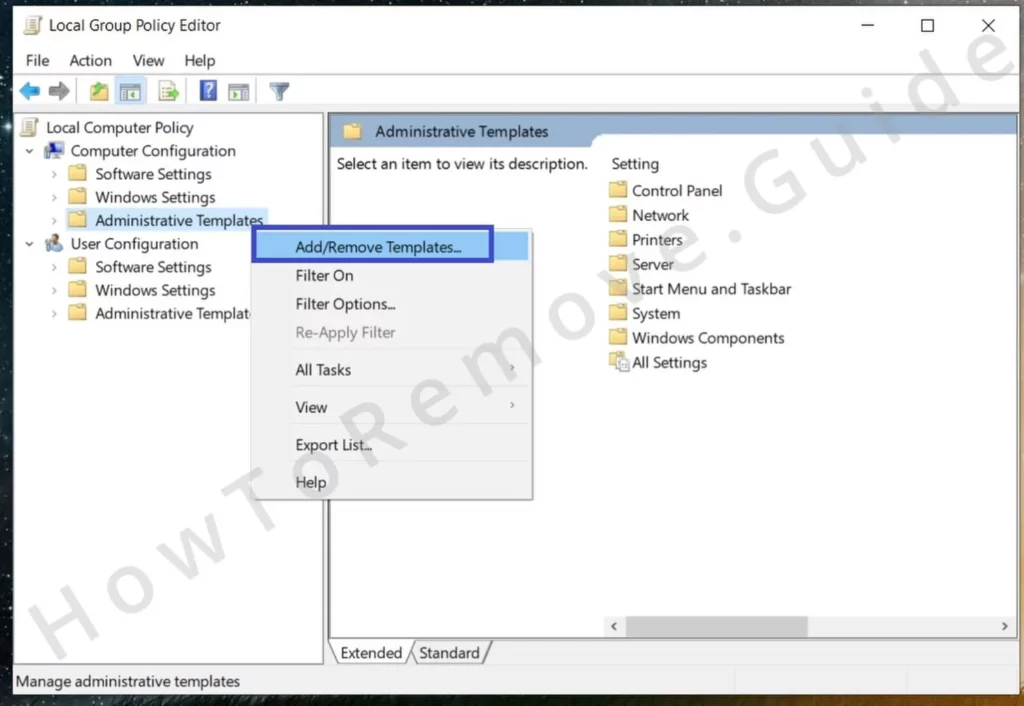
If you see something you didn’t add yourself, get rid of it. Most people never touch these templates, so odd entries are usually bad news.
If you’re on Chrome, there’s a shortcut: the Chrome Policy Remover tool. It’s a free utility that zaps all those pesky policies right out of existence. Just download it, run it as an administrator, and let it do its thing.
If Windows warns you about the tool’s safety, don’t worry, just click More Info > Run Anyway. The tool is safe.
Video walkthrough for this step:
Manual Group Policy Removal
Automatic Group Policy Removal
Remove Search great From Chrome, Edge, and Other Browsers
Once you are done with the Search great policy removal, what’s left is easy but essential. You must go into your browser again, look through its settings, and reverse any changes made to it by the hijacker.
Start by going back to the Extensions or Add-ons page and remove any rogue extensions that may still be there.
Also repair any legitimate extensions that might have been affected. Most browsers provide a convenient “Repair” button to get them back in working order.
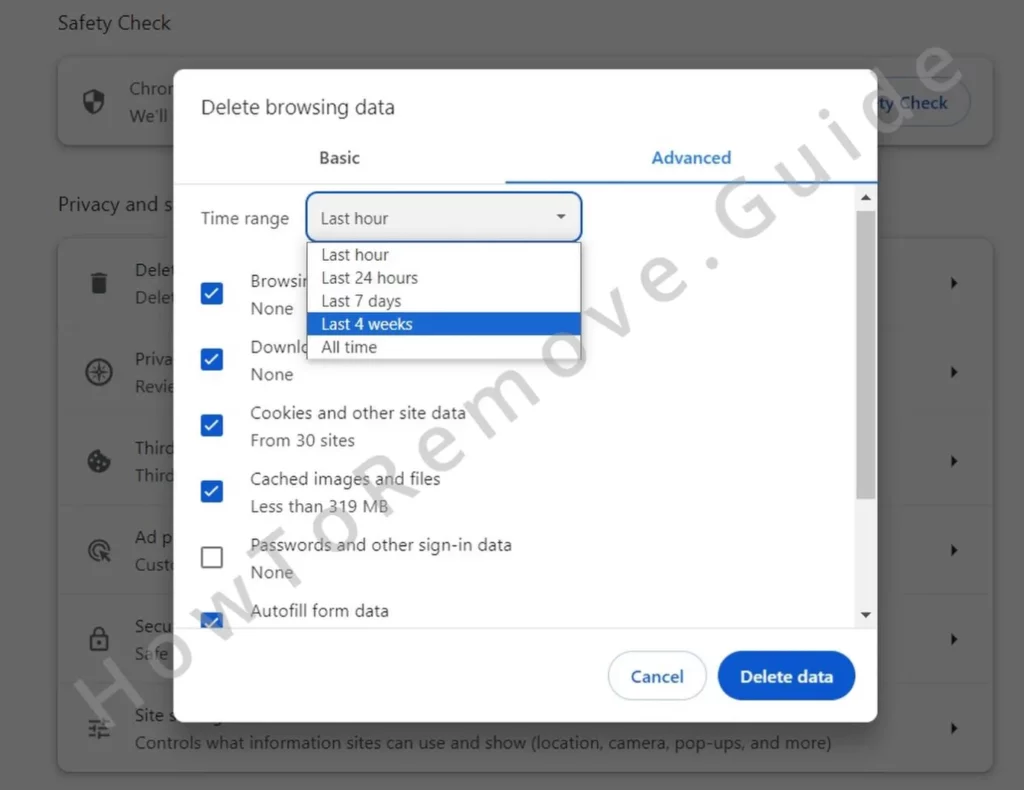
Next, head to Privacy and Security > Clear Browsing Data, select “All Time” and wipe out everything except your passwords.
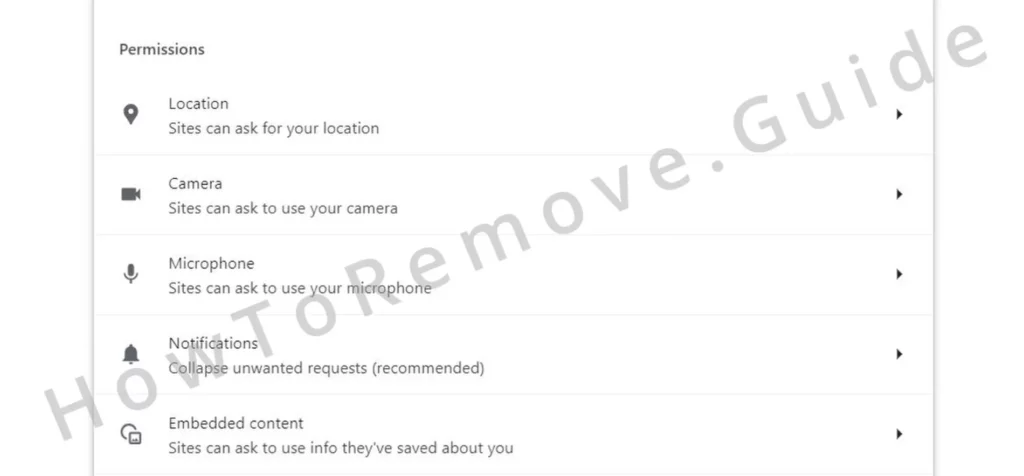
Then check the browser’s Site Settings, explore each site permission type, and remove from it any suspicious sites listed as Allowed.
While you’re at it, take a peek at your Search Engine settings. Make sure a reputable provider (like Google or Bing) is set as the default.
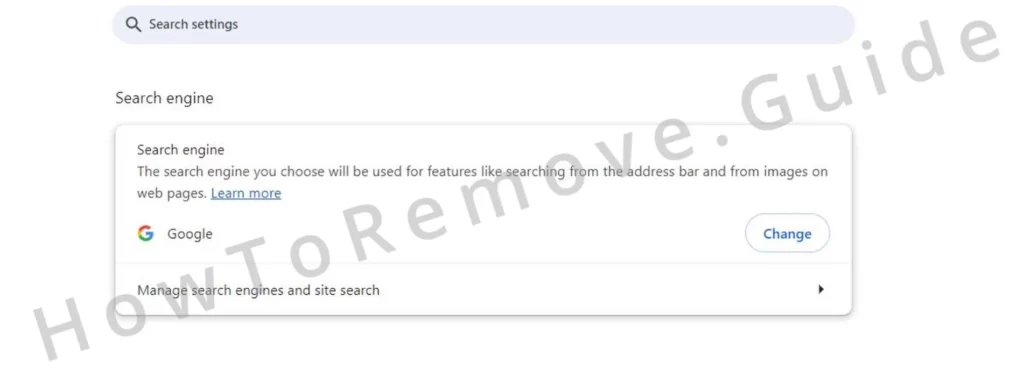
Delete any random engines that snuck in by checking the Manage Search Engines section.
Video walkthrough for this step:
Chrome
Microsoft Edge
Mozilla Firefox
Staying Ahead of the Game: Preventing Future Hijacks
You’ve successfully removed Search-great. That’s worth a moment of victory. But let’s be smart about the future. To avoid a repeat performance, be careful when installing new software. Always opt for the Custom or Advanced setup option. This way, you’ll see if anything else tries to hitch a ride. It only takes a few extra clicks to save yourself a world of trouble.
Keep your browser and operating system updated, too. Regular updates patch security holes that hijackers love to exploit. And don’t skip out on a good antivirus program. It’s like having a loyal guard dog patrolling your digital property, making sure no shady characters slip in when you’re not looking.
Wrapping It Up: Peace of Mind Restored
Removing Search-great might have seemed daunting at first, but you’ve proven that it’s completely doable with the right approach. From easy first steps to more advanced techniques—digging into policies, editing the registry, and leveraging specialized tools—you’ve covered it all. The key is persistence and a willingness to get your hands a little dirty.
As you move forward, remember the lessons you’ve learned. Be watchful, proactive, and don’t shy away from using trusted tools to simplify your life. With these strategies in hand, you’re not just fixing the current problem—you’re setting yourself up for a safer, smoother browsing experience in the long run. And honestly, doesn’t it feel great to outsmart those digital pests and reclaim control of your online world?

Leave a Reply