Strange and alarming pop-ups in the bottom-right of your screen that tell you the system is at risk or that your AV subscription must be renewed immediately can seem scary, but they are usually caused by a rogue site like Securevault (Securevault.top) that has gained pop-up permissions in your browser.
Sites like this one or others like Msdefender.co.in and Qumiho.co.in hijack the browser and then start spamming such messages with the aim of getting you to click the pop-up. This gets you redirected to some sketchy page that could try to sell you some low-quality product or outright scam you. It’s even possible you get sent to a site filled with malware.
In any case, clicking the strange notification is particularly inadvisable. Instead, you should focus on cleaning your browser. But since this isn’t always easy, I’ve prepared a guide that will help you with this task.
Securevault Removal Steps
Hijackers like Securevault are often tricky to get rid of but not always. Sometimes, a basic reset of the browser settings may eliminate the annoying Securevault malware. It’s worth trying even if it doesn’t work because there’s a chance you could save yourself a bunch of time (the detailed guide below is much lenghtier).
So here’s what to try first:
- Open your affected browser and open Settings from its menu.
- In the Settings, find Extensions or Add-ons. The browser will display all installed extensions, each one listed individually.
- Unfamiliar or suspicious ones could be linked to Securevault. Delete and disable any unwanted items by selecting the “Remove” button, if available.
- Privacy and Security settings come next. Go to Site Settings and focus on permissions for “Notifications” and “Pop-ups and Redirects.”
- Revoke permissions for Securevault.top or any other site you don’t recognize.
Restart your computer, then open the browser to check for any remaining traces of Securevault. If signs of the malware persist, more advanced steps are required. Some hijackers block settings access, but advanced techniques bypass these restrictions.
SUMMARY:
| Name | Securevault |
| Type | Browser Hijacker |
| Detection Tool |
Some threats reinstall themselves if you don’t delete their core files. We recommend downloading SpyHunter to remove harmful programs for you. This may save you hours and ensure you don’t harm your system by deleting the wrong files. |
Before you attempt to complete the full Securevault guide, note that this will take some time (likely more than an hour). Also, some of the steps below might seem confusing to inexperienced users.
So if you lack experience or don’t have free time to spare, I suggest using SpyHunter 5. It’s a powerful removal tool that’s really easy to use and will get rid of the hijacker in just a couple of minutes. You can find SpyHunter posted on the current page.
How to Stop the Securevault.top Pop-ups
If the quick steps I gave you above didn’t get the job done, it’s probably because your browser settings are blocked by a rogue third-party policy.
A message that reads “Managed by your organization” on the Settings page or in the browser menu signifies the presence of such a policy. You must deal with this first before you move on to the actual browser cleanup.
Here’s how to hunt down the rogue browser policy:
Open your browser. For Google Chrome, type chrome://policy in the URL bar.
For Microsoft Edge, type edge://policy.
For Brave, enter brave://policy.
Chromium-based browsers follow a similar pattern. Simply modify the URL to reflect the browser’s name.
A list of active policies will appear. Policies related to hijackers usually contain random characters in the Value column.
Copy these suspicious values and save them in a text file. These values will prove essential in the next step.
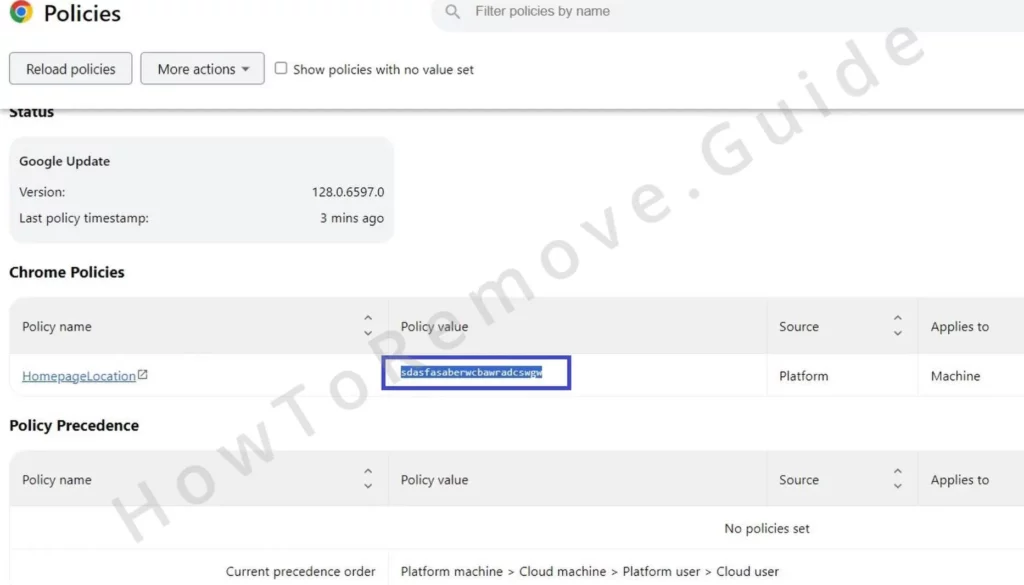
Navigate to the Extensions Manager to gather the IDs of sketchy extensions.
Securevault may have restricted access. In such cases, locate the browser’s extension folder on your computer. For Chrome on Windows, this is typically found at C:\Users\[Your Username]\AppData\Local\Google\Chrome\User Data\Default\Extensions.
Other popular browsers have the following extension folder paths:

Since you have no way of knowing which of the extension folders you see there belong to Securevault, it’s best to delete all of them. This disables all extensions, including the ones you want to keep, but those can easily be repaired later.
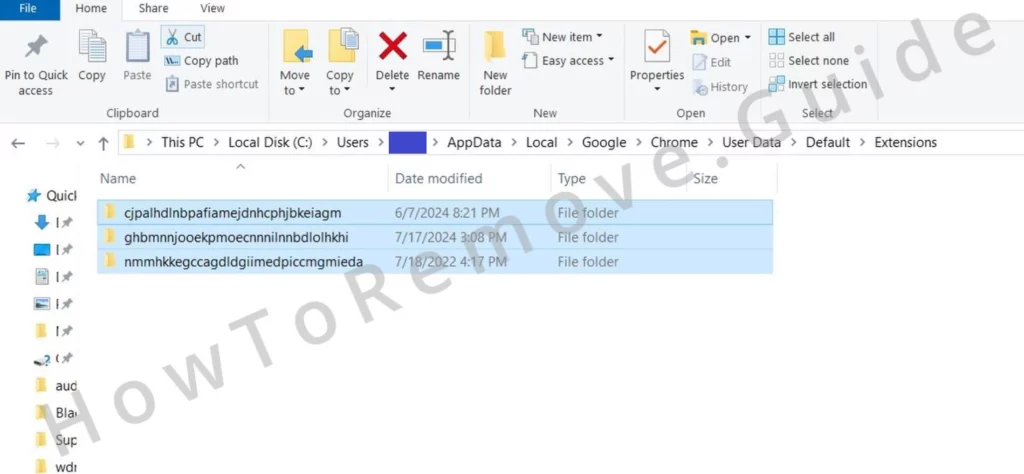
Now you’ll be able to return to the Extensions page. Once you access it, toggle on Developer Mode and look at the ID of the rogue extension(s). If the ID isn’t shown, click the extension and you’ll see it on the next page.
Copy the ID and paste it where you saved the rogue policy values from earlier. Note down the IDs of all extensions you think must be removed.
Video walkthrough for this step:
How to Get Rid of Securevault.top Through the Registry
The Registry is where the settings for the rogue policy are stored. You must now use the collected IDs and values, go to the Registry, search for them there, and delete what you find. Here’s how to do all of that. Just be careful not to delete something that’s not linked to the hijacker:
- Type “regedit” in the Start menu, then open the Registry Editor as an administrator.
- Inside the editor, press Ctrl + F to search. Each saved policy value and extension ID must be searched individually.
- Delete any matching registry keys found in the left panel.
- One result appears per search, so multiple searches are required until you clear out all rogue entries.
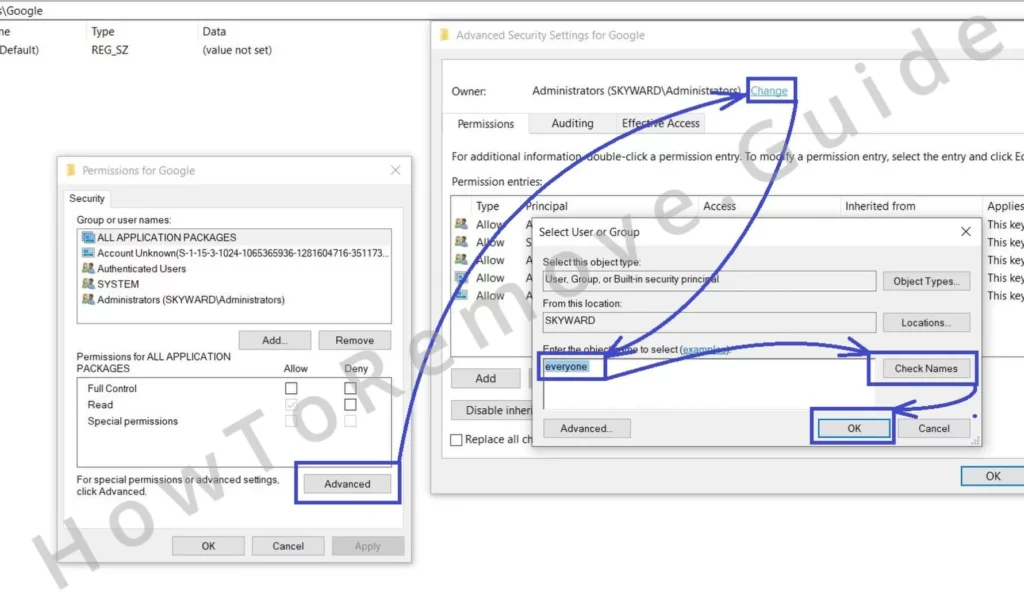
Hijackers sometimes restrict access to specific registry keys, creating another obstacle. Solution:
Right-click the parent key of any blocked entry and select “Permissions“. Open Advanced > Change. Type “everyone” as a user in the text box, then apply the new permissions.
In the previous window, tick the two Replace options, then click Apply and OK again.
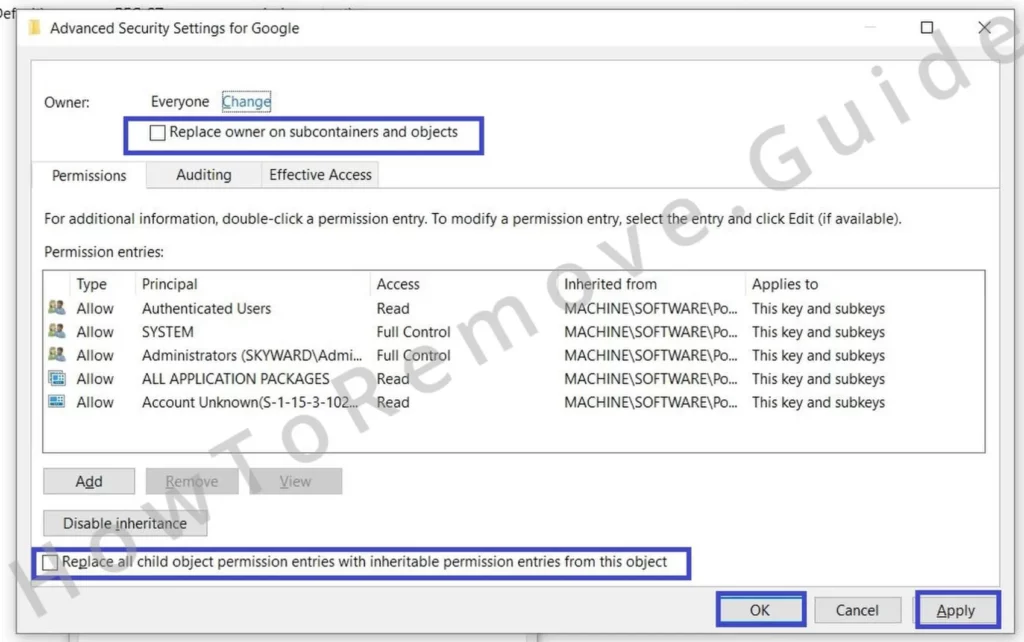
You’ve now regained access to the stubborn key and can easily delete it.
This action restores access to blocked keys, allowing deletion of stubborn entries. Deleting these entries restores control over your browser settings, effectively breaking the hijacker’s hold.
Video walkthrough for this step:
Other Ways to Get Rid of Securevault Policies
I can provide two alternative ways to clear out rogue policies. I recommend using these in combination with the registry cleanup in case the latter didn’t manage to get rid of the hijacker policy that’s currently blocking your browser settings:
Type “gpedit.msc” in the Run dialog (Win + R).
Inside, navigate to “Administrative Templates” under “Computer Configuration.”
Right-click on it and select “Add/Remove Templates.”
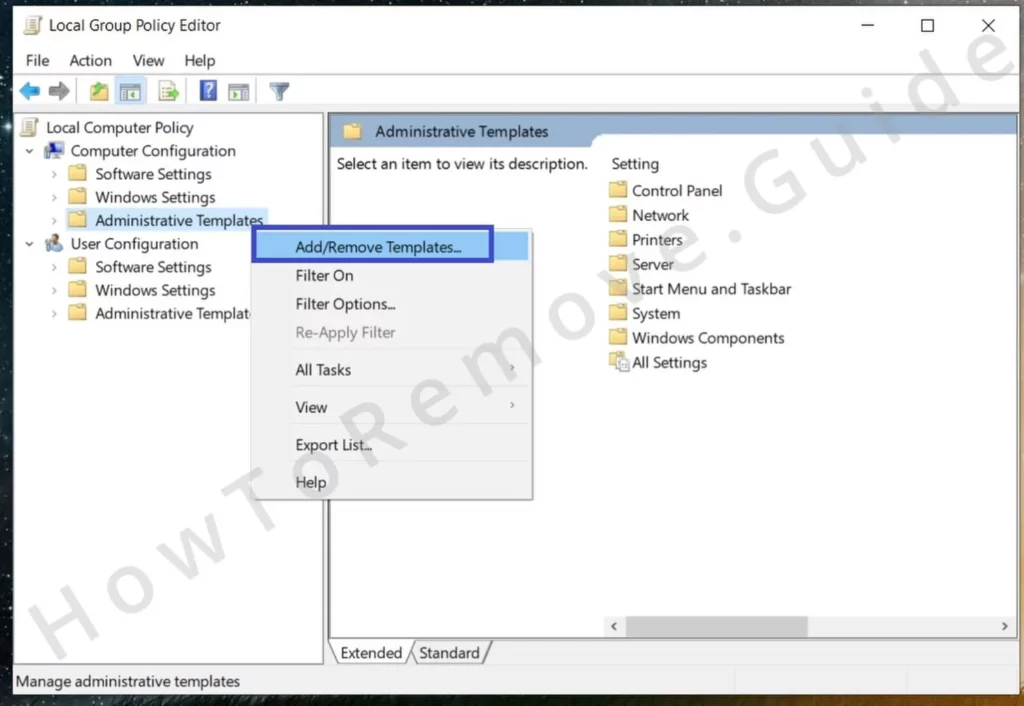
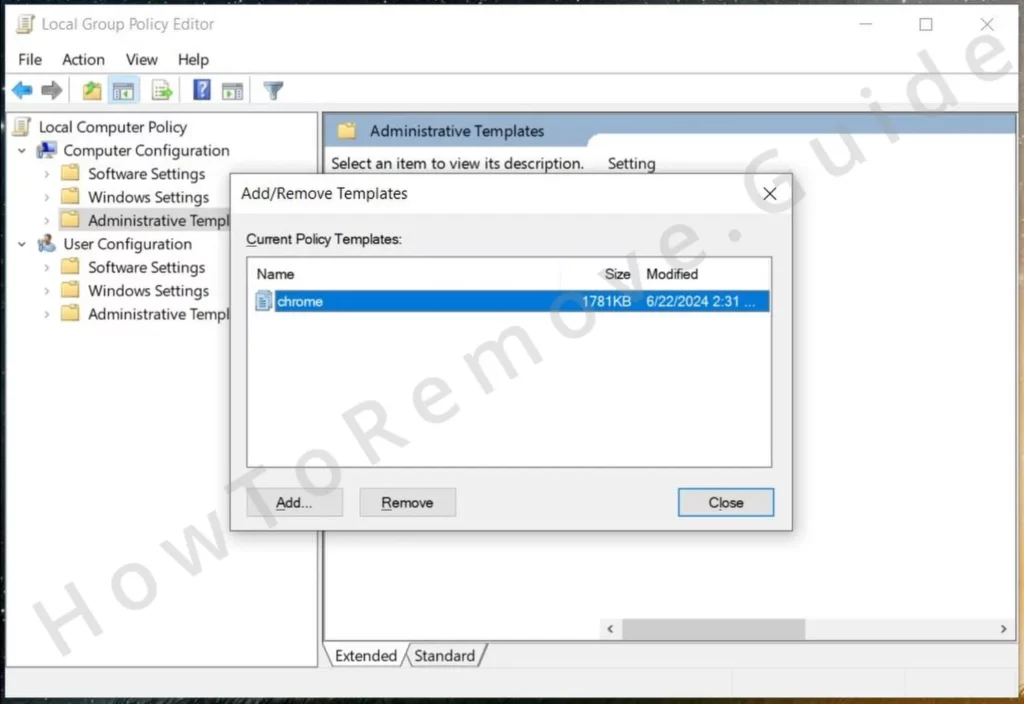
Remove all templates. Most users do not add templates manually, so this step is generally safe.
Chrome users can also use the Chrome Policy Remover tool. This free utility automatically deletes unwanted policies in Chrome.
Download and run the tool as an administrator. The system might warn you about software from unknown publishers. Click “More Info,” then “Run Anyway” to bypass the warning.
The tool executes a script to remove policies tied to Securevault, effectively handling cleanup without further registry modifications.
Video walkthrough for this step:
Manual Group Policy Removal
Automatic Group Policy Removal
How to Remove Securevault From Chrome, Firefox and Other Browsers
The policies should have been taken care of by now, which frees the browser settings and allows you to restore them to the way the were before the hijacker came. Just make sure to be thorough with this step and not miss anything, otherwise the intrusive pop-ups might continue to appear.
In the Extensions or Add-ons menu, delete any items associated with Securevault.
- Reinstall trusted extensions if they were affected. Many extensions have a “Repair” button. Clicking it will restore functionality. If not visible, attempting to use the extension might prompt it to appear.
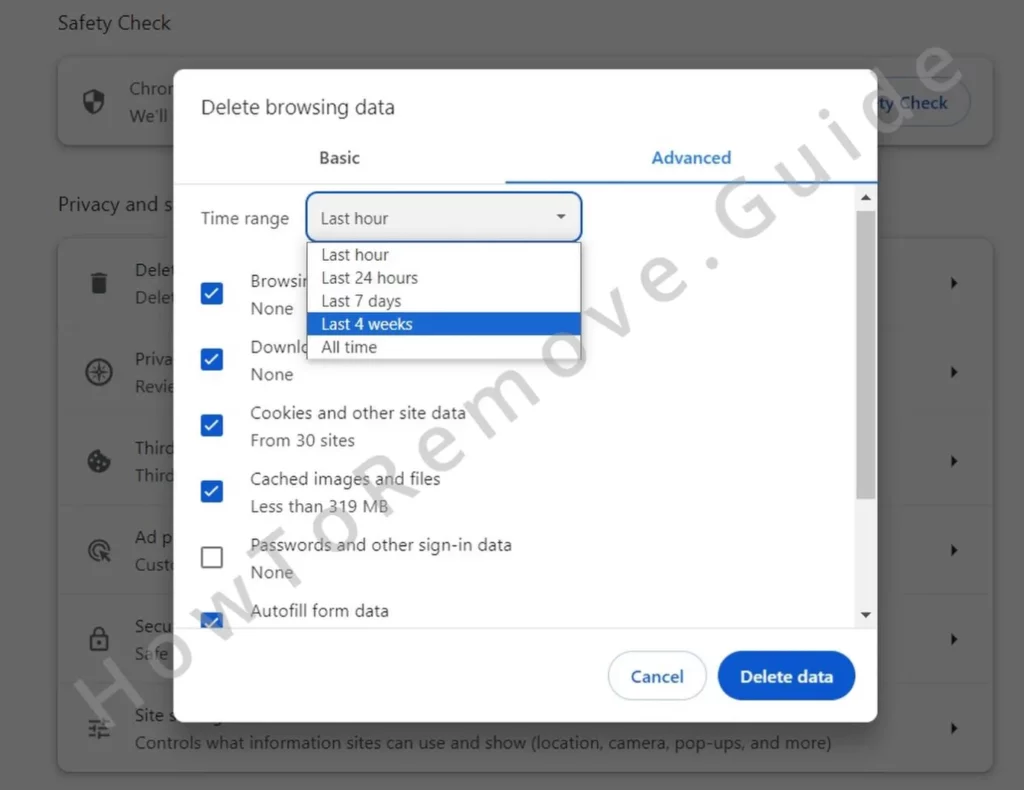
Next, go to Privacy and Security settings, select “Clear browsing data”. Choose the appropriate time range and delete cached files, cookies, and other site data. Avoid clearing login data and passwords.
Check Site Settings again. Revoke permissions for any unrecognized websites. Set preferred homepage, search engine, and startup pages.
In Edge, the Site Settings section is found at Cookies and Site Permissions.

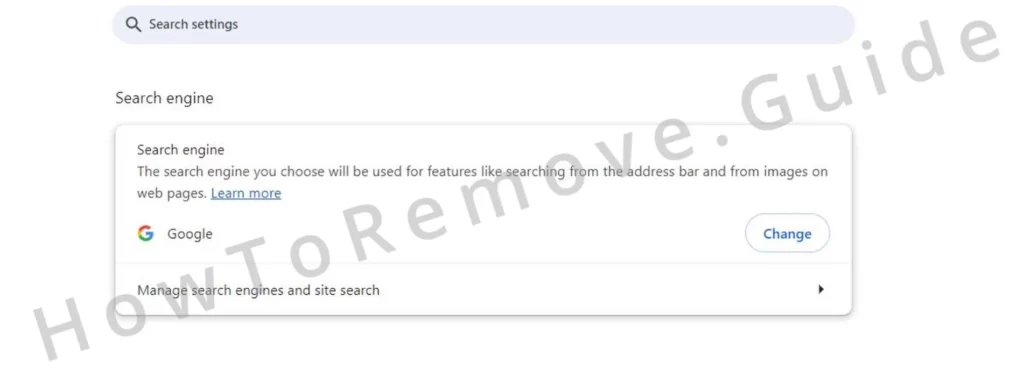
Check your default search engine and make sure it’s not some rogue site.
Also, go to Manage Search Engines and make sure there aren’t any rogue URLs listed there. If you see anything you don’t recognize, delete it.
The last two sections you’ve got to check are Appearance and On Startup. See if there are any rogue URLs there and delete them.
Video walkthrough for this step:
Chrome
Microsoft Edge
Mozilla Firefox
Dealing with Persistent Securevault Malware: Third-Party Solutions
In cases where manual removal fails, a third-party anti-malware tool may succeed. Persistent hijackers sometimes hide in background processes, reinstalling malware each time it’s deleted. Tools like SpyHunter 5 specialize in detecting such malware, especially if it is embedded in hidden locations. Download SpyHunter 5, install it, and run a full system scan. The tool will identify rogue software and remove it from the system. Reboot the computer to finalize the process.
SpyHunter 5 locates even deeply hidden malware components. Running a scan provides extra security. For many, using this tool proves the final step in achieving a malware-free system. Its thoroughness brings peace of mind, especially when all manual attempts fail.
Preventing Future Browser Hijacking and Malware
Avoiding browser hijacks in the future requires preventive measures. Regularly updating security settings keeps malware at bay. Review browser permissions frequently. Unauthorized sites granted permissions pose a security risk. Revoke permissions from any unfamiliar site immediately. Trusted extensions offer a good first defense, but researching before installation avoids potential threats. Avoid random extensions, as hijackers often disguise themselves as add-ons.
Antivirus programs provide additional protection. Combining antivirus with an anti-malware tool strengthens defenses. Both update automatically, preparing your computer for new threats. Paying attention to browser performance also helps. Unexpected slowdowns, altered settings, or redirected searches often signal hijacking. Noticing these early signs lets you address the problem before it becomes critical.
These steps offer a thorough, multi-layered approach to browser security. Removing the Securevault malware and using preventive practices safeguard your browsing experience, making it free of unwanted interruptions.

Leave a Reply