If you are worried about the sudden appearance of distressing malware warnings that seem to originate from a well-known AV, such as McAfee or Norton, but have something called Shedroobsoa as their source, then this article’s for you.
First and foremost, these alerts are fake. They are there to get you to click them and visit some sketchy page that, at best, promotes some obscure app and, at worst, is designed to scam you or infect you with actual malware. The actual cause of these fake alerts is the Shedroobsoa browser hijacker which has likely gained pop-up permissions in your browser alongside other privileges. To stop the pop-ups, you must get rid of Shedroobsoa.

Since we’ve seen many hijackers like Shedroobsoa and covered them here – Bingsearch.io, twnt1.ttrk.io, and others – we’ve got a pretty good idea of how to eradicate them. The exact steps you’ll need to complete are explained below, so I recommend using the following guide to free your browser from the Shedroobsoa annoyance.
Shedroobsoa.net Removal Tutorial
Eliminating Shedroobsoa.net doesn’t have to seem daunting. Start with the easiest techniques to conserve effort and time. Should these initial efforts fall short, move on to more thorough methods. Adhering to a structured, logical sequence makes the process more manageable, so steer clear of jumping straight into intricate fixes. Whenever possible, choose simple strategies first.
Quick Steps to Remove Shedroobsoa
- 1.1Open your web browser and navigate to its configuration area by entering the Settings section. For Chrome, click the three vertical dots located in the top-right corner. Firefox users should locate the three horizontal bars in that same region.
Once the dropdown appears, hunt for the segment called Extensions or Add-ons. This part lists all installed browser enhancements, allowing you to inspect them thoroughly for anything unusual, unnecessary, or potentially harmful that might be affecting your internet experience. - 1.2Examine the extension list meticulously, reviewing their names, descriptions, and permissions. Some dangerous add-ons may disguise themselves with misleading names or icons, so remain cautious. If something looks unfamiliar or suspicious, press the Delete option immediately to eliminate it and avoid any risks.
When in doubt about an extension, quickly search the web using its exact title. Many problematic ones have been reported by others, and you might find discussions or posts indicating if it’s safe or a known threat. Taking a moment to verify can prevent larger issues down the road. - 1.3Visit your browser’s Privacy and Security settings and locate the section for Site Permissions. Websites frequently request access to functions like notifications, camera, microphone, or location tracking. While legitimate sites may need these, untrustworthy ones could exploit them to spy, steal information, or bombard you with pop-ups.
Carefully review which sites hold these rights and ensure no odd or shady ones are present. If any permissions seem excessive or unwarranted, revoke them instantly to minimize risks and prevent unwanted disruptions. - 1.4If you notice websites with privileges you don’t remember approving, go into the settings and remove their access without delay. This swift action stops unauthorized control over your browser and prevents harmful sites from interfering with your online activities. Afterward, restart your browser to apply the changes. If Shedroobsoa persists, proceed to more aggressive removal tactics.
Often, this simple adjustment restores normalcy. However, if Shedroobsoa remains stubborn, further investigation is necessary.
SUMMARY:
| Name | Shedroobsoa |
| Type | Browser Hijacker |
| Detection Tool |
We tested that SpyHunter successfully removes Shedroobsoa* and we recommend downloading it. Manual removal may take hours, it can harm your system if you re not careful, and Shedroobsoa may reinstall itself at the end if you don’t delete its core files. |
If you’re comfortable with basic troubleshooting, follow this guide step-by-step. But if time is short or you’d rather avoid the effort, there’s a simpler option. A dependable tool can quickly and safely handle the task, skipping the manual process. For those valuing convenience, that’s the best choice.
How to Remove the Shedroobsoa Virus
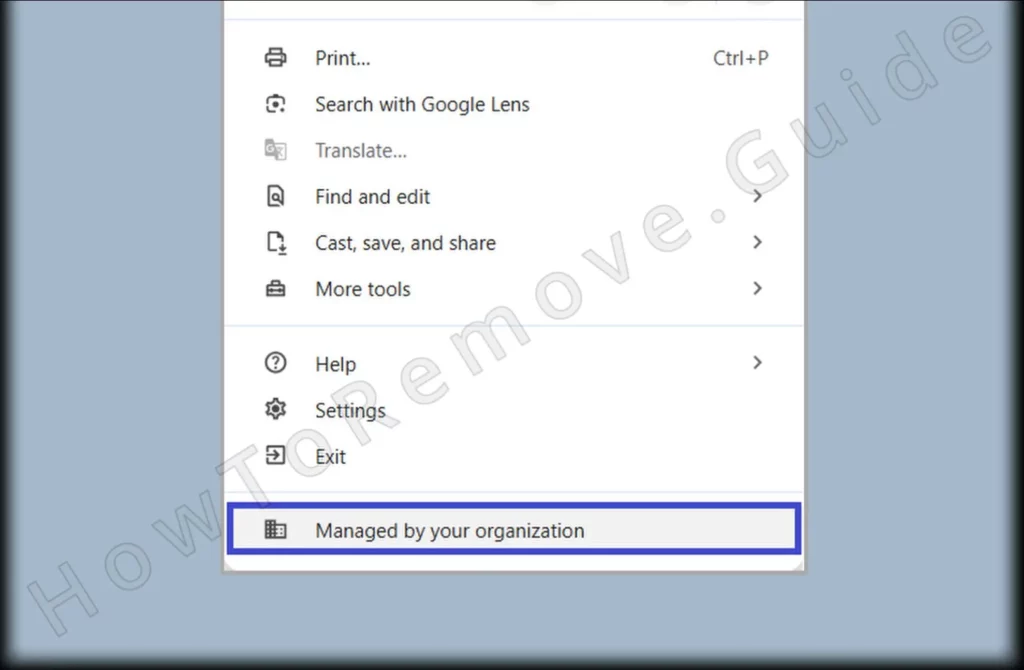
Hijacker sites like Shedroobsoa infiltrate your browser by embedding hidden policies that restrict your ability to modify settings. Wondering if this affects you? Check your browser’s menu and browse through it. See “Managed by your organization”? That’s the hijacker locking you out. Additional steps are needed to take back control.
Managed by your organization
This phrase signals a third-party policy affecting your browser.
1. Identify the Shedroobsoa Policies
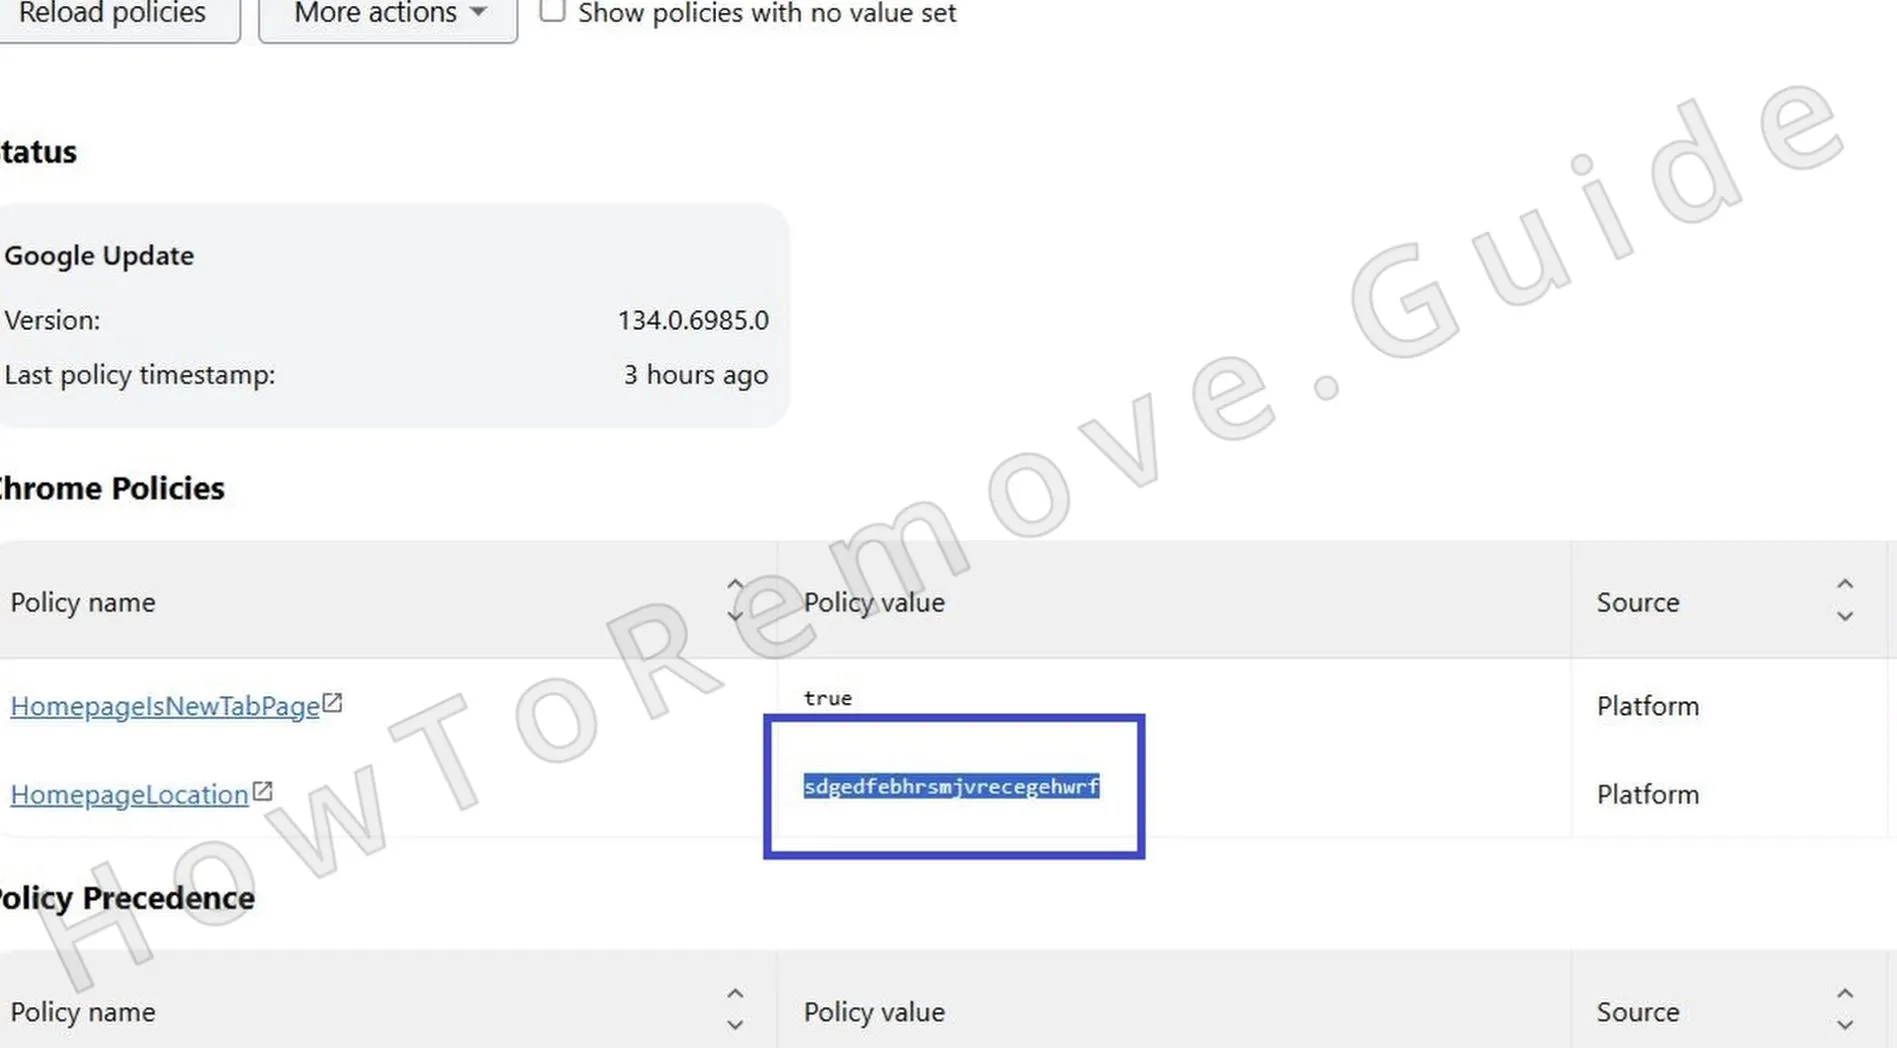
- 1.1To view the policies influencing your browser, enter a designated address in the URL bar:
– For Chrome: chrome://policy
– For Edge: edge://policy
After typing this, a list of all rules currently governing your browser will display. Analyze it closely to spot any unexpected, questionable, or unauthorized rules possibly linked to the Shedroobsoa hijacker. - 1.2Inspect the Policy Name and Value columns for anything strange or unfamiliar. Some hijackers use random strings of letters and numbers rather than obvious names, making them harder to detect. Note down or photograph any dubious policy names and details for use in later removal steps.
- 1.3Return to the Extensions section and enable Developer Mode by toggling the switch in the top-right area. This reveals more details about each extension, such as its unique ID, aiding in identifying any odd or concerning ones.
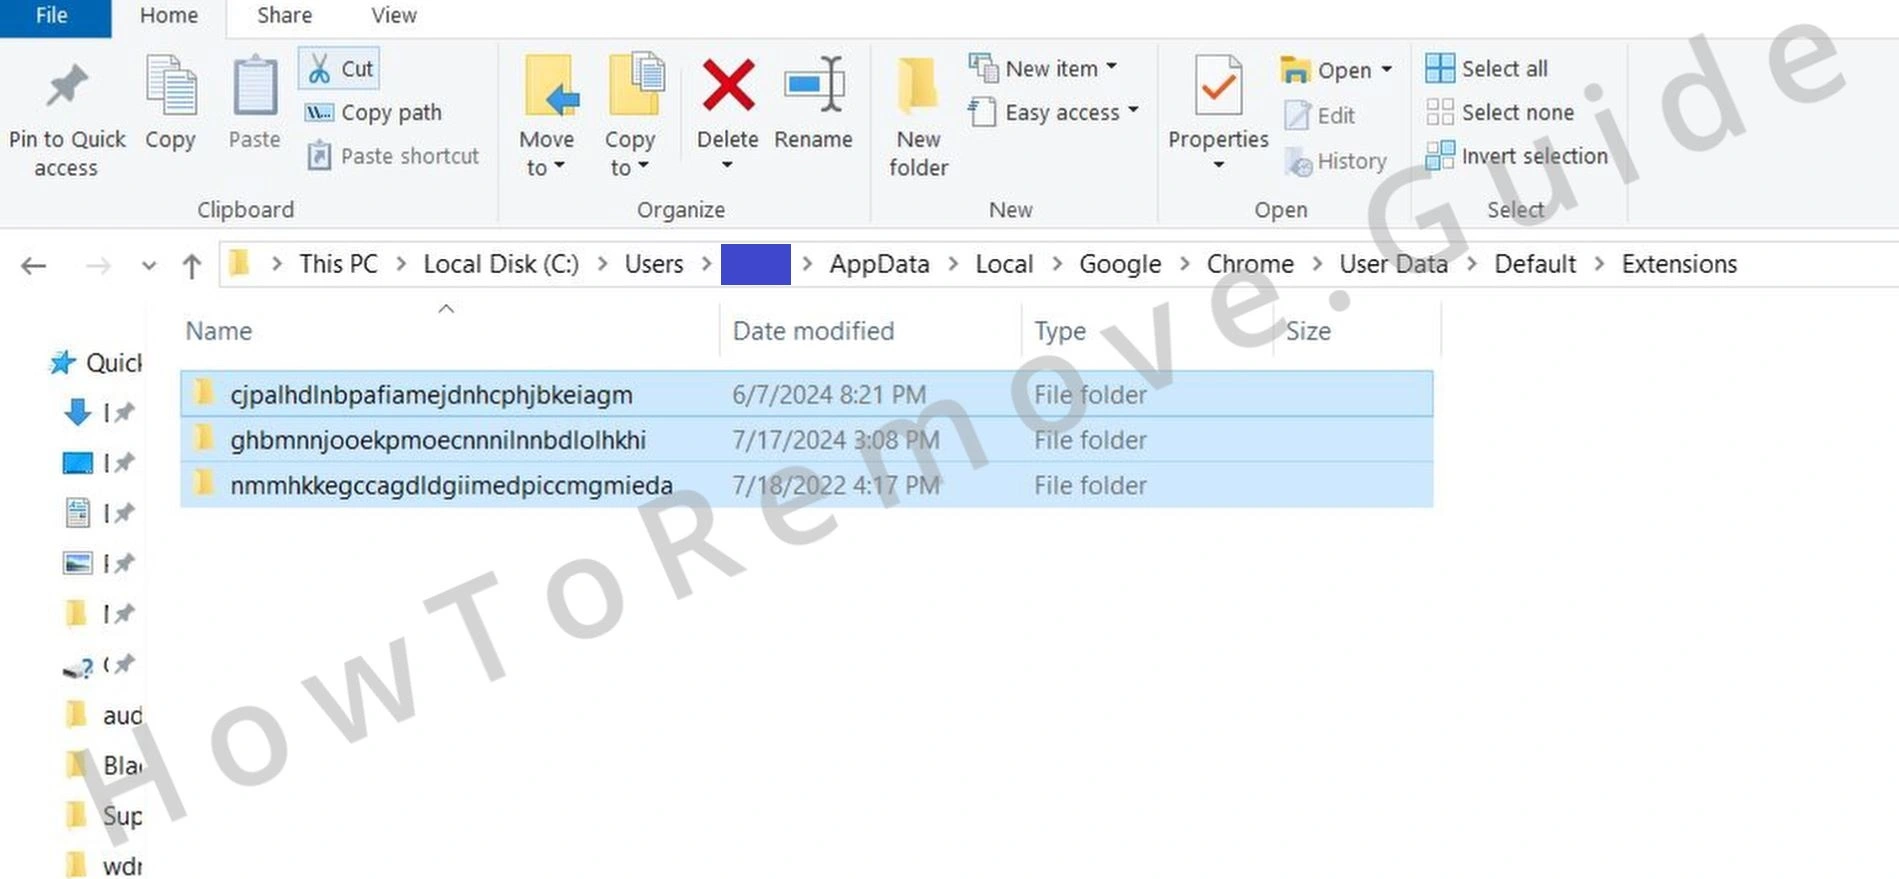
If anything seems suspicious, write down its ID, as it could be useful for manual removal in the steps ahead. - 1.4If Shedroobsoa prevents access to the Extensions page, use File Explorer to manually locate the extension files. Navigate to this directory:
C:\Users[Your Username]\AppData\Local\Google\Chrome\User Data\Default\Extensions - 1.7After completing these steps, go back to the Extensions page, turn on Developer Mode, and record the IDs of any remaining rogue extensions. Basically, try to perform step 3 from this section again.
Video walkthrough for this step:

Get Rid of Shedroobsoa.net Policies
When Shedroobsoa.net digs into your system, you must clear its traces from the Windows Registry. It’s a complex task, no doubt – crucial, too. Nervous about editing it yourself? Use a dedicated tool to handle it. Accuracy is key, whichever method you choose, to eliminate this intruder effectively.
2. How to Delete Shedroobsoa.net Policies Through the Registry
- 2.1To access the Registry Editor, press Win + R, type “regedit”, and hit Enter. This utility allows you to view and modify system configurations that control your operating system and applications.
If a User Account Control (UAC) prompt appears, click Yes to grant administrative privileges, as registry changes require elevated access. Move forward carefully to avoid unintended alterations. - 2.2Inside the Registry Editor, launch the search function by clicking Edit > Find or pressing Ctrl + F. Enter the policy values or extension IDs you noted from the browser’s policy page or Developer Mode.
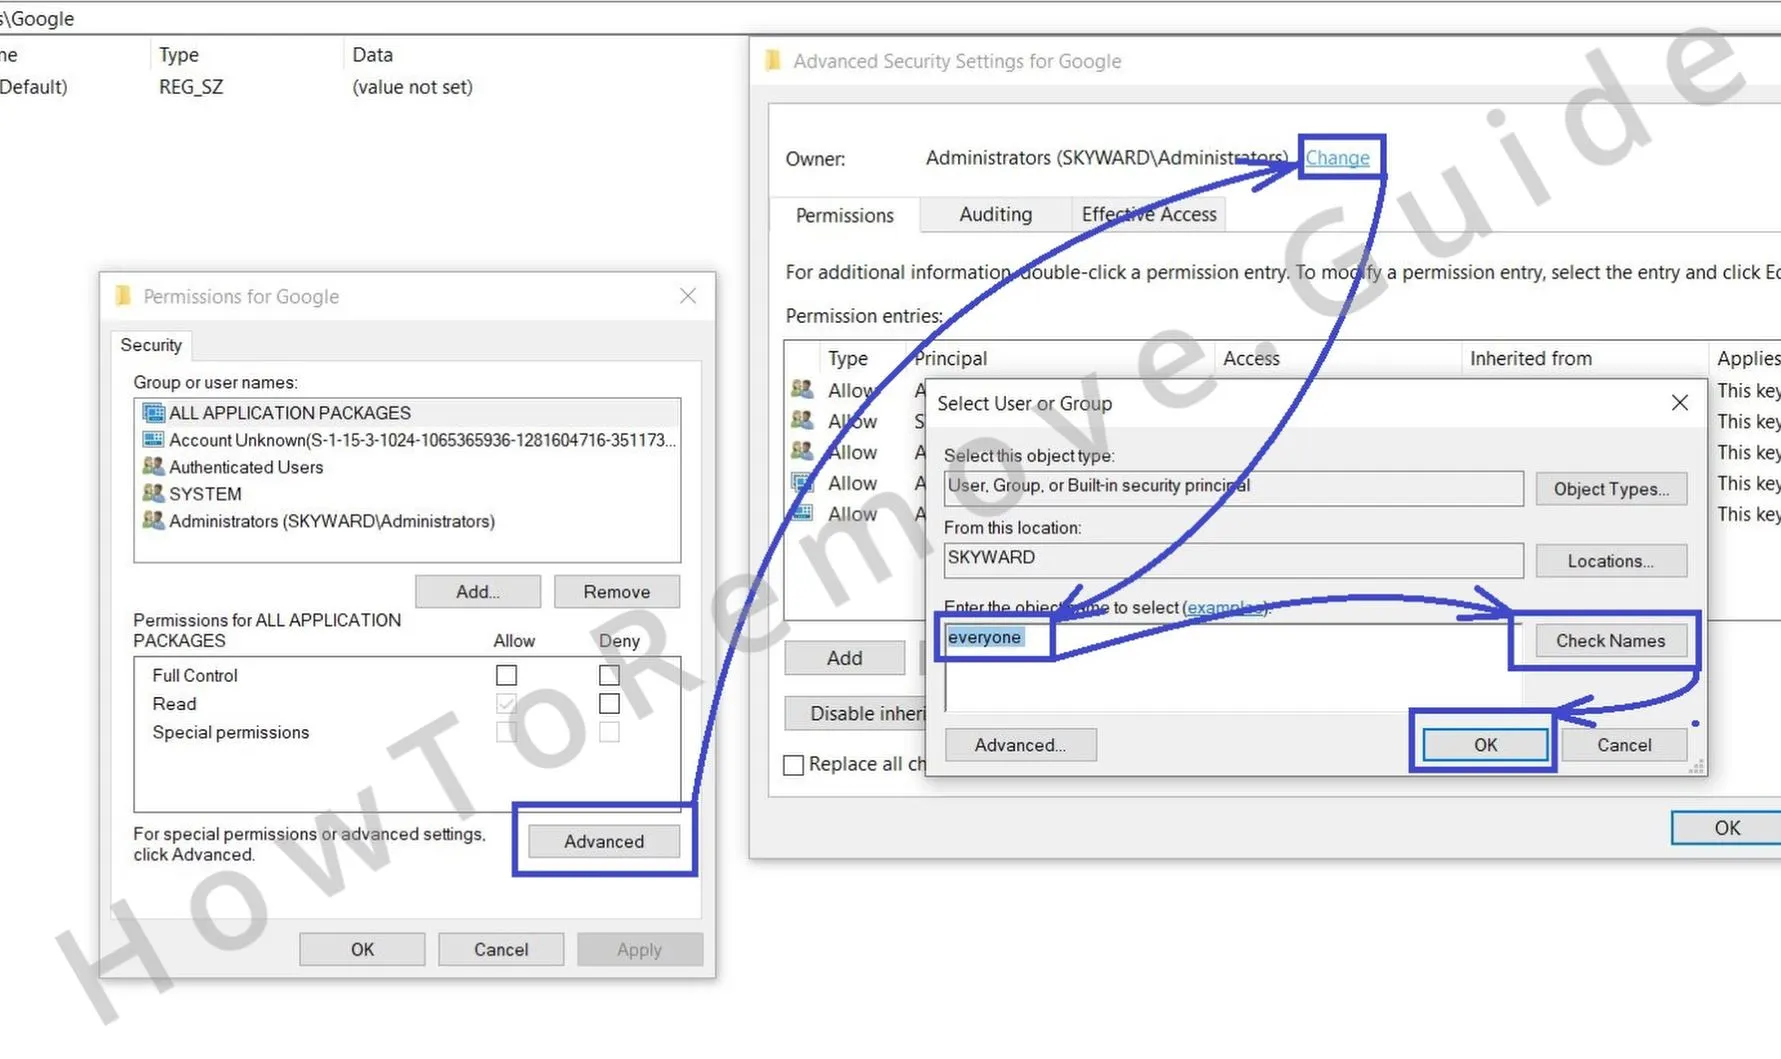
Click Find Next to locate registry entries tied to Shedroobsoa. If a match appears, right-click it and select Delete. Repeat the search multiple times to ensure all related entries are found, as hijackers often spread across various locations. - 2.3Some registry entries may resist removal due to restricted permissions. If you encounter a resistant item, modify its access as follows:
– Right-click the entry and select Permissions.
– Click Advanced, then locate the Owner field at the top.
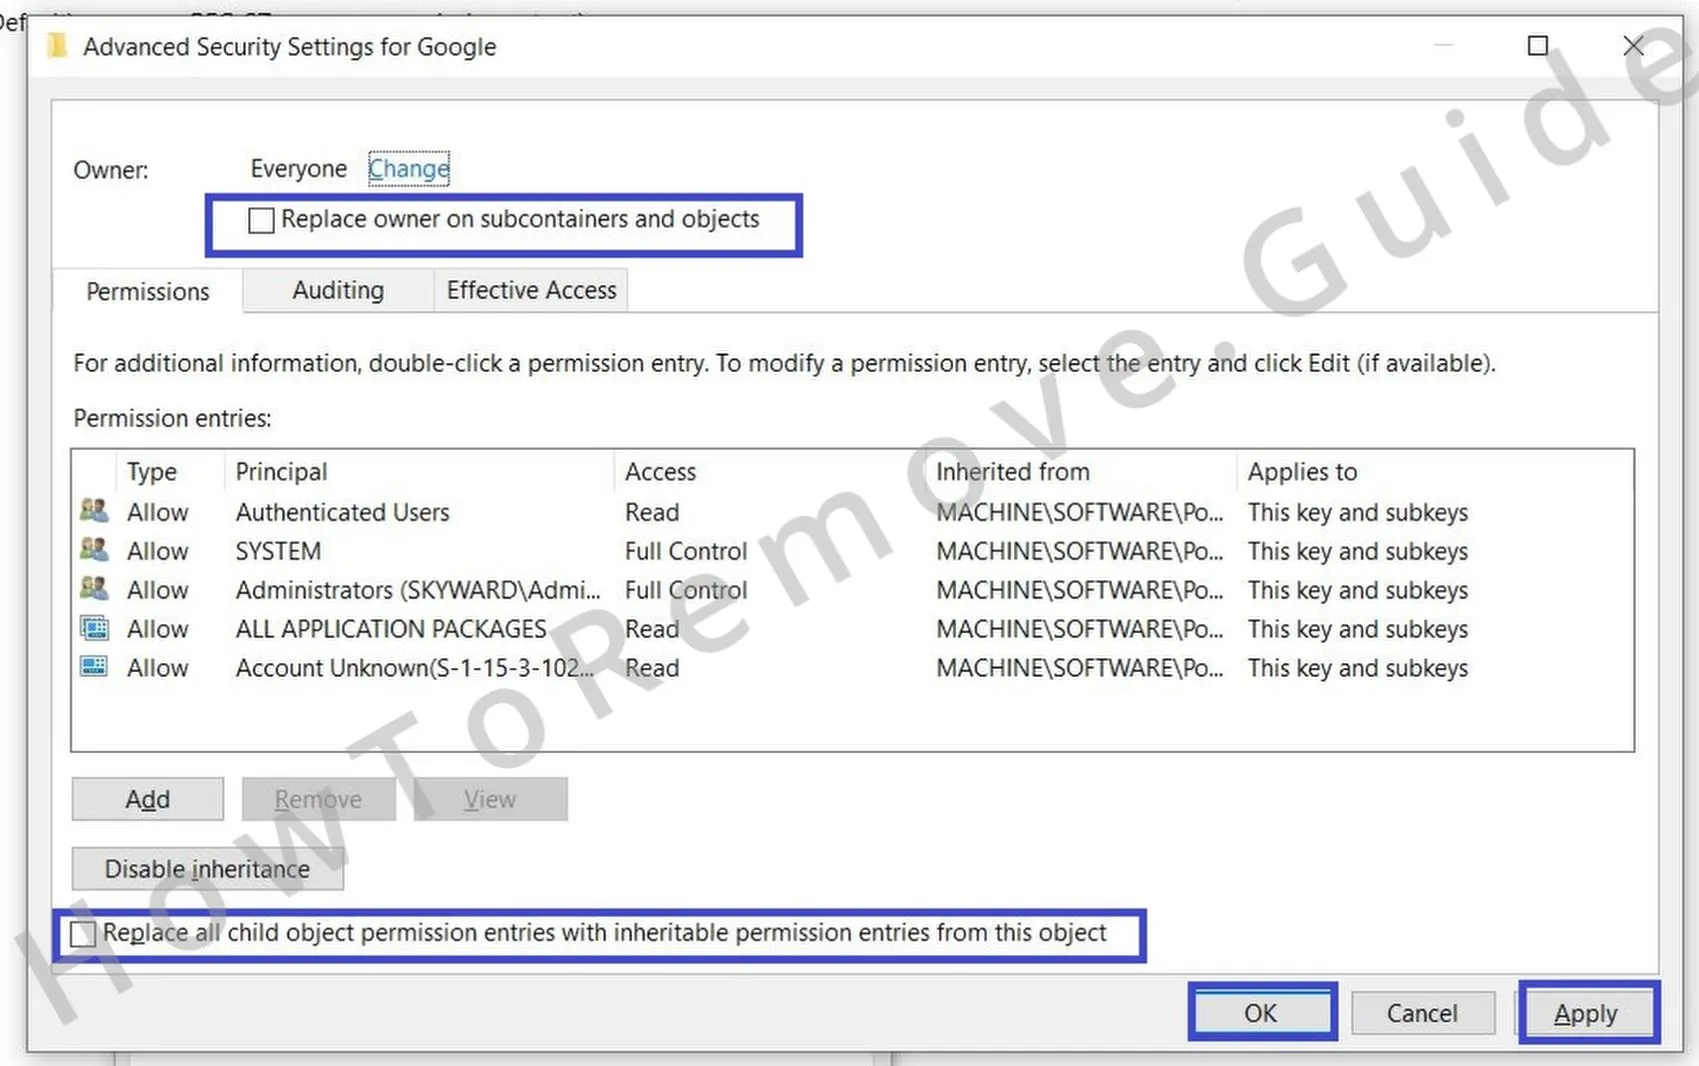
– Click Change, type “Everyone” in the field, press Check Names, and hit OK. - 2.4After adjusting permissions, enable the options “Replace owner on subcontainers and objects” and “Replace all child object permission entries with inheritable permission entries from this object”.
Press Apply, then OK to confirm the changes. Return to the stubborn registry key, right-click, and choose Delete. This eradicates even the most persistent Shedroobsoa policies from your system.
Video walkthrough for this step:
Alternative Tools to Delete Shedroobsoa.net Policies
Look again for the “Managed by your organization” alert. If it’s disappeared, great – you’re back in control. Still there? Don’t panic. Shedroobsoa.net can be stubborn, but multiple solutions exist to kick it out. Remain calm, keep digging, and push forward until it’s completely removed from your device.
3. Other Ways to Get Rid of Shedroobsoa.net Policies
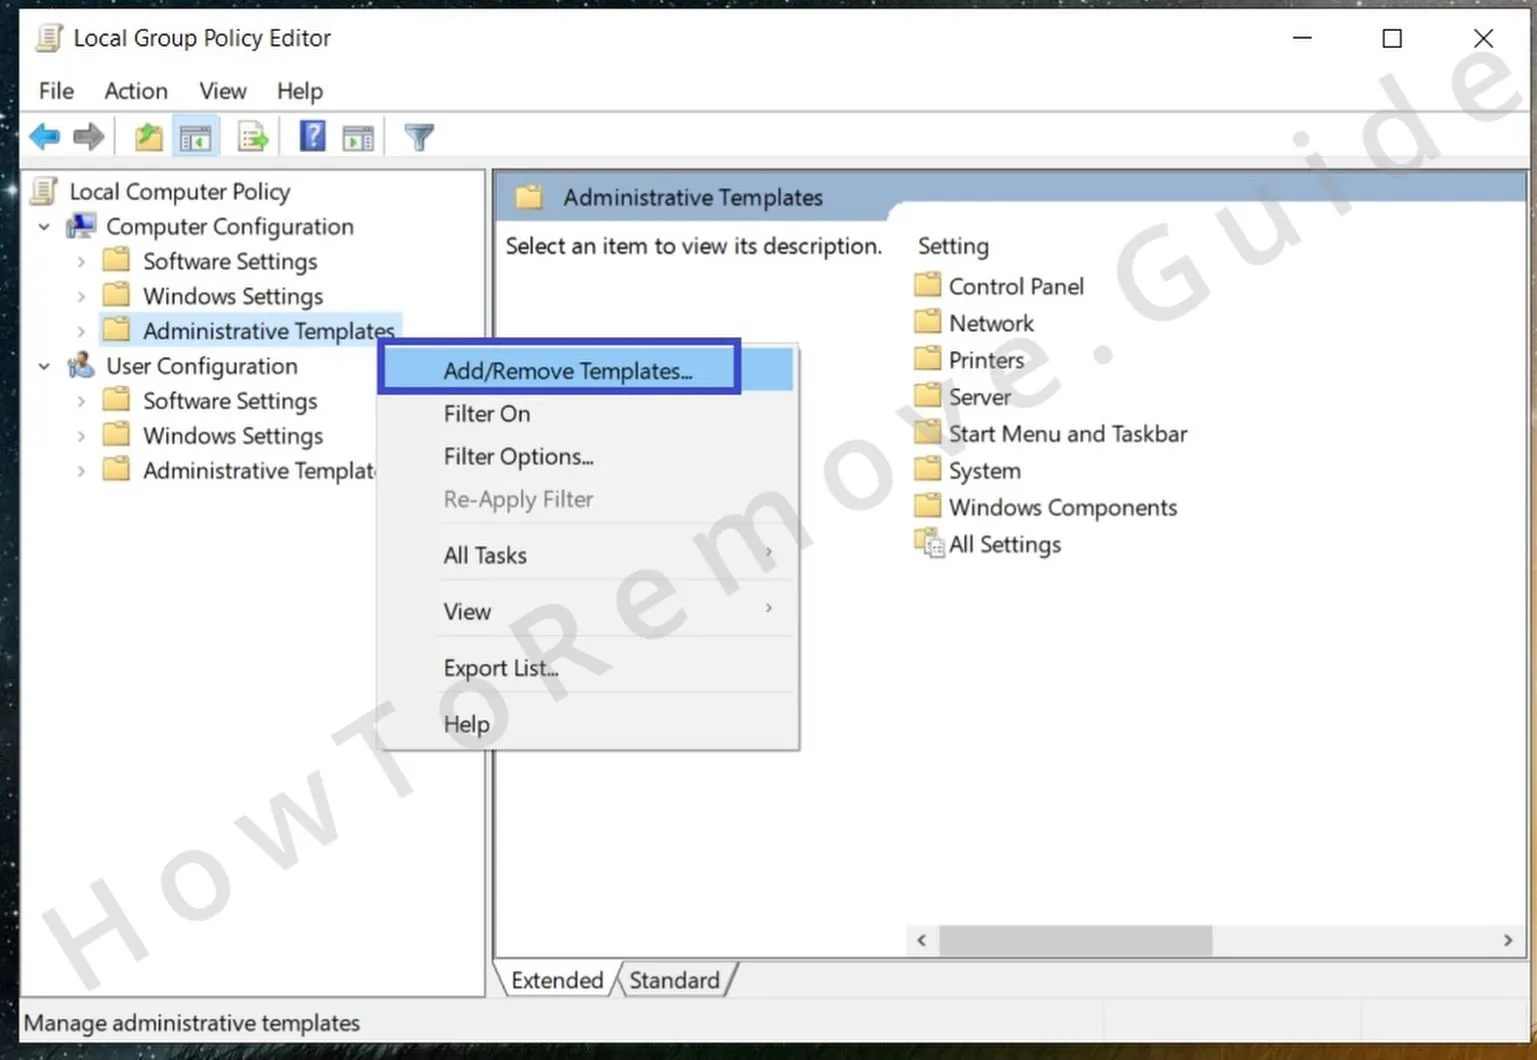
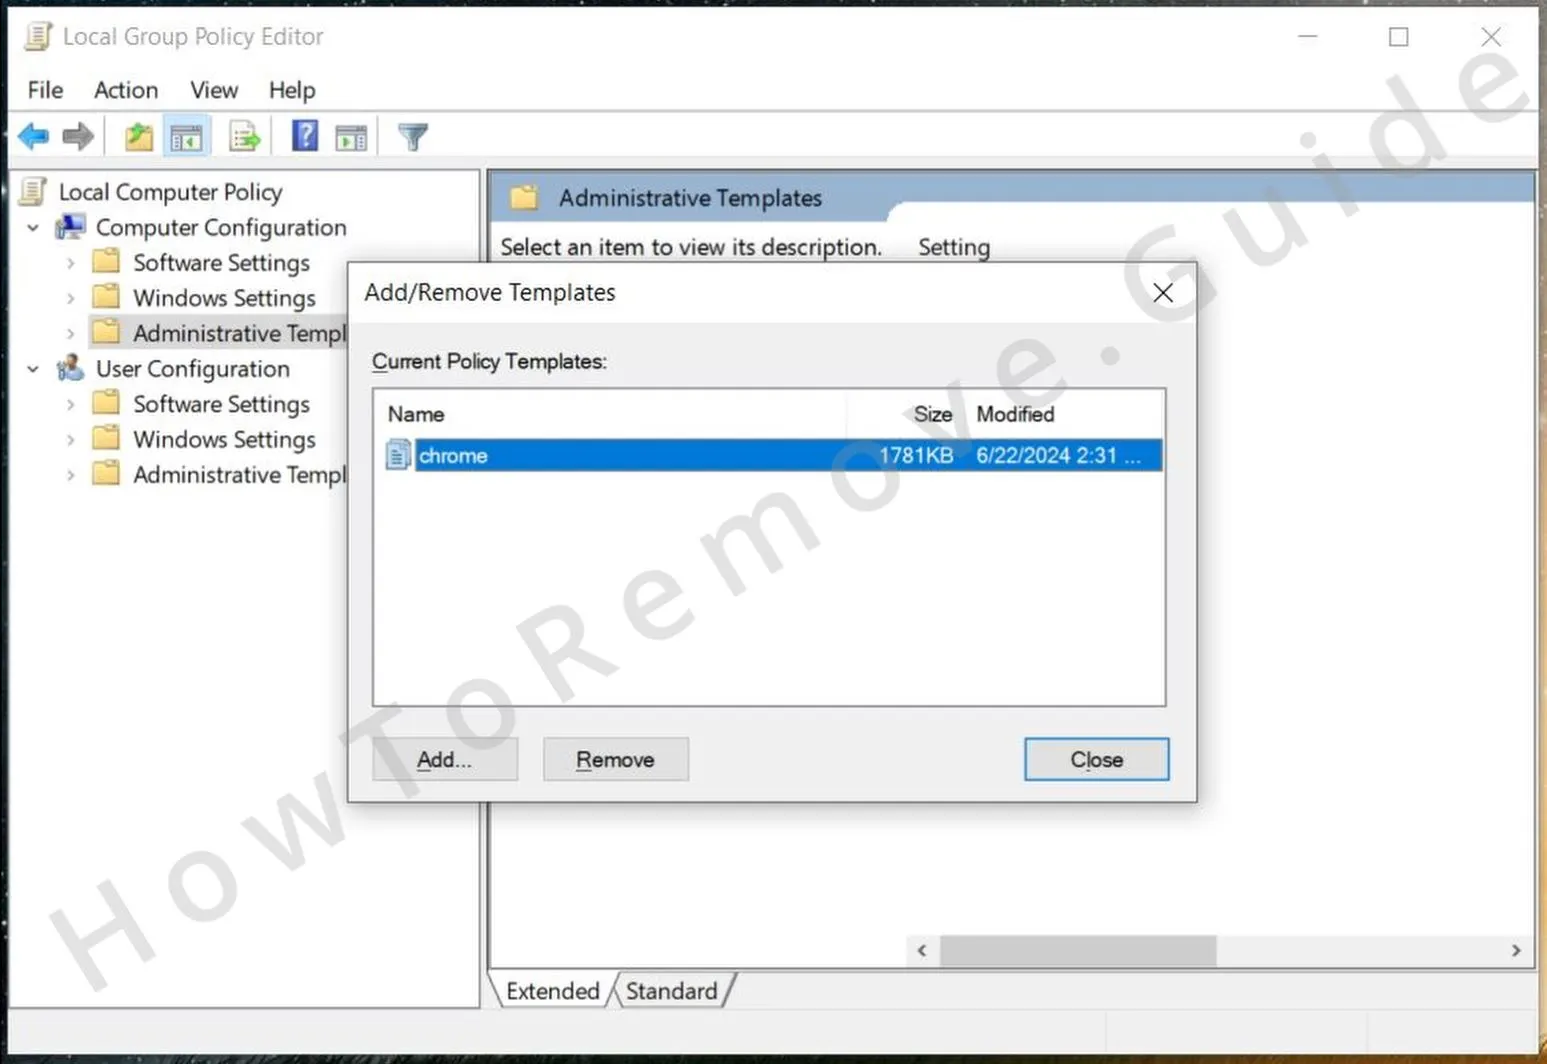
- 3.1Press Win + S, search for “Edit Group Policy”, and launch the Group Policy Editor. This tool enables administrators to define and enforce system policies, including those potentially altered by Shedroobsoa.
Once inside, head to Administrative Templates, where browser-related settings that may have been manipulated are stored. - 3.3For Chrome users, the Chrome Policy Remover tool can automatically erase rogue policies. Follow these steps:
– Obtain the tool from a provided source.
– Right-click the file and choose Run as Administrator to grant full access.
– Allow it to scan and remove all active Chrome policies, restoring normal settings.
This method suits those who prefer automated solutions over manual adjustments. - 3.4When running tools like Chrome Policy Remover, Windows may display a security warning about unrecognized programs.
To proceed, click More Info, then select Run Anyway. This permits the tool to operate, provided you’ve verified its legitimacy. Always source such tools from reputable providers to avoid additional risks.
Video walkthrough for this step:
Manual Group Policy Removal
Automatic Group Policy Removal
Uninstall Shedroobsoa From Chrome, Edge, and Other Browsers
Hopefully, Shedroobsoa is gone, leaving your browser running smoothly once more. Don’t get complacent – double-check every corner. One missed clue might allow it to creep back in. Stay sharp, proactive, and determined to prevent its comeback. Protecting your browser hinges on consistent, careful attention.
4. How to Remove Shedroobsoa From Your Browser
- 4.1Go back to the Extensions or Add-ons area and perform a final review of all listed items. If anything questionable or unrecognized remains, click Remove to delete it permanently.
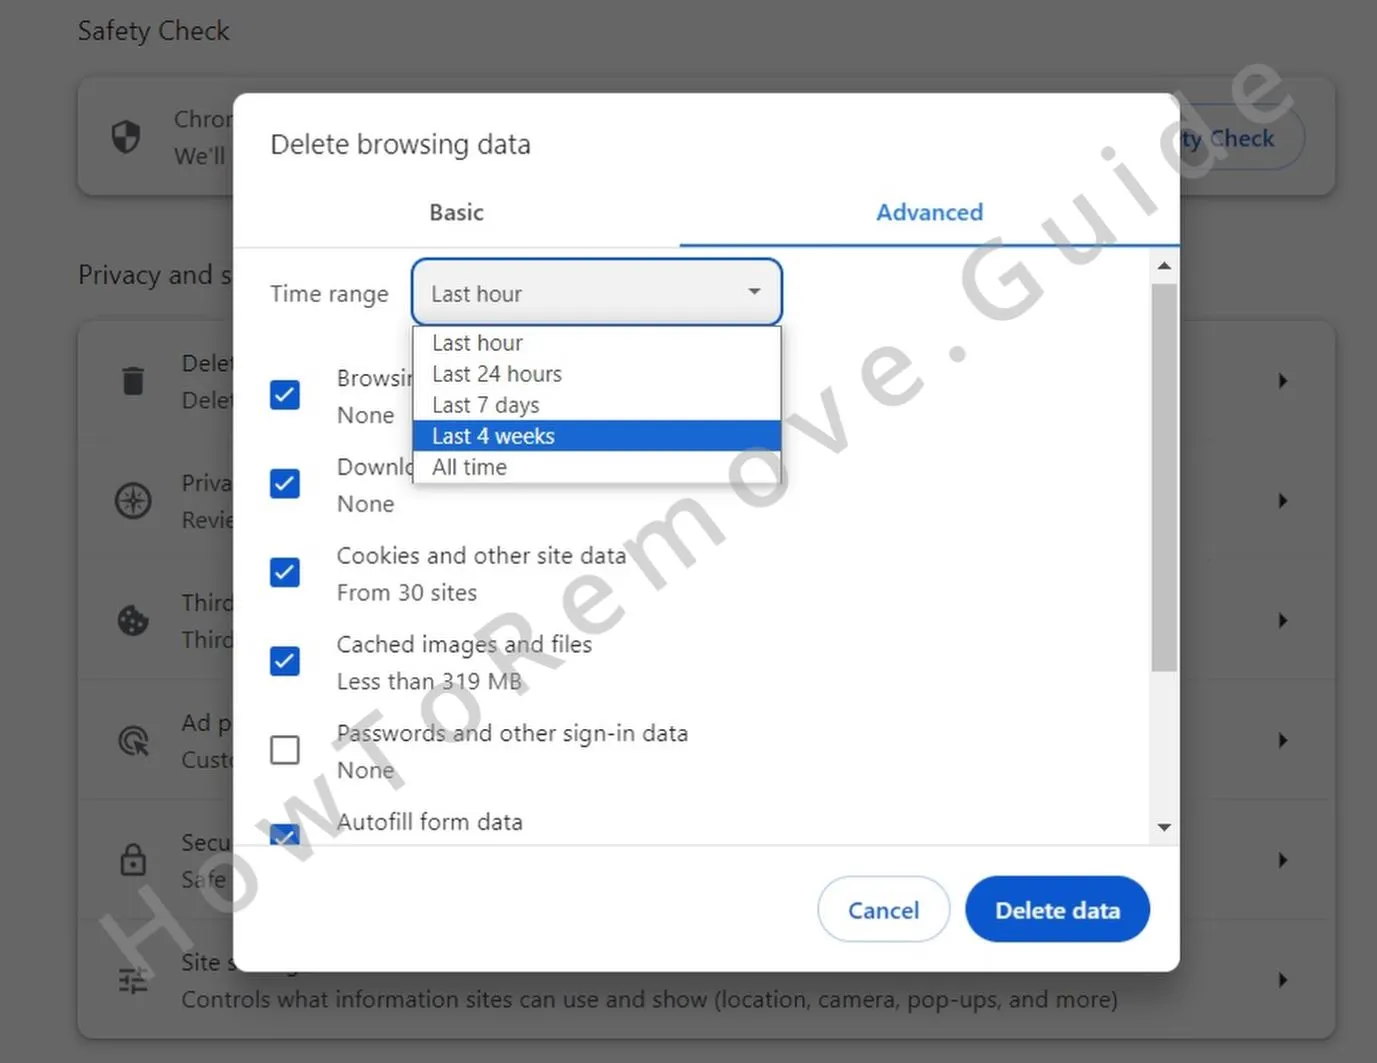
Even after earlier efforts, some hijackers can reappear after a restart. A thorough check here ensures no covert add-ons have resurfaced. - 4.2Head to Clear Browsing Data, choose All Time as the time range, and select all options except Saved Passwords. Press Clear Data to erase cached files, cookies, and history that might still contain Shedroobsoa traces.
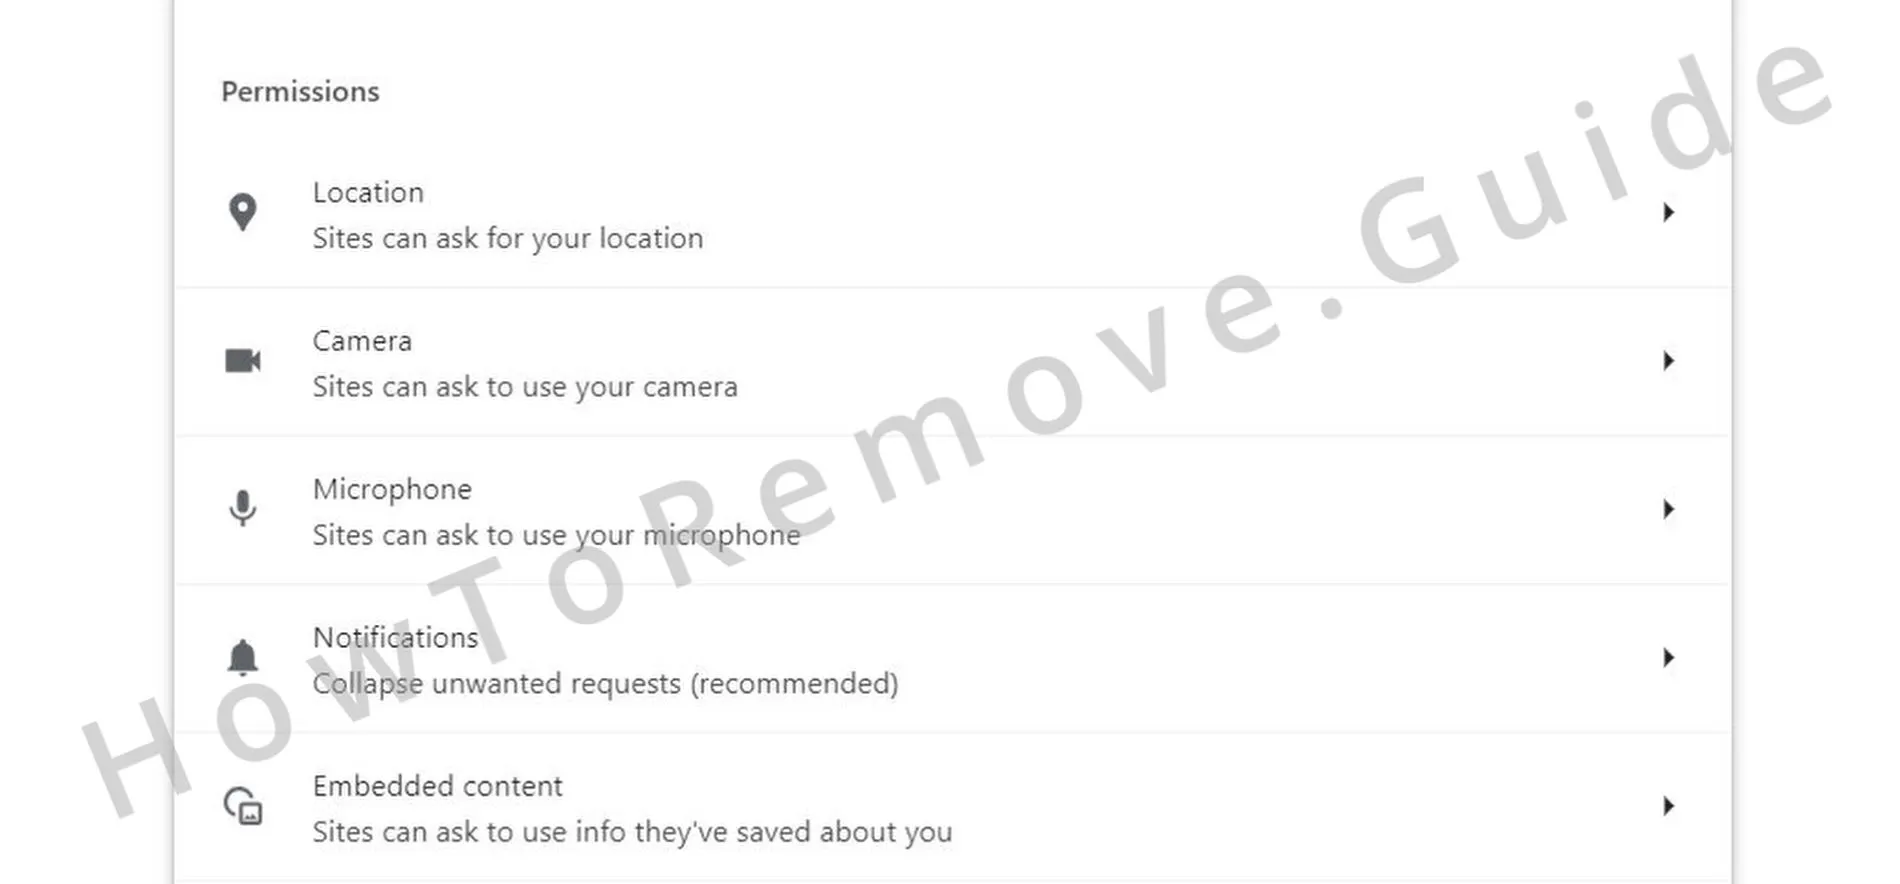
Wiping this data prevents malicious scripts from reloading on restart and gives you a fresh start. - 4.3Enter the Privacy and Security section and access Site Settings. Check each permission category – such as notifications, location, and camera – to ensure no unauthorized sites retain control over your system’s features.
If any suspect sites still have access, hit Remove or Block to sever their connection for good, preventing hijackers from regaining influence. - 4.5Inspect the On Startup and Appearance settings to determine if your homepage or startup pages have been altered. If an unknown URL is set as your homepage, delete it and revert to a safe site.
Some hijackers modify these settings to steer you to rogue pages, so resetting them ensures a secure and seamless browsing experience.
Video walkthrough for this step:
Chrome
Microsoft Edge
Mozilla Firefox

