

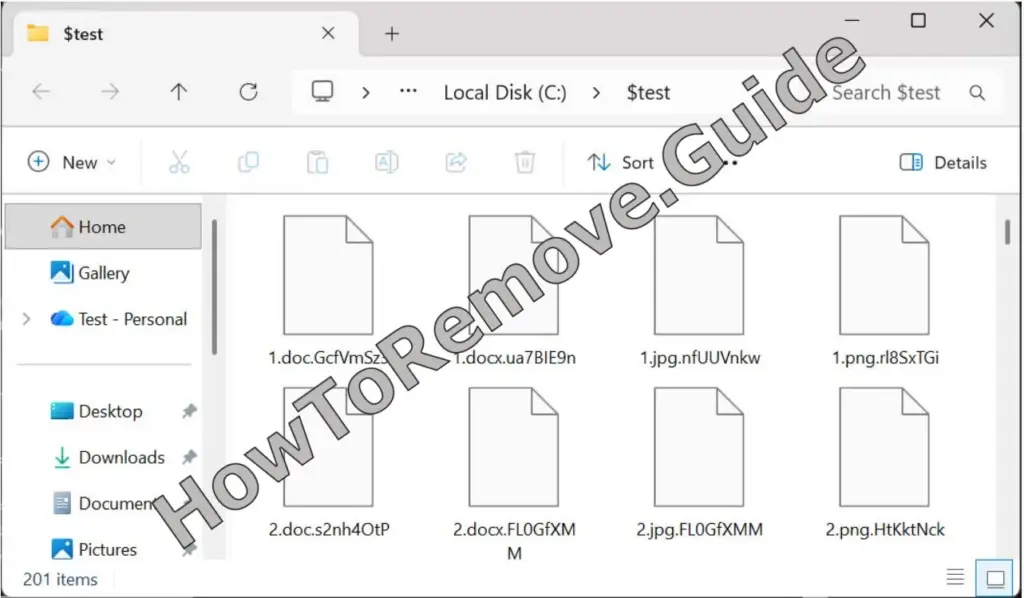
Late in 2025, Sp1d3rw3b started showing up as the name attached to ShinySp1d3r, a new RaaS operation: one team maintains the encryptor, then “affiliates” use it against companies and split the ransom.
The typical hit is two-stage pressure. Criminals copy confidential files, then scramble systems so machines won’t boot or open documents – classic double-extortion. Victims are told to negotiate over TOX. Early samples look Windows-first, with chatter about VMware ESXi and Linux builds.
We tested that SpyHunter successfully removes Sp1d3rw3b* and we recommend using it. It will block Sp1d3rw3b from reinstalling itself and it will make sure your device is clean from any malware.
 Try Free For 7 Days*
Buy now15% OFF if you buy straight without trial.
 OFFER
OFFERThe human side is the weak point. Actors linked to Scattered Spider lean on social-engineering – phone calls, fake identities, and password resets – to seize accounts. Related crews also sell stolen data; a “Sp1d3r” broker advertised a $1M Truist bundle.
Defense starts with identity controls: require MFA with phishing-resistant FIDO2 keys for admins, and drill the helpdesk to verify callers using call-backs to approved numbers and ticket history. Keep offline immutable backups, and test restoring a server regularly.
SUMMARY:
| Threat name | Sp1d3rw3b |
| Category | Ransomware |
| Detection Tool |
Some threats reinstall themselves if you don’t delete their core files. We recommend downloading SpyHunter to remove harmful programs for you. This may save you hours and ensure you don’t harm your system by deleting the wrong files. |
Sp1d3rw3b Ransomware Removal and File Recovery Guide
As soon as you suspect Sp1d3rw3b activity, cut communications first. Unplug Ethernet, disable Wi-Fi, and disconnect any VPN so the system cannot pull additional payloads or sync damaged data outward. Avoid opening cloud-drive folders and pause synchronization until you confirm no related components remain active on the machine.
After isolating the device, shut it down fully while Sp1d3rw3b is still under investigation. A complete power-off stops active processes and prevents timed actions from running in the background. Do not browse files on the affected host out of curiosity. Use a separate clean device to read instructions and prepare tools without risking cross-contamination.
Containment is the priority when Sp1d3rw3b is involved, because time and access are what these attacks consume. Reducing uptime, similar to Payfast ransomware, limits the window for file damage and blocks opportunistic follow-on malware. Treat the situation like an incident you stabilize step by step, not a pop-up you try to close. Keep notes on what you observe and change for later review.
How to Remove the Sp1d3rw3b Infection
Remove Sp1d3rw3b before attempting any recovery. Restoring files while malicious code is still present can trigger immediate re-locking, repeated deletion attempts, or new persistence on restart. The safe order is: stop execution, remove what launches it, verify with a scan, then move to file recovery. Work slowly and track each change so you can undo mistakes.
You can approach Sp1d3rw3b cleanup manually or with automated scanning. Manual removal provides visibility but demands careful Windows hygiene and attention to where programs are allowed to write. Threat components often hide behind ordinary names inside common user folders. If you go manual, assume there may be more than one launch point, not a single obvious executable.
An automated scanner can help catch leftovers from Sp1d3rw3b that are easy to miss, such as autoruns, scheduled tasks, and secondary droppers. A solid anti-malware or EDR tool can review startup locations and typical drop paths quickly. Keep the host offline while you prepare. Reboot only after removal and after a confirming scan shows no active traces.
Manual removal is workable against Sp1d3rw3b if you stay precise. Deleting the wrong item can break legitimate software, while leaving a single loader can reinstall the whole chain. Combine process inspection with persistence checks so you can stop execution, remove related files from disk, and confirm that no autoruns remain. Verify locations and timestamps instead of trusting names.
For manual cleanup of Sp1d3rw3b, follow the sequence below without skipping ahead: identify suspicious processes, remove the files they run from, then clear scheduled triggers that relaunch them. After the manual pass, run a full antivirus scan to confirm nothing is hiding in secondary folders. Document anything you delete so you can explain what changed later.
- Begin with inspection, not random deletions. While still offline, open Task Manager with Ctrl + Shift + Esc, expand More details, and review Processes and Details so you can see parent-child relationships. Enable the command-line column for context and flag entries tied to Sp1d3rw3b exactly once here.
- Judge by behavior, not branding. Look for unusual CPU, Memory, or Disk use, especially when the process runs from user-writable locations. If a name mimics a Windows binary, verify its folder – the real svchost.exe should be in C:\Windows\System32, not in %Temp%.
- When a process looks wrong, right-click it and choose Open file location to expose the folder. Random-looking filenames, very recent timestamps, or companion .dll files inside %AppData%, %LocalAppData%, or %ProgramData% often point to a dropper. Close open apps and try deleting the entire folder.
- If deletion fails because the file is in use, assume it is locked by a running component. Use a trusted unlocker – install LockHunter on a clean PC, copy the installer over, then unlock and remove the file. After it is deleted from disk, return to Task Manager and use End task on the matching process.
- Move on to persistence. Open Task Scheduler from Start, expand Task Scheduler Library and subfolders, and look for newly added or oddly named entries. Review General, Triggers, and Actions so you understand what each task starts and when it runs.
- Focus on where tasks execute from. Items that launch from %Temp%, %LocalAppData%, Downloads, or call .ps1, .vbs, or unknown .exe files via cmd.exe /c deserve scrutiny. Triggers like At logon and On idle commonly exist to resurrect removed components quietly.
- For any task you confirm as malicious, disable it first, then Delete it under Task Scheduler Library, and remove its referenced file path on disk if present. Empty Recycle Bin. Finish by running an offline antivirus scan so remnants in uncommon directories do not survive your manual review.
How to Decrypt Sp1d3rw3b Files
Before you try any decryption method, confirm the exact family involved. Attackers reuse note layouts and timers, but key schemes can differ, making the wrong tool useless. From a clean device, use ID Ransomware with a ransom note and one affected sample, or compare attacker emails and extension patterns. This helps confirm whether Sp1d3rw3b is the correct diagnosis before you risk further file changes.
Decrypt only after removal is complete. Any active component can monitor folders and re-lock outputs as they are created. Stay offline unless you need to download a tool – reconnect briefly, obtain what you need, then disconnect again. Keep original files untouched while testing so you can retry with different methods without compounding corruption.
Check Emsisoft for Available Decryptors
Emsisoft maintains a library of free decryptors and is a sensible first place to check. Tool availability can change as keys are recovered or new cases are analyzed. If a matching option appears for your incident, follow its instructions exactly and keep the output logs for reference. The general flow below mirrors how these tools are typically used when listed on the Emsisoft site.
At the time this was written, no dedicated decryptor was visible on the Emsisoft website for this case. That can change, and a new release may appear later. If a matching tool is available when you read this, the steps below outline a safe way to attempt recovery.
When you are ready, reconnect briefly, download the correct Emsisoft decryptor, then right-click it and choose Run as administrator so it can access protected locations that may have been affected earlier.
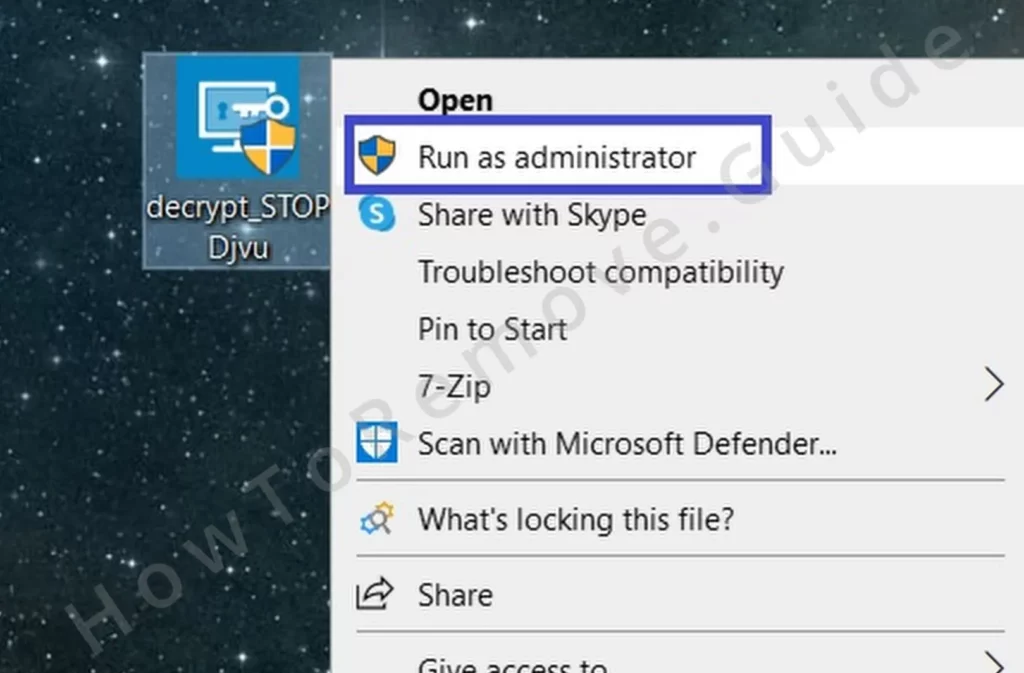
If the download is an installer, complete setup as prompted. Portable builds may run immediately. Close other programs to reduce conflicts and speed up enumeration while the decryptor examines targets across the selected locations.
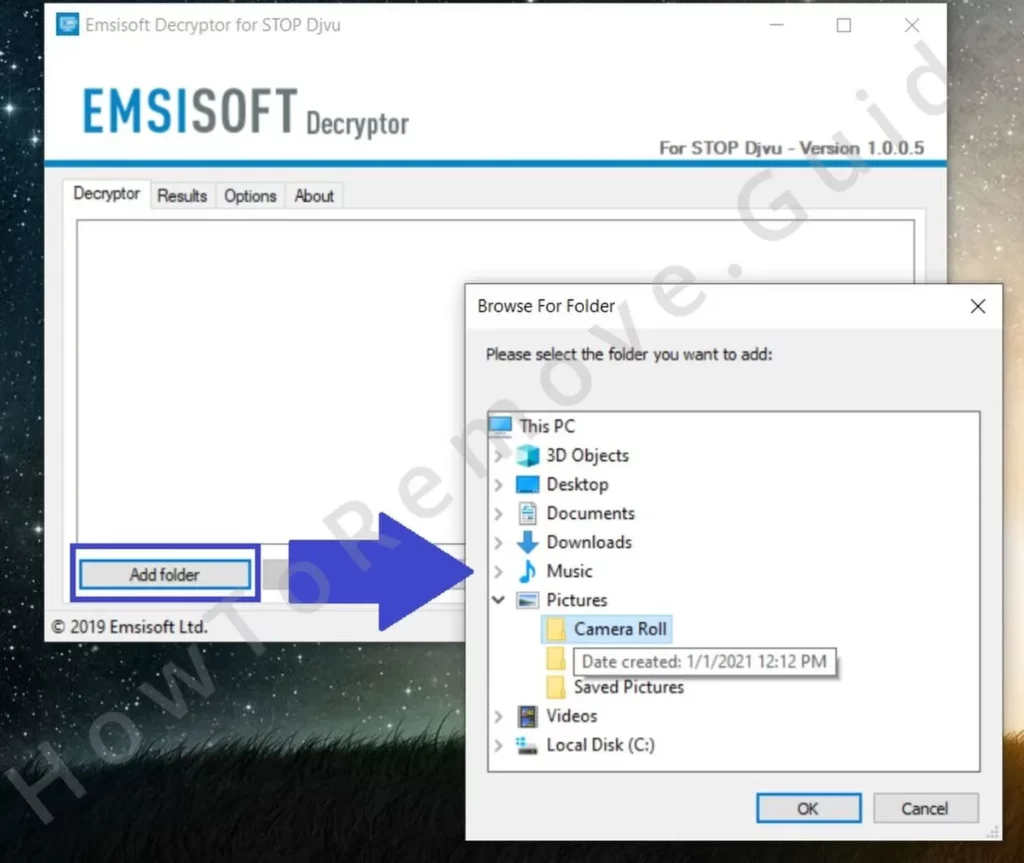
Inside the decryptor, click Add Folder, then browse to each directory holding affected data – Documents, Desktop, shared workspaces, and backups. Include mapped drives only when they are isolated and you are confident you are not connecting back into a live production environment.
Click Decrypt to begin. For large collections, this can take a while, so let it run without interruption. Avoid moving or renaming files during the operation. When it finishes, review the log so you can see what succeeded and which items failed.
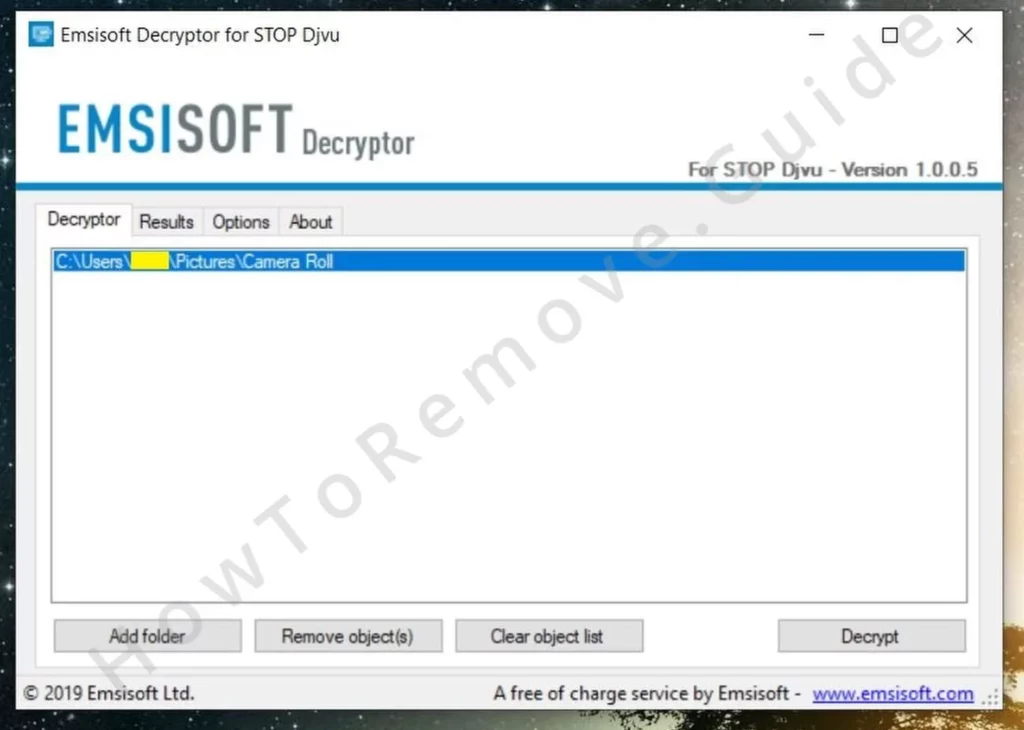
Keep the machine online only if the decryptor needs a server-side key lookup. If an offline key was used during the incident, some files may decrypt; if an online key was used, this approach may not work. Save the logs so you can compare results later or provide them during further analysis.
Recover Files With PhotoRec
If decryption is not available or does not succeed, file carving may still recover some originals. PhotoRec does not unlock encrypted data; it scans the disk for deleted file fragments that may still exist. Results depend on how much the drive has been written to since the event, so keep changes minimal. Store any recovered items away from data that was affected by Sp1d3rw3b.
Download and extract PhotoRec, then right-click qphotorec_win.exe and choose Run as administrator so it can access the disk with fewer permission issues.
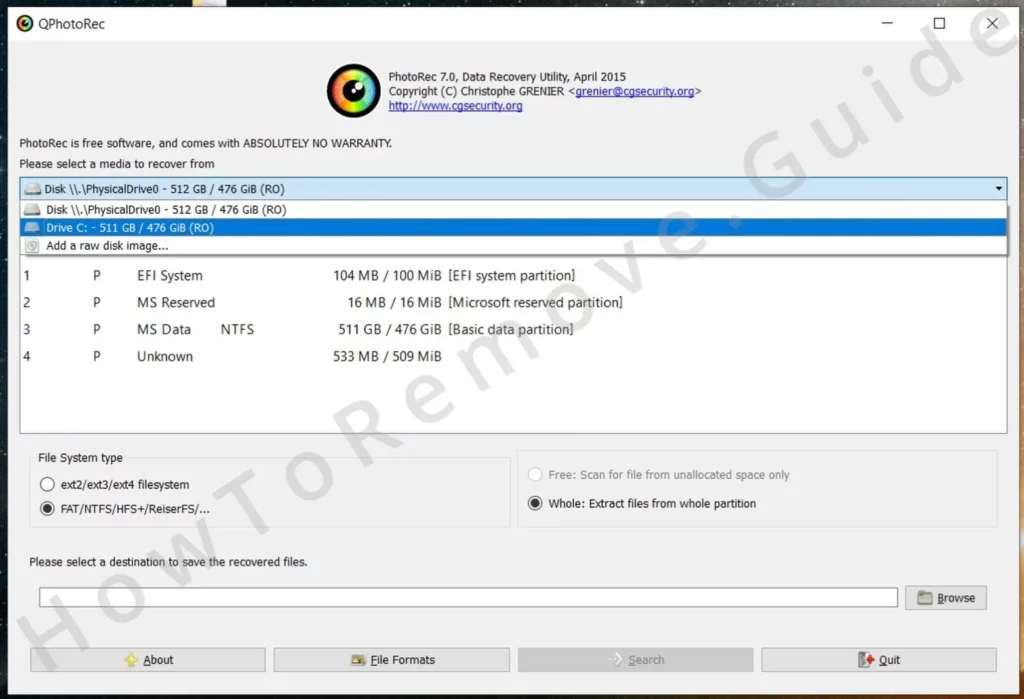
Use the drive selector to pick the affected disk, then choose the correct NTFS partition where the files originally lived. Confirm the partition label and size before continuing so you do not scan the wrong volume.
To reduce noise and improve speed, narrow what PhotoRec searches in File formats. Selecting only the document, archive, and image types you actually need makes review easier after the scan.
Set the recovery destination to an external drive or another physical disk. Writing recovered data back onto the same partition can overwrite remnants you are trying to salvage.
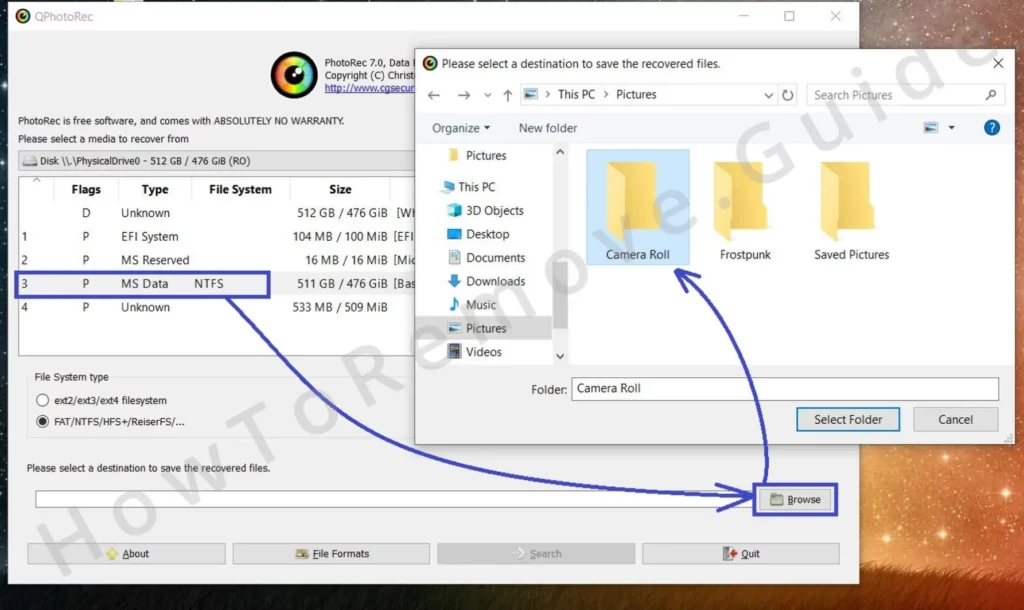
Press Search to start. Let the scan run without interruption – deep scans can take hours depending on disk size and condition. Avoid running other software that creates temporary files, because that increases write activity on the drive.
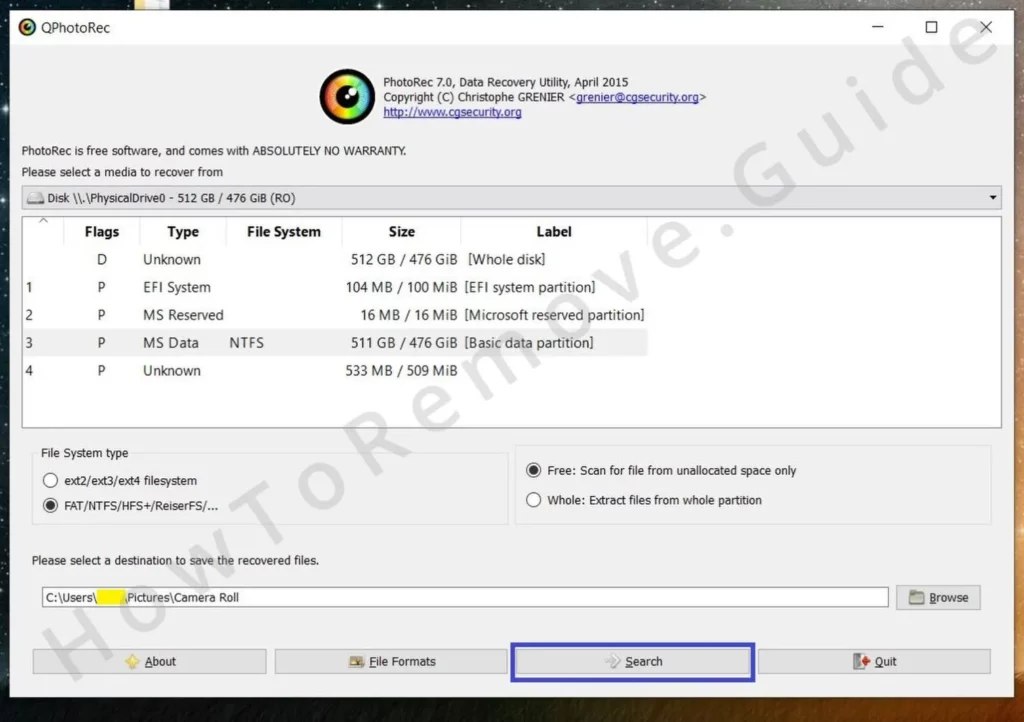
When the scan finishes, open the output folders PhotoRec created and review the results. Sort by file type and date, copy useful items into a safe workspace, and leave the recovered originals unchanged while you confirm file integrity and completeness.
Restore Files With Media_Repair
For media that is only partially affected or is corrupted, Media_Repair can sometimes rebuild playable copies using a clean reference file. It supports MP3, WAV, MP4, MOV, 3GP, and M4V. The closer your reference matches the damaged file’s source – codec, resolution, frame rate, and capture device – the more accurate the reconstruction tends to be.
Download Media_Repair and open it. Running as administrator can help when the tool needs to read protected folders or save alongside sources that were previously restricted. Keep other programs closed to reduce disk contention during processing.
In the program, open the folder containing the damaged media and select the files you want to check. Use the upper right-hand icon to scan so the tool can mark which items it can attempt to repair.
If files are flagged as repairable, provide a suitable reference file created with the same device and settings. Select the reference, then click the lower right-hand icon so the program can model the correct structure before writing rebuilt copies.
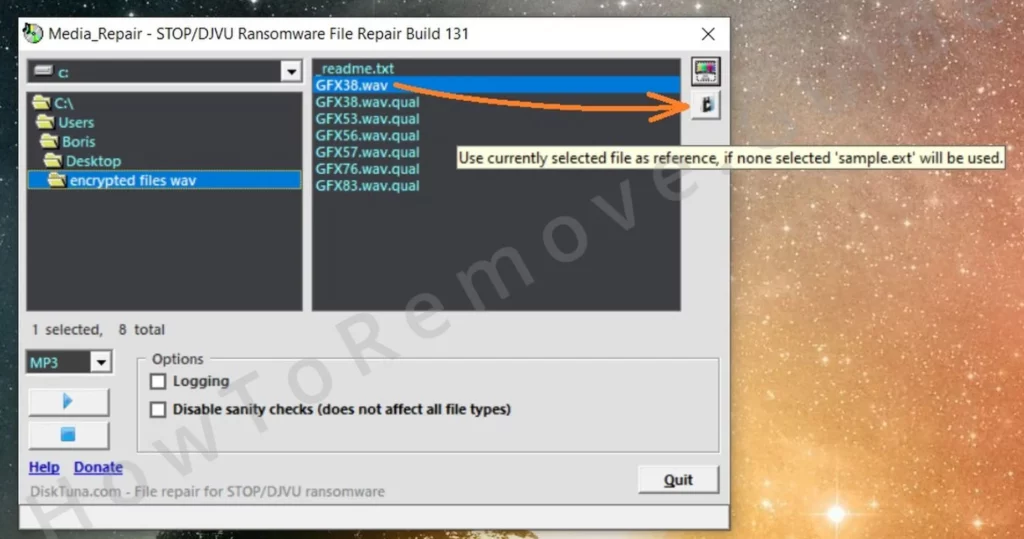
Select the target files again and click Play to begin reconstruction. Time required depends on the file sizes and how many items you selected. Keep the system idle so disk throughput stays steady and results are consistent.
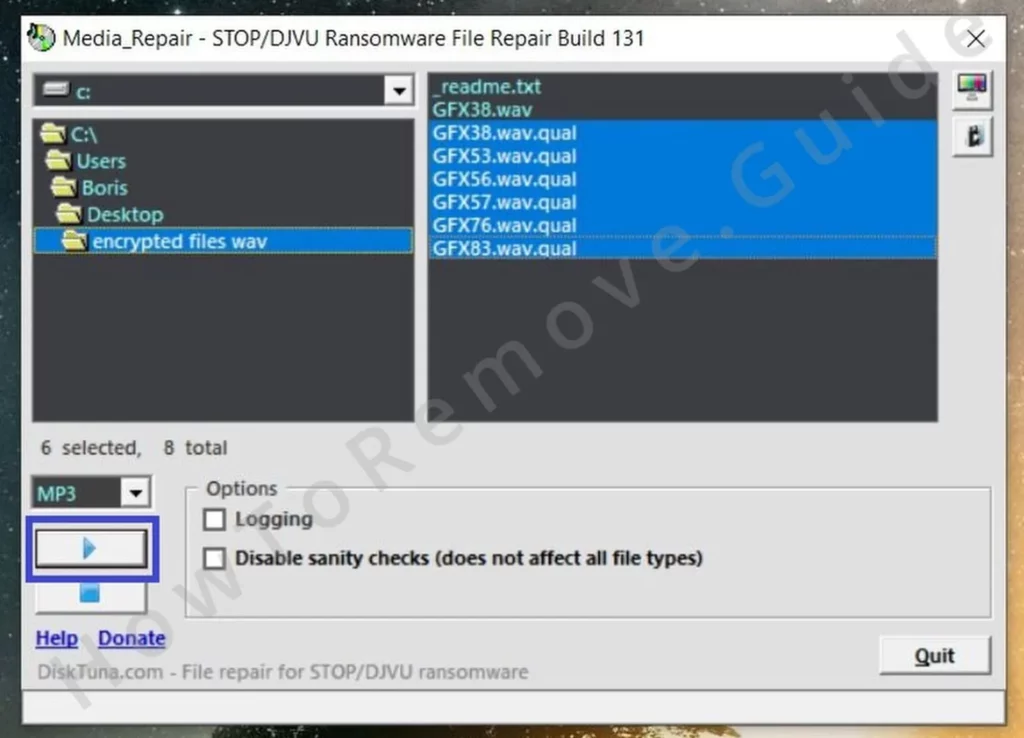
After completion, look for a new FIXED folder in the same directory. The tool writes reconstructed copies there so you can compare them without modifying the damaged originals.
Open the FIXED folder, test playback in a stable player such as VLC, and confirm sync, duration, and basic metadata. Keep working outputs, and archive both the damaged inputs and repaired copies so you can re-check them later if needed.
Final Thoughts: Preventing Future Ransomware Attacks
Recovery is only part of the response. Keep offline or immutable backups, apply updates for Windows and third-party software quickly, and enable SmartScreen plus Controlled folder access where available. Be cautious with macros, unknown installers, and extensions. Do not pay ransoms; prioritize layered protections and a rehearsed incident workflow to limit future damage.
