This page is a removal tutorial for Strave App – and adware suite (a group of software tied together) that creates an app which in turn hogs system resources to mine digital currencies and serve as a backdoor for other malware. This particular software type has been reiterating and infecting users for years, just changing its name and some details about how it works to throw off removal guides like ours. You can find more details about its behavior in virustotal if you need more specifics on how it works or if you are tech-savvy enough to make use of them.

Strave App Removal Instructions
Most of the time, removing malware like Strave App is a lengthy process, but in rare cases, it might be possible to remove such threats in a quicker, more conventional way, which is what I suggest you try first:
- Start by opening the Apps & Features section in your Start Menu. This is your first line of defense against any unwanted programs.
- Once you’re there, sort your list of programs by the date they were installed. This helps you pinpoint any suspicious software, especially those added around the time your computer started acting up.
- See anything odd? Maybe an app you don’t remember installing? If Strave App or any similar program pops up, uninstall it. No hesitation. Just hit that remove button.
- But don’t stop there. Head over to C:\Program Files and C:\Program Files (x86). These folders can be sneaky hiding spots for leftover files that didn’t get removed during the uninstall.
- If you find anything that looks remotely linked to Strave App, delete it.
Once you’ve cleaned these directories, reboot your computer. Sometimes, that’s all it takes. If Strave App is still hanging around, don’t worry—it just means it’s time to roll up your sleeves.
SUMMARY:
Important! Read Before Continuing
Tackling Strave App adware manually can take some time—usually over an hour—and requires a bit of technical skill. If you’d rather avoid the hassle, SpyHunter 5 offers a more straightforward solution.
This robust tool is designed to remove adware efficiently without requiring you to navigate complex steps. It’s a quick and effective alternative for those who want results without the extra effort. The good news? SpyHunter 5 is available right here on this page. If you’re looking for a faster, simpler way to get rid of Strave App, this tool is worth considering.
How to Remove the Strave App Virus
If you are determined to remove Strave App without employing any sort of specialized anti-malware tools, then you need to prepare. The successful completion of the next guide requires two prerequisites to be met:
You must have LockHunter (free) installed on your PC:
First things first, download LockHunter – a totally free and super helpful tool. Think of it as your secret weapon for files that don’t want to be deleted. Once installed, this tool will help you take down even the most stubborn remnants of Strave App. Trust me, it’s worth having in your toolkit.
You must expose hidden files and folders:
Malware loves to hide in plain sight—or rather, out of sight. To level the playing field, you’ll need to make hidden files visible. Open Folder Options from the Start Menu, switch to the View tab, and enable the option to show hidden files, folders, and drives. Hit apply, and voilà—hidden files revealed.
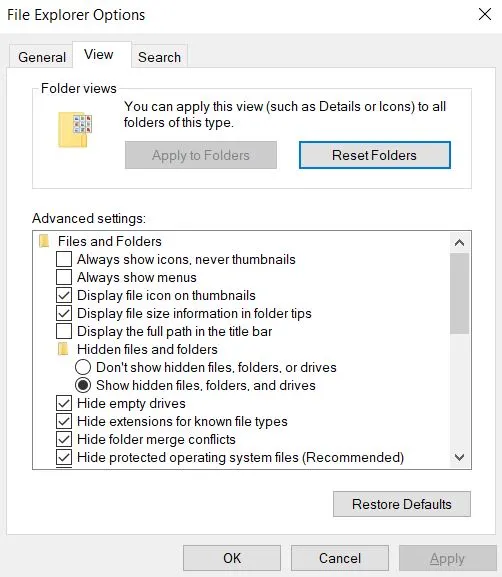
How to Show Hidden Files and Folders
Delete Strave App Virus Files
With the preparations now completed, you are ready to begin hunting down and ridding your system of malware files. There are several locations where you are likely to find files linked to Strave App and you must explore and clean out each one.
Start in the Roaming folder at C:\Users\YourUsername\AppData\Roaming. If you spot any files with weird names that don’t make sense, don’t second-guess yourself—delete them.
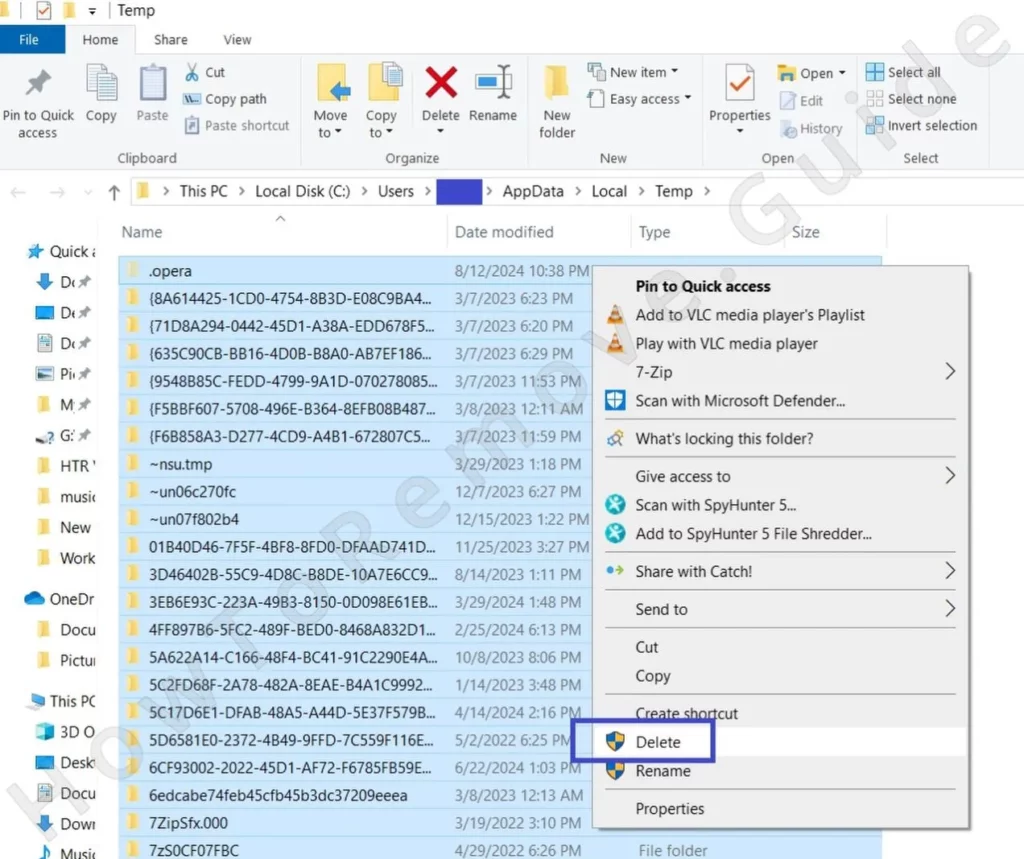
Next, head to the Temp folder at C:\Users\YourUsername\AppData\Local\Temp. Think of this as malware’s personal dumping ground. The good news? You can clear out this folder without any risk. It’s all temporary files, nothing essential. Clean it out completely.
But you’re not done yet. Malware like Strave App often sets itself up to launch automatically at startup. Check these directories for anything unusual:
- C:\ProgramData\Microsoft\Windows\Start Menu\Programs\Startup
- C:\Users\YourUsername\AppData\Roaming\Microsoft\Windows\Start Menu\Programs\Startup
If you find anything that looks out of place, delete it. Finally, circle back to C:\Program Files and C:\Program Files (x86) for one last sweep. Leave no stone unturned.
When Files Won’t Budge: Use LockHunter
Here’s where LockHunter earns its keep. If you encounter a file that refuses to be deleted, just right-click it, select the “What’s locking this file?” option, and then click “Delete it!“. That’s it – stubborn file taken care of.

How to Delete Persistent Files with Lock Hunter
Get Rid of Strave App Scheduled Task
An often forgotten malware-removal step is the Task Scheduler cleanup. The goal here is to seek out and delete rogue tasks that might be set to automatically launch the malware or even reinstall it once you’ve managed to delete it.
Open the Task Scheduler through your Start Menu and navigate to the Task Scheduler Library.
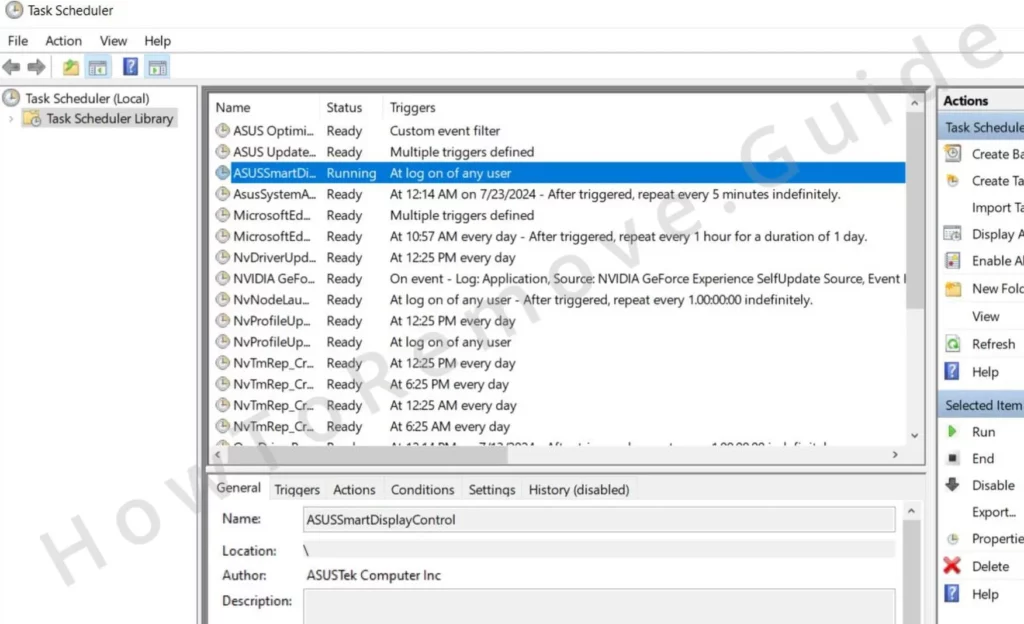
Look for any tasks with odd names or unfamiliar scripts. If something doesn’t sit right, delete it. Clearing out these scheduled tasks cuts off Strave App’s ability to spring back to life.
Video walkthrough for this step:
Remove Strave App From the System Registry
You should definitely also pay a visit to the system registry. Malware often creates rogue keys in there that let it perform various actions without user knowledge or permission. Here’s how to perform a registry cleanup:
Open the Registry Editor by typing “regedit” into your Start Menu and running it as an administrator. Use the search function (Ctrl + F) to look for entries related to Strave App. Focus your search on these directories:
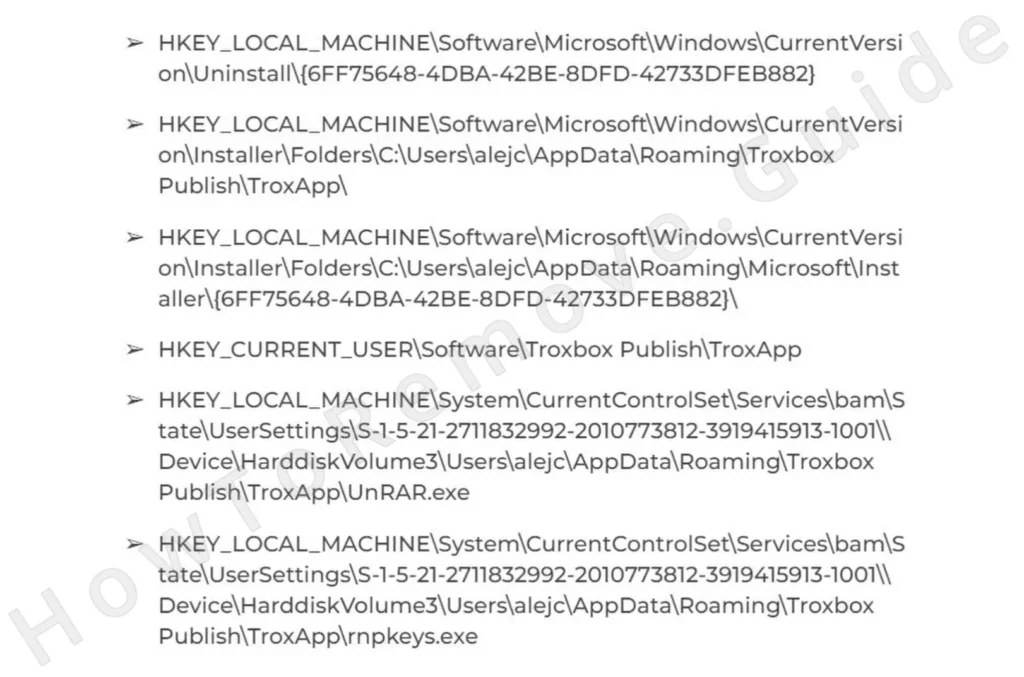
Before you delete anything, back up the registry by selecting File > Export. This backup is your safety net, just in case. Once you’ve backed up, carefully delete any entries tied to Strave App. Don’t touch anything unrelated.
Video walkthrough for this step:
Eliminate Strave App Browser Policies
The Strave App malware might have also targeted your browser in which case it’s highly likely that it has added enforced a rogue policy. To reverse any unwanted changes made to the browser, you’ll first have to deal with that policy:
Search in the Start Menu for “edit group policy“, open the Group Policy Editor, and navigate to Computer Configuration > Administrative Templates.
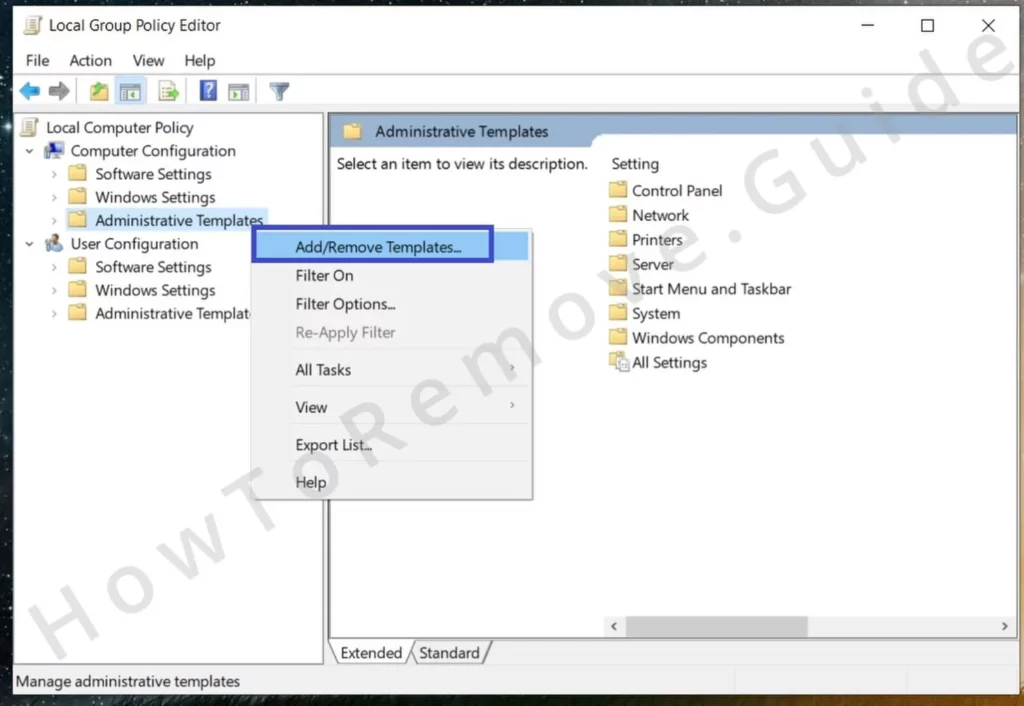
Right-click Administrative Templates, select Add/Remove, and delete any unfamiliar templates.
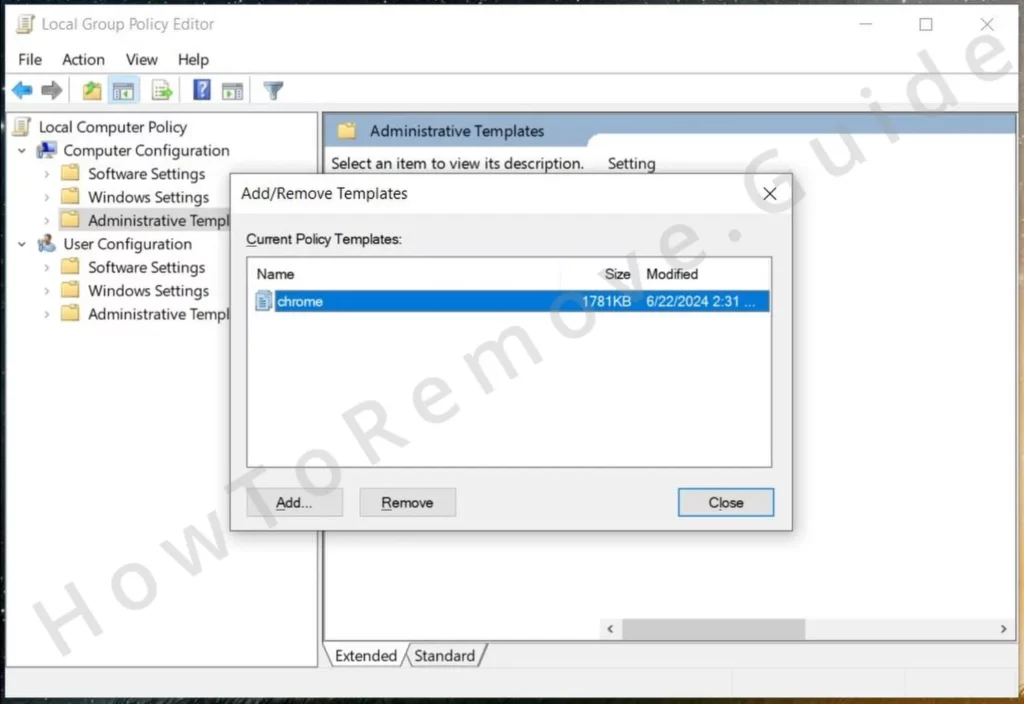
If you’re using Chrome, tools like Chrome Policy Remover can make this process easier.
Video walkthrough for this step:
Manual Group Policy Removal
Automatic Group Policy Removal
Uninstall Strave App From Your Browser
The one thing left to do to ensure that Strave App is fully gone from your PC and browser is to check the browser settings and revoke any changes made by the malware. Here are the main settings sections you must examine:
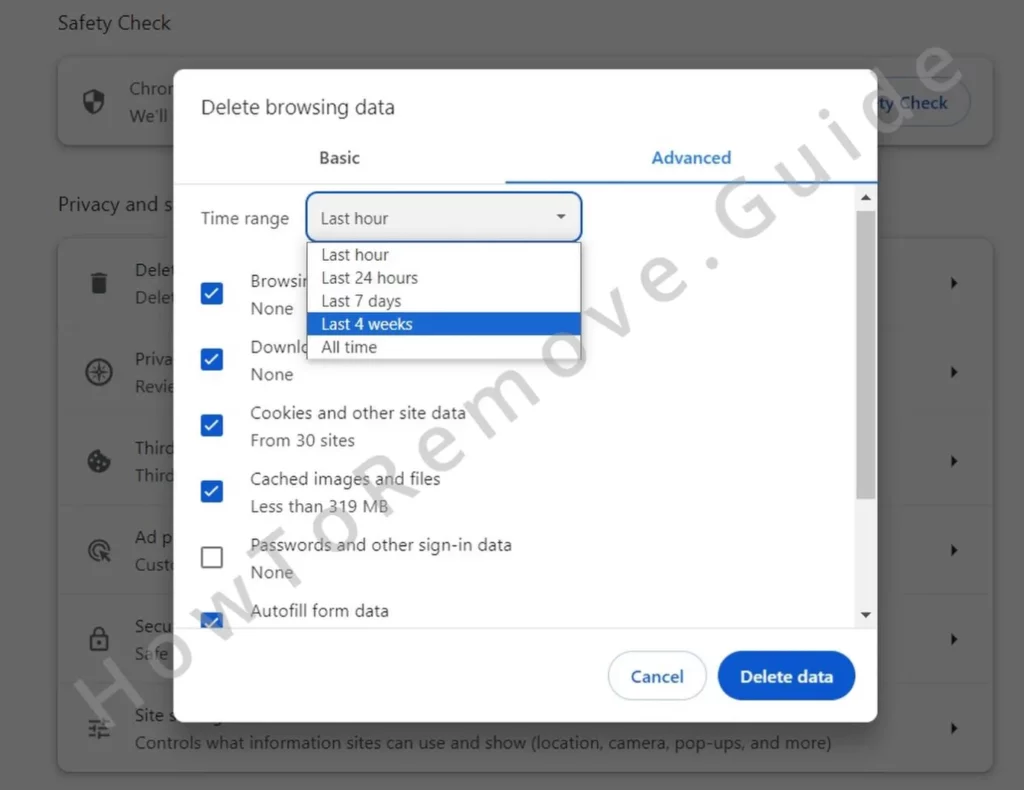
Clear your browser’s cache, selecting the All Time option to ensure nothing is left behind. Keep your saved password, but delete all other data types.
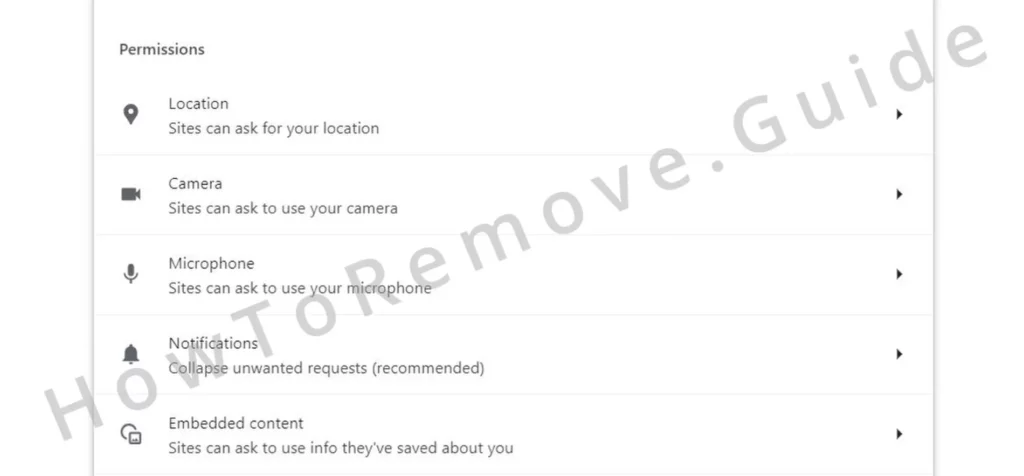
Review your browser’s Site Settings for unfamiliar URLs in each permissions category and delete them.
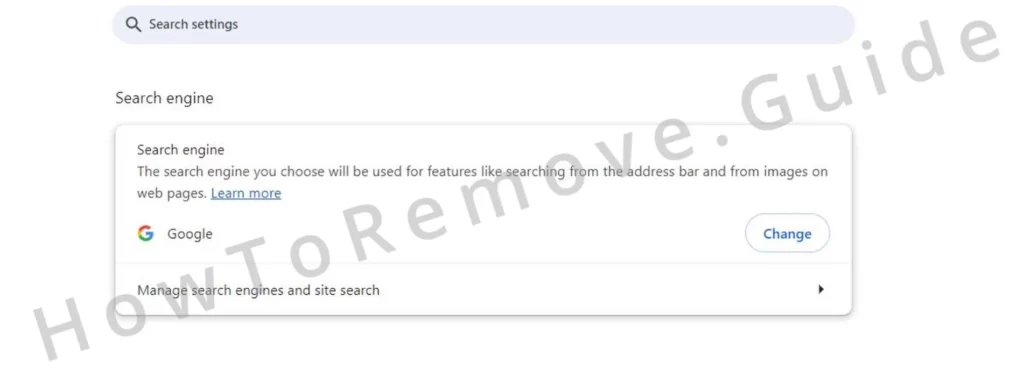
Lastly, reset your default search engine, homepage, and startup settings. This ensures you’re in control again. In the Search Engine settings, make sure to click Manage Search Engines and look for unfamiliar URLs that you must delete.
Video walkthrough for this step:
Chrome
Microsoft Edge
Mozilla Firefox
Wrapping It All Up
By now, you’ve done the hard work of removing Strave App from your computer. But here’s the thing—malware can return if you’re not careful. Take these precautions to protect yourself going forward:
- Keep everything updated: Regularly update your operating system, browsers, and antivirus software.
- Download wisely: Only install programs from trusted sources.
- Be cautious with emails: Avoid opening attachments or clicking links from unknown senders.
- Back up your files: Regular backups are your best defense against future problems.
Removing malware like Strave App might feel overwhelming, but with a systematic approach and the right tools, you can handle it. Stay vigilant, stay updated, and your system will stay safe. You’ve got this.

Leave a Reply