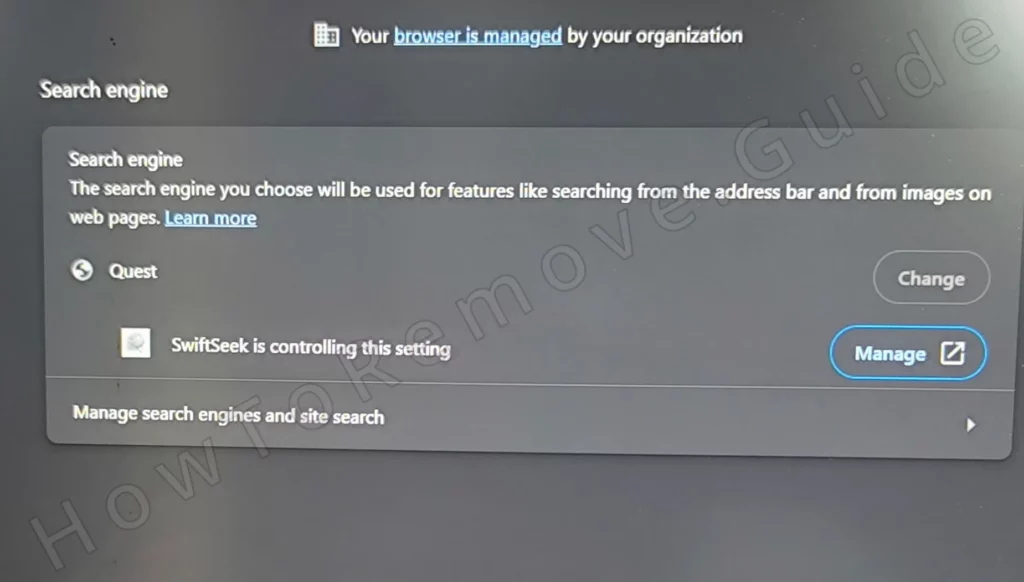
The rogue SwiftSeek Chrome extension hijacks your browser and messes with its settings by changing the default search engine to fake potterfun.com/q/ search engine (or some other sketchy site) and adding its own policy to the browser.

This is very similar to other browser hijackers, such as ZoomFind or QuickFind, which we’ve dealt with in the past. Because of this, we have a pretty good idea how you can manually remove SwiftSeek and we are going to show you the exact steps to do so in the following guide.
SwiftSeek Removal Tutorial
I recommend that you first start simple. Try to fix the browser the conventional way. This won’t always work, but the times it does, it can save a ton of time:
- Open the browser, then navigate to the main menu, and select “Settings“.
- Open Extensions/Extensions Manager, and look for any unusual entries, especially SwiftSeek.
- If SwiftSeek appears in the list, click “Remove”, provided there’s a working Remove button underneath it.
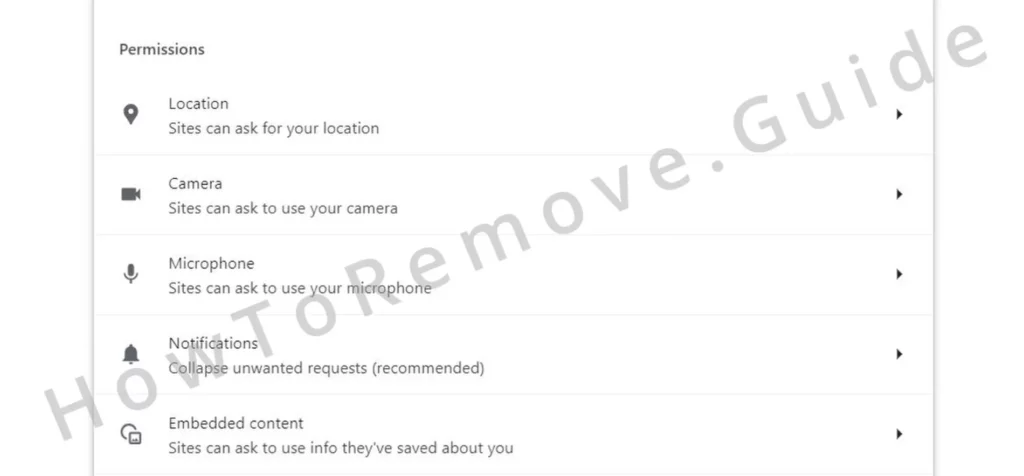
- Next, go to “Privacy and Security” settings. Look under “Site Settings” and open the permissions for notifications, pop-ups, and redirects.
- Check for any unfamiliar URLs, like boyu.com.tr or anything else that looks sketchy. Remove URLs that you don’t know or trust.
It’s possible that these steps fix your browser, but it’s also possible you aren’t even able to fully complete them. But don’t worry if there isn’t a working Remove button for the rogue extension or if you aren’t allowed to delete rogue URLs from the permission categories. We know how this can be fixed and soon you will too!
I have high confidence this guide will help you delete SwiftSeek from your browser. However, I can’t promise it won’t return if there’s a rogue program in your PC that added the hijacker to your browser in the first place.
If you think there are any malware apps on your PC, I strongly recommend using a specialized anti-malware tool to clean your system. Unfortunately, I have no way of knowing what exact program introduced SwiftSeek to your browser, so I can’t offer you concrete removal instructions for it.
That said, Spy Hunter 5 – a powerful removal tool available on this page – can make quick work of any rogue apps still present on your PC, so I suggest giving it a try.
How to Get Rid of the SwiftSeek Extension in Chrome
SwiftSeek installs rogue policies that block standard removal. This is the main ace in the hole for hijackers like it.
Most users have no clue how to deal with these policies and it can take some time and effort to eliminate them, but once you’ve got this sorted out, the rest of the SwiftSeek removal is actually quite straightforward.
Now, to remove the rogue hijacker policies, you must first identify them:
Open your browser. In Chrome, type “chrome://policy” into the address bar and hit Enter.
For other browsers based on Chromium, the URL you must enter is the same, you just replace “Chrome” with the name of the browser. For instance “edge://policy” for MS Edge, and so on.
Examine the list of active policies you’ll see on that page. You’ll want to look for policy values that look like a randomized string of characters.
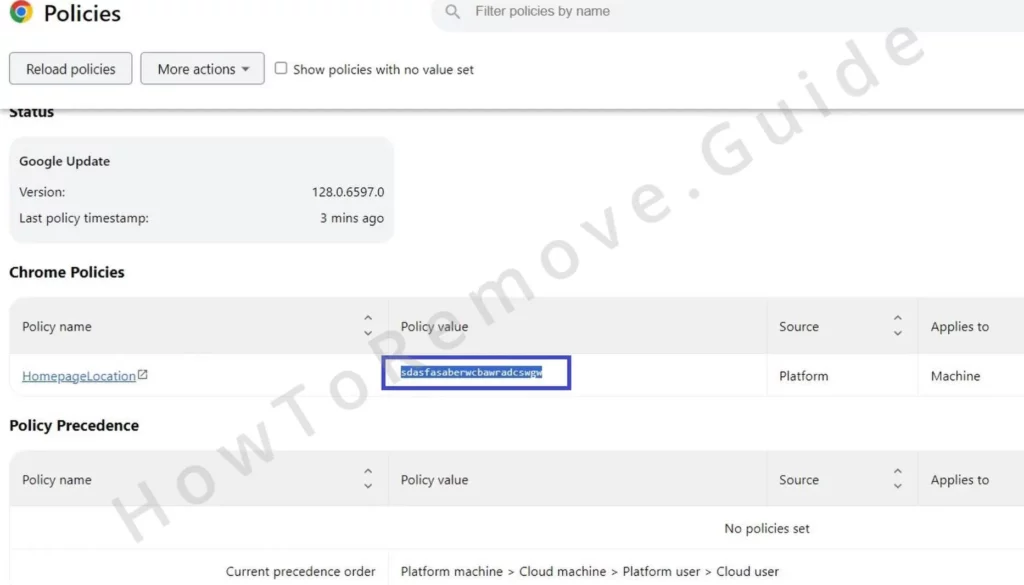
If you see such values, save them to a text file. You’ll use them in later steps.
Then go back to the “Extensions Manager” to gather more information about SwiftSeek. You’ll need to get the extension’s ID.
However, sometimes the hijacker won’t even allow access to the “Extensions Manager”. It might redirect you to other pages, like Google or Bing.
If this happens, I’ve found a very easy solution: just go to the location where your browser stores its extensions folders and delete everything there.
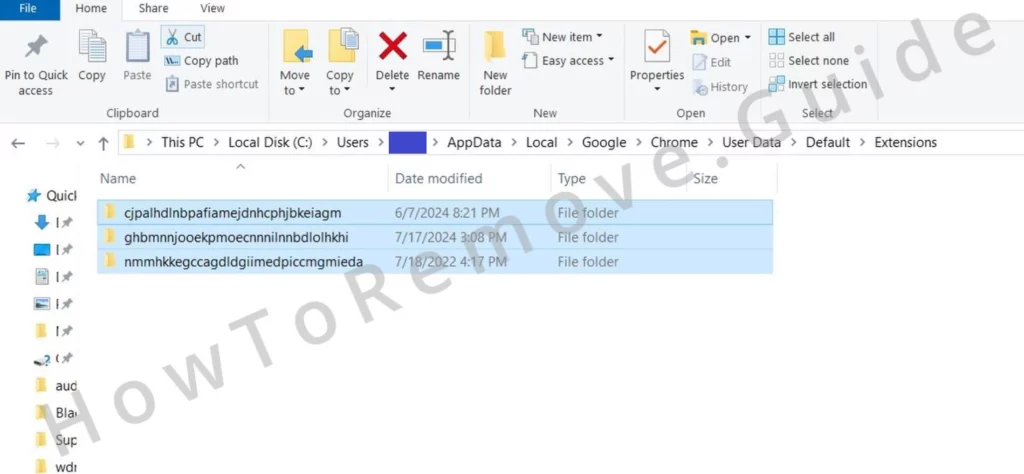
For Chrome, the specific path is C:\Users\[Your Username]\AppData\Local\Google\Chrome\User Data\Default\Extensions.
The locations for several other popular browsers are shown below:

The reason you must delete all extension folders is that you have no way of knowing which of them belongs to the hijacker. Deleting everything will also corrupt the regular extensions – the ones you want to keep – but it’s really easy to restore them later, once SwiftSeek has been dealt with.
Once the folder is empty, return to the “Extensions Manager”. Turn on Developer Mode. Look for the ID under the SwiftSeek extension.
If the ID doesn’t show up, click on the extension. You’ll find it on the next screen. Copy the ID and save it with the suspicious values from earlier.
Also save the IDs of other questionable extensions you think might be related to the hijacker.

Video walkthrough for this step:
How to Delete SwiftSeek Virus Policies
By now, you should have all the values and rogue extension IDs you need to remove the hijacker’s policy from your browser.
This is done through the Registry:
Open the “Registry Editor” with admin rights. You can find it by searching for it in the Start Menu.
When the Editor appears on your screen, go to the “Edit” menu and use the “Find” function.
Search for the first suspicious policy value you saved.
if a matching item is found, delete the entire registry key that contains it. The registry keys are the folders you’ll see in the left panel of the Editor.
Multiple entries for the same value might exist, so always search again after each deletion until there are no more results left.
Perform the same steps for all rogue policy values and extension IDs saved earlier. This ensures all related entries are gone from the registry.
Nowadays, many hijackers restrict user access to their registry keys which results in an error when you try to delete them.
The way to bypass this is to right-click the key and choose Permissions. Then select Advanced, then Change. Then type “Everyone” in the text field and click Check Names.
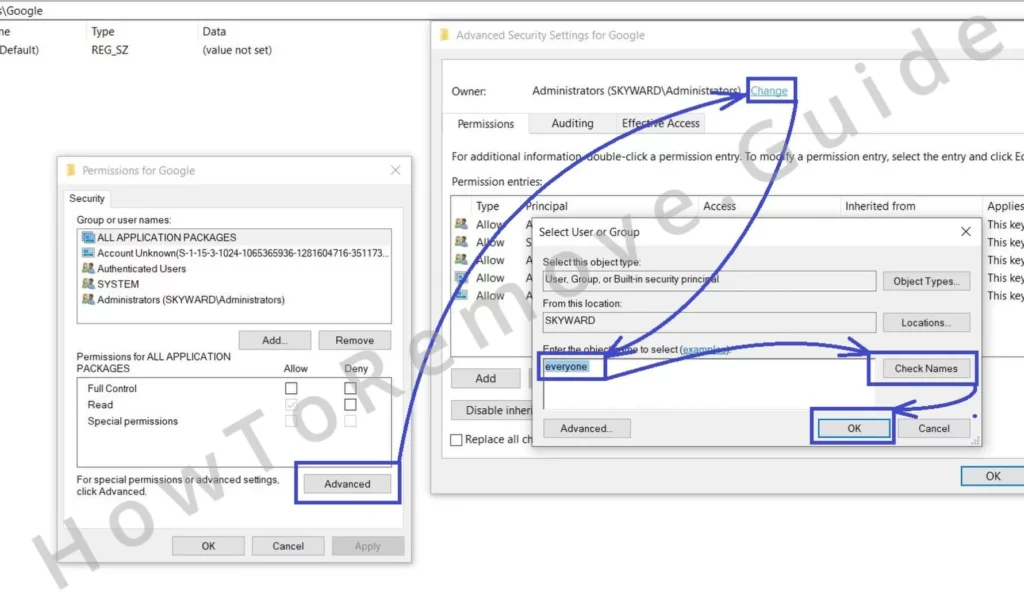
Now click OK, enable the two Replace options in the previous window, and apply the changes.
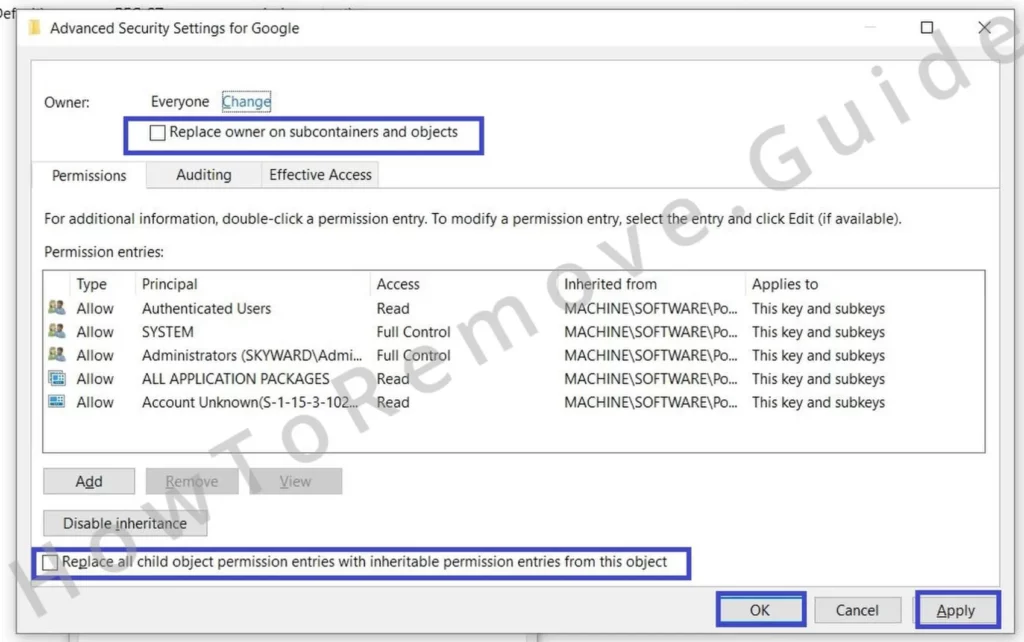
The key is now under your control. Delete it and proceed to the next one.
By removing these registry entries, you’ll weaken SwiftSeek’s hold on your browser. The hijacker should no longer be able to keep you from modifying the browser’s settings.
However, if the rogue policy persists, a few more methods exist that will help you finalize its removal.
Video walkthrough for this step:
More Ways to Remove SwiftSeek Malware Policies
The registry changes are sometimes not enough. SwiftSeek can be stubborn, but there’s another way to get rid of those rogue policies.
Use the Group Policy Editor – you’ll find it by searching for it in the Start Menu.
Once inside, navigate to “Local Computer Policy” > “Computer Configuration” > “Administrative Templates“. Right-click the last one, and open Add/Remove Templates.
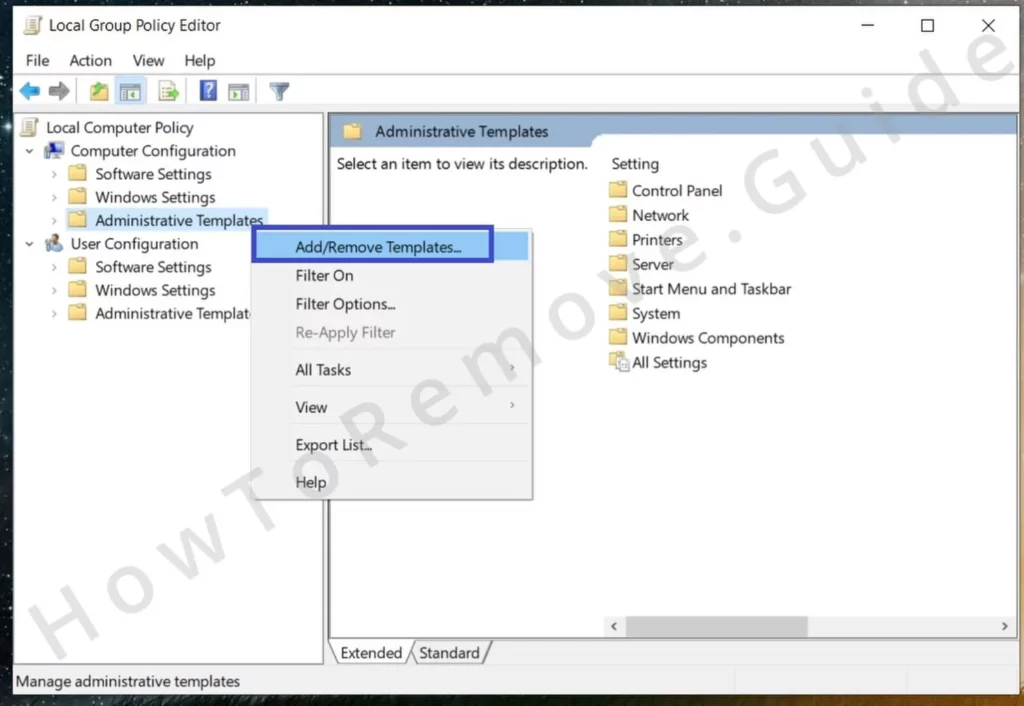
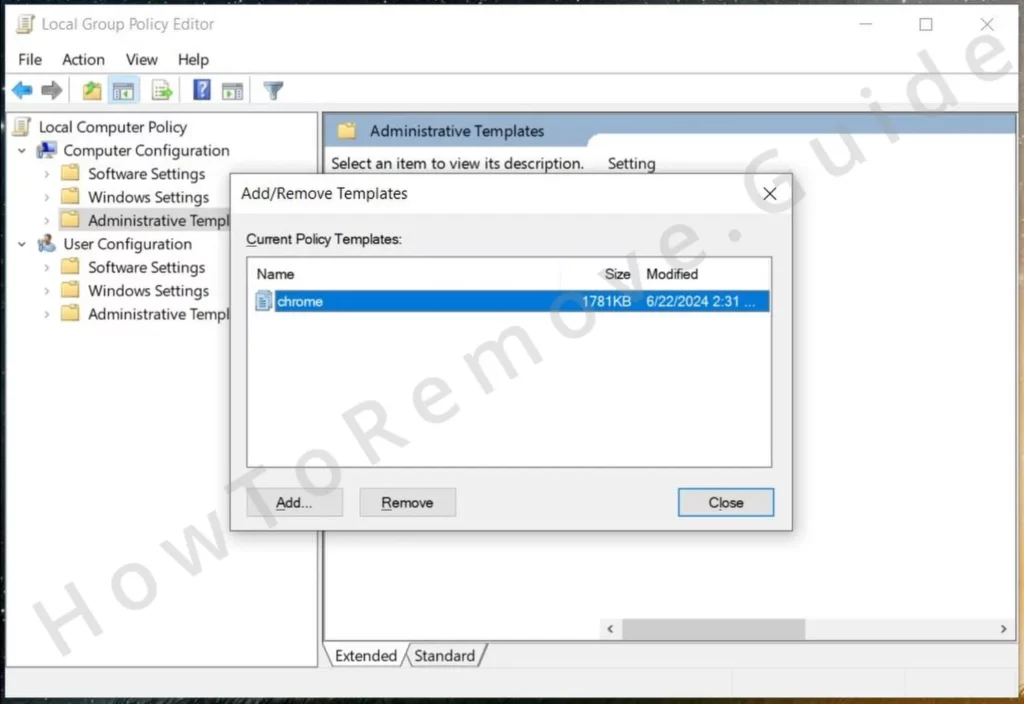
Check the entries. Delete any unfamiliar or suspicious items.
People rarely modify these templates, so you should probably just delete everything you see on that list, as it’s probably related to the hijacker. This should clear any remaining policies linked to SwiftSeek.
Chrome users have an even quicker solution. The Chrome Policy Remover tool is totally free, requires no installation, and removes all policies affecting the browser.
Just download it from the link and Run it as Administrator. It will handle everything for you.
Antivirus software and Windows Security might flag it as potentially unsafe, but don’t worry, we’ve tried it and it’s perfectly safe.
If you see a warning from your AV, whitelist the tool, and if Windows Security also warns you, just click More Info and choose Run Anyway.
In a few moments, the rogue policies will vanish and you can proceed to the next steps.
Video walkthrough for this step:
Manual Group Policy Removal
Automatic Group Policy Removal
How to Uninstall the SwiftSeek Extension From Chrome and Edge
The rogue policies should now be fully gone if you’ve performed the previous steps as instructed.
For this final stage of the guide, you need to clean up the browser’s extensions and reset any altered settings.
Open the browser again and go back to the Extensions Manager. Now you should be able to easily do away with any rogue extensions.
Just click the Remove button of SwiftSeek and other sketchy extensions to uninstall them.
As for the extensions you want to keep that go corrupted earlier, click the Repair button that should now be next to each one.
If no such button is available, just try to use the respective extension and once the browser “realizes” that it’s broken, it’ll give you the option to repair it.
Head to the Privacy and Security section and clear your browsing data. Click the respective option, then go to the Advanced tab and tick every box except the one for your Passwords.
Choose a period long enough to go back before SwiftSeek appeared in your browser and delete the browsing data.
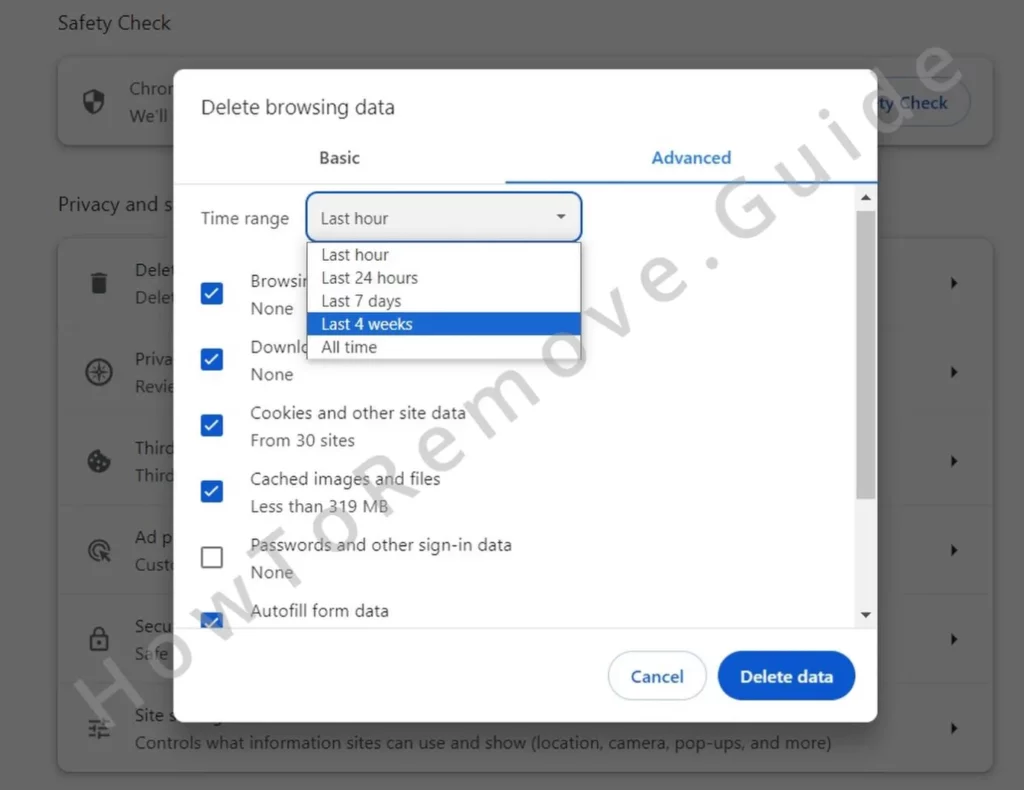
After clearing the data, review all site permissions and not just notifications and pop-ups.
Return to Site Settings and check every permission category. Ensure that no rogue URLs have crept back into the list. If any unfamiliar sites remain, block them to ensure SwiftSeek doesn’t return.
Don’t forget to change back your browser’s default search engine. Go to the Search Engine settings section and choose Google or another reliable search provider.
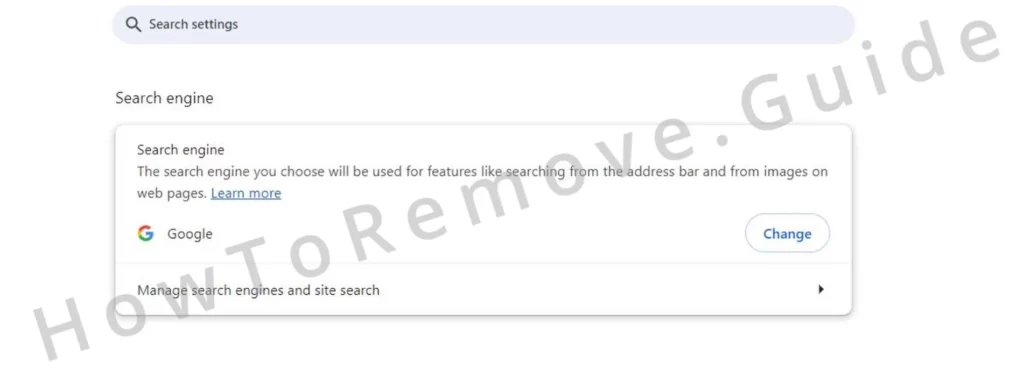
Then open “Manage Search Engines” and delete any unrecognized sites, such as boyu.com.tr. This prevents unwanted search redirects.
Lastly, I recommend that you also check the browser’s Startup and Appearance settings. SwiftSeek could have altered these as well. It might have changed your homepage or startup tabs.
Restore your preferences. Set your homepage to a trusted site. Once finished, your browser should be fully restored.
Video walkthrough for this step:
Chrome
Microsoft Edge
Mozilla Firefox
How to Remove the SwiftSeek Virus
SwiftSeek should be gone now but hijackers often come bundled with other rogue software as I already pointed out earlier. This creates a risk of reinstallation if that other rogue app stays in the system.
The best way to ensure there’s no malware left on your PC is to scan it with a reliable anti-malware tool like Spy Hunter. It has a proven track record of detecting and removing a wide range of malware threats.
Of course, you can try to delete the rogue software on your own, but that’s often more difficult than it seems. Even programs that are technically not malicious but simply unwanted can create files and system records in various places within the system which makes finding and deleting everything a frustrating chore. On the other hand, a specialized removal software can quickly find those files and eliminate them in a matter of minutes with minimal input on your end.

Leave a Reply