Mobility Search is one of the more persistent browser hijacker sites out there. It’s basically a fake search engine that uses various distribution vectors in order to embed itself in your browser and handle your online searches. Of course, it’s a much worse search option than Google or Bing but that’s to be expected since its main goal is to collect user data, generate ad revenue, and promote various other sketchy sites.
We’ve seen many similar hijackers, including boyu.com.tr or maxask.com, so we’ve got a pretty good idea what to expect from Mobility Search and how to take care of it.

Like other hijackers, this one can be pretty annoying with how it disrupts your browsing and workflow, so you probably don’t need any more convincing to remove it. However, on the off chance you are okay with keeping Mobility Search in your browser, I do need to tell you that this hijacker could expose you to online scams and malware-infested sites, so getting rid of it is recommended if you want your system to be safe.
Speaking of removal, the next section will give you all the info you need on the various ways to get rid of this hijacker, so go ahead and check it out if the rogue site is still allowed access to your browser.
Mobility Search Removal Guide
Most users who encounter Mobility Search in their browsers report having difficulty removing it. The conventional way to restrict a site’s access to a particular browser doesn’t appear to work on Mobility Search in most cases.
However, this doesn’t have to always be the case. In some instances, the quicker and simpler steps might indeed get the job done, so I suggest you give them a try first, before delving into the more advanced solutions:
- Open the menu of the affected browser and go to Settings.
- Go to Privacy and Security > Site Settings > Notifications and delete any rogue or unfamiliar URLs.
- Go to Search Engine and change the browser’s default search tool to something reliable.
- In Extensions, click the Remove button of any potentially unwanted extensions.
For some of you, this might be all that’s needed to get rid of Mobility Search. However, most users will usually need to go through a number of other steps before they can fully eliminate the hijacker. If that’s the situation you’re in right now, proceed to the detailed guide you’ll find below the table.
SUMMARY:
| Name | Mobility Search |
| Type | Browser Hijacker |
| Detection Tool |
We tested that SpyHunter successfully removes Mobility Search* and we recommend downloading it. Manual removal may take hours, it can harm your system if you re not careful, and Mobility Search may reinstall itself at the end if you don’t delete its core files. |
Important! Read Before Proceeding!
We are pretty confident that the following advanced removal steps will be enough to rid you of the Mobility Search hijacker. However, they do require some time to complete – expect this process to take an hour or more. Also, some of the steps require some personal judgment and inexperienced users might find them challenging or confusing.
For this reason, an alternative we recommend for those of you short on time or lacking technical experience is to opt for the professional SpyHunter 5 removal tool. You can find it on this page and it will let you quickly and safely get rid of Mobility Search alongside any other hijackers and rogue apps that might have entered your system alongside it.
How to Get Rid of Mobility-search.com Policies in Chrome
The main obstacle to removing a browser hijacker is often a third-party policy that the rogue site/extension has added to the browser. Most Chromium-based browsers have the Enterprise Policies feature and many hijackers exploit this to block your access to some of the browser’s settings. This prevents you from restoring them once the hijacker has made changes to them.
A giveaway sign that such a policy is in your browser is the Managed by your organization message shown at the bottom of the browser menu or at the top of its settings page. If you see this message, then your first task is to deal with the rogue policy like we’ve shown next.

Head to the policy management page of your browser:
Chrome users go to chrome://policy, Edge users to edge://policy, Brave users to brave://policy (just change the name in the URL for other Chromium browsers).
Here, you’ll find a list of any policies installed in the browser. Look closely. Strings of letters and numbers might appear as the values of some of the policies.
These are usually tied to Mobility Search or other hijackers. Write them down. You’ll need them soon.
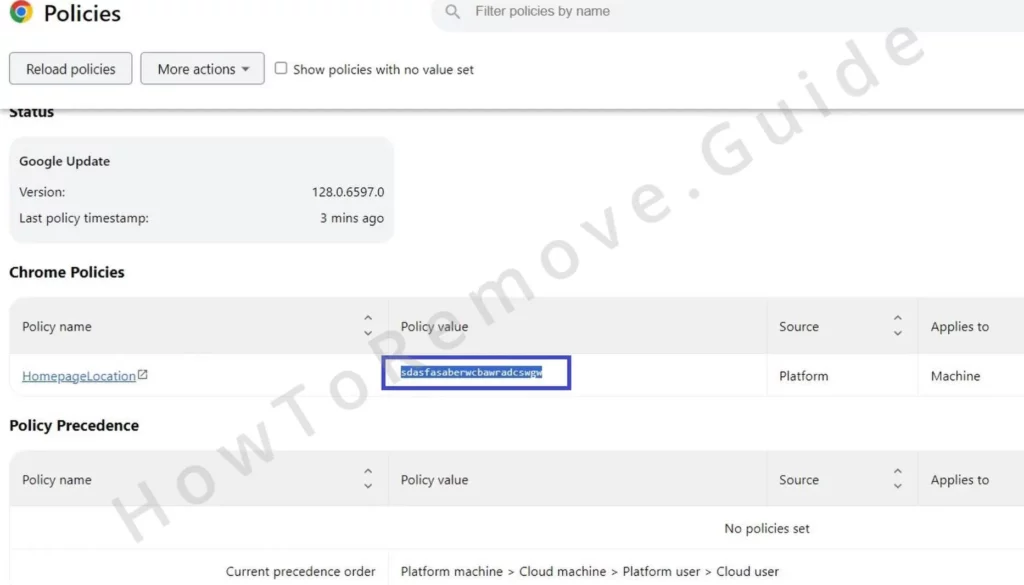
The next place you must visit is Settings > Extensions in the browser, but the hijacker might sometimes block your access to it by redirecting you elsewhere. The solution to this is simple:
Navigate to C:\Users\[Your Username]\AppData\Local\Google\Chrome\User Data\Default\Extensions in your file system and delete everything inside. Yes, everything. This will disable all extensions. But don’t worry; you can reinstall the good ones later.
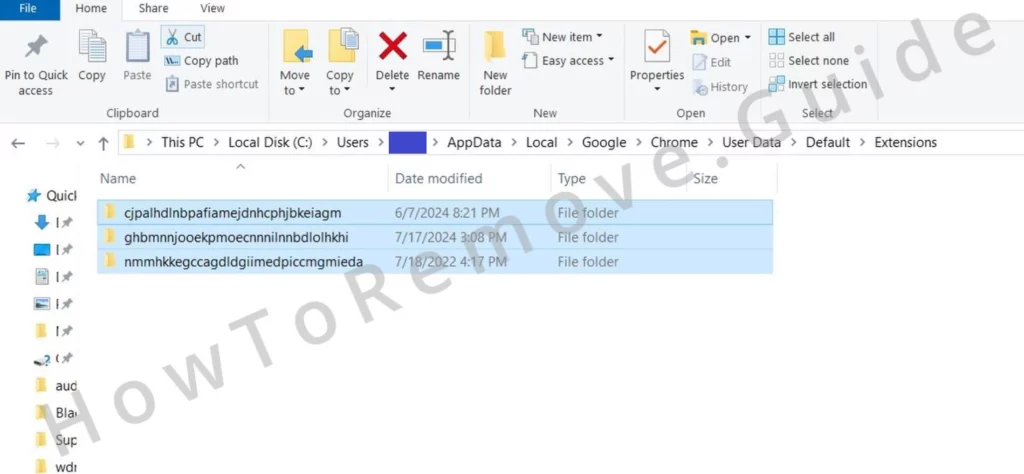
Once you’ve cleared the folder, return to the Extensions page in your browser.
By now, you should see all the installed extensions. Activate Developer Mode in the Extensions Manager to reveal the ID of all installed extensions, including any rogue ones that may be linked to the hijacker.
Take note of their IDs and save them too.

Video walkthrough for this step:
Clean the Registry From Mobility Search Items
Time to dig into the system registry. Precision is key.
Open the Registry Editor with administrative privileges. You can do this by searching for “regedit” in the Start Menu, right-clicking the first thing, and selecting “Run as administrator“.
Inside, go to the Edit menu and use the Find function to search for the policy values you previously noted down.
When you find a matching registry key (folder in the left panel), delete it. Repeat this until all keys related to this search are gone.
It’s tedious, but necessary.
Sometimes, Mobility Search restricts access to certain registry keys. If you encounter this, don’t panic. There’s a way around it:
Right-click on the parent key, select “Permissions“.
Open Advanced > Change, and type “Everyone“. Click Check Names then OK.
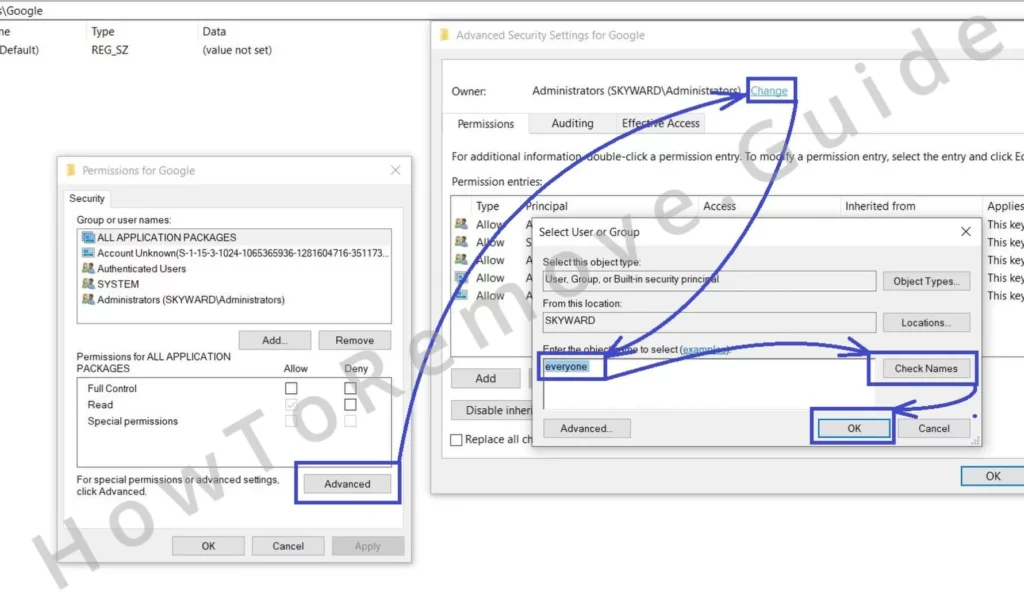
Enable the “Replace…” options (both of them) and then Apply + OK.
Now, you should have access to delete the stubborn keys.
Just remember to search for and delete keys related to all Policy values and Extension IDs that you saved earlier.
Video walkthrough for this step:
Additional Policy Removal Steps
The Registry cleanup is usually enough, but we want to be thorough, so here are two more steps you can do to ensure no rogue policies remain:
Search for “Edit Group Policy” in the Start Menu and press Enter.
Once open, navigate to and right-click on Administrative Templates (it’s under the Computer Configuration section).
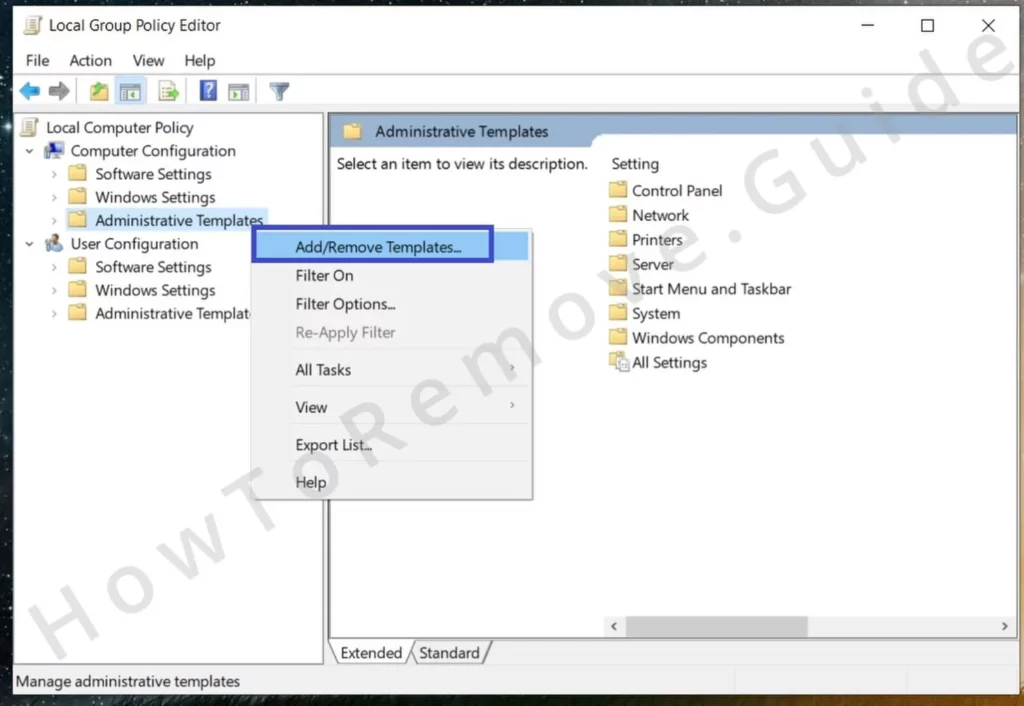
Select “Add/Remove Templates” and delete everything in the next list.
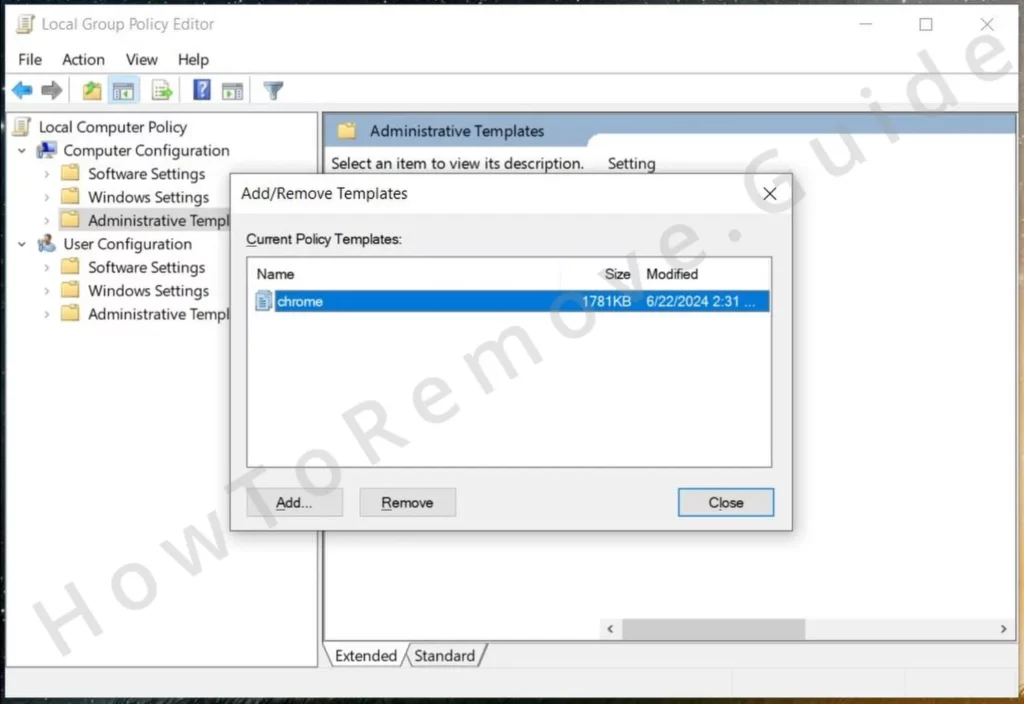
Then download the Chrome Policy Remover tool and run it with admin rights. It’s a free utility designed to eliminate any lingering policies automatically.
Ignore any warnings from Windows by clicking More Info > Run Anyway. The tool is safe, so don’t worry.
Let it run its course. This step adds an extra layer of security.
Video walkthrough for this step:
Manual Group Policy Removal
Automatic Group Policy Removal
How to Delete the Mobility Search Virus Extension
Time to finish the job. You’ll basically have to perform the quick steps we showed you at the start of the guide but with a couple of additions:
Go back to the Extensions tab. By now, you should be able to remove any rogue extensions that you haven’t yet managed to get rid of.
The “Remove” button should be functional so click it on browser add-ons you consider unwanted.
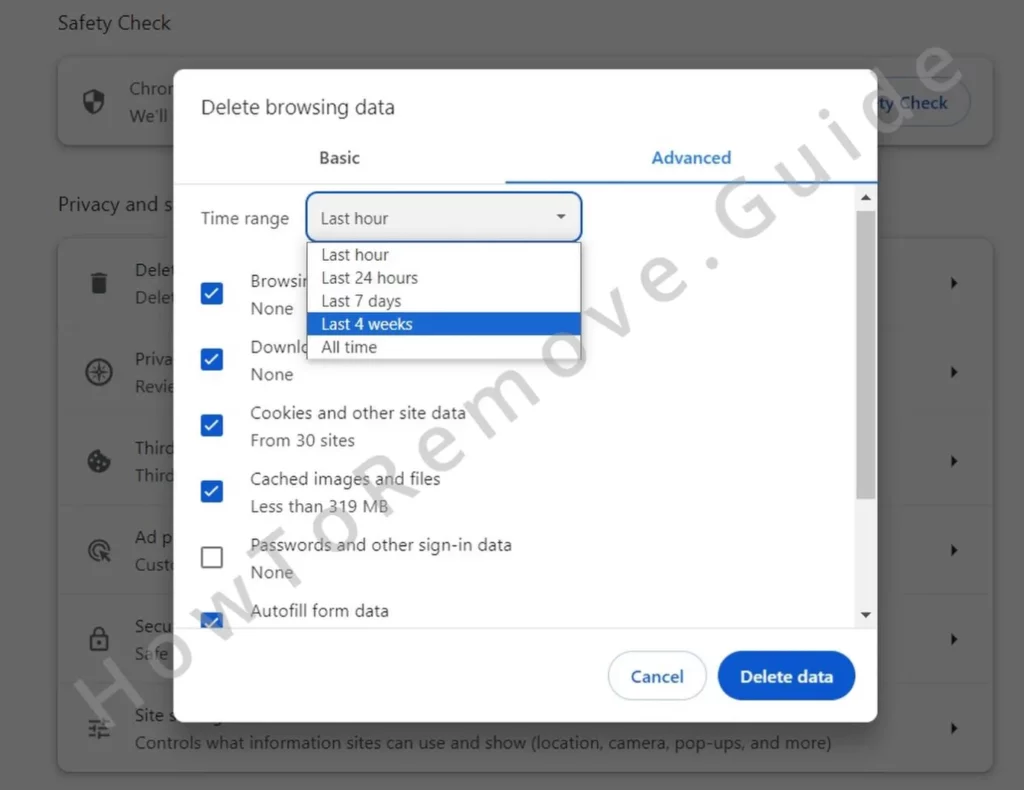
Now, clean your browsing data. Go to your browser’s Privacy and Security settings. Select “Delete browsing data“. Choose a suitable timeframe that extends to the time when Mobility Search first appeared.
Delete everything except for passwords. Cached images, cookies, site data. All of it needs to go (you can make the adjustments in the Advanced tab of the data deletion window).
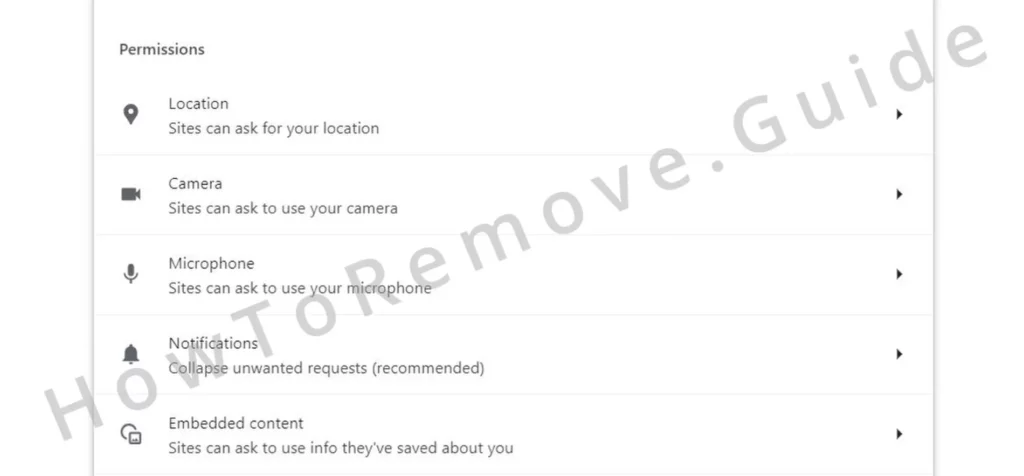
Also re-visit the Site Settings section and this time check each permissions type for mobility-search.com, searching.com, or any other rogue URLs.
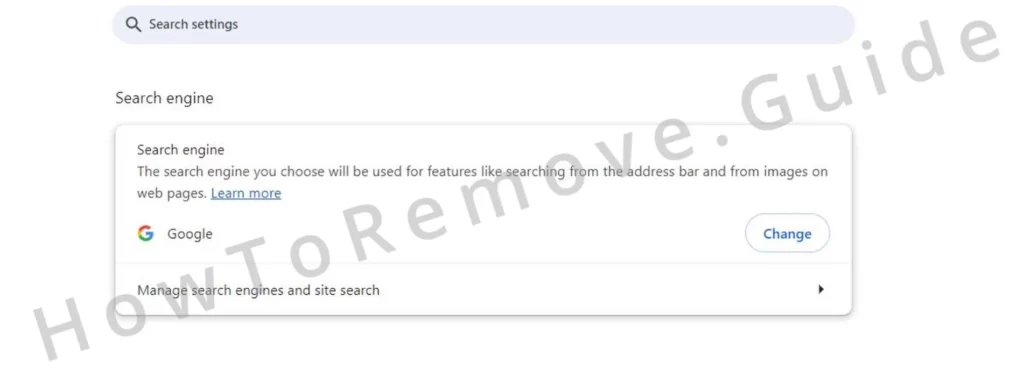
Then check the search engine settings. Make sure your default search engine is trustworthy. Remove any suspicious entries in the Manage Search Engines section.
Video walkthrough for this step:
Chrome
Microsoft Edge
Mozilla Firefox
Finally, review the Appearance and On Startup settings, too. Get rid of any unfamiliar URLs you might see there. Now, your browser should be clean.
What Is Mobility Search?
Mobility Search is browser hijacker that sneaks its way into your browser settings and takes over. It’s like a digital squatter, redirecting your searches to mobility-search.com or, more annoyingly, Yahoo. Sure, it might look legitimate at first glance, but trust me, it’s all smoke and mirrors. The real goal here? To rake in cash by boosting traffic to shady sites and flooding you with ads.
Now, what makes Mobility Search even trickier is how it plays tag-team with other nasties like Myhoroscope/MyhoroscopePro and Search Conduit. These guys don’t just crash the party—they help each other stick around. Myhoroscope might show up as a harmless browser extension, but it’s really there to reset Mobility Search’s grip every time you think you’ve gotten rid of it. Search Conduit? Same story, different packaging. It redirects your browsing and exposes you to sketchy sites, doubling down on the chaos.
How does it get in? Well, it’s sneaky. It often piggybacks on free software installs, hiding in the fine print you probably didn’t read. Once it’s in, it digs in deep, using Chrome’s “Managed by your organization” feature to lock down your settings. Throw in a few rogue registry edits and fake notifications, and suddenly, you’re in way over your head.
The risks here aren’t just about inconvenience. You’re looking at phishing scams, malware traps, and even stolen personal data. Oh, and all those numbers they show you on their fake dashboards? Pure fiction. They’re just there to keep you hooked while your privacy gets sold to the highest bidder.
Bottom line: Mobility Search and its crew are a digital nightmare. Staying vigilant isn’t just smart—it’s essential.
How to Avoid Mobility Search in the Future?
Let’s face it: we all know not to click shady links, visit dodgy sites, or download sketchy files. But even the savviest internet users can stumble into trouble if they’re not careful. That’s where a few underrated tricks can make all the difference.
Stop Automatic Downloads
First, let’s talk about downloads. You’d be surprised how often trouble sneaks in through automatic downloads. A simple fix? Head to Settings > Downloads in your browser and enable the option to manually choose a save location before anything downloads.

It’s like putting a lock on your digital front door—nothing gets through without your approval. Easy, right?
Use Enhanced Browser Security
Next, take a look at your browser’s security settings. Most modern browsers come with built-in features to keep you safe, but here’s the kicker: they’re not always turned on by default. In Chrome, for example, you’ll find Enhanced protection under Privacy and Security.
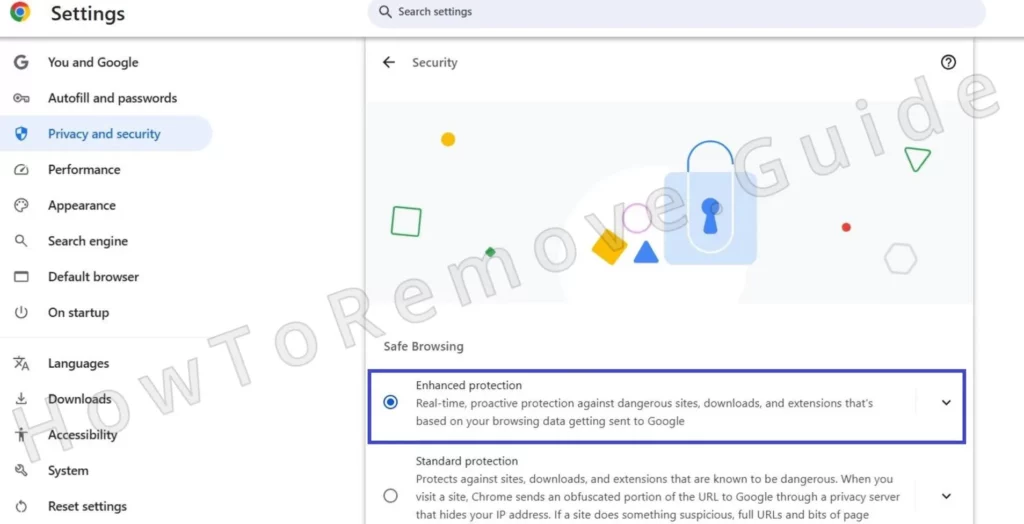
This isn’t just marketing fluff—it actively blocks phishing attempts and shady downloads. Oh, and don’t forget to enable “Always use secure connections” while you’re there. Not a Chrome user? No problem. Firefox and Edge have their own versions of these settings, so take a few minutes to explore and activate them.
Get an Ad Blocker
Finally, let’s clear up a common misconception about ad-blockers. They’re not just for skipping YouTube ads (though that’s a nice perk). A good ad-blocker acts like a bodyguard, shielding you from dangerous pop-ups, fake redirects, and malicious ads. Many will even warn you before you stumble into an unsafe site. Installing one is like adding another layer of armor to your online defense.
Follow these steps, and you’ll make it a lot harder for hijackers like Mobility Search to catch you off guard. Stay sharp, and stay safe!

Leave a Reply