DSR Search, found at search-redir.com, has quickly become the browser hijacker nobody asked for but plenty have stumbled upon. Its goal is the goal of any other run-of-the-mill hijacker – to replace your default search engine with a counterfeit one. The result is a flood of misleading ads, redirects to Yahoo or Bing, and promotions for questionable sites that feel shady at best.
But this isn’t just a minor annoyance, it’s a symptom of something bigger. DSR Search is one piece of a much larger puzzle, tied to networks of rogue programs and malware. Ignore it, and you’re leaving the door wide open to more trouble.

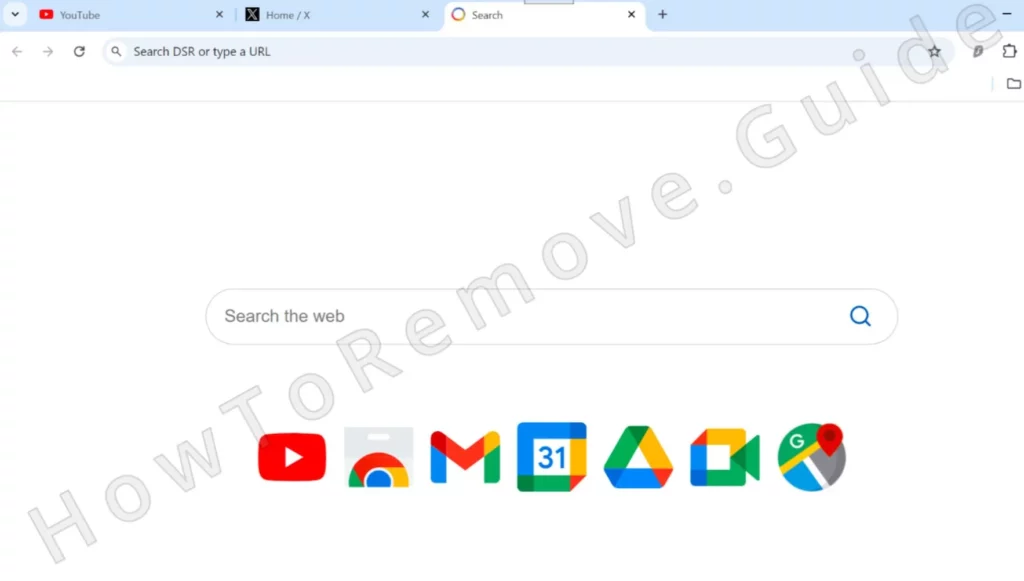
This hijacker doesn’t just waltz into your system on its own. It typically hitchhikes with software like Watchdog, PCAppStore, or a fake optimization app named “Fast“. Once inside, it burrows deep, altering your browser’s settings and ensuring it won’t be easy to get rid of. And here’s the kicker: even if you remove one rogue app, others might linger, keeping the hijacker active.
If DSR Search has made itself at home in your browser, act fast. Use a trusted anti-malware tool to clean your system, reset your browser settings, and avoid downloading from unverified sources. Stay vigilant—prevention beats cure every time.
DSR Search Removal Guide
If you want to manually delete DSR Search, there are two ways to go about it. The first one is to try a couple of simpler, more conventional steps. The other is to go for a more in-depth removal that takes considerably more time and effort.
To figure out which one you need, just go to the affected browser, click its menu, and look at the menu’s bottom, or go to the Settings page and look at the top of that page. If you see a note that reads “Managed by your organization”, you’ll need the advanced steps (shown further down). If you don’t see this message in the menu, the quick steps shown next should suffice:
- Go to the Extensions Manager in your browser and look for DSR Search or anything linked to it.
- If you find the culprit, see if there’s an active Remove button beneath it and click that.
- Go to Privacy and Security in the browser’s settings and examine the Site Settings section. Look specifically at Notifications and Pop-ups and Redirects.
- See “Search-redir.com” or any other unfamiliar URLs there? Delete them and then restart your browser.
- Now go to the Search Engine section in the browser’s settings and make sure you are using Google or another reputable search provider as the browser’s default one.
Now reboot the PC and reopen the browser. If there are no remaining traces of DSR Search, you’re probably good to go.
I won’t lie to you, most of the time the hijacker won’t be gone. It’s even possible that you weren’t able to perform one or more of these quick steps. Doesn’t matter – the actual removal guide below will let you solve all of that, so go ahead and complete its steps if DSR Search is still being a nuisance.
SUMMARY:
Removing DSR Search and its sneaky companions isn’t a quick task—it’ll take at least an hour and requires some basic troubleshooting skills. But if you’re thorough and follow each step, the effort is worth it. Patience is key here; missing even a single rogue element could bring the hijacker back.
If you’re short on time or not confident in your tech skills, there’s an easier option. Tools like SpyHunter 5 offer a straightforward way to eliminate DSR Search and related malware. With just a few clicks, your PC can be clean and secure again.
How to Get Rid of DSR Search
If you’ve already seen the “Managed by your organization” message in your browser, then you know you’ll need to dig deeper to get rid of the hijacker as the quick steps shown above won’t be enough. This is because there’s a third-party policy introduced to the browser that’s blocking you from deleting the hijacker. The good news is it’s not too difficult to hunt down and eliminate the rogue policy. It just takes a bit of time.

To remove the policy, you need to visit the browser’s policy page. Enter the correct URL into the address bar and press Enter:
- For Chrome:
chrome://policy - For Microsoft Edge:
edge://policy - For Brave:
brave://policy
For other Chromium browsers, adapt the URL by replacing the browser name.
Once the page loads, look for a policy with random characters in the Value column. This represents the hijacker’s control. Copy this value and save it in a text file. This small step might feel insignificant, but it’s a critical part of the process.
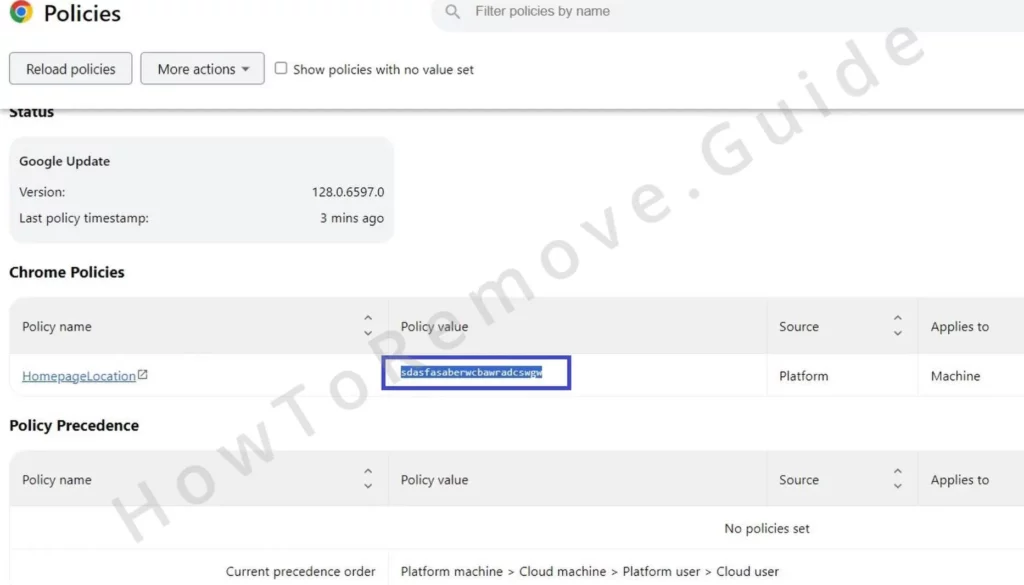
Now you need to do a similar thing in the Extensions Manager page of your browser.
However, the hijacker’s extension often interferes with browser functionality, including blocking access to the Extensions page. If this happens, you’ll need to remove the extension data directly from your computer’s file system.
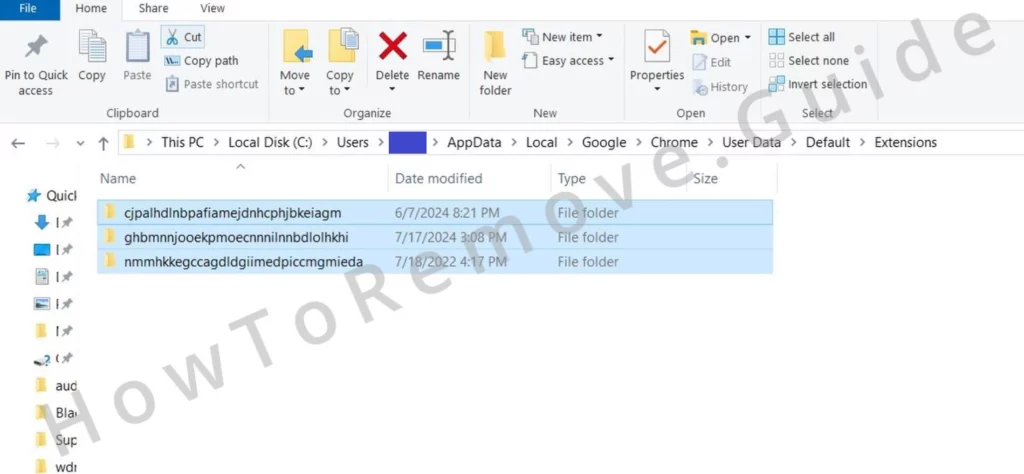
First, navigate to the extensions folder.
For Chrome: C:\Users\[Your Username]\AppData\Local\Google\Chrome\User Data\Default\Extensions
For other Chromium-based browsers, check the following image:

Once in the extensions folder, you won’t see clear labels for individual extensions. To eliminate the hijacker, delete all folders in this directory. Press Ctrl + A to select everything, then press Delete. This action disables all browser extensions. Legitimate ones can be reinstalled later without much hassle.
With the extension data cleared, try accessing the Extensions Manager again. The page should now open normally.
Enable Developer Mode on the Extensions page to display detailed information about each extension. Look for the hijacker extension ID. If it’s not immediately visible, click on any suspicious extensions to view their details. Copy the ID and add it to your text file.
Check for any other extensions that might be connected to the hijacker. Even seemingly harmless extensions could be compromised. Documenting all suspicious IDs ensures no traces are left behind.

Video walkthrough for this step:
How to Delete DSR Search Virus Policies
The previous step was all about gathering information that will help you find and delete entries linked to the rogue DSR Search policy. Now that you’ve got the needed data, it’s time to go to the Registry Editor, search for the rogue items, and eliminate them:
First, go to the Registry Editor. You’ll find it in the Start Menu, but make sure to open it with Admin privileges.
Press Ctrl + F, then search for the first of the collected policy values.
Delete the key (folder in the left panel) that gets found and search again.
You must make sure there are no more results for that search query and then proceed to the next policy value or rogue extension ID.
The hijacker could be blocking your access to some of its keys, but there’s an easy solution:
Start by right-clicking the parent key. You must go to Permissions > Advanced > Change, and type “everyone” in the text field.
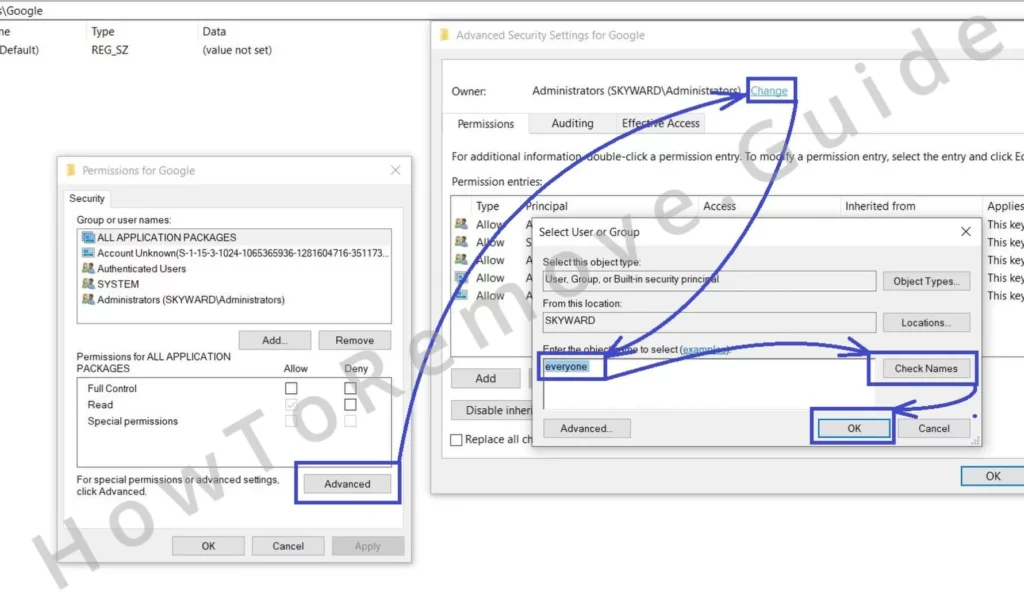
Then you must click the Check Names button and Apply the changes. Next, click OK, enable the two newly-appeared “Replace…” options, and click Apply and OK again.
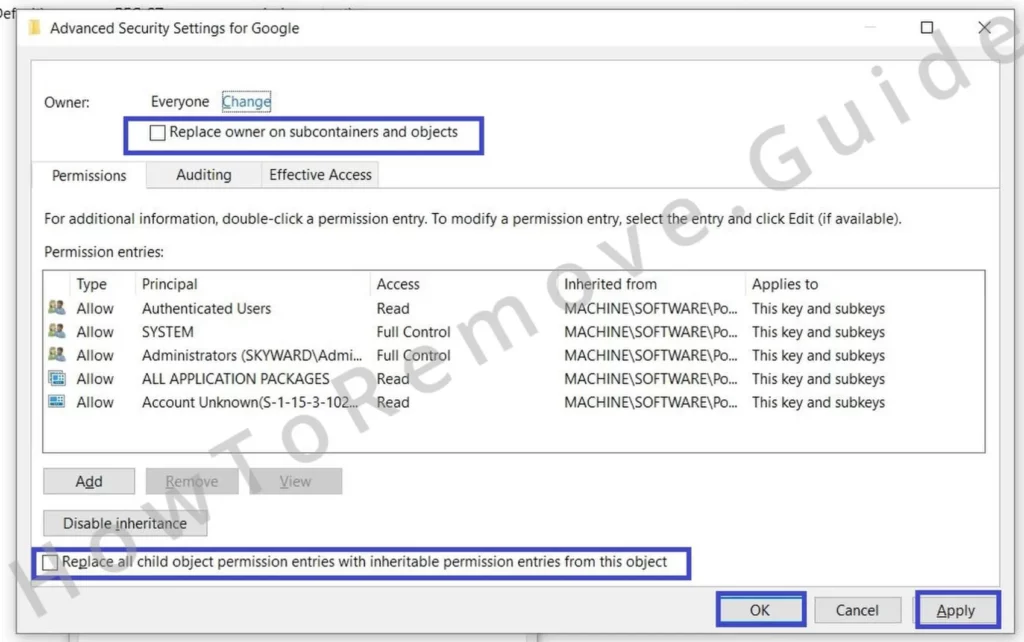
This should make the hijacker key deletable, so go ahead and remove it.
Video walkthrough for this step:
Get Rid of DSR Search Malware Policies: Alternative Methods
There are alternative ways to get rid of rogue policies. The registry cleanup is the main solution, but if it doesn’t work in your case, I can provide you with two more options.
The first one uses a built-in Windows tool called Group Policy Editor. Here’s how to use it:
Open the Start Menu. and search for “Edit Group Policy“. Click the first thing that shows up.
In the Group Policy Editor, find and right-click Administrative Templates on the left, and click on Add/Remove Templates.
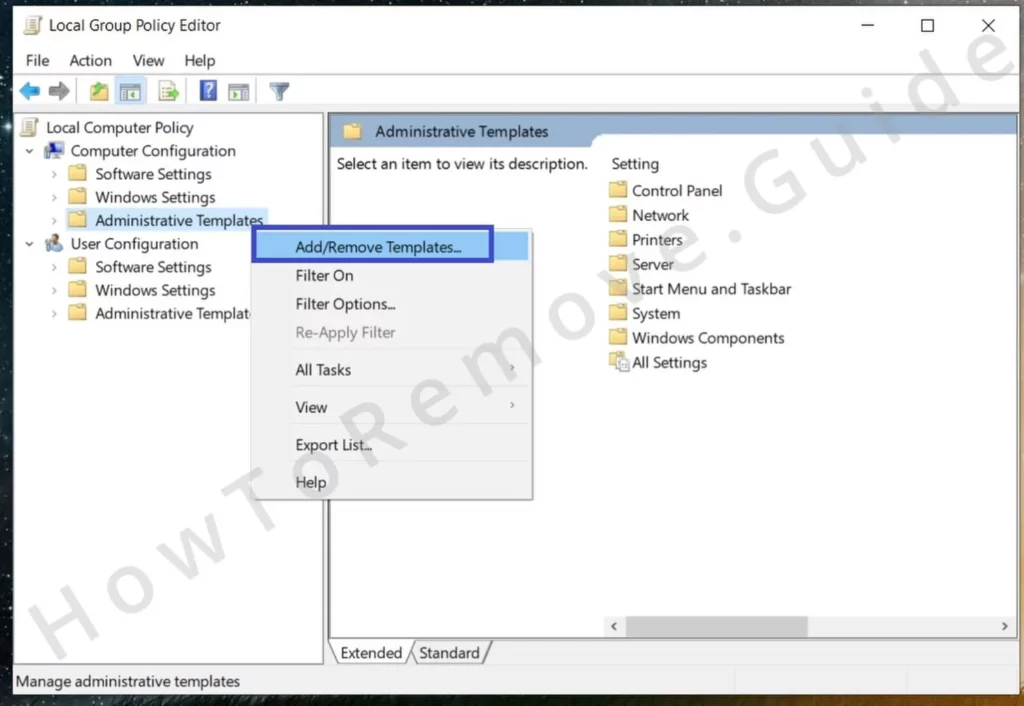
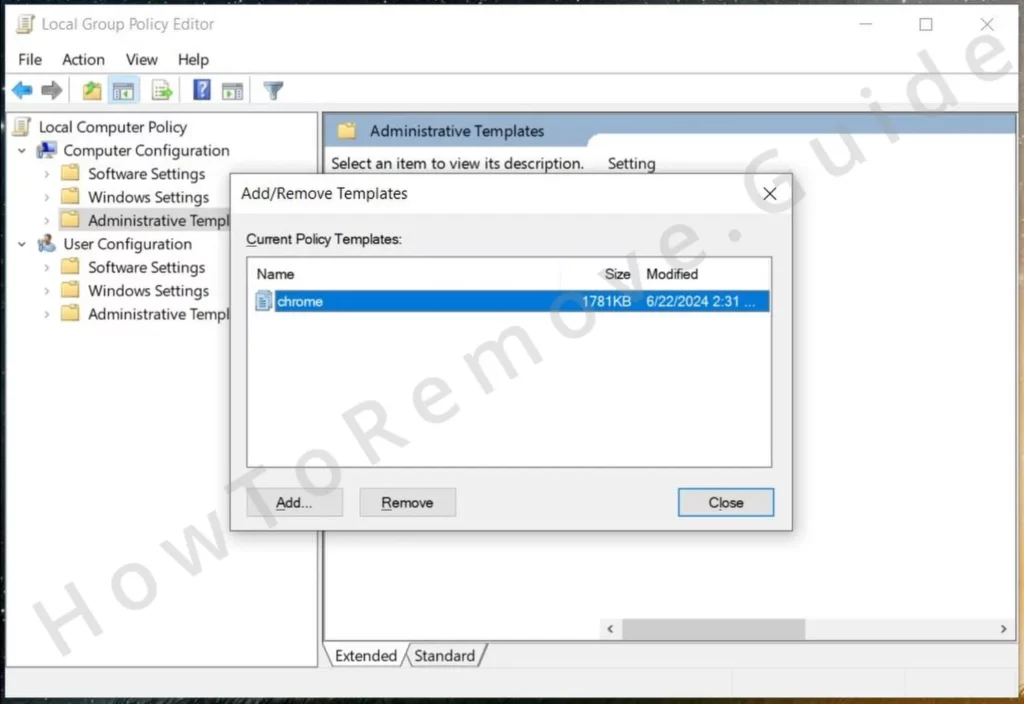
Remove any unrecognized templates. We doubt you’ve willingly added any yourself, so it’s generally best to delete everything you see in that list.
The next thing you can do is to use the free Chrome Policy Remover tool, but only if you are a Google Chrome user.
This automates the removal of rogue policies and is super easy to use – you just need to run it and will take care of the rest.
Download and run it with administrator privileges. Your system might warn you about the program, since it’s not from an official developer, but don’t worry, it’s perfectly safe so ignore the warning: Click “More Info” and “Run Anyway” and the tool will open and automatically eliminate policies applied by the hijacker.
Video walkthrough for this step:
Manual Group Policy Removal
Automatic Group Policy Removal
How to Remove DSR Search From Chrome and Edge
Once you’ve performed all the previous steps, the “Managed by your organization” message should no longer be in your browser, which means the rogue policy is gone. All that’s left to do now is to clean up the browser’s settings:
Start with the Extensions page. Delete any suspicious extensions linked to DSR Search.
Next, visit the Privacy and Security settings to delete the browser cache, cookies, and other temporary data that may hold records linked to the hijacker.
Click the Delete browsing data button, go to the Advanced tab, and put ticks on everything. Leave only Passwords unchecked. Then choose a time frame long enough to include the entire period DSR Search was in the browser, and then delete the data.
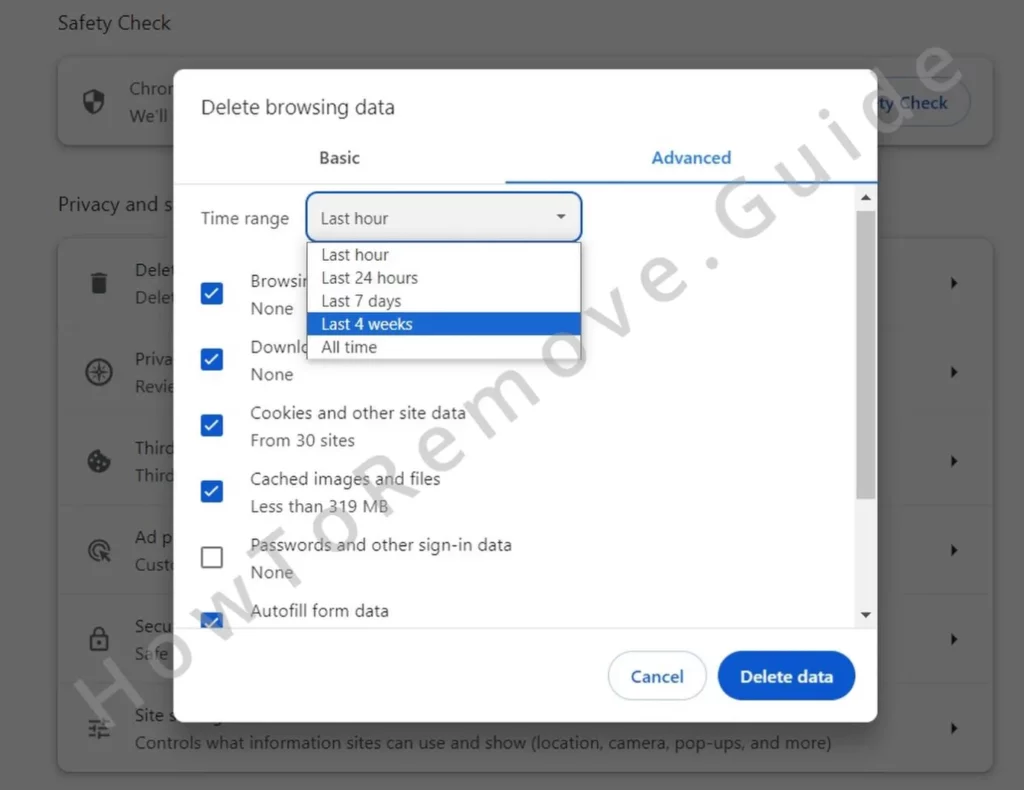
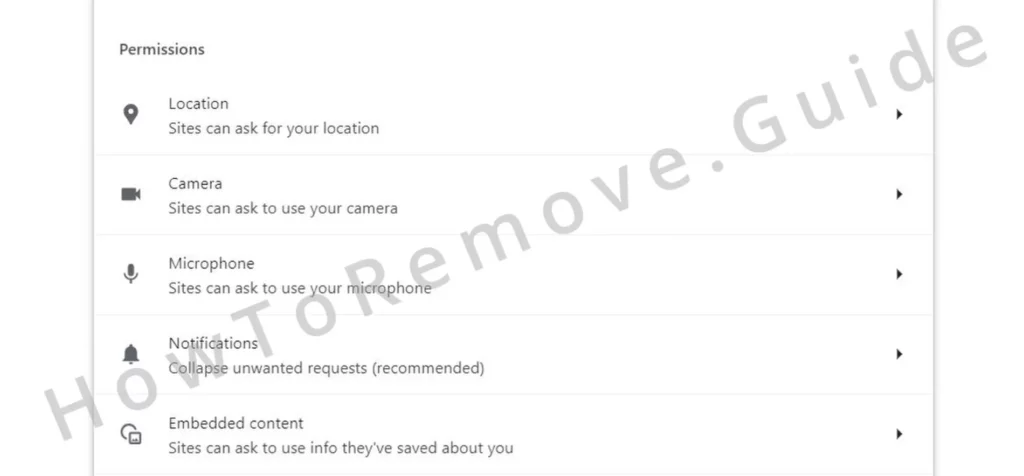
Once again, review the Site Settings, but this time check every single permission type to remove unfamiliar URLs like “Search-redir.com” listed in the “Allow” section.
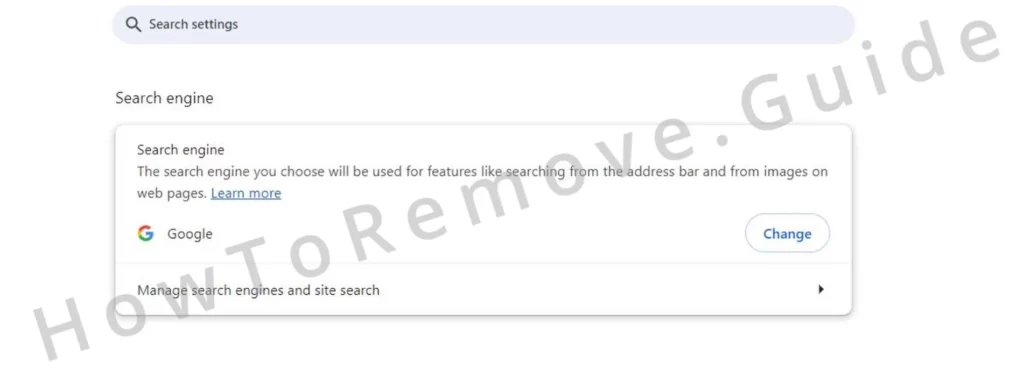
Also, don’t forget to reset your search engine to a trusted provider and to delete any rogue addresses shown in the Manage Search Engines section.
Lastly, ensure there aren’t any suspicious URLs in the “On Startup” and “Appearance” tabs. If there are, delete them.
Video walkthrough for this step:
Chrome
Microsoft Edge
Mozilla Firefox
How to Remove the “Fast!” Virus
Dealing with the “Fast!” virus can feel like a game of digital whack-a-mole. This pesky malware, often linked to the notorious DSR Search hijacker, isn’t one to simply pack up and leave. It hides in various corners of your system, making it a tough nut to crack. But don’t let its persistence get the better of you. With a methodical approach, you can rid your PC of this unwanted guest once and for all.
Step One: Disabling the Core Application
The first target is the “Fast!” app itself. Start by opening it and disabling any options that allow it to run in the background. This simple step ensures it can’t relaunch mid-removal. Then, search for “Startup” on your computer, and inspect the programs set to open at boot. Find “Fast!” in this list and disable it.
Once the groundwork is laid, head to Apps & Features in your settings. Locate and uninstall “Fast!” from the list. While you’re at it, check for other dubious apps like “PC App Store,” which might have snuck in alongside it. Rogue programs often travel in packs, so take your time clearing out anything suspicious.
Step Two: Stopping Background Processes
Even after uninstalling, “Fast!” has a habit of sticking around in the shadows. Open the Task Manager using Ctrl + Shift + Esc and look for active processes tied to “Fast!”—”FastSRV” is a common offender. Right-click the process, select Open File Location, and delete the entire folder.
If a file refuses to budge, claiming it’s “in use,” bring out a tool like LockHunter to unlock and delete it. Then, go back to Task Manager and terminate any remaining traces of “Fast!” processes.
Step Three: Cleaning Up Scheduled Tasks
The final layer of defense lies in hidden scheduled tasks. Open Task Scheduler and carefully review the Task Scheduler Library. Examine the tasks for any signs of unknown .EXE files or suspicious URLs. If you find something unusual, delete it immediately. This step might seem tedious, but skipping it could let “Fast!” return to haunt your system.
Final Sweep and Prevention Tips
Restart your computer and verify that “Fast!” is truly gone. Check Apps & Features, Task Manager, and your system tray for any remaining signs. Going forward, keep your antivirus software updated and run regular scans. Staying proactive now will save you from headaches down the road. You’ve got this!
Tips to Avoid DSR Search In the Future
Everybody knows not to visit sketchy sites, download pirated content, or open links attached to suspicious emails and other online messages. If you still do any of this despite being aware of the risks, that’s on you. However, there are several other important, yet oft-overlooked precautions that can help you avoid DSR Search and other similar hijackers:
Disable Automatic Downloads
This tip is super simple, yet can save you so much trouble down the line. Just go to your browser’s Settings > Downloads, and toggle on the option that forces the browser to always ask you where to save a file before downloading.

This simple step ensures nothing can be downloaded automatically as you’ll always first need to manually specify a download location.
Use Enhanced Security in your browser
Nowadays, any browser worth its salt has a slew of enhanced security settings that can notably improve your online safety. The stricter settings aren’t enabled by default but if you want to avoid DSR Search and other similar hijackers in the future, I recommend enabling them.
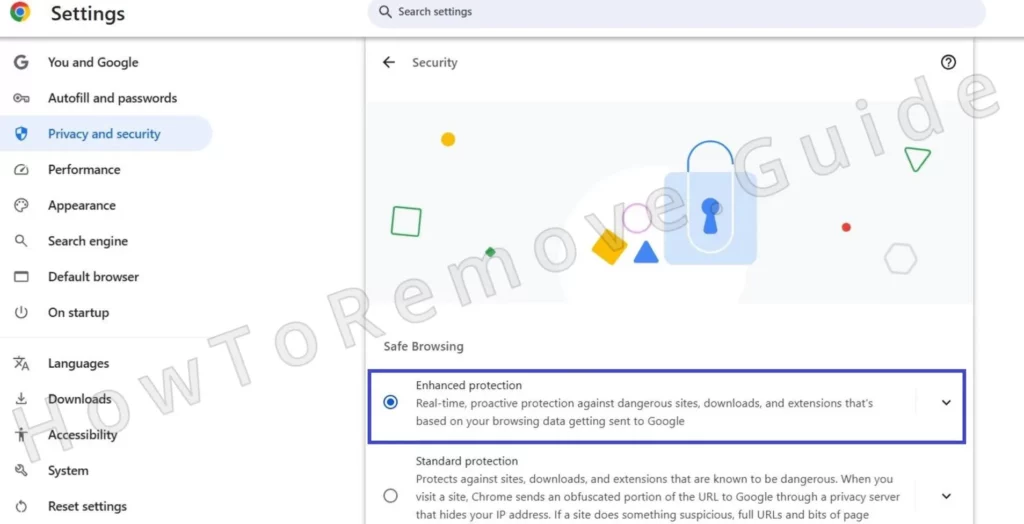
For example, in Chrome and other Chromium browsers, it’s a good idea to go to Privacy and Security > Security and turn on “Enhanced protection” and “Always use secure connections”. Other browsers have similar options.
Install an ad-blocker
Ad-blockers are not only for watching YouTube without ad interruptions every 2 minutes. They also help with security – they block hazardous pop-ups and redirects to rogue sites, and warn you when you are about to visit an unsafe page. Install one now to greatly improve your browser security.

Leave a Reply