Noticing a Node.js runtime process in your PC should normally not be a cause for worry since this is a legitimate program that is used by developers for running JavaScript code. However, if the Node.js runtime process seems to have appeared out of nowhere and has suddenly started hogging resources for no clear reason, then you might be dealing with malware in disguise.

Viruses and Trojans that disguise themselves as legitimate apps and processes is a nothing new, so it won’t be a surprise if that’s what’s currently going on in your PC. My advice? If there are any Node.js runtime processes or apps on your PC and you have no idea where they come from or what they do, it’s best to get rid of them. At best, you simply don’t need them. At worst, your system has malware similar to NanoPhanoTool or Altrousik.
In either case, removal is the recommended course of action and the steps below will show you how you can deal with this on your own.
Node.js runtime Virus Removal Tutorial
You’ll need to perform a series of steps to hunt down and fully remove the Node.js runtime virus and everything linked to it. Here’s a quick overview of the required actions:
- Install LockHunter and reveal hidden files and folders.
- Look through the Task Manager, identify rogue processes, go to their location folders, delete everything, and then quit the process.
- Find and delete remaining malware files in other locations, such as:
C:\ProgramData\Microsoft\Windows\Start Menu\Programs\StartupC:\Users\YourUsername\AppData\Roaming\Microsoft\Windows\Start Menu\Programs\Startup
- Clear the Task Scheduler.
- Clear the System Registry.
Each of these steps is explained in detail below. But before you go there, I strongly suggest going to your Start Menu > Settings > Apps, sorting the list by date, and deleting any recent installs that seem unfamiliar or suspicious.
SUMMARY:
The following guide on how to remove Node.js runtime includes some moderately advanced steps that inexperienced users may find difficult. Also, the completion of all the steps requires about an hour (possibly more).
With these things in mind, if you think that the manual guide below isn’t for you, I suggest trying to remove the malware with the help of an automatic removal tool called SpyHunter 5. It will take care of the Node.js runtime virus in no time and clean your PC of any other rogue elements. If you want to give it a try, you’ll find it linked on this page.
How to Remove the Node.js Runtime Malware
Some of the Node.js runtime files you’ll have to delete might be blocked, so the first thing you need to do before you go any further is install the free LockHunter tool on your PC.
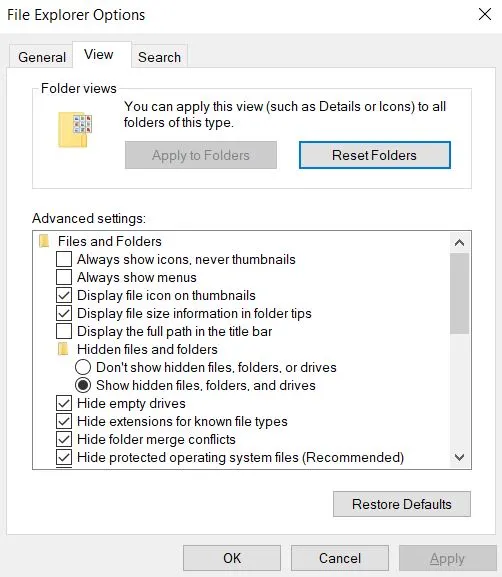
Next, you should also ensure that the hidden files and folders on your PC are visible. Here’s how:
Open Folder Options from the Start menu, switch to the View tab, and enable “Show hidden files and folders.” This simple step lifts the curtain on files that malware would prefer you never find.

Video walkthrough for this step:
Now you are ready to begin the actual removal process.
Get Rid of Node.js Runtime Background Processes
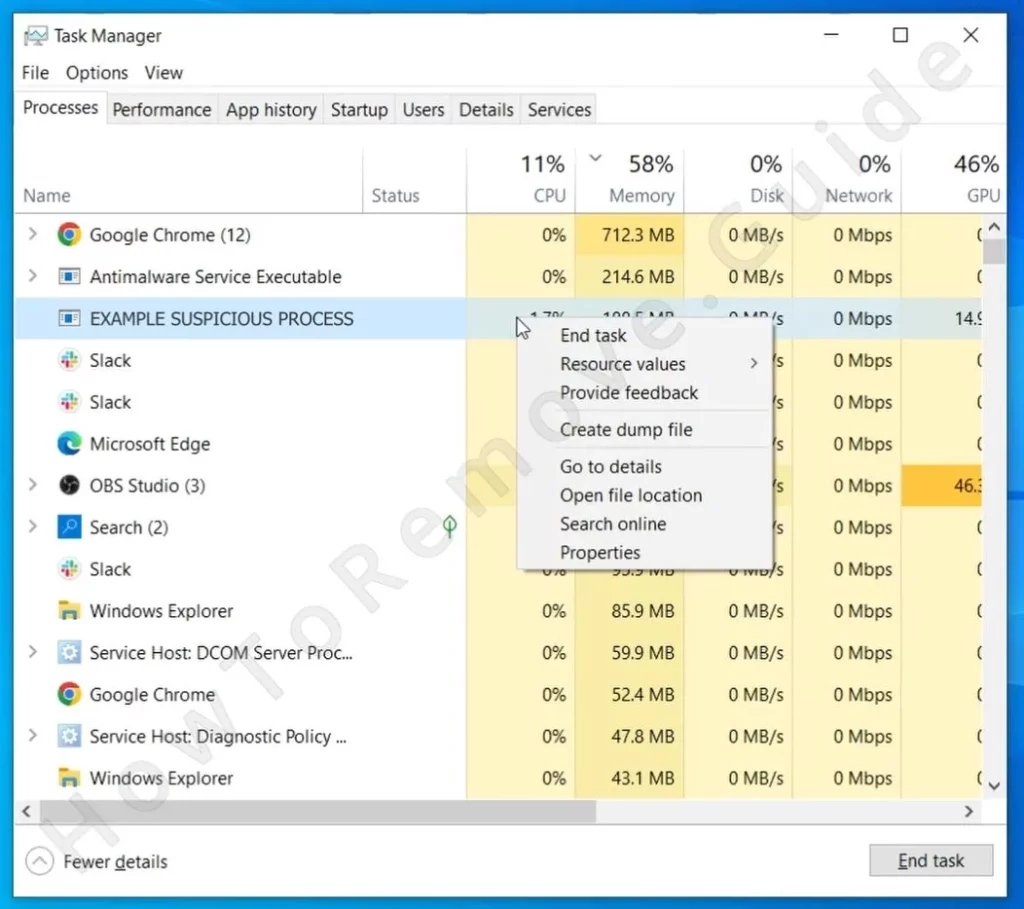
Node.js runtime works behind the scenes by draining resources and making itself at home. You are very likely to find processes related to it in the Task Manager, which is where you should go now:
Press Ctrl + Shift + Esc to open Task Manager. If it looks small, click “More Details” to expand it.
Sort the processes by CPU or Memory usage. Malware often sticks out by hogging resources under a cryptic name. Found something odd? Right-click it and select “Open File Location.” If the location screams “Node.js runtime,” delete the file.

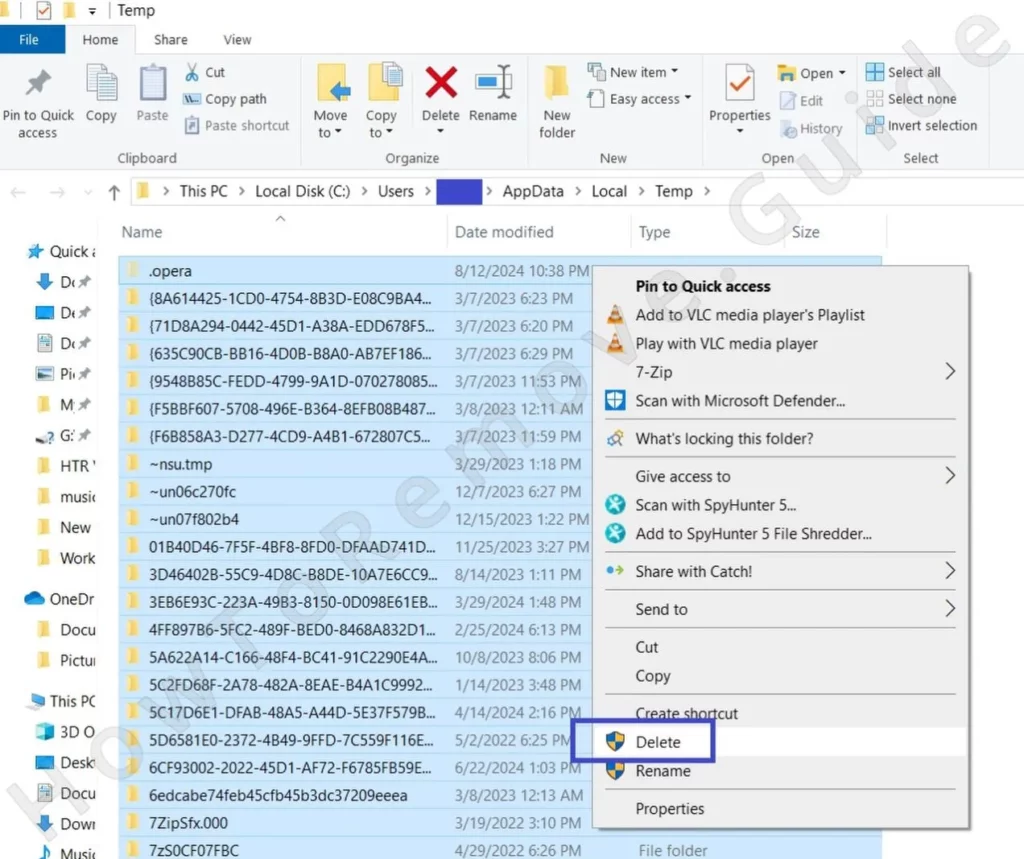
Can’t? That’s where LockHunter comes in—it’s your malware-busting sidekick. With it already installed, right-click the rogue file/folder, click “What’s locking this file/folder?”, and then click Delete.
Once you’ve dealt with the file, go back to Task Manager and end the process. This step ensures that Node.js runtime doesn’t restart itself while you’re busy cleaning up.
Video walkthrough for this step:
Delete Node.js Runtime Virus Files
Malware doesn’t clean up after itself. To finish the job, search for leftovers in these folders:
C:\ProgramData\Microsoft\Windows\Start Menu\Programs\StartupC:\Users\YourUsername\AppData\Roaming\Microsoft\Windows\Start Menu\Programs\Startup- C:\Users\YourUsername\AppData\Local\Programs
- C:\Users\YourUsername\AppData\Roaming\Microsoft\Windows\Start Menu\Programs
Next, clear out C:\Users\YourUsername\AppData\Local\Temp by deleting everything in it.
Finally, empty your Recycle Bin. It’s the digital equivalent of taking out the trash.

How to Delete Persistent Files with Lock Hunter
Get Rid of Node.js Runtime Scheduled Tasks
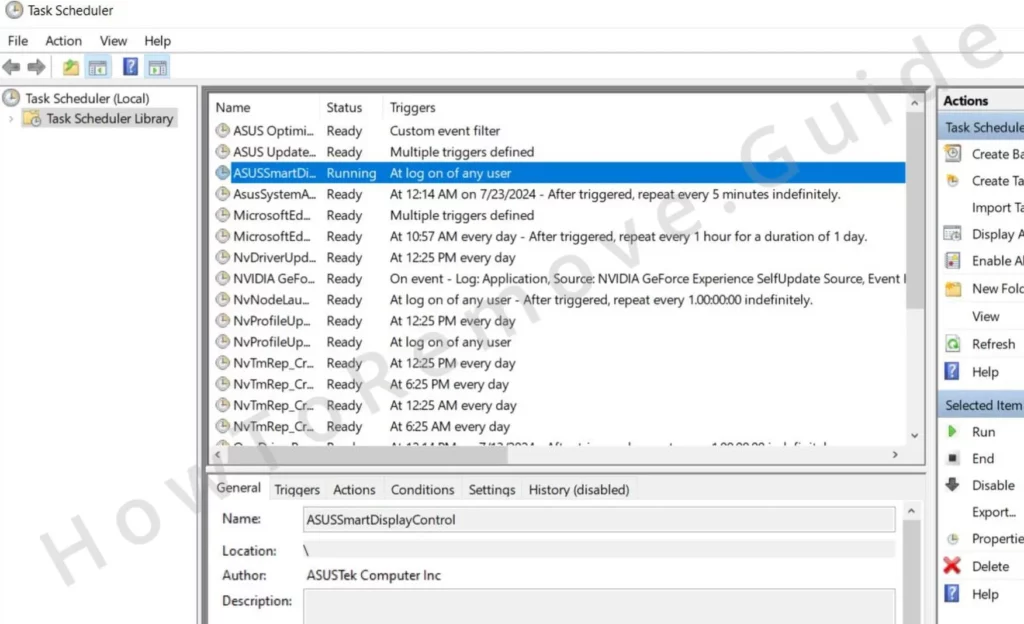
Node.js runtime might have scheduled tasks to reappear like an unwelcome houseguest. Open Task Scheduler from the Start menu and review the Task Scheduler Library.

Double-click each task to inspect its details, especially the Actions tab. If a task points to a suspicious file or script, note its location, delete the task, and manually remove the file.
This part can feel tedious, but it’s worth it. Eliminating these tasks is like changing the locks—they can’t come back without them.
Video walkthrough for this step:
Uninstall the Node.js Runtime Malware Through the System Registry
The final cleanup needs to happen in the Registry Editor. The Node.js runtime virus likely has entries there that you need to delete. Here’s how:
Open it by pressing Win + R, typing regedit, and pressing Enter. Use Ctrl + F to search for Node.js runtime-related entries, deleting them as you go. Also search for the names of any programs you deleted in the Apps section (at the start of the guide) and the names of any processes you ended in the Task Manager.
Next, manually inspect these keys for anything unusual:
HKCU\Software\Microsoft\Windows\CurrentVersion\RunHKCU\Software\Microsoft\Windows\CurrentVersion\RunOnceHKLM\Software\Microsoft\Windows\CurrentVersion\RunHKLM\Software\Microsoft\Windows\CurrentVersion\RunOnceHKLM\Software\Microsoft\Windows\CurrentVersion\Policies\Explorer\RunHKCU\Software\Microsoft\Windows\CurrentVersion\Policies\Explorer\RunHKEY_LOCAL_MACHINE\Software\Microsoft\Windows\CurrentVersion\RunServicesHKEY_LOCAL_MACHINE\Software\Microsoft\Windows\CurrentVersion\RunServicesOnceHKEY_LOCAL_MACHINE\Software\Microsoft\Windows\CurrentVersion\RunOnce\SetupHKEY_LOCAL_MACHINE\SYSTEM\CurrentControlSet\service
IMPORTANT!: Do not delete these keys. Instead, check their contents in the right panel and delete any values there that seem suspicious, but leave the keys themselves intact!
Video walkthrough for this step:
Avoiding Future Malware Problems
With Node.js runtime gone, your focus should shift to prevention. Start by keeping your operating system and software updated. Those updates aren’t just annoying pop-ups—they patch vulnerabilities that malware loves to exploit.
Be cautious about what you download and where you click. Scammers thrive on curiosity and haste, so take a moment to think before you act. Invest in a reliable antivirus program with real-time protection. It’s like a guard dog for your system.
And finally, back up your data regularly. Whether you use the cloud or an external drive, having a backup means you can bounce back quickly if trouble strikes again.
The Final Word
Removing Node.js runtime isn’t just about reclaiming your system—it’s about learning how to keep it safe moving forward. By following these steps, you’ve shown malware the door and bolstered your defenses. Stay vigilant, stay informed, and remember: A little caution now can save you a lot of trouble later.

Leave a Reply