A new wave of browser hijackers that spread and promote the infamous boyu.com.tr search engine appears to be on the rise. Last week we talked about InstantQuest and today we came across a browser hijacker called QuickFind. Like its predecessors, QuickFind seems hellbent on replacing your browser’s default search engine with the rogue boyu.com.tr search engine, which is designed to promote all sorts of content, including sites and pages that could be unsafe.
Having this hijacker attached to your browser doesn’t automatically mean your system or personal data are in immediate danger, but it does mean you need to take action. Any way you look at it, the presence of QuickFind on your PC is a security hazard that must be addressed ASAP.
QuickFind Removal Tutorial
The advanced removal guide on this page takes some time to complete, so I suggest you first try to remove QuickFind the easy way. Won’t always work, but it’s still worth the shot:
- Open your browser, navigate to the main menu, and then go to settings.
- Then open the Extensions tab and look for QuickFind in this list. There may or may not be a Remove button under it. If the button is there, click it to delete the extension.
- Then head to Privacy and Security in your settings.
- Open Site Settings and check the permissions for notifications, pop-ups, and redirects.
- Look for any suspicious websites like boyu.com.tr. Delete them if you find any.
This may stop the hijacker. Restart your browser to see if QuickFind has been removed. If the hijacker is gone, great, no need to perform the more advanced steps.
On the other hand, if QuickFind is still being a nuisance, don’t worry, we’ll help you get rid of it. Same thing if you weren’t able to perform the steps shown above. For instance, if there wasn’t a Remove button under the QuickFind extension, the detailed guide below will let you overcome this obstacle.
SUMMARY:
The next tutorial will let you eliminate the hijacker, but QuickFind may have come bundled with other software, including malware. This additional software must also be removed, or QuickFind could return.
The problem here is I don’t know what got installed on your PC to allow the hijacker in, so I can’t provide concrete steps for its removal. For this reason, I suggest that you combine the following steps with the use of a reliable removal tool such as SpyHunter (which you can find on this page).
How to Get Rid of the QuickFind Extension in Chrome
The main trick that lets most hijackers like QuickFind resist the users’ removal attempts is the use of a rogue third-party policy.
Rogue policies block you from changing your browser settings, so you can’t remove the hijacker or restore your default search engine.
If you see “Managed by your organization” somewhere in the browser, this is likely the case. You need to remove these policies to regain control.
Open your browser and “<Browser Name>://policy” into the address bar, where you must replace “Browser Name” with the name of the browser you are trying to unblock. For example, type Chrome://policy for Google Chrome or Edge://policy for MS Edge.
Go to that address and you’ll see a list of policies in the browser. Pay attention to the values of each policy. Some values will look strange – random letters and numbers are a sign of trouble.
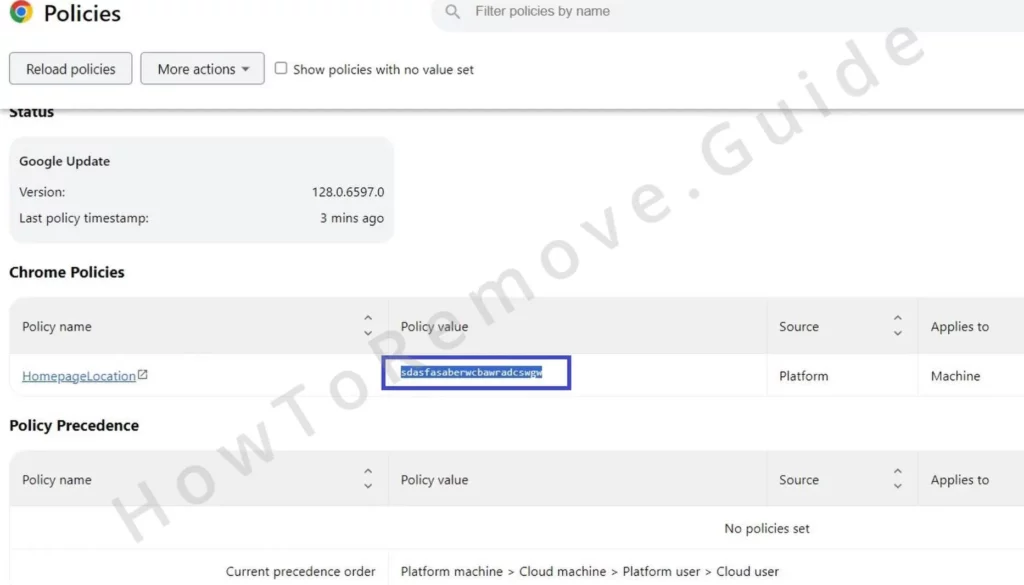
Copy these suspicious policy values. Save them in a text file because you’ll need them in a moment.
The next place that you must go to to gather more info is the Extensions Manager.
However, sometimes the hijacker blocks access to it. When this happens, you must remove the extension files manually. It sounds complex, but it’s easy if you follow these steps:
First, find the extensions folder on your computer. The path varies by browser. For Chrome, go to C:\Users\[Your Username]\AppData\Local\Google\Chrome\User Data\Default\Extensions.
Here are the extension folder paths for several other browsers:

Once you find the folder, delete the contents. All contents. This removes the files for all your extensions, including the rogue one.
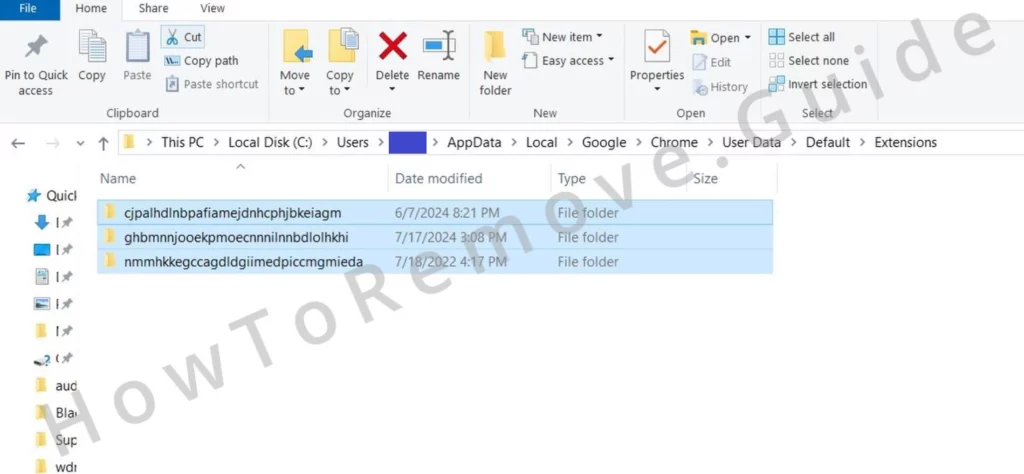
Now you’ll be able to open the Extensions Manager, so go to it and activate Developer Mode to see more information.
Locate the ID of the QuickFind extension and any other rogue add-ons and write down the IDs. Save them IDs along with the rogue policy values.

Delete QuickFind Virus Policies from Your Registry
Accessing the registry is key. You need to remove the rogue policies from here to regain control of your browser.
Use the Start Menu search bar to find the Registry Editor and then open it with administrative privileges.
Search for the rogue policies by pressing Ctrl + F and pasting the values you saved earlier. Delete matching registry keys as you find them (the registry keys are the folders shown in the left panel).
Delete all keys linked to the rogue policy values and extension IDs.
Important!: Each time you delete a key, search again for the same value or ID because there could be other related keys left. This is because each time you search, you’ll get only a single result, even if there are more than one related keys.
Sometimes you won’t be able to delete the registry keys immediately. QuickFind may block you from doing so, which is another of its clever persistence tricks. Here’s how this is solved:
Right-click the parent key (the key is a level above the one you are trying to delete). Then go to Permissions, and then choose Advanced.
Click Change, then type “everyone” and click Check Names. Click on Apply and then OK.
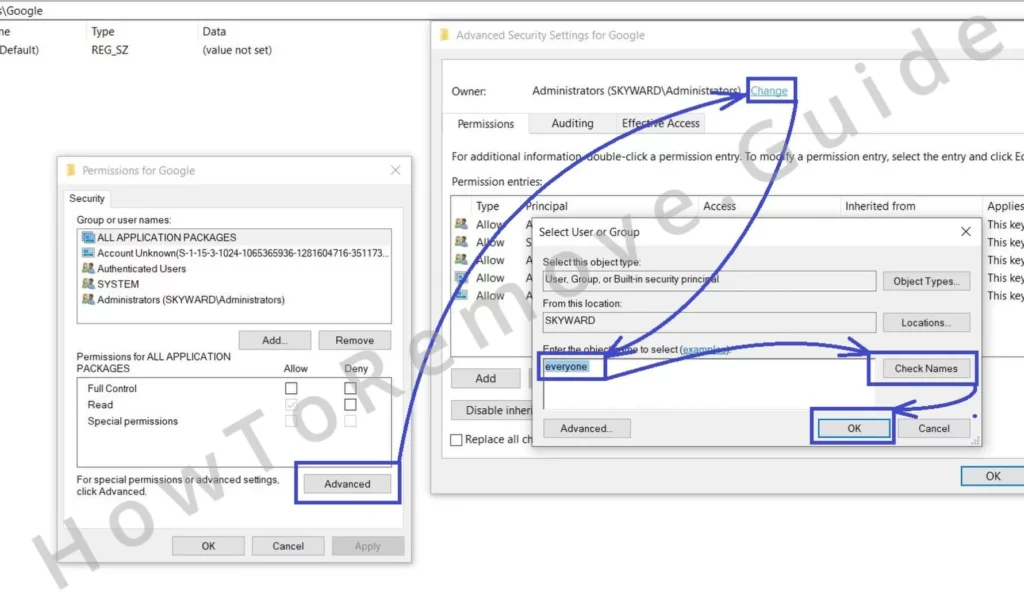
In the previous window, you’ll see two new “Replace…” options – tick them both, then click Apply and OK again.
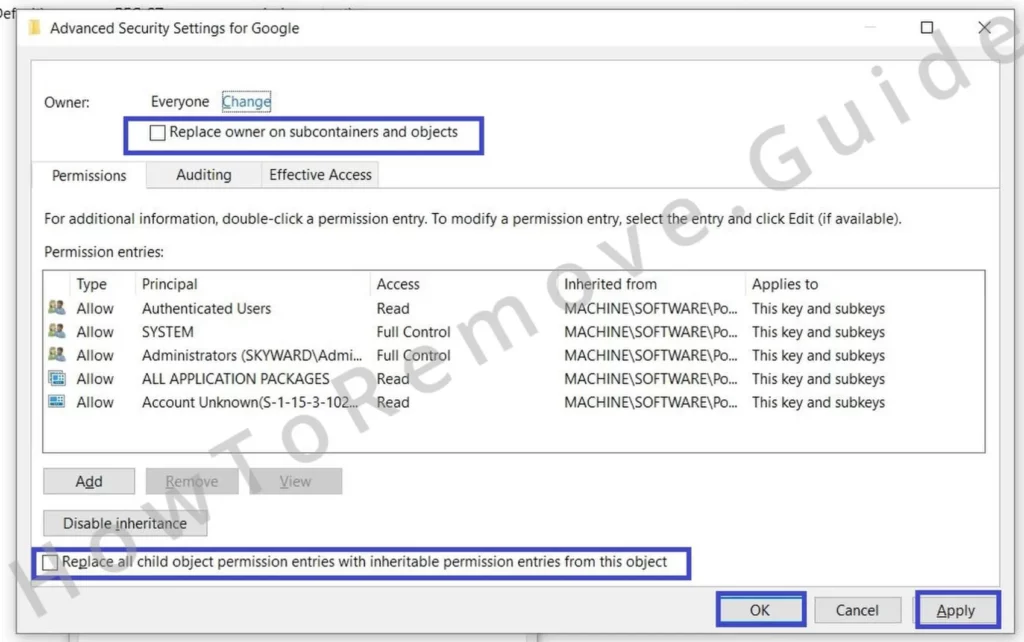
This allows you to delete the key. Once you’ve deleted all matching keys for one policy, move on to the next. Repeat this process until all rogue policies and extension IDs have been removed.
If you’re still facing issues with unwanted policies after this, there are two alternative ways to try.
Other Methods to Get Rid of QuickFind Extension Policies
The Group Policy Editor is another tool you can use to get rid of hijacker policies.
Search for it in the Start Menu and open it. Then look for Administrative Templates and right-click it.
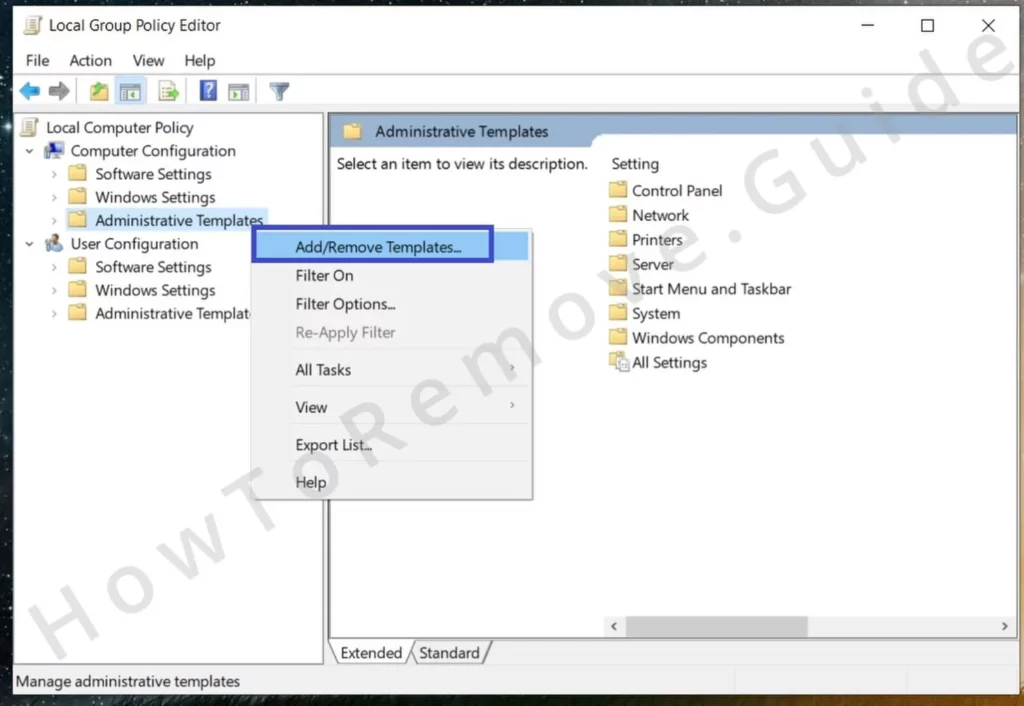
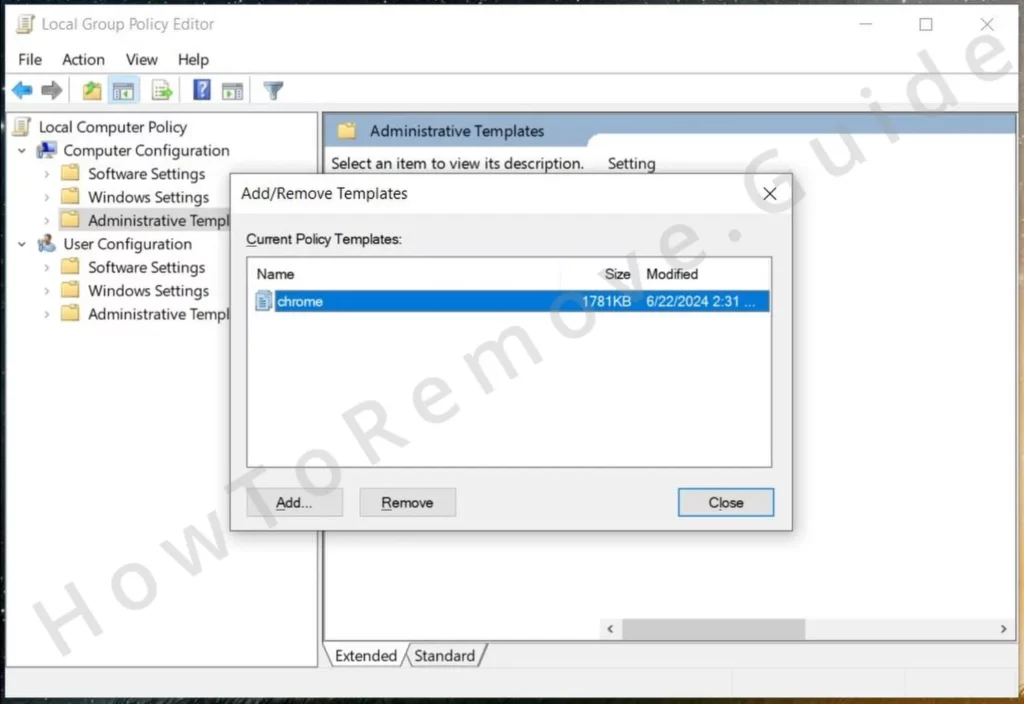
Here, you’ll find templates that may include rogue entries. Remove anything unfamiliar or suspicious. Most users don’t add anything to this list so it’s probably best to delete everything you see there.
A useful tool for Chrome users is the free Chrome Policy Remover. It automatically removes all policies from the Chrome browser in only a couple of clicks.
Download and run it with administrator privileges. Windows Defender or other antivirus software may block it, though, but that shouldn’t worry you, the tool is safe.
Just ignore the warnings and whitelist it if you need to and run it anyway. The Chrome Policy Remover will automatically do its job and once it’s done, your Chrome will have no policies that restrict your access to its settings.
How to Uninstall the QuickFind Extension From Chrome, Edge, and Other Browsers
Now it’s time to finally clear your browser from the rogue extension and the changes it has introduced to its settings.
Launch the affected browser and go back to the Extensions Manager.
This time, you will be able to remove the QuickFind extension once and for all, so do that.
If there are any other suspicious add-ons, delete them too.
Take a look at your settings afterward. Some legitimate extensions may need repair after the changes you made earlier. You should see a repair button underneath them. Click it to restore their functionality.
If the button isn’t available yet, try to use the respective extension and once your browser “realizes” it’s broken, the Repair button will appear.
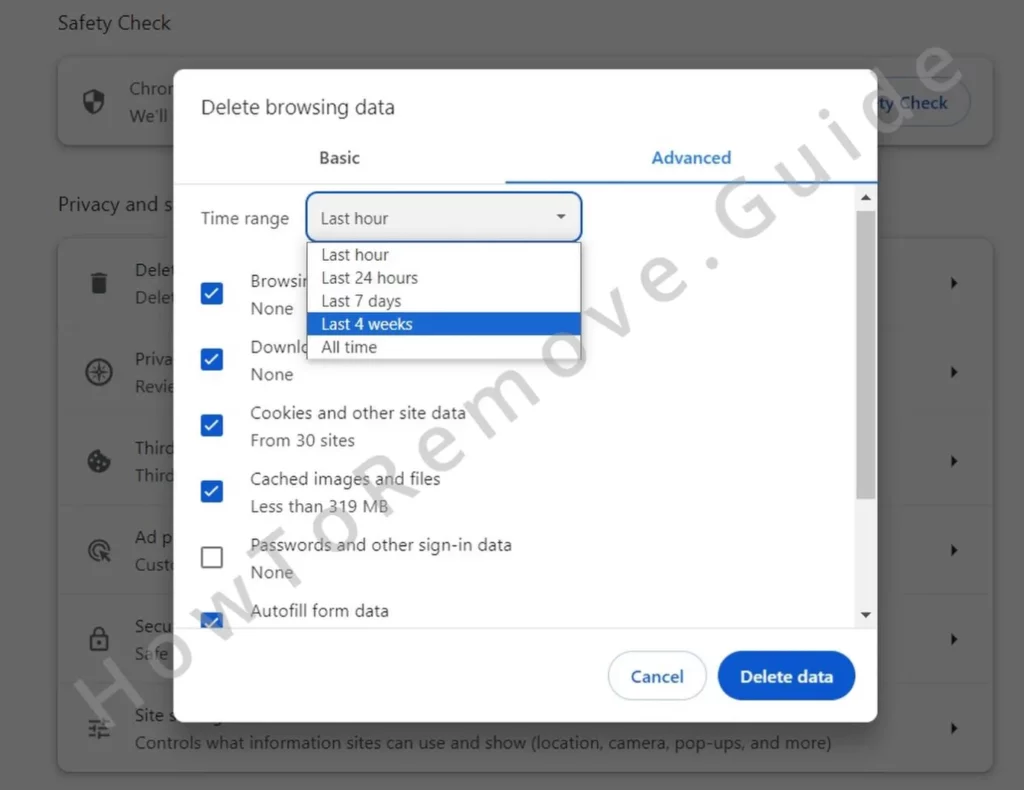
Now is also the perfect time to clean up your browsing data. Go to Settings > Privacy and Security > Clear/Delete Browsing Data > Advanced. Delete all data types except passwords for a period that goes back to before QuickFind first appeared.
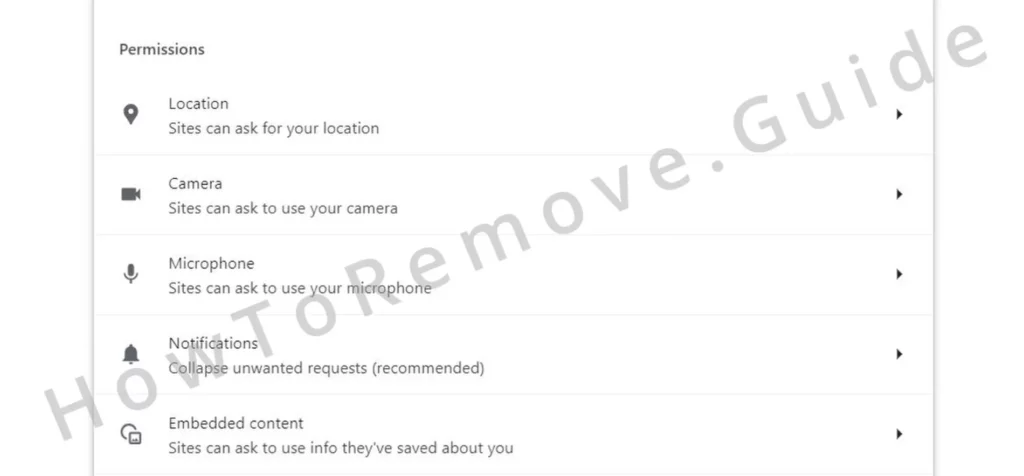
Check the Site Settings section once again. This time, visit all permission categories and remove from them any unknown URLs. Again, look out for boyu.com.tr, because it’s likely to be there.
Next, make sure to review the Search Engine section as well. Choose a trusted provider like Google or Bing, and delete any unrecognized engines like Boyu in the Manage Search Engines section.
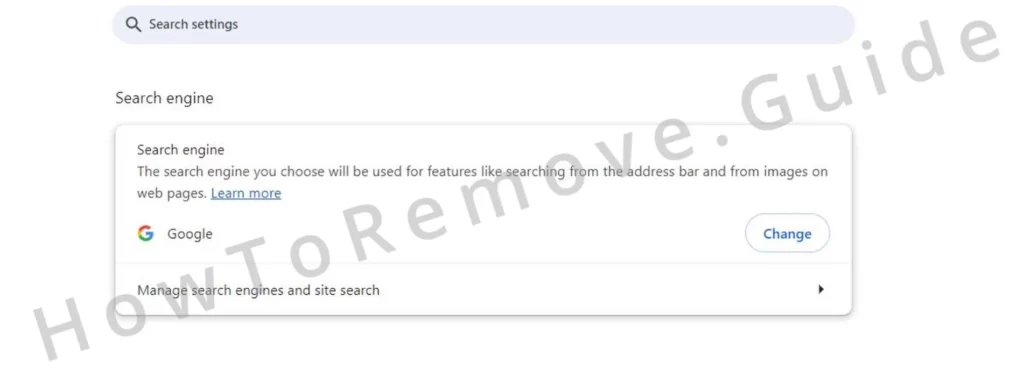
You should also check the On Startup and Appearance tabs – they too could have rogue URLs that you must delete.
And with this last step completed, the hijacker should finally be fully gone from your browser.
But since there’s always the possibility that QuickFind manages to slip through the cracks, remember that Spy Hunter 5 is still a valid option to get rid of any malware remnants responsible for the hijacker’s persistence.

Leave a Reply