Secure Search is a fake search engine, similar to Maxask and Boyu.com.tr, that gets introduced to the browser without the user’s informed consent. It replaces the user’s preferred search engine and redirects their searches to potentially unsafe sites such as phishing sites or ones filled with malware.
Secure Search can enter the browser in many different ways and can sometimes even be introduced to it by the installer of a legitimate app. Some users have even tied the appearance of Secure Search in their browser to the installation or an update of McAfee – a respected antivirus program.
The issue here stems from the search engine itself – in and of itself, it isn’t something harmful, so even regular programs can have it bundled with its installers. However, its redirects and site promotions can expose you to danger, which is why you should get rid of it with the help of the guide I’ve prepared for you below.
Secure Search Removal Steps
Hijackers are stubborn and difficult to remove by definition, yet sometimes users get lucky and manage to delete them the conventional way. So this is what I suggest you do first – perform the next quick steps and only move on to the detailed guide below if they don’t work for you:
- Access the browser menu to open Settings.
- Find the Extensions (or Add-ons) section, and examine each extension carefully. You should be able to see Secure Search, but there could also be other unwanted browser add-ons listed on that page.
- Secure Search and any other suspicious or unknown extensions should be removed. Use the “Remove” option under them if it’s available.
- Move on to the Privacy and Security settings, and access Site Settings. MS Edge users should go to the Cookies and Site Data.
- Review the permissions for Notifications and Pop-ups/Redirects. Block any permissions granted to suspicious or unfamiliar websites.
Restart your PC once this step is complete, then open the browser to check for traces of Secure Search. If the hijacker persists, you’ll need to complete the advanced removal steps that follow.
Same thing if you weren’t able to perform any of the quick steps.
This is to be expected when trying to remove a hijacker, but I know how to circumvent its various tricks and I am about to show you now.
SUMMARY:
| Name | Secure Search |
| Type | Browser Hijacker |
| Detection Tool |
Some threats reinstall themselves if you don’t delete their core files. We recommend downloading SpyHunter to remove harmful programs for you. This may save you hours and ensure you don’t harm your system by deleting the wrong files. |
This hijacker probably got added to your browser by some rogue app that got recently installed on your PC. If that’s the case, the app in question must also go or it might re-add the hijacker to the browser.
However, there are thousands of different apps that could have done this, so I can’t provide specific steps on how to remove them all. The alternative I can offer is a highly potent removal tool called SpyHunter 5. You’ll find it on this page, so use it in combination with the manual steps to ensure that both your browser and your system are cleaned from any rogue software.
How to Get Rid of the Secure Search Virus
The most common trick hijackers use to keep you from removing them is to add their own policy to the browser, which restricts your ability to modify its settings.
If such a policy has been added to your browser, there will be a “Managed by your organization” message in its menu and atop the Settings page.
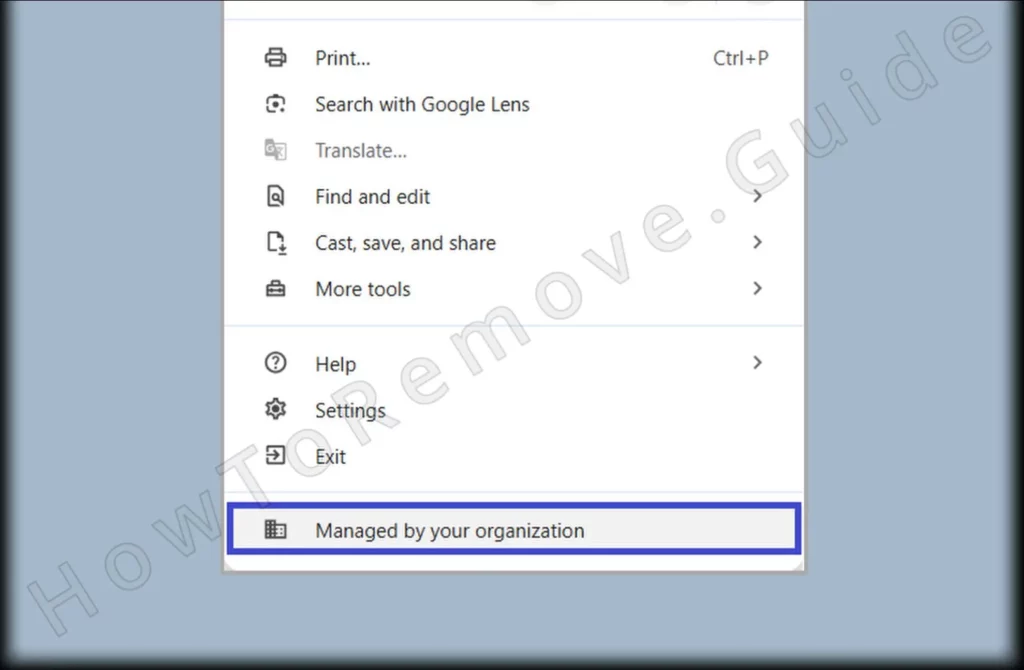
In this case, our first task is to get rid of the rogue policy:
Visit this policy page of your browser by typing the browser-specific URL:
- Chrome: chrome://policy
- Edge: edge://policy
- Brave: brave://policy
Most Chromium-based browsers use similar URLs for their Enterprise Policies.
Once you open the policies page, look through the active policies and focus on the Values column.
Search for any values that appear randomly generated – like a sequence of random letters.
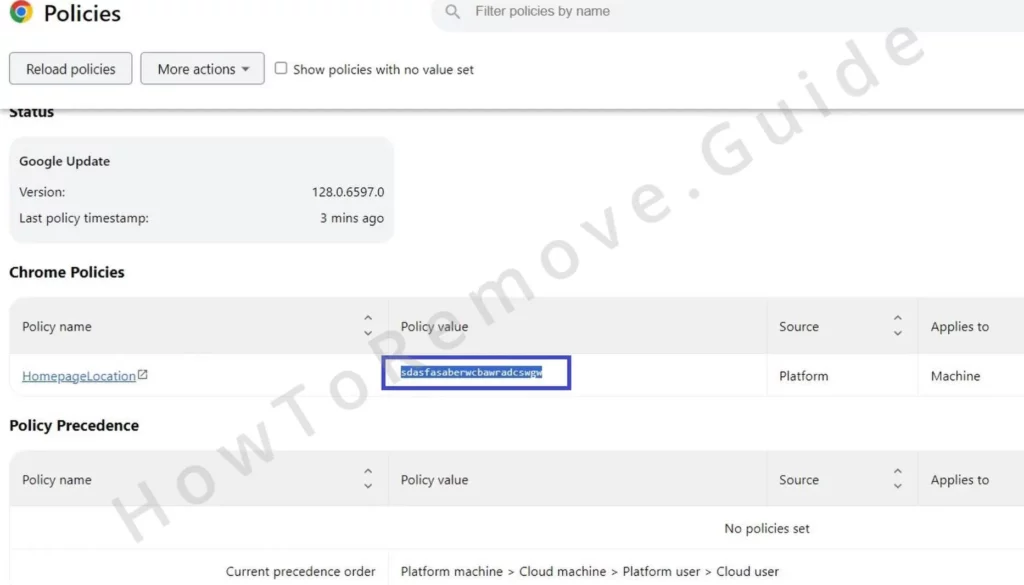
Save each suspicious policy by copying its value into a text file. You’ll need this information in a bit.
Move on to the Extensions Manager of the browser to reveal additional clues.
Secure Search, however, may reroute your attempts to reach this page by redirecting you to Google or some other site. The workaround I’ve found is to go to the browser’s extensions folder and delete everything there.
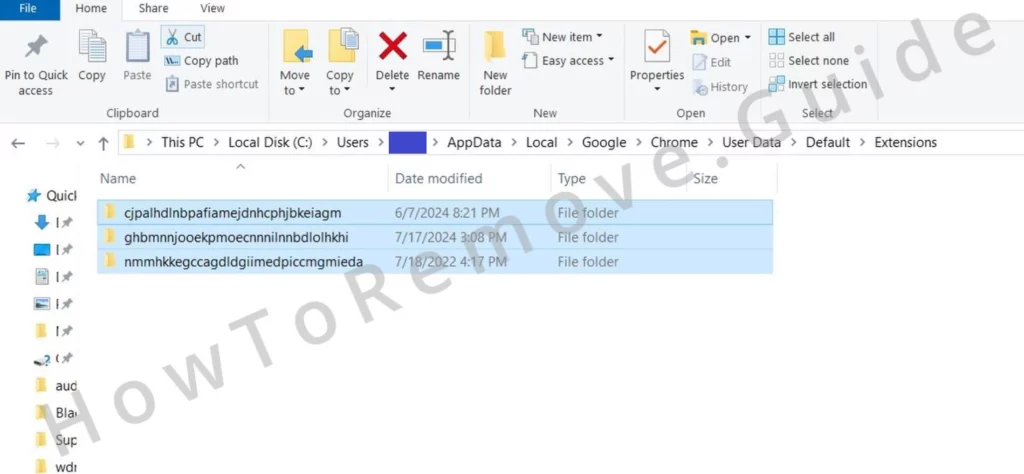
For Chrome, that folder is found at:
C:\Users\[Your Username]\AppData\Local\Google\Chrome\User Data\Default\Extensions
You can see the paths for several other popular browsers below:

As I said, everything in those folders must go. This will ensure that the files of the rogue extension are deleted and you should then be able to access the Extensions Manager page.
Upon re-accessing the Extensions page, toggle on Developer Mode.
This should reveal the extensions’ IDs – you must copy the ID of the Secure Search extension and save it in the same text file. If there are other suspicious items on that page, save their IDs too.
Note that, on some browsers, you first need to click the extension to go to its page and that’s where you’ll be able to see its ID.
Video walkthrough for this step:
How to Remove Secure Search Policies
With the policy values and extension IDs at hand, you can now begin cleaning your System Registry which is where the policy settings are stored.
You can open the Registry Editor by typing “regedit” in the Start menu search bar. Just make sure to run it as an administrator.
Once you’re in the Editor, use Ctrl + F to open the search box, enter the first policy value or extension ID, and click Find.
Delete the related registry key from the left panel that gets found. Then click Find again and delete the next thing.
To clean everything, you need to run multiple searches for the same value/ID until there are no more results left.
Once you’re done with the keys linked to the first value/ID, do the same with the rest.
Hijackers sometimes will block your attempts to delete their registry keys by restricting your access to them. But since you are the admin of your PC, you can easily change that. Here’s how:
Right-click the parent key, located a level above the locked one.
Select Permissions, then Advanced, and click Change at the top.
Enter “everyone” into the text field, then click Check Names > Apply > OK.
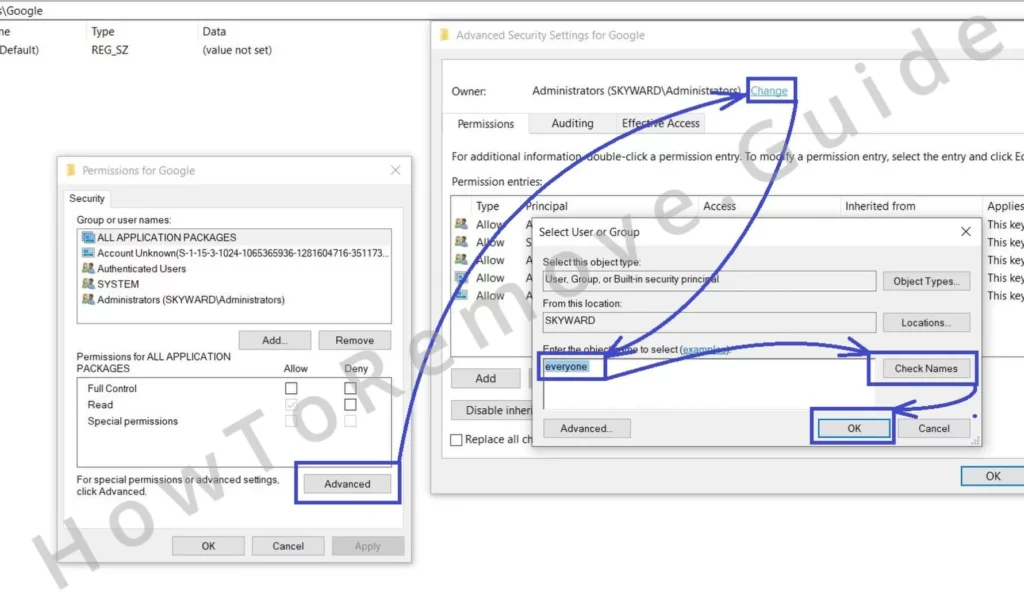
Back in the Permissions window, enable the two Replace options, then select Apply and OK again.
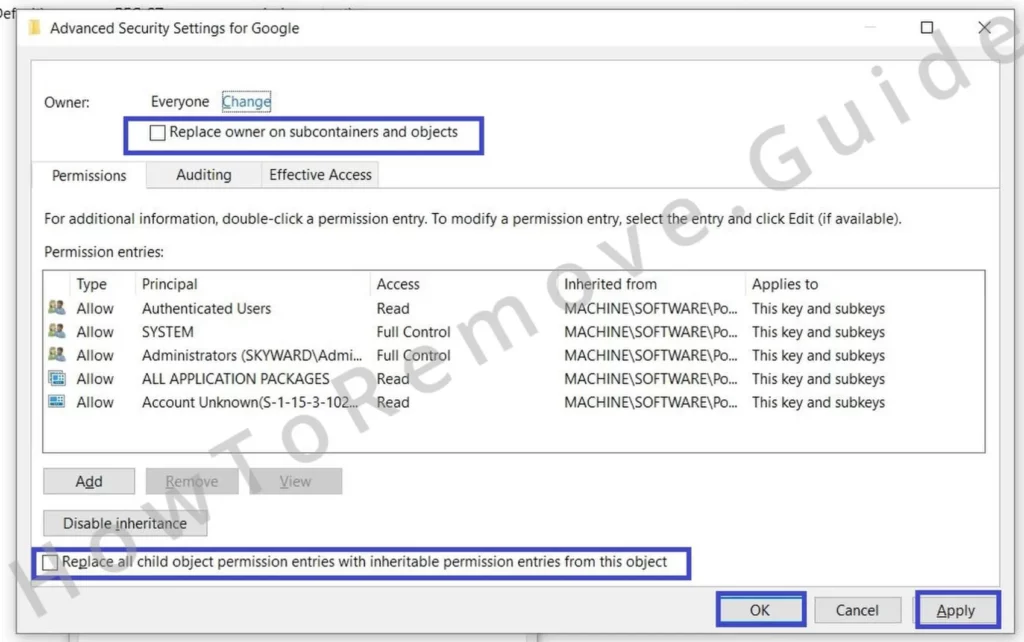
This sequence restores control over stubborn keys which you’ll now be able to delete.
Video walkthrough for this step:
Other Ways to Delete Secure Search Malware Policies
Cleaning the Registry isn’t the only way to get rid of rogue browser policies. Two alternatives you can use are shown below:
The first one is to delete the hijacker policies through the Group Policy Editor. Type “gpedit.msc” in the Run dialog (Win + R) and hit Enter to access it.
Within it, locate Local Computer Policy, navigate to Computer Configuration, then to Administrative Templates.
Right-click Administrative Templates and choose Add/Remove Templates.
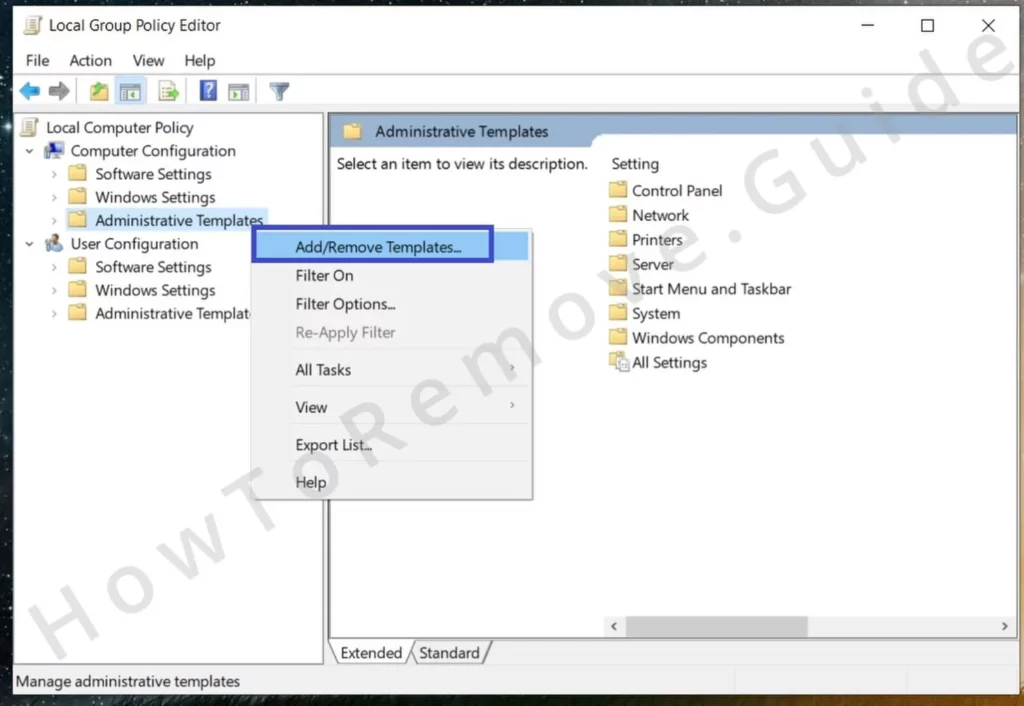
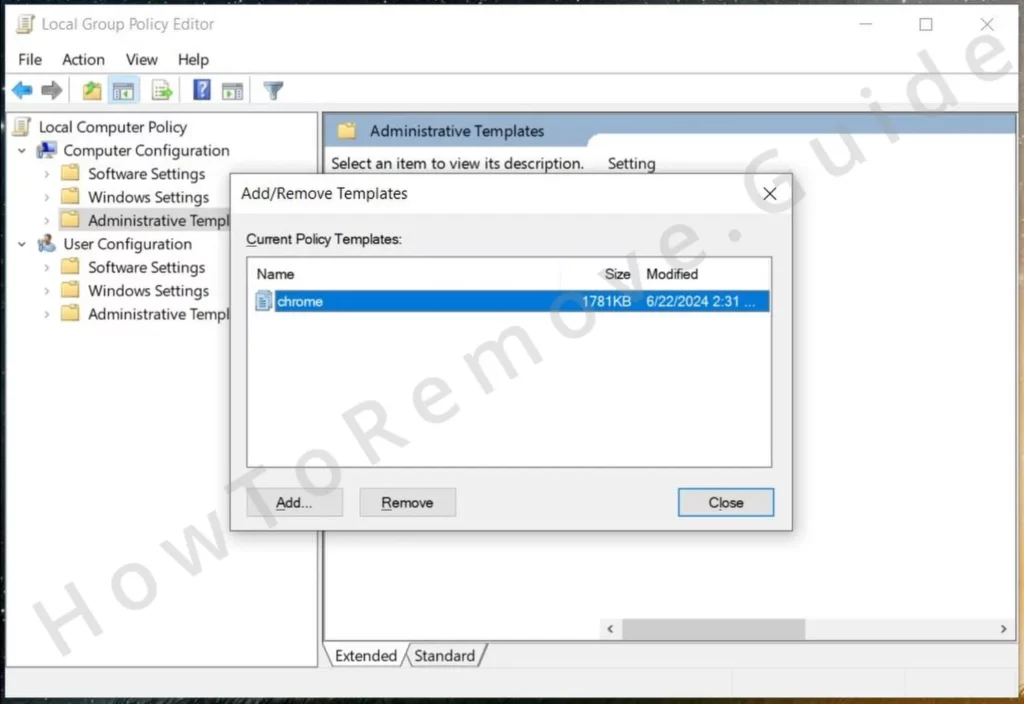
Remove unfamiliar entries. Most users do not add anything to that list, so it’s probably okay to just delete everything there.
The second alternative is only for Chrome users. They can try the free Chrome Policy Remover tool.
This is a simple utility that automatically runs a script that deletes all any and all policies present in the Chrome browser.
Just download it and run it as an administrator. A Windows security prompt may appear, but there’s no reason for concern as the tool is perfectly safe.
You can ignore the Windows warning by clicking More Info and then Run Anyway.
The tool will then start and do its job of cleaning your Chrome browser from unwanted hijacker policies.
Video walkthrough for this step:
Manual Group Policy Removal
Automatic Group Policy Removal
How to Uninstall Secure Search From Chrome Edge or Another Browser
Your browser should no be free from the restrictive Secure Search policy which gives you the opportunity to finally restore its settings and get rid of any rogue extensions.
Go back to the browser in question and revisit its Extensions or Add-ons page. Remove Secure Search and any other items that might be connected to it.
I also recommend that you repair your legitimate extensions. You damaged them when you deleted the contents of the browser’s extensions folder earlier in this guide.
You can now restore the desirable extensions by clicking the Repair button underneath each one.
- If no such button is available, just try to use the extension and when it doesn’t work, the Repair option will show up.
For a thorough cleanup, delete any temporary browsing data through the Privacy and Security settings.
Go there, select Clear Browsing Data, set the time range to “All Time“, and go to Advanced tab. Tick all boxes except Passwords and login data, then delete.
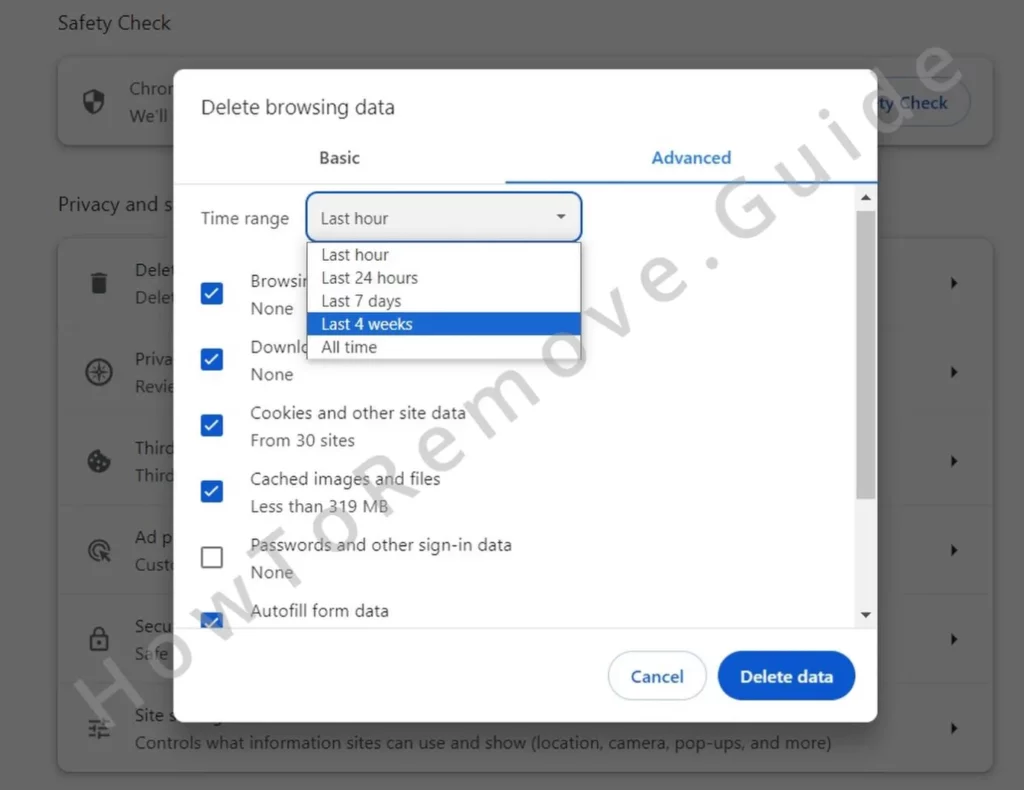
You must also check the site permissions. In Chrome, go to Privacy and Security > Site Settings. In Edge, go to Cookies and Site Permissions.
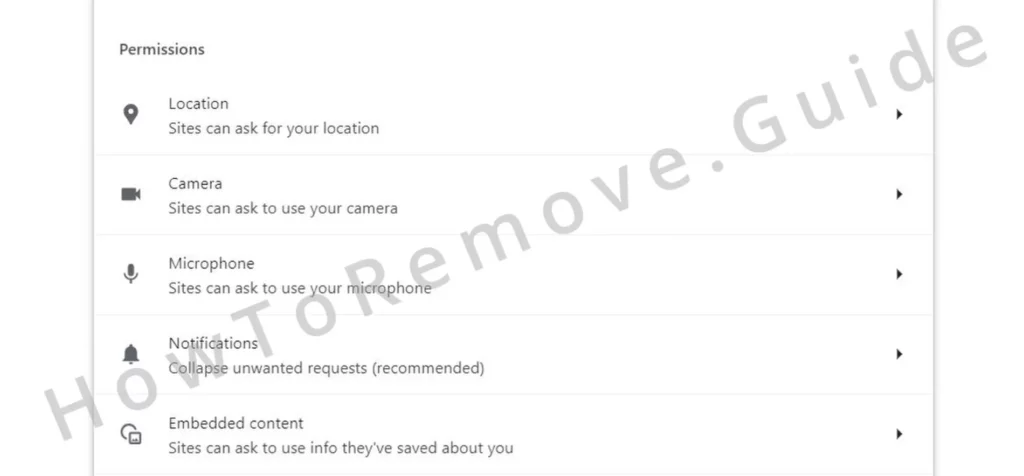
Check each permissions for any unknown or untrusted websites and revoke their access by blocking them.
The next settings to check are in the Search Engine tab. First, make sure that the default browser search engine is set to a reliable one.
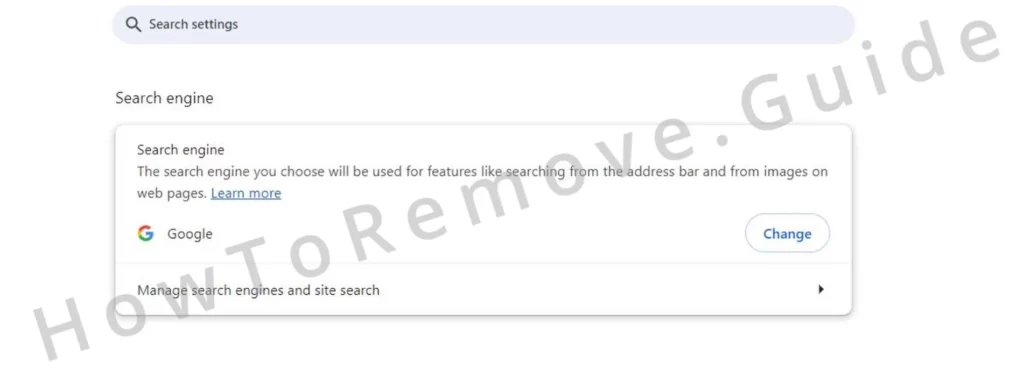
Then click Manage Search Engines, look for unfamiliar or suspicious URLs, and delete them.
There are two more settings sections left to check – On Startup and Appearance. Both might include some rogue addresses, so if you see anything sketchy there, delete it.
Video walkthrough for this step:
Chrome
Microsoft Edge
Mozilla Firefox
If you only had the hijacker and no other malware, these manual steps should be enough to clean your system and restore your browser to its normal state.
However, if the Secure Search still refuses to go away or if there are other problematic apps in your system that are being a nuisance, then I recommend securing your system with SpyHunter 5.
As I already said, this tool is great at dealing with various forms of malware, including hijackers, and you can find it linked on this page in case you want to give it a try.

Leave a Reply