Skyjem is a browser hijacker that continues to bother users of Chromium-based browsers, especially those using Microsoft Edge and Opera GX. It shows up in the browser as the new default search engine and handles all user searches if they are made through the URL bar/omnibar.
At its core, Skyjem.com is a fake search engine, similar to boyu.com.tr or maxask.com, that’s designed to promote other sketchy pages and sites through its modified search results. It can also reroute your searches through a series of other sites/fake search engines before landing you on a Yahoo or Bing SERP. The goal here is to let those other sites collect browsing data from you that can later be used for targeted ads.
I’ve been following Skyjem for a while and managed to gather quite a lot of info about it. One important thing to note about this hijacker is that it’s closely tied to a rogue app called iGuardian (or InternetGuardian). If your browser has been hijacked by Skyjem, you should check your PC and Task Manager for files/processes tied to iGuardian (iGuardian.exe). It seems that the hijacker gets introduced to the browser by this rogue app and can’t be removed until the app in question is uninstalled.
Additionally, rogue extensions like Fortify and the Searchisty Extension in your browser can also be linked to the presence of the hijacker, so those need to be removed too if found.
If you are struggling with Skyjem and wish to find a way to get rid of it, this post is for you. In the guide below, I’ve compiled all the most effective steps, tips, and advice to let you eliminate the hijacker and restore your browser.
Skyjem Removal Instructions
Most users complain about Skyjem being really difficult to remove, yet I recommend first trying to delete it in the traditional way. If this works, you’ll save yourself a bunch of time, because the full guide below can take a while to complete:
- Launch the affected browser and access the settings menu.
- Navigate to the extensions or add-ons section, where all installed extensions are listed.
- Examine this list meticulously for any unfamiliar or suspicious extensions.
- If any dubious extensions are found, attempt to uninstall them if they have an active Remove button.
- Open the browser menu and proceed to Settings > Privacy and Security
- Open site settings and check the Notifications and Pop-up permissions. Scrutinize these settings for entries related to the hijacker or other unknown websites and block any addresses currently listed under “Allow“.
Restart your browser after making these changes. Does the issue persist? In some lucky cases, these straightforward steps resolve the problem. Most of the time, though, you’ll need to rely on the more intensive measures we’ve prepared for you next.
SUMMARY:
IMPORTANT NOTE BEFORE YOU CONTINUE
The hijacker uses sneaky software to worm its way back into your browser, even after you think it’s gone. Figuring out exactly which malware brought Skyjem to your system isn’t something we can always pinpoint.
The culprit might be the aforementioned InternetGuardian app, but could also be something else. Without that piece of the puzzle, specific removal instructions aren’t realistic. It’s like trying to fix a leak without knowing where the water’s coming from.
Spy Hunter 5, linked right here on this page, can find and remove those rogue apps before they have a chance to bring Skyjem back. This tool doesn’t just clean up the mess—it gives your system a layer of protection. When you’re dealing with issues like this, having a reliable solution takes a lot of the stress out of the equation.
How to Get Rid of Skyjem.com
One of the main persistence techniques that browser hijackers like this one employ to keep themselves attached to the browser is to leverage the enterprise policies feature that many browsers have.
The Skyjem hijacker adds a rogue third-party policy to your browser and that restricts your ability to make changes to the browser settings. This means you are left unable to reverse any unwanted modifications that the hijacker has already made in the browser.
For this reason, focusing on getting rid of any rogue policies currently in your browser will be the first task of this guide.
Begin by going to the affected browser and visiting one of the following URLs:
chrome://policyfor Chromeedge://policyfor Edgebrave://policyfor Brave
In case the browser you are using isn’t among these three, just change the URL by adding its name (this is only for Chromium browsers).
The next page will provide you with information about any policies currently active in the browser Look for ones with values made of random characters. Those will typically be linked to the hijacker – you must copy them and save them into a separate document; they will be needed later.
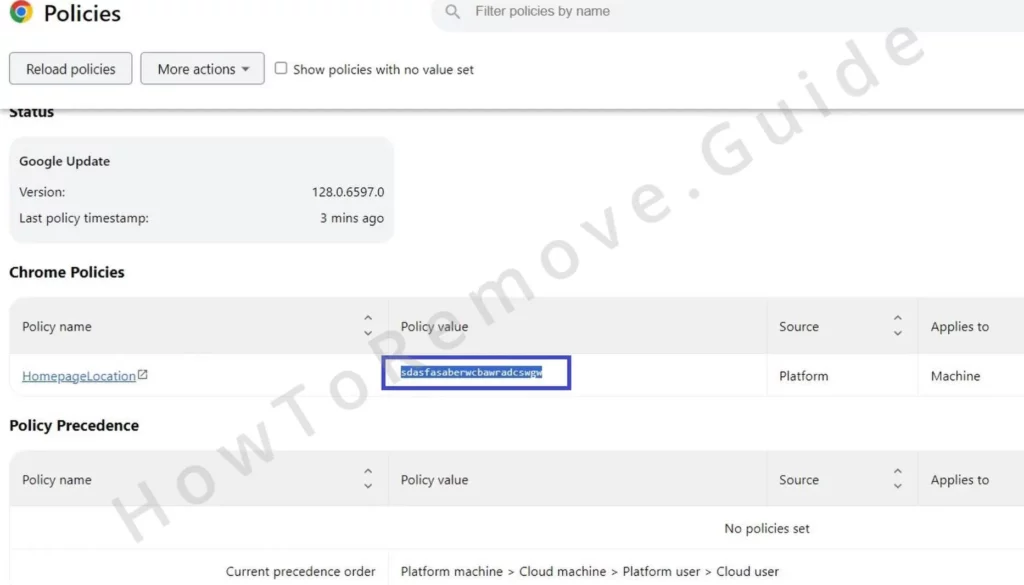
There’s also some information to be gathered from the Extensions Manager in your browser, so go there again.
In case Skyjem redirects you to a different page whenever you try to open the Extensions Manager, here’s how to solve this issue:
Navigate to the extensions folder for your browser:
For Chrome on Windows, the path is typically C:\Users\[Your Username]\AppData\Local\Google\Chrome\User Data\Default\Extensions.
Here are the paths for three other popular browsers:
- Microsoft Edge:
C:\Users\[Your Username]\AppData\Local\Microsoft\Edge\User Data\Default\Extensions - Opera:
C:\Users\[Your Username]\AppData\Roaming\Opera Software\Opera Stable\Default\Extensions - Brave:
C:\Users\[Your Username]\AppData\Local\Brave Software\Brave-Browser\User Data\Default\Extensions
Once you get to the respective directory, you must delete everything that’s in it.
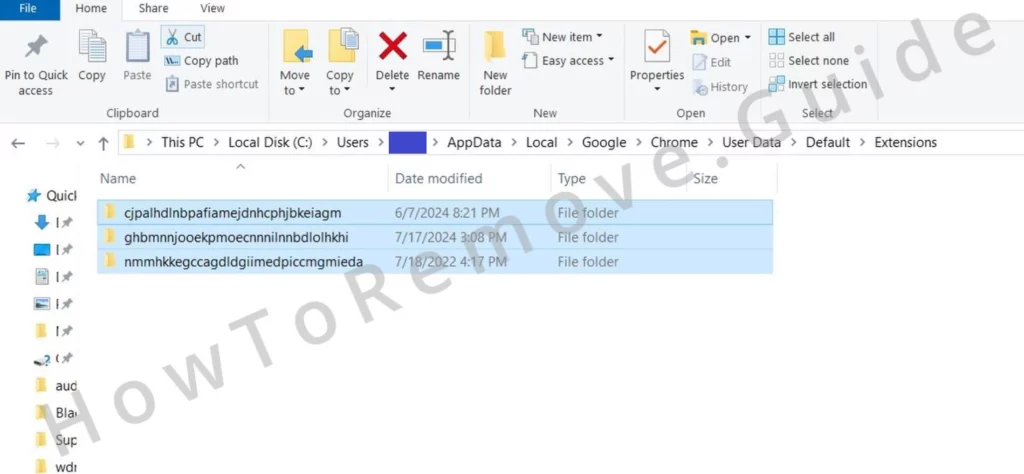
This action will “break” all extensions in the browser and thus bypass any blocks the hijacker extension has set up.
Other extensions, including legitimate ones, will also become broken, but you can fix them easily with a single click on the Repair button that should now become available in the browser.
Once the extension folders are deleted, go back to your browser’s extensions page and enable developer mode.
Then copy the ID numbers of any rogue add-ons and save them in the same file where you saved the hijacker policy values.
Armed with this information, you can now proceed with eliminating the rogue policies from your browser.

Video walkthrough for this step:
How to Delete Skyjem Virus Registry Keys
The rules linked to the rogue third-party policy that Skyjem has introduced to your browser are stored in your System Registry. You must now go there, search for items linked to the collected values and IDs and delete anything you find.
Access the Registry by opening the Run dialog (Win + R), typing regedit, and pressing Enter.
Caution is required when modifying the registry because incorrect changes can affect system stability. Delete only items that you are sure are linked to the hijacker.
Once you are in the Registry Editor, press Ctrl + F and use the search box to find items related to the rogue policy values and extension IDs that you noted earlier.
If the search finds anything, delete the registry key (folder) in the left panel that contains it.
Remember: you must always perform another search after you delete a rogue item. Each search in the registry shows only a single result, so, to be sure there aren’t more rogue items left, you must search again.
Then manually navigate to this Registry directory:
- HKEY_LOCAL_MACHINE/SOFTWARE/Policies/Google/Chrome
If you see an Extensions key there, delete it.
A new persistence trick some hijackers employ is to restrict access to their Registry keys which prevents you from deleting it. If you get an error when attempting to remove a particular hijacker key, do this to gain the necessary permissions:
Right-click the problematic key’s parent key and select “Permissions“. Then go to Advanced > Change, type “Everyone” in the text box, and click Check Names. Click Apply and then OK.
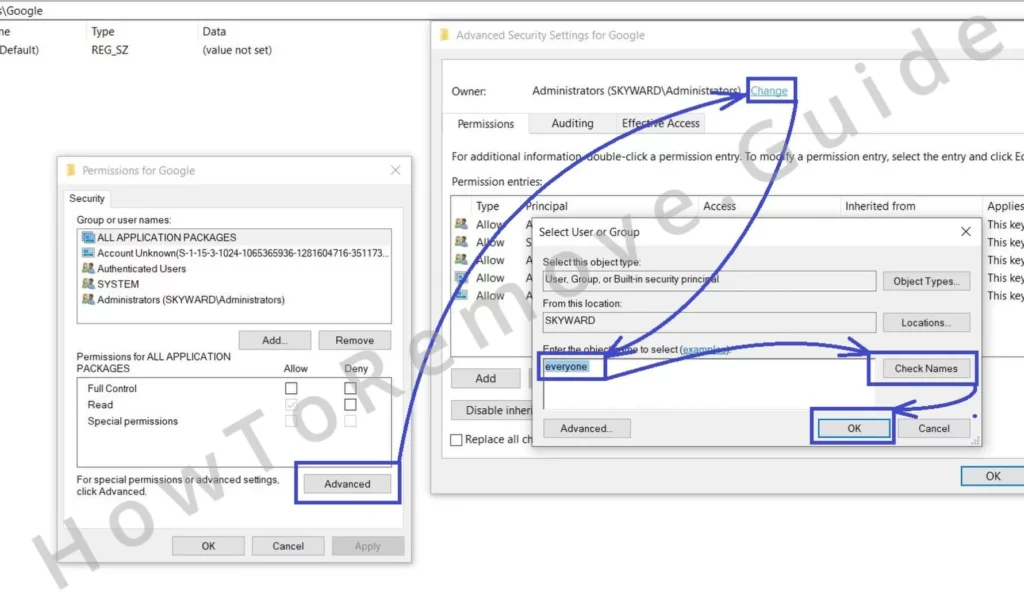
In the previous window, put ticks in the two “Replace…” options and apply the changes to gain full control.
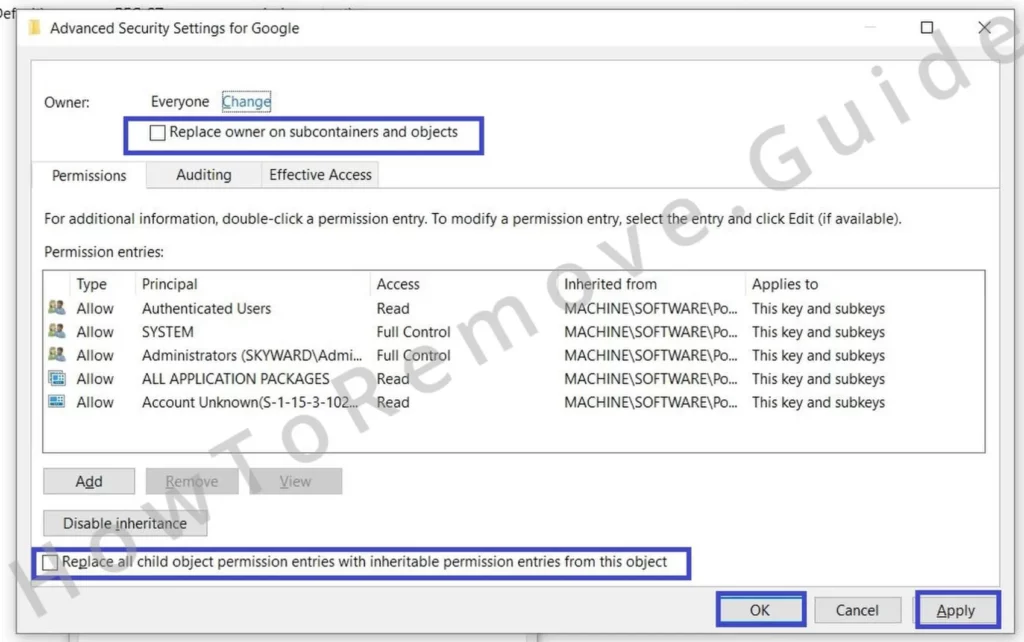
Deletion of the troublesome key should now be possible.
Video walkthrough for this step:
Other Ways to Get Rid of Skyjem.com Malware Policies
Sometimes, the Registry Cleanup might not suffice in which case you’ll have to resort to other tools to get rid of the Skyjem policy. If you are still seeing the “Managed by your organization” message in the browser, do this:
The first one is to access the Group Policy Editor and delete any rogue policies present there. Search for “Edit Group Policy” in the Start Menu, open the first result, and right-click on “Administrative Templates“.
Select the Add/Remove button and delete any templates not added by you. The hijacker may have inserted policies here to maintain control over your browser.
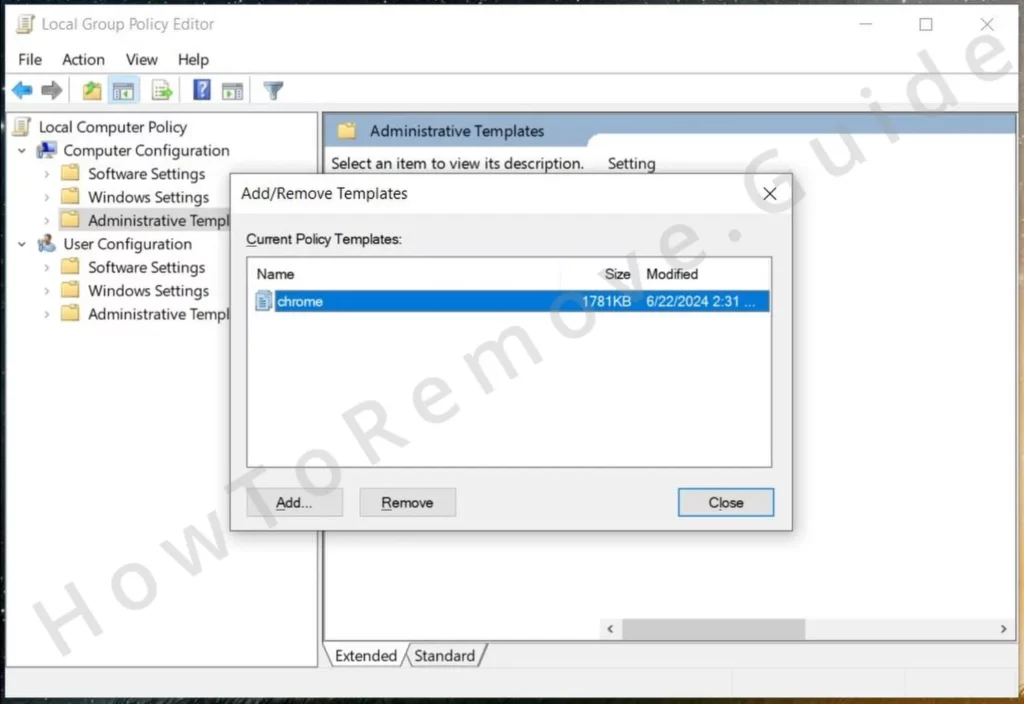
Chrome users have an additional tool at their disposal. It’s called Chrome Policy Remover and you can download and use it for free. Get it from the provided link and run it with Admin permissions.
Windows may warn you about it, but there’s no need to worry, the tool is safe. Just click More Info > Run Anyway and let it perform its task of deleting all Chrome Policies.
Video walkthrough for this step:
Manual Group Policy Removal
Automatic Group Policy Removal
How to Remove Skyjem by Uninstalling IGuardian
As I mentioned above, the IGuardian malware is often tied to Skyjem’s presence in the browser. Therefore, I strongly recommend looking for and deleting this software from your PC. Here’s how to do it:
- Type Apps & Features in the Start Menu, open it and look for InternetGuardian, IGuardian, or anything similar.
- If you see the malware, click it, click Uninstall, and follow the prompts to delete it.
- Then open the Task Manager (Ctrl + Shift + Esc) and look for an IGuardian.exe process.
- If you find it, right-click it, select Open File Location, and then minimize the newly opened folder.
- Back in the Task Manager, select the rogue process, and then click End Task.
- Return to the location folder and delete its contents. If any of the files/folders there can’t be deleted due to still being in use, download and install LockHunter. Then right-click the stubborn file/folder > What’s Locking it? > Delete.
- Then go to C: > Program Files (not Program Files x86!), look for an iGuardian folder, and delete it.
I also recommend checking the Registry for any “iGuardian” or “InternetGuardian” items and deleting them too.
Video walkthrough for this step:
Uninstall Malware Applications
How to Delete Malware Processes From the Task Manager
How to Delete Persistent Files with Lock Hunter
Uninstall the Skyjem Virus Extension From Chrome, Edge, and Other Browsers
Hopefully, by now you’ve taken care of the rogue Skyjem policy and IGuardian and can move on to cleaning the browser itself and restoring it to its normal state. You need to be very thorough here and make sure that no modifications made by the hijacker are allowed to persist.
With rogue policies and registry entries removed, restoring your browser to its normal state becomes the final task that will finally rid you of the frustrating hijacker.
Start by going yet again to the Extensions page of the affected browser (browser menu > Extensions > Extensions Manager) and ensure all unwanted extensions are gone. Just click Remove and this time the rogue add-ons should get uninstalled right away.
Then open the browser menu again, go to Settings, and navigate to the Privacy and Security settings. Click Delete browsing data, select the Advanced tab, and clear your browsing data for a long enough period so that there’s no chance that anything linked to Skyjem stays behind.
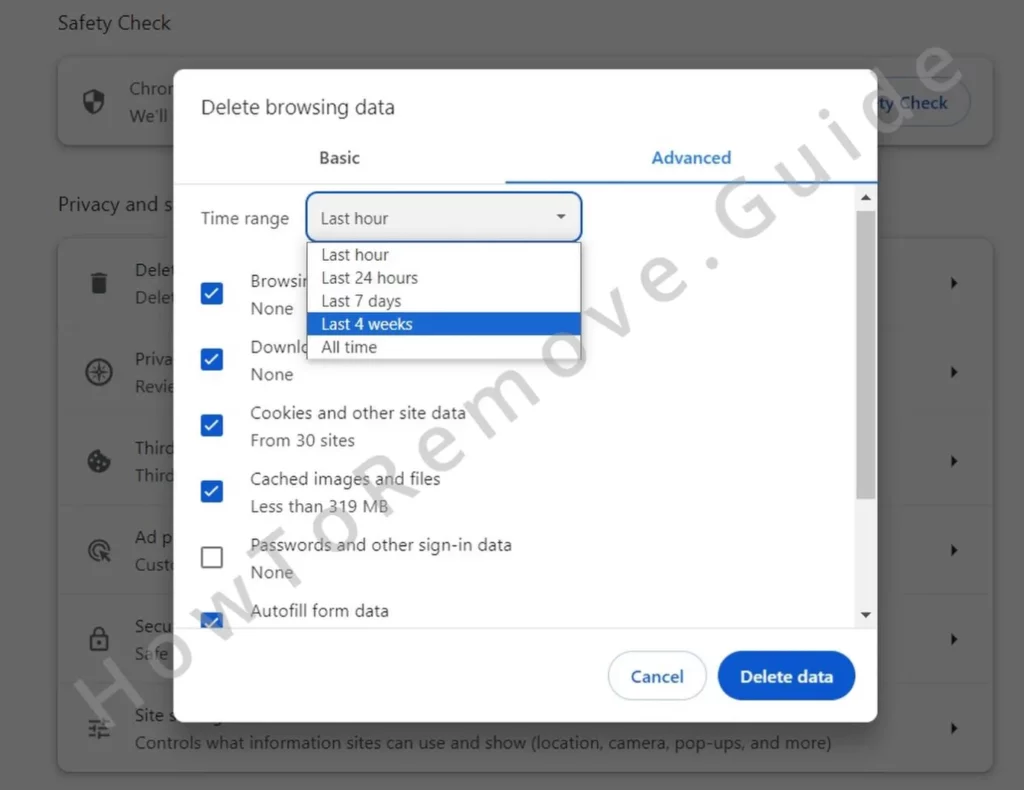
Delete cached images, cookies, and all other data types except passwords.
Review the Site Settings once more. This time check all permission types and remove any unfamiliar URLs from the “Allow” lists to prevent future issues.
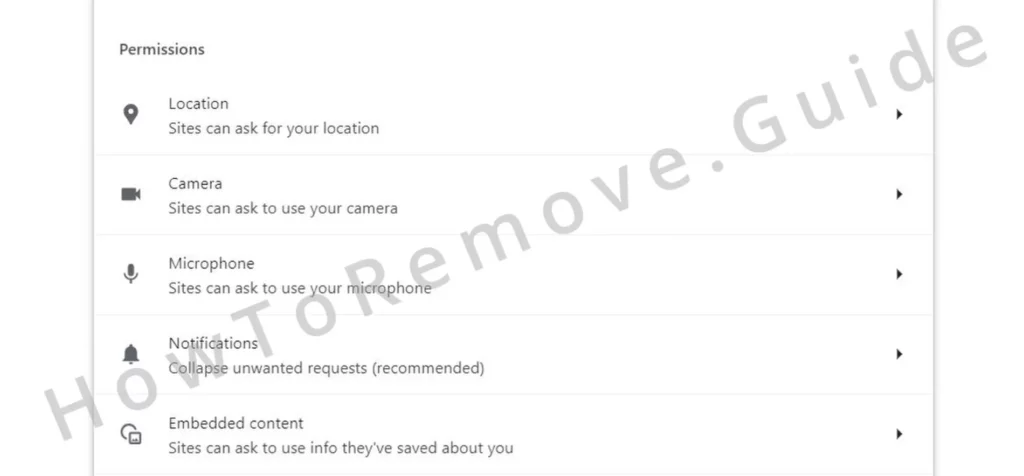
Reset your default search engine to a trusted provider from the Search Engine settings tab.
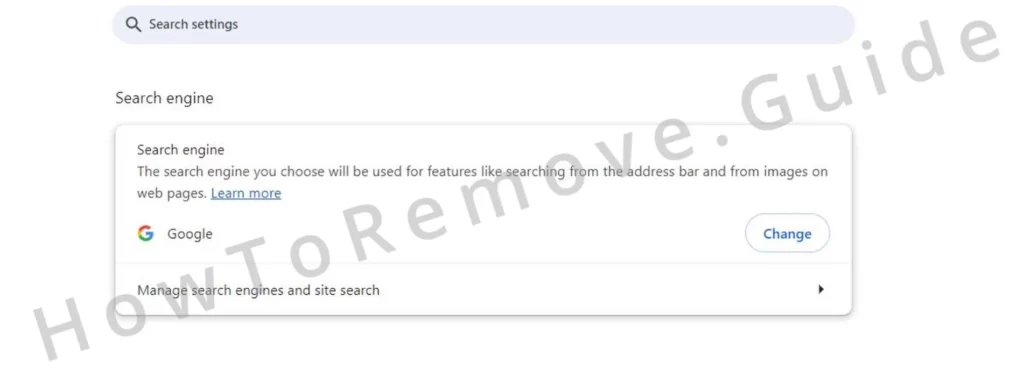
Then open Manage Search Engines and see if there are any URLs listed there that are unknown to you or seem problematic. If you notice anything that shouldn’t be there, delete it.
Lastly, pay a visit to the Startup and Appearance settings and delete from them any rogue URLs to ensure no unwanted pages open when launching your browser.
Video walkthrough for this step:
Chrome
Microsoft Edge
Mozilla Firefox
Uninstall AstralQuasarel to Remove Skyjem
Skyjem isn’t just a browser hijacker; it’s a gateway to a web of fake search engines and malicious sites. When I dug into the Internet Guardian app, which enables Skyjem, I uncovered a whole network. These hijackers survive by pushing users toward other shady platforms. If Skyjem appears in your browser, there’s a good chance you’ll encounter more. It’s like finding one thread that leads to an entire tangled web.
Reports from several German users highlight a new issue—AstralQuasarel. This unwanted extension takes over your browser by enforcing a third-party policy and replacing the search engine with AstralQuasarel. If it’s there while you’re dealing with Skyjem, you’ll need to remove it, too. Leaving it behind only guarantees more problems later.
AstralQuasarel does more than hijack settings; it stops you from uninstalling Chrome entirely. The browser disappears from the Control Panel and Apps & Features. Even using the .exe file to uninstall redirects you back to Apps & Features, trapping you in a loop. This behavior makes removing the extension a top priority.
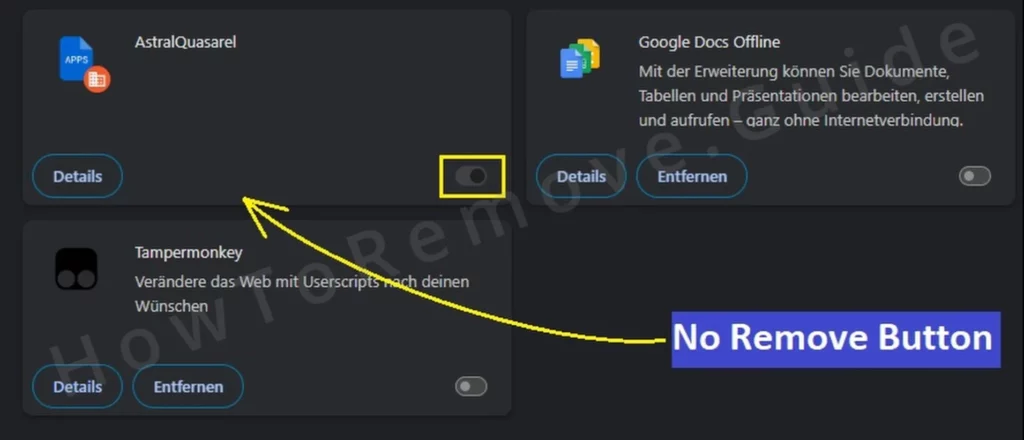
This extension takes over critical system functions, granting itself high-level privileges. Compared to Skyjem, AstralQuasarel’s impact is far worse. It locks you out of basic controls, leaving you stuck unless you act fast. Ignoring it allows the problem to escalate, putting your browser and personal information at risk.
AstralQuasarel relies on the “Managed by…” policies feature to maintain its grip. These policies must go before you can uninstall the extension. Following the guide above, you’ll find the exact steps needed to delete those policies. Once they’re gone, removing AstralQuasarel becomes straightforward. Treating the root cause always works better than fighting the symptoms.
Skyjem ties into other shady domains like busqueda.me and moreresearch.com. Landing on either usually means you’re caught in the same hijacker network. Tracking these threats is essential to staying ahead. As more information surfaces, this guide will stay updated to keep you informed. Stopping these hijackers starts with recognizing their tricks and acting fast.

Leave a Reply