ZoomFind is the latest in a long line of browser hijackers that do basically the same thing – they change your browser’s search engine to the fake boyu.com.tr search engine (or another rogue site) and refuse to get removed by enforcing a custom policy in the targeted browser. Just two days ago I posted an article about its previous iteration – QuickFind – and today I learned about this new version from the same family of hijackers.
Something worth noting here is that this hijacker may get attached to your browser in different ways. You could get the rogue ZoomFind Chrome extension or start to get intrusive notifications from a site called ZoomFinds.cc. In either case, you are dealing with the same thing and the guide I’ll present you with here will let you deal with the rogue extension.
ZoomFind Removal Steps
First, you should try the simple method for removing unwanted stuff from the browser. This may or may not work, but it’s worth the try because it can remove the need to perform the more advanced and time-consuming steps below:
- Launch the browser you’re trying to get clean, access the main menu, and enter Settings.
- Navigate to Extensions and look for ZoomFind there. Also look for other sketchy and unfamiliar add-ons that you don’t want in the browser
- If ZoomFind or another rogue extension is present and there’s a Remove button beneath it, click that button. Don’t worry if the Remove option isn’t shown or is grayed out. Just move on with the next steps.
- The next thing to do is to go to Settings > Privacy and Security, and access Site Settings.
- Open the permissions for Notifications, Pop-ups, and Redirects. Look for unfamiliar URLs, like boyu.com.tr and others, and delete any that seem suspicious. Do this for each of the mentioned permission categories.
Once you are done, restart your browser. If ZoomFind no longer appears, you’ve done it and there’s no need to do anything else.
Most of the time, however, these steps will likely not be enough. Again, not to worry, the removal process is just getting started. Proceed to the advanced steps below and complete them as they are shown to fully get rid of ZoomFind.
SUMMARY:
The guide I’ll give you next will almost certainly rid you of ZoomFind. The issue, however, is that this hijacker probably got installed in your browser thanks to some other rogue software you recently got on your PC. That software must also be removed or the hijacker might come back eventually. However, the app that got you ZoomFind can be anything, so I can’t offer specific removal instructions for it.
A valid solution to clean your system from anything else that might be linked to the hijacker is to use a professional removal tool, such as Spy Hunter 5. I’ve used it many times to remove malware and it’s always been a reliable helper. If you want to give it a try, you’ll find it posted on this page.
How to Get Rid of the ZoomFind Virus
If you weren’t able to remove ZoomFind through the quick steps above, it’s probably because the hijacker has installed a rogue policy in the browser that’s preventing its removal. You must remove that policy in order to get rid of the hijacker.
To do this, first type “Chrome://policy” in your browser’s address bar (assuming you are using Chrome) and hit Enter.
If you’re using Edge, replace the word “Chrome” in the URL with “Edge”. Same with other Chromium-based browsers that have the policies feature.
This will bring up a list of policies active in your browser. Look closely at the values of each one. Look for values made of random letters or numbers or both.
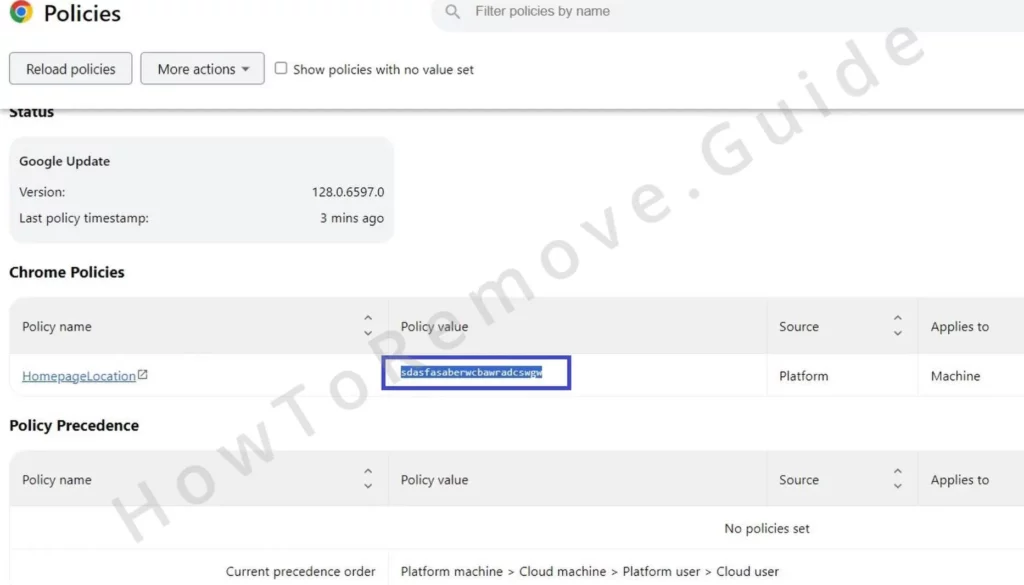
When you see such a value, copy it and save it in a text file. Do the same with all rogue-looking values. You’ll need them for later steps.
You should also revisit the Extensions Manager in your browser to gather more information about ZoomFind.
However, the hijacker might not let you go there and redirect you to a different page. Don’t panic, the solution is very simple:
If ZoomFind blocks your access to the Extensions Manager, you must find the extension files manually and delete them. Each browser stores its extensions in different locations.
For Chrome, the path is C:\Users\[Your Username]\AppData\Local\Google\Chrome\User Data\Default\Extensions.
The paths for other popular browsers are shown below:

Once you go to the respective Extensions folder, delete everything inside. Don’t leave any files or folders behind. This corrupts all extensions, including anything linked ZoomFind.
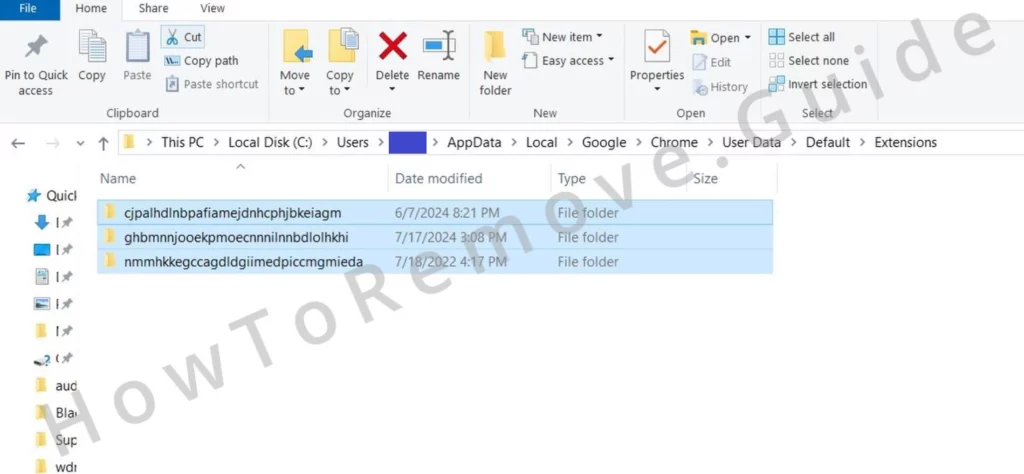
Don’t worry about the extensions you want to keep, they can be repaired later with only a couple of clicks.
After clearing the folder, open the Extensions Manager again. Once you get there, turn on Developer Mode. Then look under the ZoomFind extension and copy its ID. If the ID isn’t shown, click the extension and it should be available on the next page.
Copy the ID of the rogue extension and save it next to the policy values from earlier. Also copy the IDs of other unwanted extensions that might be in the browser.

Video walkthrough for this step:
Delete ZoomFind Virus Policies In the Registry
If you followed the previous steps correctly, you should now be ready to get rid of the rogue hijacker policies. Here’s how to do this:
Press the Windows key, type “Registry Editor”, right-click the first icon, and select the Run as Administrator option.
Open the Edit Menu then open Find. Paste the first suspicious policy value you saved earlier and search.
When you find a matching registry key, delete it (the keys are the folders shown in the left panel).
Then search again for the same value. Do this after each deleted key until you ensure there aren’t any more left. Multiple entries could exist, so you need to be thorough. Don’t leave any keys behind.
Then search for the other saved values and the saved extension IDs to delete all Registry entries linked to them.
Newer hijackers like ZoomFind will often block the user’s access to certain keys and thus make them “undeletable”. You can bypass this by adjusting access permissions:
Right-click the key you want to delete or, better yet, its parent key (the level above the one you want to delete).
Open Permissions, select Advanced. Then click on Change. Type “everyone”, click on Check Names, and apply the changes.
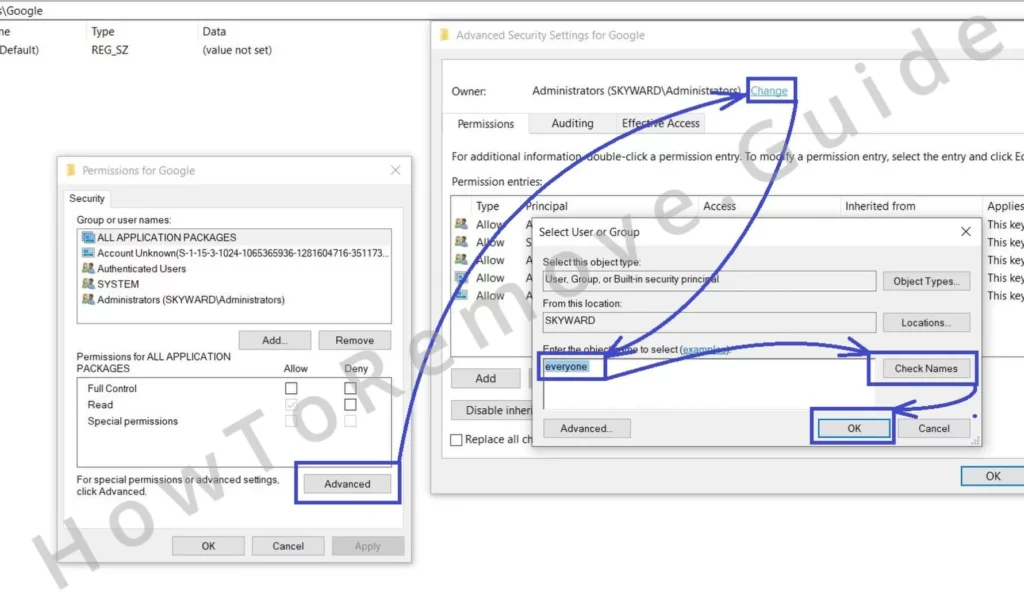
In the previous window, two options that start with “Replace…” will appear – check them both, then click Apply > OK, and the key will be under your control. Delete it and proceed to the next one.
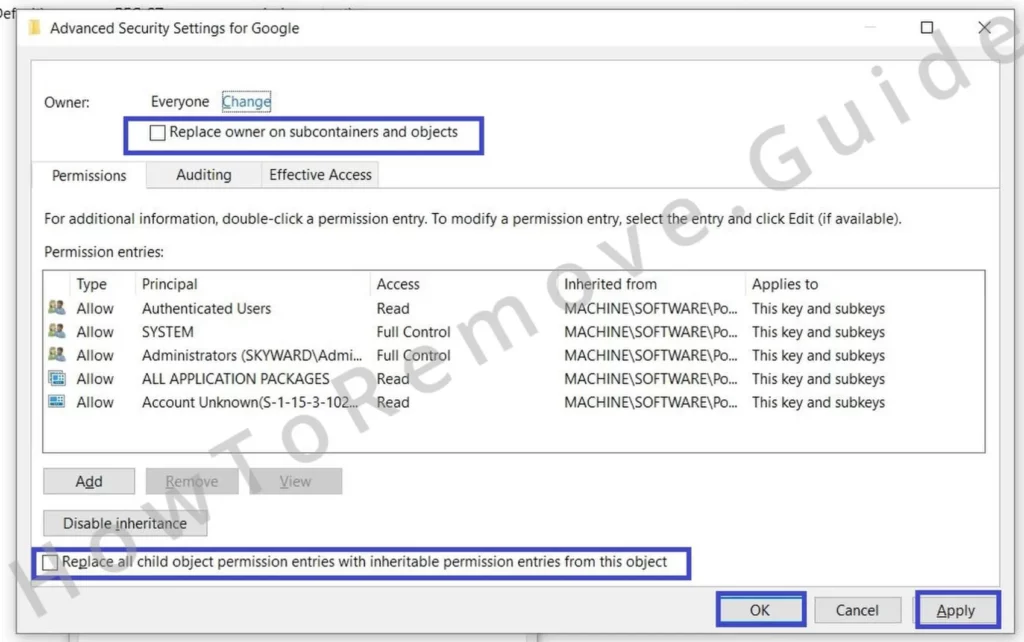
Once you’ve cleared all the rogue policies and extension IDs from the registry, ZoomFind should lose its hold on your browser. If issues remain, additional methods are available to remove these unwanted policies.
Video walkthrough for this step:
Other Ways to Get Rid of ZoomFind Malware Policies
If you weren’t able to fully get rid of the rogue hijacker policy through the previous method or if you simply prefer not to tinker with your PC’s registry, there are alternative methods.
The Group Policy Editor offers another way to remove hijacker policies. To access it, just search for it in the Start Menu and click its icon.
Once inside, navigate to Administrative Templates (found under Local Computer Policy > Computer Configuration). Right-click it, then open Add/Remove Templates.
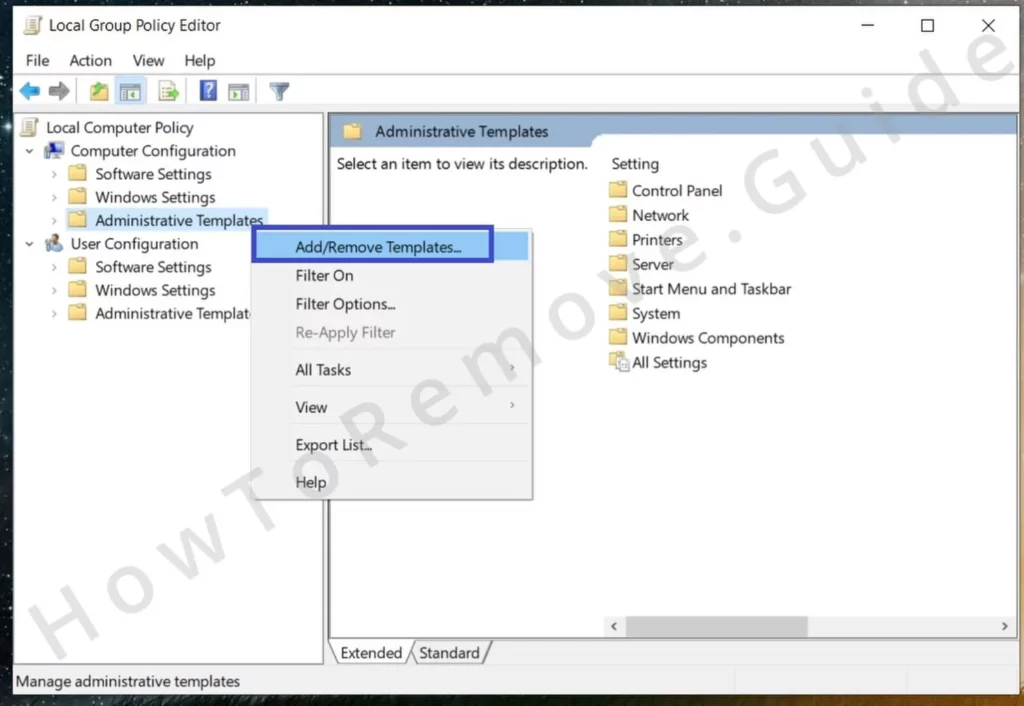
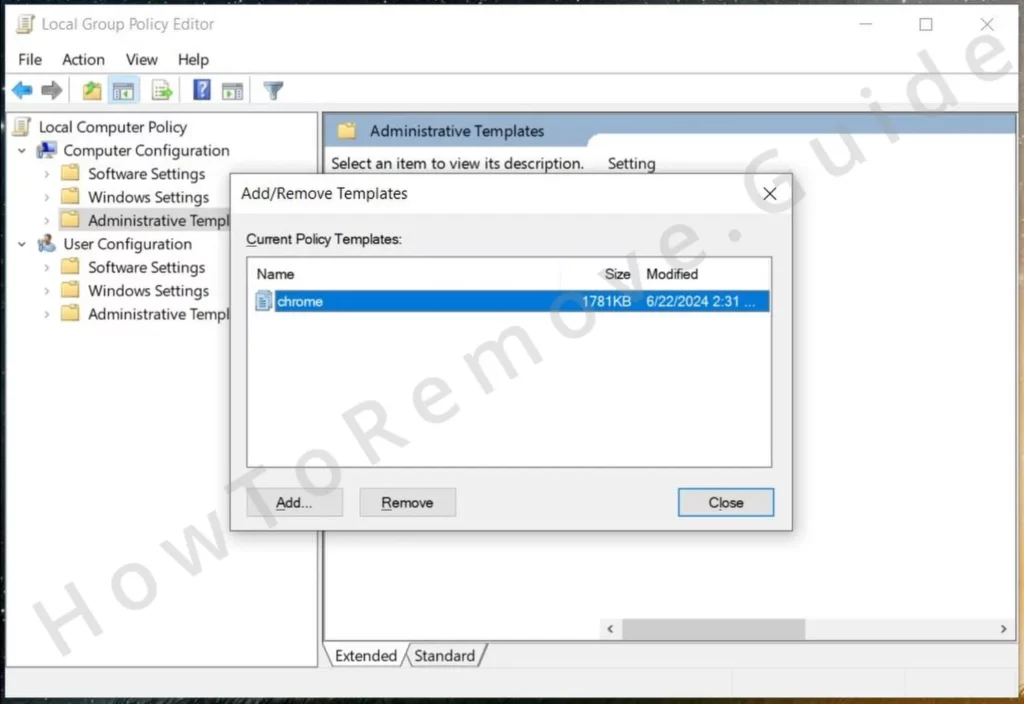
Review the entries here. If you see any unfamiliar or suspicious entries, delete them. Most users don’t customize these templates, so you’re probably safe to remove everything in that list.
A more direct solution exists for Chrome users. The free Chrome Policy Remover tool can eliminate all policies affecting your browser. Just download it from the provided link and run it as Administrator and it will automatically take care of the rest.
It’s possible that Windows Defender or your antivirus software flag it, but you can ignore these warnings. The tool is safe. If you get the Windows Defender warning, just click More Info and then click Run Anyway to start the app. After a couple of moments, all Chromie policies will be removed.
Video walkthrough for this step:
Manual Group Policy Removal
Automatic Group Policy Removal
How to Uninstall the ZoomFind Extension From Chrome, Edge, and Other Browsers
By now, the rogue policies should be gone and you must move on to cleaning up your browser’s extensions and settings.
Launch your browser again, and go to the Extensions Manager once more. You should now be able to remove any add-ons linked to ZoomFind and any other rogue extensions with ease. Just click Remove and they should go be deleted.
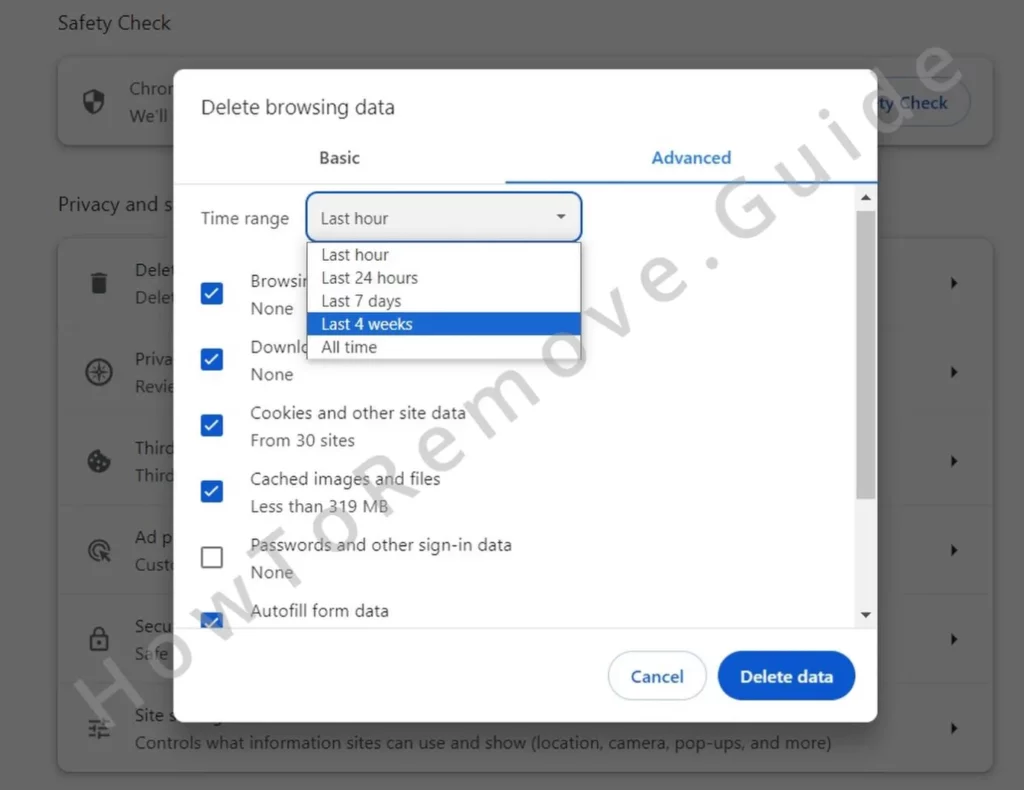
Also, revisit the Privacy and Security section. Click Delete browsing data, select the Advanced tab, and put ticks in everything. Leave only the Passwords box unchecked.
Choose an appropriate period – it should extend to a moment before ZoomFind got in your browser. Then delete the browsing data.
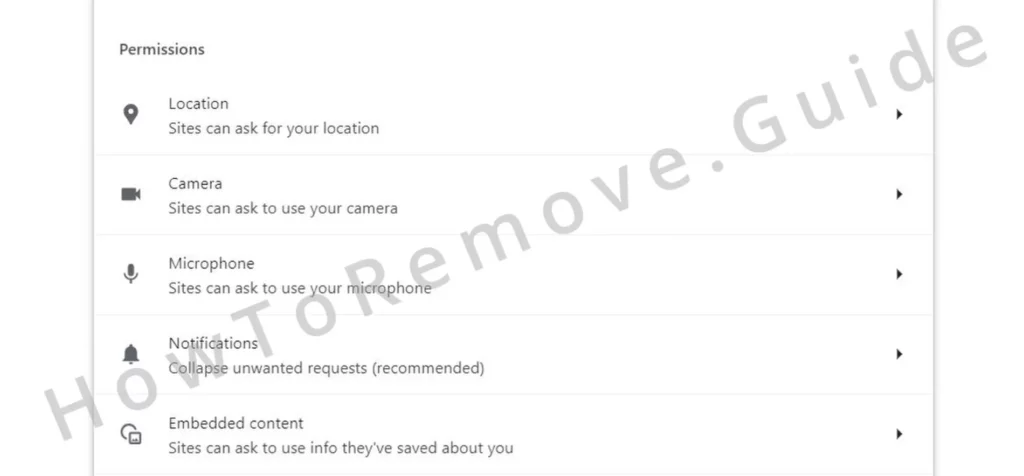
Also, open Site Settings and this time review all permission categories. Make sure that there aren’t any rogue or unfamiliar URLs listed in their respective Allow sections. If there are, block them (click the three dots then click block).
After that, go to the Search Engine section, and ensure that your default search provider is legitimate. ZoomFind might have set an unfamiliar search engine, such as Boyu.
Restore the default search engine to a trusted provider like Google or Bing, then open Manage Search Engines, and if you see any unrecognized sites there, delete them.
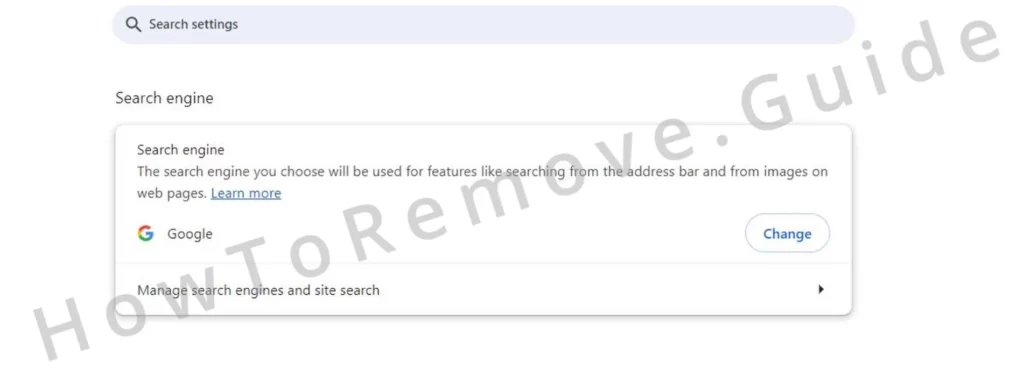
Finally, review the browser Startup and Appearance settings. ZoomFind might have changed your homepage or startup tabs to some rogue site. Reset them to your preferences.
Video walkthrough for this step:
Chrome
Microsoft Edge
Mozilla Firefox
I am confident that, if you followed the instructions correctly, the hijacker should be fully gone from your PC. That said, the possibility of something being left behind in your system is still there.
As I said before, there could be other rogue apps on your PC that may restore the hijacker if you don’t eliminate them. For this reason, consider using Spy Hunter to quickly and securely clear your system from any malware or PUPs that might be hiding in it.

Leave a Reply