If you are wondering how to transfer your favorite photos, videos and other files from your iPhone, iPad, or your Android device to your Mac or PC, on this page, you will learn the fastest and the easiest methods, which you could use. What is more, in the next lines, we will show you how to make your photos available on all your devices and import and export them without USB cable. So, stay with us.

Where do you want to keep your files?
Firstly, you need to decide where you want to keep your collection of favorite photos and videos. With iCloud Photos, you can make them available on all your devices, but you can also store them on your Mac or PC.
How to Transfer files from Phone to PC
iCloud Photos
iCloud Photos gives you access to your latest photos and videos and their edits across all your devices – from your iPhone, iPad, iPod touch, Mac, Apple TV, on iCloud.com, and even your PC.
NB: The photos and videos that you upload in iCloud Photos use your iCloud storage. That’s why, before you turn on iCloud Photos, make sure that you have enough space in iCloud to store all that you want. You can see how much space you need and then upgrade your storage plan if necessary.
Preparation:
- Make sure that the software on your devices is up to date.
- Set up iCloud on all of your devices.
- For PC, download iCloud for Windows.
- Sing in to your iCloud on all of your devices.
- Make sure that your devices are connected to Wi-Fi.
Turn on iCloud Photos:
- On your iPhone, iPad, or iPod touch, go to Settings > (your name) > iCloud > Photos, then turn on iCloud Photos.
- For Mac, go to System Preferences > iCloud. Click the “Options” button next to Photos and select iCloud Photos.
- On your Apple TV, go to Settings > Accounts > iCloud > iCloud Photos.
- On your PC, follow the steps in the link to set up iCloud Photos for Windows.
In case that you have already synced photos to your iOS device from iTunes, the moment you turn on iCloud photos on your iOS device, you will see a message that states “Photos and Videos Synced from iTunes will be Removed.” The files that you synced from your computer will remain on the computer, but they will be removed from your iOS device. You can get them back on your iOS device by turning on iCloud Photos on your Mac or PC. This way, the photos and videos from your computer will be uploaded to iCloud and you will be able to access them on all of your devices.
For more help using iCloud Photos on your Mac or PC, check the links.
Import files to your Mac
If you need to import images from digital cameras and SD cards or you want to transfer photos from your iOS device to your Mac, here is what you need to do:
Preparation: Importing photos to your Mac requires iTunes 12.5.1 or later, that’s why, make sure that you have the latest iTunes version on your Mac.
- First, connect your iOS device or digital camera to your Mac with a USB cable. If you’re using an SD card, insert it into the SD slot or connect it via a card reader.
- A notification may ask you to unlock your iOS device using your passcode. You may also be prompted to “Trust This Computer”. Select “Trust” and continue.
- The Photos app should automatically open on your Mac, if not, just navigate and open it.
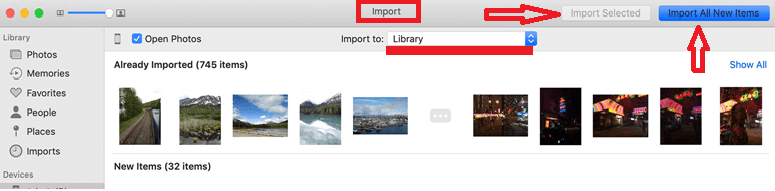
- If an Import screen doesn’t automatically open, click the “Import” tab at the top of the Photos app, or click the device’s name in the Photos sidebar to see all the photos and videos that are stored on your connected device.
- Select the photos that you want to import and then click on “Import selected”.
- When you finish with importing, disconnect your device by safely ejecting it.
NB: Photos and videos that you sync from your computer to your iOS device using iTunes cannot be imported back to your computer.
Here is what to do if you can’t import photos from your iPhone, iPad, or iPod touch to your computer.
Import to your PC
With the help of Windows Photos app, you can import photos to your PC by connecting your device to your computer:
Preparation: Importing photos to your Mac requires iTunes 12.5.1 or later, that’s why, make sure that you have the latest iTunes version on your Mac.
- Connect your iOS device to your computer with a USB cable.
- A notification may ask you to unlock your iOS device using your passcode. You may also be prompted to “Trust This Computer”. Select “Trust” and continue.
- Next, follow the steps, shown in these Microsoft instructions to learn how to import photos to Windows Photos app:
NB: Some of the videos that you import from your iOS to your PC may be rotated incorrectly in Windows Photos app. To play them in the correct orientation, you can add them to iTunes.
NB: Photos and videos that you sync from your computer to your iOS device using iTunes cannot be imported back to your computer.
Transfer photos from your computer to your iOS device
There are several options for transferring photos and videos from your computer to your iPhone, iPad, or iPod:
- Use iCloud Photos with Photos for macOS or iCloud for Windows to have your photos accessible on all your devices.
- Use AirDrop – a quick and easy Mac-only option, to wirelessly send photos and videos from your Mac to your iOS device. The photos will appear in the device’s Photos app.
- Sync your photos manually with iTunes. When you sync your iOS device with iTunes, the photos and videos on your iOS device automatically update to match the albums on your computer.
Transfer Files from Android to PC without USB
How many times you find yourself in a hurry to transfer files between your PC and your Android device but the bloody USB cable is nowhere around. If you are like use and want to live cable-free, these wireless file-transfer methods may be just for you.
Wireless ADB
Configuring a wireless ADB connection may initially require a USB cable for the first setup, but once you are done, you can toss USB cable for good. 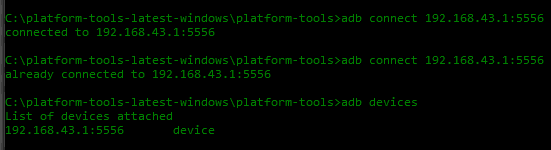
- First, connect your Android device to your PC via USB
- Launch an ADB terminal as normal.
- Next, type adb tcpip 5556 in the ADB Terminal. This will restart the ADB host in tcpip mode.
- In the ADB terminal, type: Adb shell Ifconfig
- Next, you need to find the IP for your Android device in the output list. Normally, it will look something like 192.168.x.x
- Next, type exit in the ADB shell and then type: adb connect xxx.xxx.x.x:5556 (replace xxx with your Android IP address)
- Finally, disconnect the USB cable from your Android device and continue using ADB with commands like /push and /pull for file transfers.
Wireless sync apps
Alternatively, you can use the help of third-party apps to transfer files between your PC and your Android smartphone or tablet. There are many free tools available online (such as Droid Transfer, AirDroid, Wi-Fi File exporter, etc.), which are intuitive and can easily import and export files and easily sync data between two devices wirelessly. All you need to do is to find software of your liking, launch it, both on your PC and Android, and follow the instructions to transfer files between them.
Leave a Reply