Vipleague.lc
If your browser has gotten hijacked by a piece of software named Vipleague.lc, then you would probably like to learn more about this unpleasant app’s characteristics as well as about the best methods you can use to have it removed. Here, we can offer you both of those things and this is why you are advised to keep on reading in case you have Vipleague.lc on your computer.

Vipleague.lc is a software piece that belongs to the browser hijacker category – those are apps capable of getting installed on all kinds of browsers, even on some of the safest and most secure ones like Chrome, Firefox and even Safari. Once installed on the browser, the hijacker is likely to trigger page-redirects to Vipleague.lc or a similar URL ,like Karativa, ads generation in it as well as tinker with its search engine, toolbar ad homepage settings. The changes in your browser’s settings are again done with the purpose of facilitating the advertising campaign that the hijacker is likely going to be used for. That’s right, the usual purpose of most such apps is none other than flooding your browsers with ads and earning revenue from that activity. Each click you make on hijacker-related advertisements effectively gets transformed small amounts of income. This is precisely why you will likely see dozens of pop-ups, blinking boxes, colorful banners and other similar commercial messages on your screen while browsing with a hijacker in your browser – it’s all done to make you click on the advertisements. However, we advise you not to do that even it is for the sole reason of trying to get rid of the ads. In fact, the best way to put an end to all this intrusiveness is by removing the hijacker and this is why we have prepared instructions on how to do that for those of you who may need them.
The Vipleague.lc virus
Remember how we told you that you shouldn’t interact with the advertising messages that an app like the Vipleague.lc virus is likely to put on your screen? Well, there is a good reason why you may not want to do that and the reason is because some of them may actually be hazardous. The Vipleague.lc virus isn’t typically dangerous by itself, it isn’t a Ransomware, a Trojan, a Spyware or some other similar malicious virus infection.
However, randomly clicking on its advertisements might indeed lead to the eventual infection of your PC with some insidious Ransomware cryptovirus or with a Trojan Horse because some of the advertisements may be linked with shady and unreliable online addresses. The best thing to do in this case is, as we said, to get rid of Vipleague.lc by using the guide on this page or the anti-malware program added to it. Also, one last thing to remind you about is that you need to be cautious online and be selective with regards to the download sources that you tend to use in order to ensure that you don’t get any more hijackers in your system.
SUMMARY:
| Name | Vipleague.lc |
| Type | Browser Hijacker |
| Detection Tool |
Some threats reinstall themselves if you don’t delete their core files. We recommend downloading SpyHunter to remove harmful programs for you. This may save you hours and ensure you don’t harm your system by deleting the wrong files. |
Remove Vipleague.lc Virus
To try and remove Vipleague.lc quickly you can try this:
- Go to your browser’s settings and select More Tools (or Add-ons, depending on your browser).
- Then click on the Extensions tab.
- Look for the Vipleague.lc extension (as well as any other unfamiliar ones).
- Remove Vipleague.lc by clicking on the Trash Bin icon next to its name.
- Confirm and get rid of Vipleague.lc and any other suspicious items.
If this does not work as described please follow our more detailed Vipleague.lc removal guide below.
If you have a Windows virus, continue with the guide below.
If you have a Mac virus, please use our How to remove Ads on Mac guide.
If you have an Android virus, please use our Android Malware Removal guide.
If you have an iPhone virus, please use our iPhone Virus Removal guide

Some of the steps will likely require you to exit the page. Bookmark it for later reference.
Reboot in Safe Mode (use this guide if you don’t know how to do it).

WARNING! READ CAREFULLY BEFORE PROCEEDING!
*Read more details in the first ad on this page, EULA, Privacy Policy, and full terms for Free Remover.
Press CTRL + SHIFT + ESC at the same time and go to the Processes Tab (the “Details” Tab on Win 8 and 10). Try to determine which processes are dangerous.

Right click on each of them and select Open File Location. Then scan the files with our free online virus scanner:


After you open their folder, end the processes that are infected, then delete their folders.
Note: If you are sure something is part of the infection – delete it, even if the scanner doesn’t flag it. No anti-virus program can detect all infections.

Hold together the Start Key and R. Type appwiz.cpl –> OK.

You are now in the Control Panel. Look for suspicious entries. Uninstall it/them.
Type msconfig in the search field and hit enter. A window will pop-up:

Startup —> Uncheck entries that have “Unknown” as Manufacturer or otherwise look suspicious.

Hold the Start Key and R – copy + paste the following and click OK:
notepad %windir%/system32/Drivers/etc/hosts
A new file will open. If you are hacked, there will be a bunch of other IPs connected to you at the bottom. Look at the image below:

If there are suspicious IPs below “Localhost” – write to us in the comments.
Open the start menu and search for Network Connections (On Windows 10 you just write it after clicking the Windows button), press enter.
- Right-click on the Network Adapter you are using —> Properties —> Internet Protocol Version 4 (ICP/IP), click Properties.
- The DNS line should be set to Obtain DNS server automatically. If it is not, set it yourself.
- Click on Advanced —> the DNS tab. Remove everything here (if there is something) —> OK.
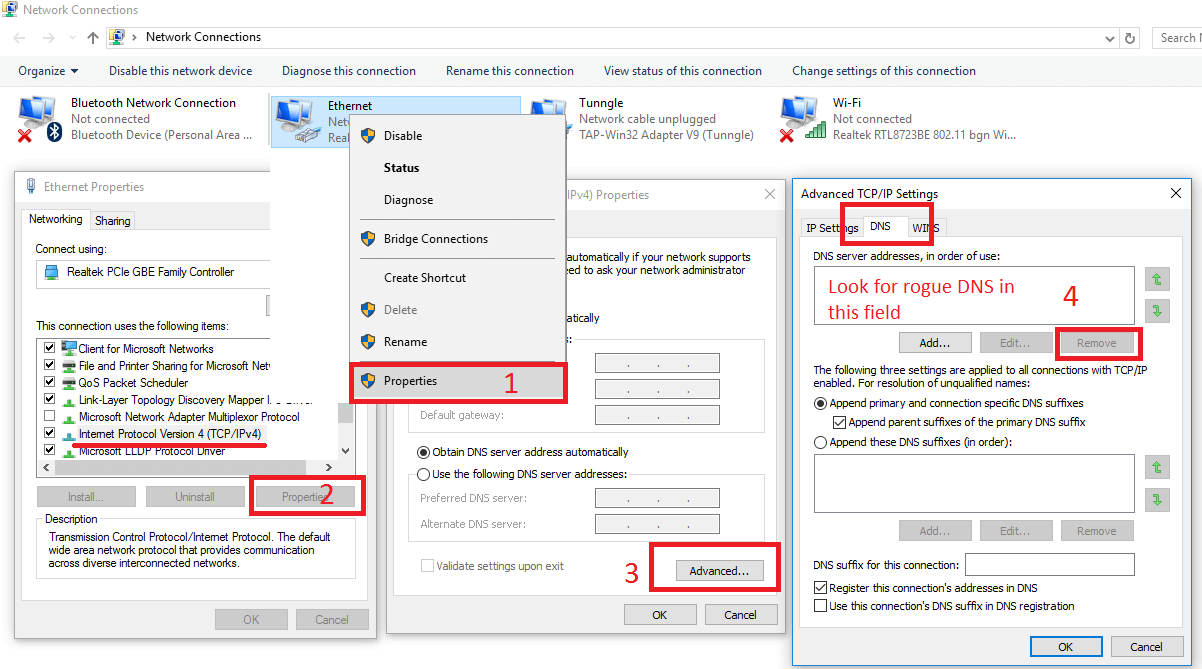

- After you complete this step, the threat will be gone from your browsers. Finish the next step as well or it may reappear on a system reboot.
Right click on the browser’s shortcut —> Properties.
NOTE: We are showing Google Chrome, but you can do this for Firefox and IE (or Edge).

Properties —–> Shortcut. In Target, remove everything after .exe.

![]() Remove Vipleague.lc from Internet Explorer:
Remove Vipleague.lc from Internet Explorer:
Open IE, click ![]() —–> Manage Add-ons.
—–> Manage Add-ons.

Find the threat —> Disable. Go to ![]() —–> Internet Options —> change the URL to whatever you use (if hijacked) —> Apply.
—–> Internet Options —> change the URL to whatever you use (if hijacked) —> Apply.
 Remove Vipleague.lc from Firefox:
Open Firefox, click ![]() ——-> Add-ons —-> Extensions.
——-> Add-ons —-> Extensions.

Find the adware/malware —> Remove.
 Remove Vipleague.lc from Chrome:
Close Chrome. Navigate to:
C:/Users/!!!!USER NAME!!!!/AppData/Local/Google/Chrome/User Data. There is a Folder called “Default” inside:

Rename it to Backup Default. Restart Chrome.

Type Regedit in the windows search field and press Enter.
Inside, press CTRL and F together and type the threat’s Name. Right click and delete any entries you find with a similar name. If they don’t show up this way, go manually to these directories and delete/uninstall them:
- HKEY_CURRENT_USER—-Software—–Random Directory. It could be any one of them – ask us if you can’t discern which ones are malicious.
HKEY_CURRENT_USER—-Software—Microsoft—-Windows—CurrentVersion—Run– Random
HKEY_CURRENT_USER—-Software—Microsoft—Internet Explorer—-Main—- Random
If the guide doesn’t help, download the anti-virus program we recommended or try our free online virus scanner. Also, you can always ask us in the comments for help!
Leave a Reply