How to Record Your Computer Screen
There are a number of reasons why you may want to record your screen, and so it is a good idea to know how you can do this. For example, you may have an exciting gaming session that you would like to share with your friends. Or perhaps you have some important work or a presentation that you need to record in order to be able to present it to your management, co-workers, clients, etc.

How to Record Your Computer Screen
And depending on the type of operating system you are using, there will likely be different solutions available for you to record your screen. This particular guide is designed to assist Windows 10 users in screen recording. And as you will find, even in Windows 10 alone there are several options to choose from. Here we will have a look at them all. And once you’re done reading, you can decide for yourself which option best suits your needs and which you would like to stick to from now on.
Before we get started, here is a brief overview of the options that we will be examining in the below guide:
- Game Bar (comes integrated with Windows 10)
- PowerPoint (comes with the Microsoft Office suite)
- OBS Studio (free software)
- Snagit (paid software)
Game Bar
As you can tell from the name, this tool was specifically designed for gamers. And what’s great about it is that it comes directly as part of the OS, which means that you won’t have to download any additional software. But you do need to make sure that your computer can support at least one of the following encoders (which most modern processors can anyway):
- Nvidia NVENC
- AMD VCE
- Intel Quick Sync H.264
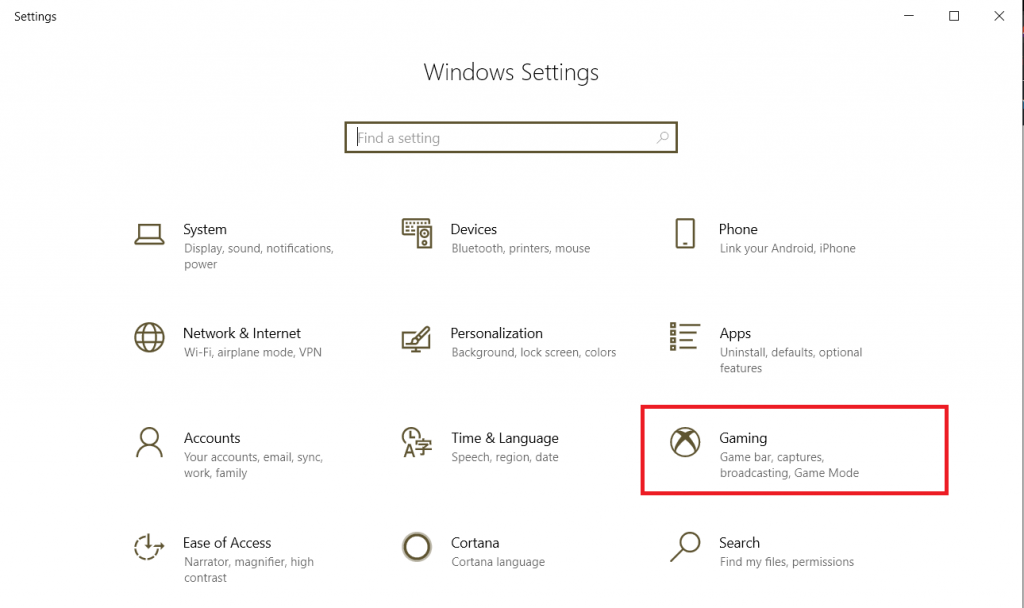
Step 1: At the bottom left corner of the screen, click on the Start button and select the cogwheel icon to enter Settings.

Step 2: In the Settings app, click on the Gaming option.
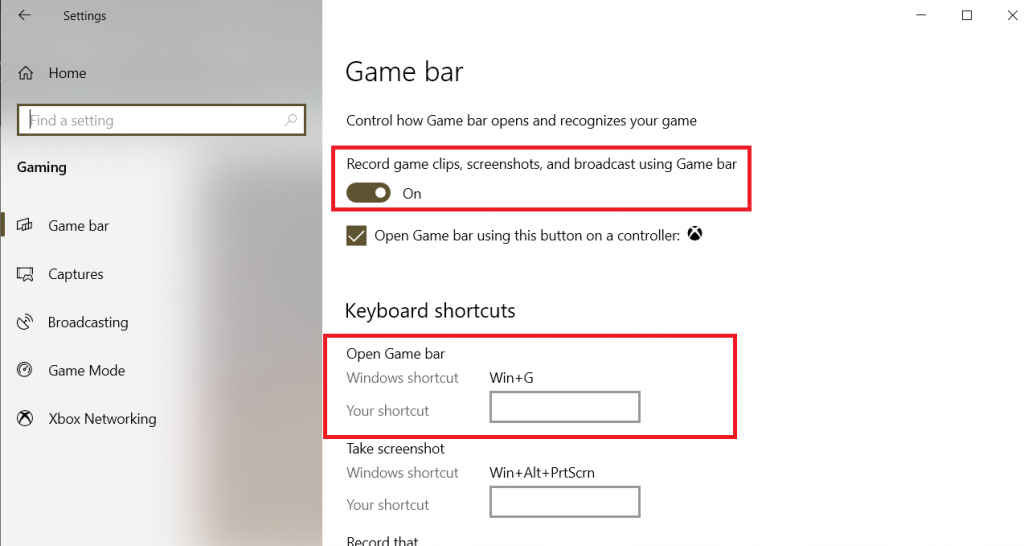
Step 3: The new window should automatically be opened under Game Bar. Check to make sure that the “Record game clips, screenshots, and broadcast using Game Bar” is enabled. And right below it, type in a preferred key combination to activate the Game Bar (if you have one that is different from the default Windows key combination Win + G).
Step 4: Activate Game Bar using the selected key combination on your keyboard. This will cause the Game Bar to appear as an overlay on your screen with different recording options for you to choose from. Note, however, that the recording will only work for games and other applications, and not for the File Explorer or desktop of your PC.
NOTE: All recorded files will be saved in MP4 format and you will be able to find them in the Videos -> Captures folder.
PowerPoint
This one may come as a surprise to many users, but it is true and you can indeed record your screen in PowerPoint. And it isn’t too difficult to do either.
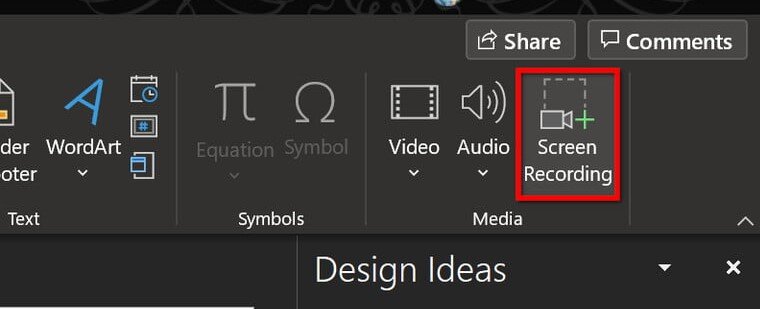
Step 1: Open PowerPoint and head over to the Insert tab.
Step 2: Click on the Screen Recording button in the far right.
Step 3: An overlay will appear on your screen, in which there will be a red dotted line framing the part of the screen that will be recorded. If you would like to have a full-screen recording, use the key combination Windows + Shift + F on your keyboard.
Step 4: To start recording your screen, click on the red Record button at the top of the screen (can also be done with the help of the key combination Windows + Shift + R).
Step 5: Press the Pause button if you would like to pause the recording and resume later. And when you are done recording, simply press the Stop button.
Step 6: You will have to save your recording yourself in this case when it appears as a video within the PowerPoint file. Simply right-click on it and select Save Media As…
NOTE: Notice that there are several video editing options available such as adding frames, changing the shape of the video, visual effects, etc. It’s not much, but enough as far as presentations go.
OBS Studio
OBS Studio is a software application designed for a more tailored touch to your screen recordings. This is professional software that is free and is more gaming-oriented than anything else.
Even though it’s free, this is among the more advanced screen-recording tools out there. It is open-source and will allow you an unlimited time of full-screen recordings. You also won’t have to worry about watermarks either. And it comes with a long list of different extras that users can enjoy, too.
For example, it has a streaming feature that will enable you to host a live audience during your recording sessions. And with the necessary hardware, you can enjoy making great quality 60-frames-per-second videos.
Potentially the only downside to this app is that may take a little fidgeting until you can customize the settings to match your preferences. But it’s certainly the bets fermium tool of its kind on the market and certainly worth giving a go if you want that extra professional touch.
Snagit
And if you are a little more hardcore, then you will want to check out Snagit, which is a paid application and will set you back some $50.
Unlike OBS, however, this tool is aimed at startups and small companies and not so much towards gamers. But it comes with a whole many more different features. Users can benefit from vlogging functionalities, product showcasing options and you can even create your own marketing videos here.
There is a range of video types to choose from, along with several graphics, and, of course, what this article is all about – screen recording. Depending on what your needs are, $50 is plenty of bang for your buck considering the variety of functions Snagit has to offer.
Leave a Comment