If your browser suddenly opens unfamiliar tabs, swaps your homepage, or spawns pop-ups even when it’s closed, there’s a strong chance that Api-microservice-us1.com has slipped in and started meddling with settings.
This browser hijacker isn’t a classic virus, but it can twist your browsing in ways you won’t like and raise your exposure to risky pages – treat Api-microservice-us1.com as a real threat and act promptly.
Api-microservice-us1.com can lock key settings behind a “Managed by your organization” message, alter your default search engine, and flood your screen with intrusive redirects and ads. You might even see fake antivirus alerts, which are meant to push clicks or shady downloads.
While Api-microservice-us1.com doesn’t damage files directly, it funnels you toward scam pages and questionable installers, so the safest approach is to ignore anything it promotes and focus on removing it completely.
The guide below walks you through a full cleanup so you can reclaim your browser and restore normal behavior. If you are tired of being constantly attacked by hijacking programs and value your time, then you can try SpyHunter 5, a tool for removing attacks such as Api-microservice-us1.com, Health-smooth-eu3.com, and My-smart-house1.com
We tested that SpyHunter successfully removes Api-microservice-us1.com* and we recommend using it. It will block Api-microservice-us1.com from reinstalling itself and it will make sure your device is clean from any malware.
Buy now15% OFF if you buy straight without trial.
Step-by-Step Api-microservice-us1.com Removal Instructions
Work through the steps slowly, checking how the browser behaves after each change and writing down anything you disable, remove, or reset so it can be put back if necessary. Following a deliberate sequence like this helps you get rid of Api-microservice-us1.com, cut down on repeated pop-ups, and avoid switching off useful features by mistake.
Early Steps to Undo Api-microservice-us1.com Browser Modifications
- 1.1Open your browser’s Settings page so you can review the options that Api-microservice-us1.com has altered.
In Chrome, use the ⋮ menu in the top-right; in Firefox, open the ≡ menu to reach the same panel.
Then visit Extensions or Add-ons, read through each entry, and jot down anything unfamiliar for later comparison. - 1.2Take a closer look at every listed extension by checking its name, icon, requested permissions, and full description.
Imitation add-ons often copy the branding of legitimate tools – choose Remove when those details seem mismatched, vague, or unrelated to what the add-on claims to do.
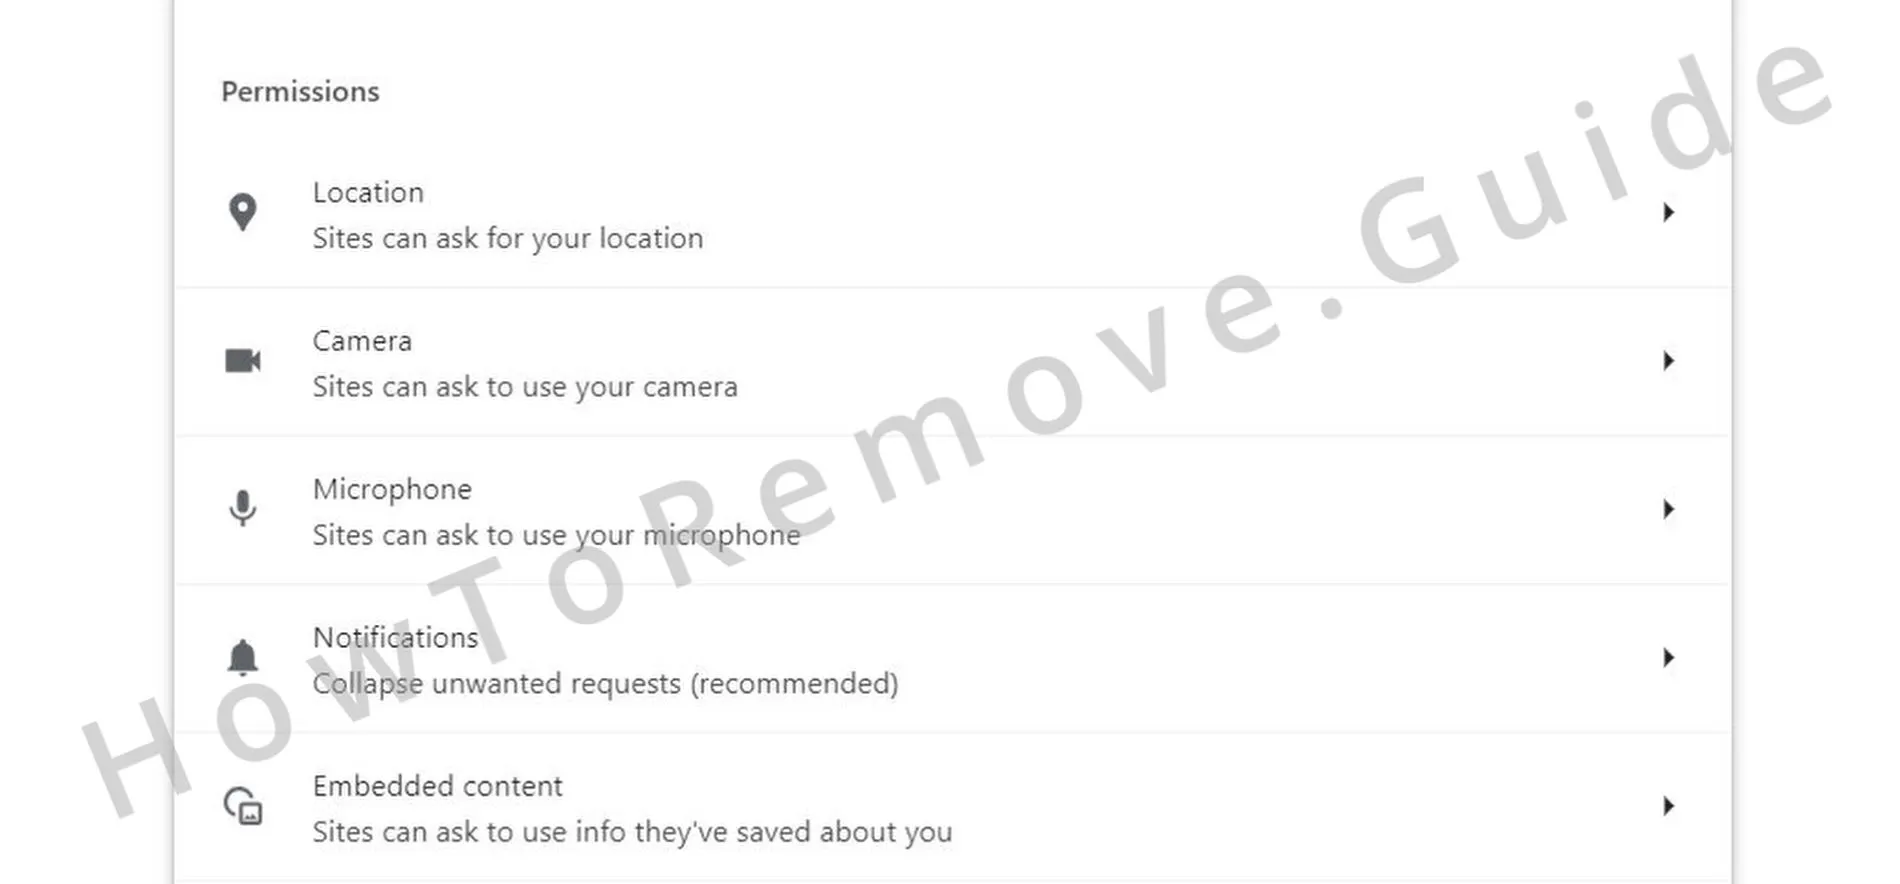
If you are uncertain, search the exact “extension name” online and compare the publisher and user feedback with what you see installed. - 1.3Open Privacy and security and then select Site permissions.
Review which sites can use your microphone, camera, location, and notifications.
Revoke permissions you do not recognise granting and keep a brief list of trusted ones so you can restore them if something legitimate stops working. - 1.4Under Site permissions, delete entries that have access you never meant to allow.
Doing this cuts down on repeated prompts, aggressive notifications, and surprise redirects that trigger as soon as the browser opens.
When you are finished, restart the browser so the changes apply and watch for any return of the unwanted behaviour.
If pop-ups and redirects stop appearing after these checks, you can treat the immediate disruption as resolved. When they continue, it usually means a separate policy or component outside the browser is still enforcing changes, so carry on removing leftovers while avoiding broad, unrelated adjustments.
SUMMARY:
| Threat name | Api-microservice-us1.com |
| Classification | Browser hijacker |
| Detection tool |
Some threats reinstall themselves if you don’t delete their core files. We recommend downloading SpyHunter to remove harmful programs for you. This may save you hours and ensure you don’t harm your system by deleting the wrong files. |
How to Manually Remove the Api-microservice-us1.com Virus
When your browser shows the message “Managed by your organization,” one or more policies are forcing specific settings every time it starts, so a simple reset will not clear them. The steps in this part of the guide focus on finding and deleting the policy entries that let Api-microservice-us1.com restore its changes, while you move carefully, double-check each edit, and keep short notes you can consult after rebooting the system.

1. Locate Browser Policies That Enforce Api-microservice-us1.com Settings
- 1.1
 Open your browser’s internal policy page to see which rules are being applied for Api-microservice-us1.com at the moment.
In Chrome: chrome://policy
In Edge: edge://policy
Wait for the list to load, then look for entries that seem unrelated to your usual setup, using Reload policies to refresh the view or export everything for later analysis. - 1.2Go through each listed policy and look for odd identifiers, long random strings, or values that do not match your usual configuration.
Highlight anything that looks suspicious so you can later connect it to specific files, folders, or extension IDs on disk.
Write down the exact policy Name and Value, since these often correspond to storage locations or registry entries that must be removed. - 1.3Open the browser’s Extensions page and switch on Developer mode using the toggle in the upper-right corner.
With this view enabled, the page shows each extension’s ID and install path, which you will need for manual clean-up.
Copy any dubious ID values into a text file so you can match them with folders when you browse the profile directory. - 1.4If the Extensions page fails to open or appears disabled, launch File Explorer instead.
Working directly with the browser’s profile folders lets you continue the clean-up even when the interface is blocked.
Turn on View > Show > Hidden items so the AppData profile directories are visible. - 1.5
 Use File Explorer to open:
C:\Users[Your Username]\AppData\Local\Google\Chrome\User Data\Default\Extensions
Each subfolder name matches an extension ID; compare these with your notes to find the unwanted add-on, avoid deleting folders you recognise as legitimate, and make a quick backup copy before removing anything. - 1.6
 If you use a different Chromium-based browser such as Brave or Opera, its extensions are stored in a comparable folder structure under AppData.
Confirm both the extension ID and the location before deleting any directory associated with a suspicious add-on.
Check the browser’s About page to make sure it is fully closed so the related files are no longer locked while you remove them. - 1.7After deleting the suspect folder, return to Extensions with Developer mode still enabled.
Confirm that the unwanted extension no longer appears; if it does, repeat the removal and search for leftover files that might be recreating it.
Press Update in Developer mode to refresh the list and expose any stealth reinstall attempts.
Remove Api-microservice-us1.com Policies from Windows
Part of the control that locks your browser settings in place is stored inside the Windows Registry, where unsafe edits can make the system unstable or hard to start. Concentrate only on keys that clearly reference Api-microservice-us1.com, avoid blanket deletions, and move slowly so you strip out the enforcement rules that survive ordinary browser resets without harming the rest of Windows.
2. Remove Api-microservice-us1.com Policy Entries Left in the Registry
- 2.1Press Win + R, type regedit, and press Enter to launch Registry Editor and start searching for policy entries that Api-microservice-us1.com has added.
Before editing anything, open File > Export to create a backup copy of the registry.
Choose All under Export range and save the backup in Documents or another clearly labelled folder. - 2.2Use Ctrl + F or Edit > Find to search for the policy names or extension IDs you recorded from the browser.
Click Find Next and remove only values that exactly match those identifiers and clearly relate to the unwanted browser configuration.
Press F3 to continue the search until no matching entries are left under the HKCU and HKLM sections. - 2.3
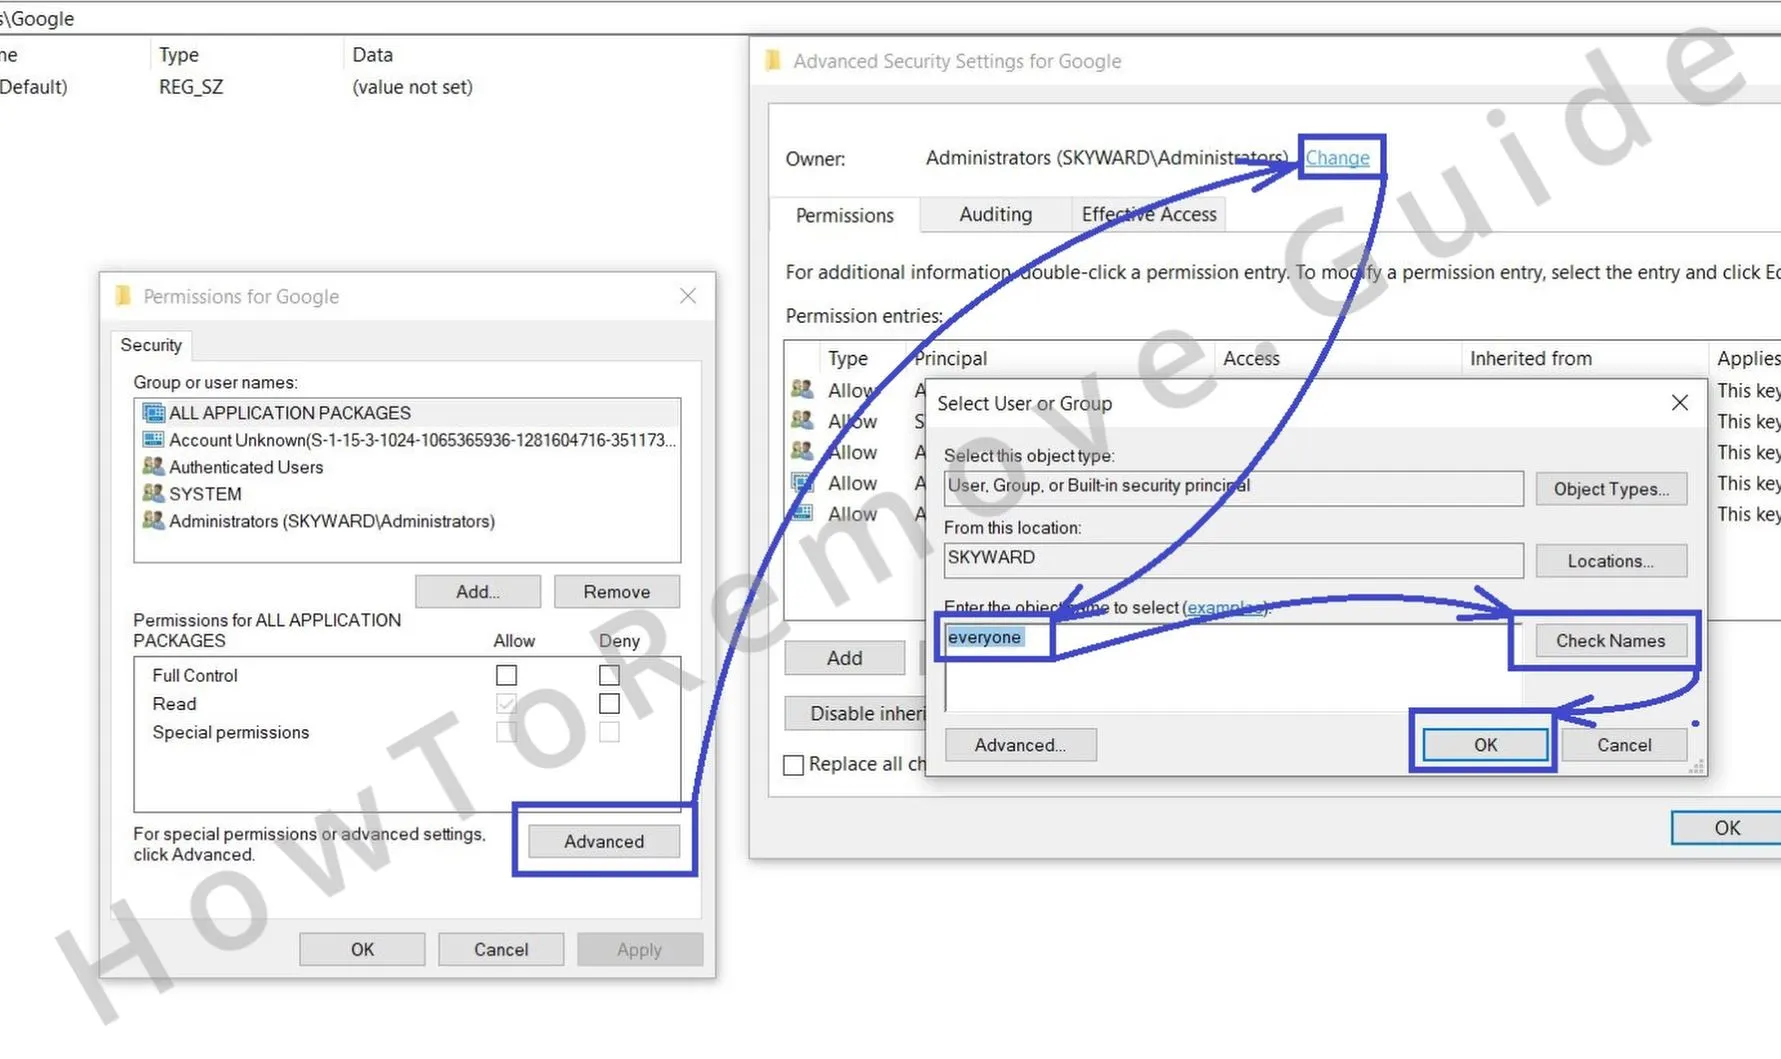 If a key refuses to delete, right-click it, choose Permissions, and then click Advanced.
In the Owner field, select Change, type Everyone, use Check Names, and confirm with OK.
Grant Full Control to both Administrators and Users so the key and all its subkeys can be removed. - 2.4
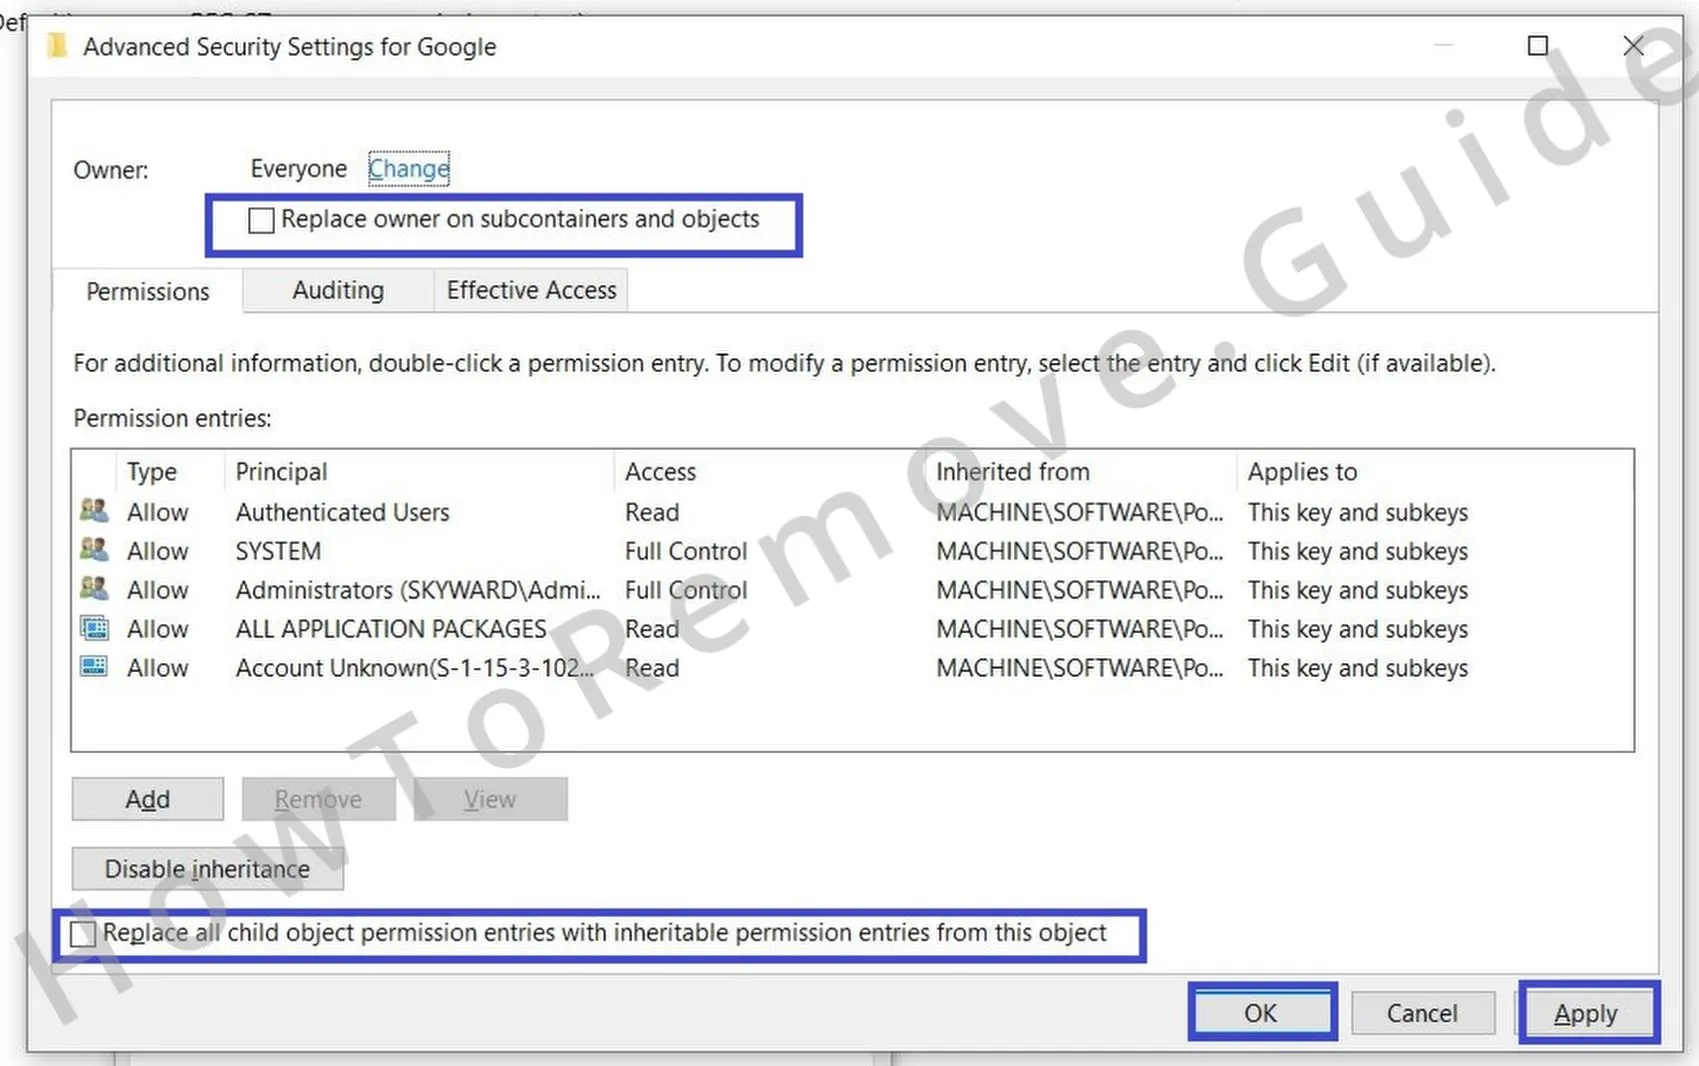 After changing the owner, enable Replace owner on subcontainers and objects as well as Replace all child object permission entries.
Click Apply and then OK, Reboot the computer, and check whether the Managed by your organization notice still appears in the browser.
If the message has gone, open regedit again and repeat your searches to verify that no related policy entries have been recreated.
After ownership and permission changes are in place, even stubborn registry keys can usually be removed without error messages or access denials. This sharply lowers the chance that policy data will come back after a reboot and helps prevent your browser settings from being silently pushed back into a hijacked state.
Alternative Ways to Clear Api-microservice-us1.com Enforced Policies
Sometimes a leftover service, scheduled task, or local policy keeps quietly reapplying controls in the background. In those situations, targeted tools and policy consoles are useful for removing the last rules tied to Api-microservice-us1.com without broad or experimental system changes. Turn to these options when the managed banner or locked settings come back after restarting Windows.
3. Extra Methods for Removing Api-microservice-us1.com Policy Rules
- 3.1
 Open the Group Policy Editor by pressing Win + S, searching for Edit Group Policy, and opening it so you can inspect rules that may have been created for XXX.
In the left-hand tree, expand Administrative Templates to review where browser and system policies are defined.
Look through both Computer Configuration and User Configuration so you cover machine-wide rules as well as ones that affect only your account. - 3.2
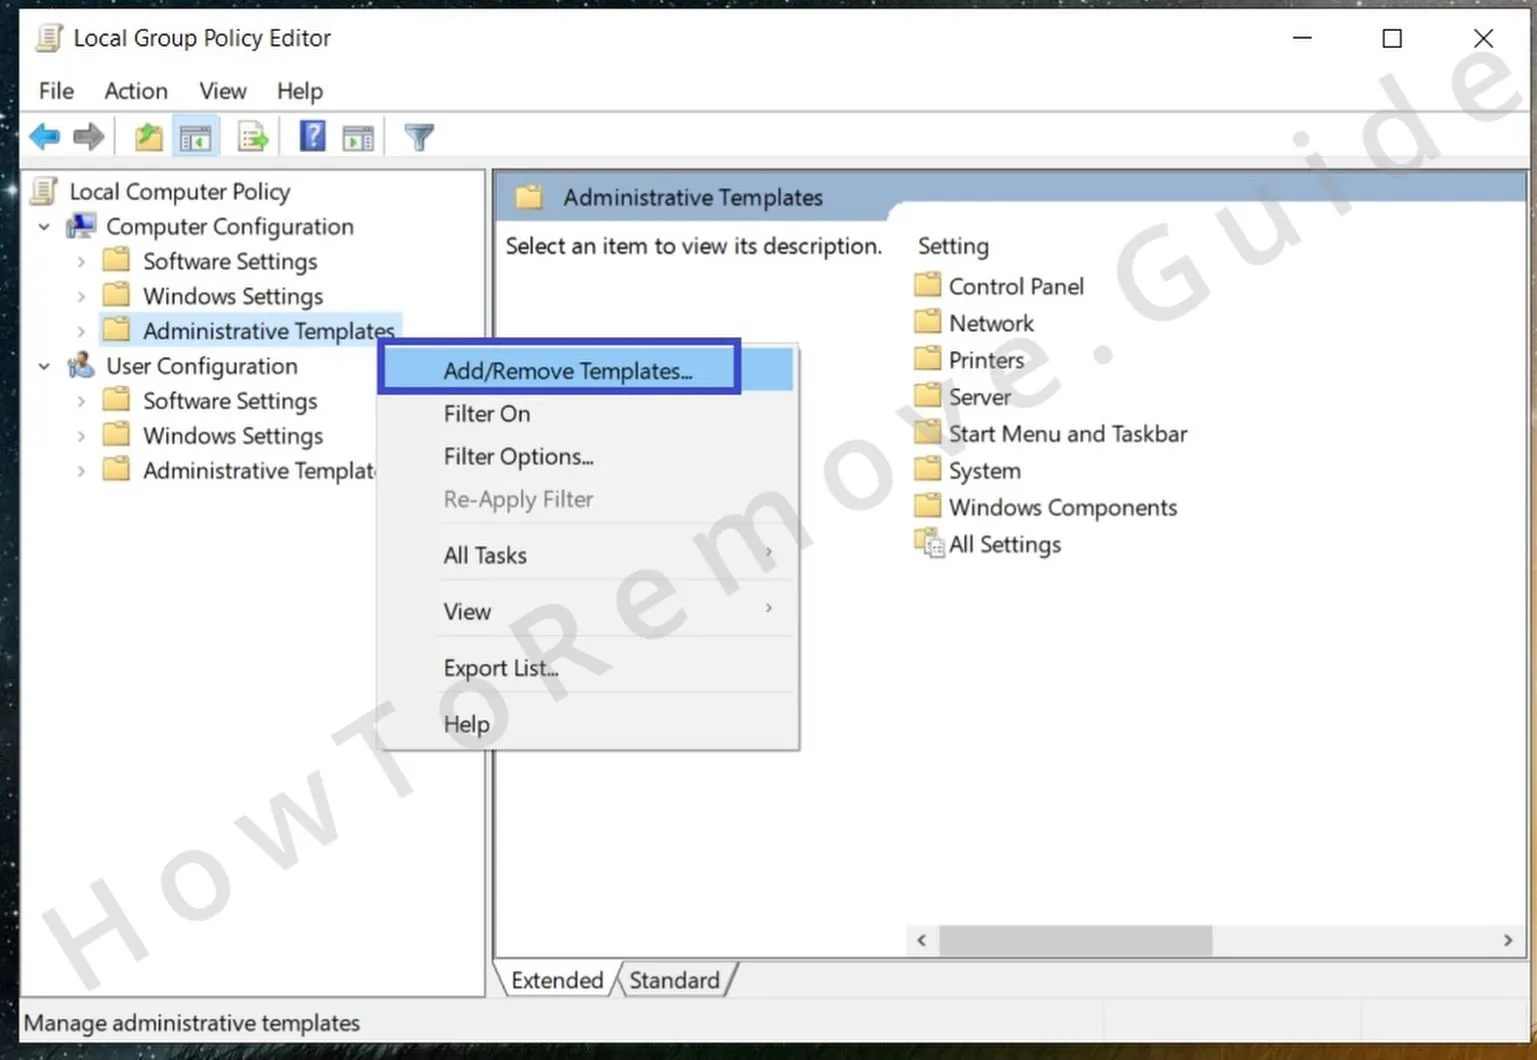
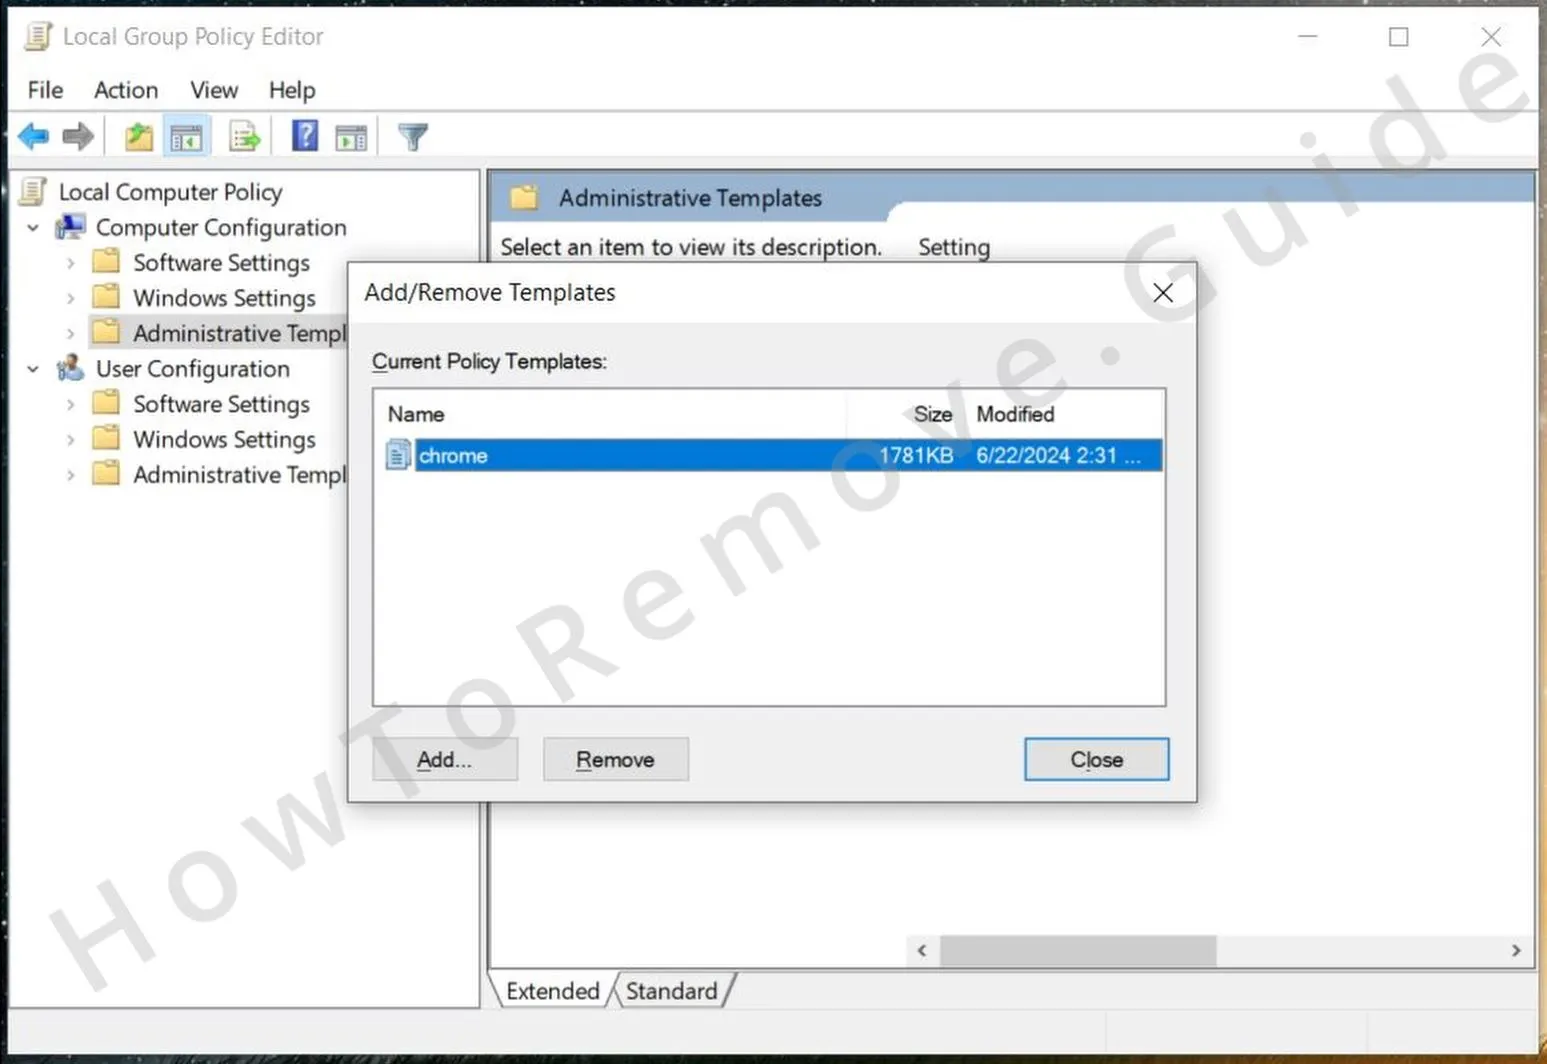 Right-click Administrative Templates and choose Add/Remove Templates.
Remove template files you do not remember adding to roll back custom restrictions that might lock browser or network behaviour.
Then review the Policy entries under Windows Components for Microsoft Edge or Google Chrome, and return suspicious items to Not Configured. - 3.3For Chrome, the utility Chrome Policy Remover can scan for and delete hidden policy files that hijackers rely on.
Get it from a trusted source, then right-click the downloaded file and select Run as administrator so it has the rights needed to adjust protected policy folders.
When the scan completes, open chrome://policy again and choose Reload policies to check that only expected entries remain. - 3.4If Windows Defender or another security product flags the tool, expand the message with More info and click Run anyway only when you are sure the download is genuine.
After the clean-up finishes, restart the PC and recheck both the Group Policy Editor and Registry Editor so you can confirm that unwanted policies have not returned.
It is also a good idea to open Task Scheduler under Task Scheduler Library and remove scheduled tasks that might silently rebuild Api-microservice-us1.com’s settings on a timetable.
Uninstall Api-microservice-us1.com from Chrome, Edge, and Other Browsers
Browser sync, multiple profiles, and cached data can quietly bring back old preferences even after you clean the main components. To stop Api-microservice-us1.com from resurfacing, you must ensure your changes carry across restarts, profiles, and sign-ins to your browser account. The following steps help you confirm that your default settings, permissions, and extensions remain stable over time.
4. Clear Remaining Api-microservice-us1.com Traces from Your Browsers
- 4.1Open your browser’s Extensions or Add-ons page again and look for entries named after Api-microservice-us1.com or otherwise out of place.
If the same suspicious item has returned, click Remove; synced data or background tasks might be reinstalling it.
Use built-in addresses such as chrome://extensions or your browser’s equivalent to open the genuine extension manager instead of themed pages that might hide problematic entries. - 4.2
 From Settings, open Clear browsing data.
Set the Time range to All time and select everything except Saved passwords if you want to keep existing logins.
Click Clear data to remove cookies, cached files, and other stored information that might continue feeding pop-ups and redirects; repeat this for each active browser profile, and consider enabling Clear data on exit if the problem comes back quickly. - 4.3
 Go to Privacy and Security > Site settings.
Review the permissions granted to your camera, microphone, location, and especially notifications, and Block or Remove any site you never intended to trust.
Use the View permissions and data stored across sites option to clear out domains that repeatedly generate prompts and alerts. - 4.4
 Open the Search engine section in your browser’s settings and select Manage search engines or its equivalent.
Delete unknown or untrusted entries and confirm that your default search engine is a provider you recognise, such as Google, Bing, or DuckDuckGo.
Also review any On-device search shortcuts or Site search definitions, where hijackers sometimes place persistent custom search rules. - 4.5Check the sections for On startup and Appearance.
Remove unfamiliar URLs set as your homepage, startup page, or new-tab page so unwanted landing pages cannot return automatically.
To finish tightening things up, turn off themes you do not need and switch back to the browser’s Default theme to rule out theme-based scripts being loaded between sessions.
To strengthen your setup further, enable two-factor authentication (2FA) on important accounts, keep both the browser and its extensions on automatic updates, and periodically export your bookmarks so you can safely use a full Reset settings if any traces of Api-microservice-us1.com appear again.