If every time you open Chrome and search for something, it redirects you to a website you never expected or If you’ve recently been hit with sudden “Norton” or “McAfee” malware alerts popping up at the corner of your screen, Nextgeeker.com is the culprit behind it, considering you reached this page. Nextgeeker.com is a malware that sneaks into your system and begins impersonating brands to make you think something is wrong. Other hijackers of this type, such as Probe-portal.com and s3-updatehub.cc, pull the same stunt, bombarding users with alarming pop-ups and redirecting searches to shady pages. Nextgeeker.com uses these tactics to redirect or to push scam sites and low-quality software your way to harvest your details. The alerts aren’t real, but the risk definitely is – since all of the stuff can lead to more malware, and the cascading effect just goes on.
We tested that SpyHunter successfully removes Nextgeeker.com* and we recommend using it. It will block Nextgeeker.com from reinstalling itself and it will make sure your device is clean from any malware.
Buy now15% OFF if you buy straight without trial.
Nextgeeker.com Removal Tutorial
Work slowly and verify each change to avoid backtracking caused by Nextgeeker.com. Make one adjustment, confirm the effect, and keep brief notes so you can reverse anything if needed. This approach stops recurring prompts and redirects and reduces the chance of restoring unwanted settings during cleanup.
Fast Actions to Undo Nextgeeker.com Browser Changes
- 1.1Open Settings in your browser to start undoing changes made by Nextgeeker.com.
In Chrome, open the ⋮ menu (top-right). In Firefox, use the ≡ menu.
Open Extensions or Add-ons, review each entry, and note anything unfamiliar for later checks. - 1.2Review every extension: verify the name, icon, requested permissions, and full description.
Imitators mimic popular add-ons – choose Remove when details don’t match.
Unsure? Search the exact “extension name” to confirm the vendor and user reports. - 1.3Open Privacy and security, then Site permissions.
Check access to your microphone, camera, location, and notifications.
Disable items you don’t remember approving and keep a short list so valid ones can be restored later. - 1.4Remove site entries with privileges you never intended under Site permissions.
This cuts off repeated prompts, alerts, and launch-time redirects.
When finished, restart the browser to apply changes and confirm nothing reverted.
If pop-ups and redirects have stopped here, you can wrap up. If they continue, components outside the browser may be enforcing policies. Proceed to locate and remove the remaining pieces without extra changes.
SUMMARY:
| Name | Nextgeeker.com |
| Type | Browser Hijacker |
| Detection Tool |
Some threats reinstall themselves if you don’t delete their core files. We recommend downloading SpyHunter to remove harmful programs for you. This may save you hours and ensure you don’t harm your system by deleting the wrong files. |
How to Remove the Nextgeeker.com Virus
When the banner says “Managed by your organization,” a policy is forcing startup and configuration values that a standard reset won’t touch. Follow the steps below to find and remove that control so Nextgeeker.com can’t restore its preferences. Confirm each change and keep brief notes for checks after reboot.

1. Find Active Nextgeeker.com Browser Policies
- 1.1
 Open the browser policy page to spot entries tied to Nextgeeker.com.
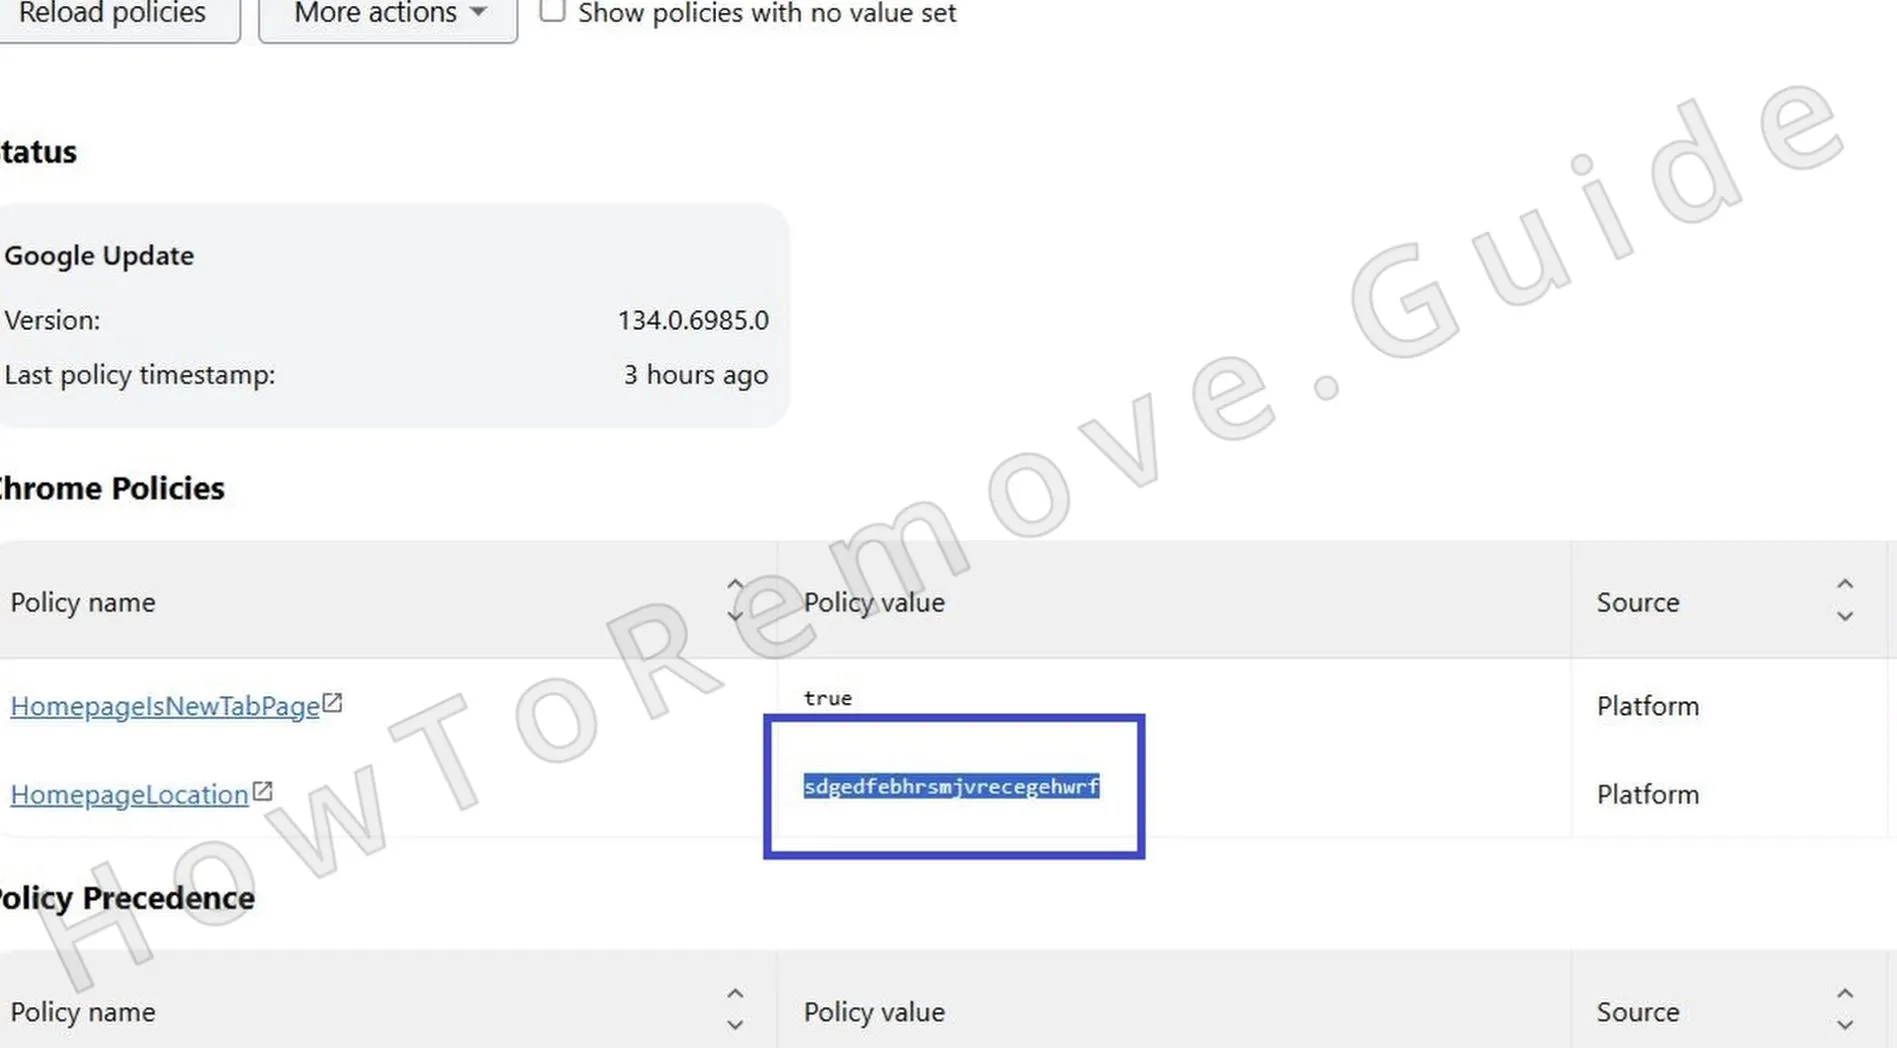
In Chrome: chrome://policy
In Edge: edge://policy
Wait for the list to load, check unusual items, and use Reload policies to refresh or export for comparison. - 1.2Inspect each policy and look for odd identifiers or random strings.
Write down suspect entries so you can match files and folders later.
Record the exact policy Name and Value; these often map to storage paths you’ll remove. - 1.3Open the browser’s Extensions page and enable Developer mode with the top-right toggle.
This reveals extension IDs and install paths for manual cleanup.
Copy each suspect ID into a text file to cross-reference directories later. - 1.4If the Extensions page is blocked or unresponsive, open File Explorer instead.
Review browser files directly to bypass interface issues.
Turn on View > Show > Hidden items so AppData profile folders are visible. - 1.5
 Use File Explorer to open:
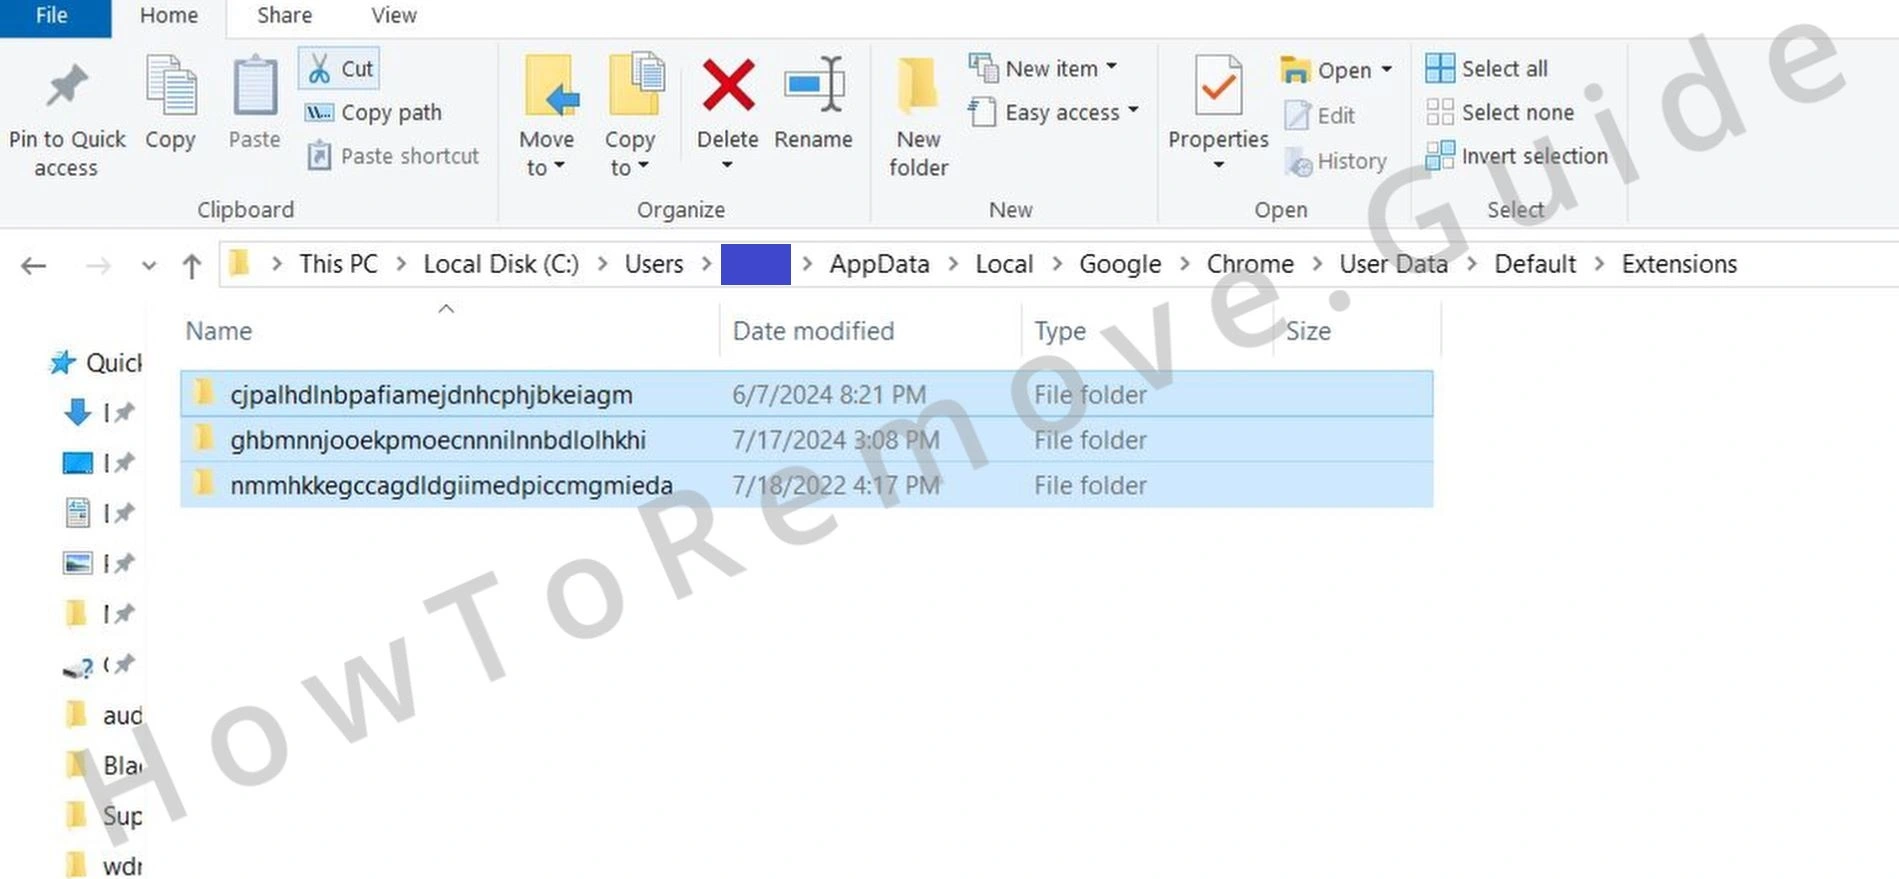
C:\Users[Your Username]\AppData\Local\Google\Chrome\User Data\Default\Extensions
Each folder name is an extension ID. Compare IDs with your notes to locate the unwanted add-on. Avoid deleting legitimate entries. Create a temporary desktop backup before deleting to prevent mistakes. - 1.6
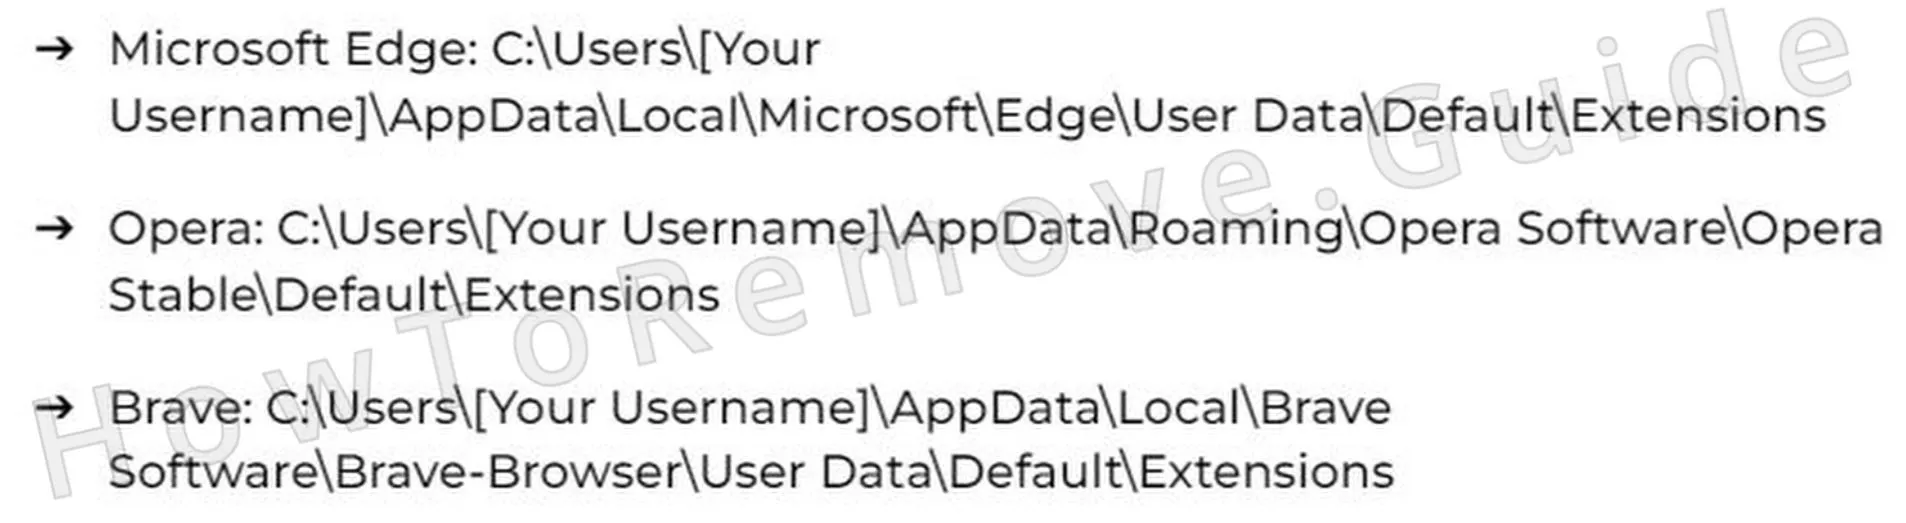 Using another Chromium-based browser such as Brave or Opera? Its extensions live under a similar path in AppData.
Confirm the extension ID and location before deleting any folder tied to the unwanted add-on.
Check the browser’s About page to ensure it’s fully closed so files unlock for deletion. - 1.7After removing the suspect folder, return to Extensions with Developer mode still enabled.
Confirm it’s gone. If it remains, delete it again and look for leftovers that can re-enable it.
Use Update in Developer mode to refresh and expose stealth reinstalls.
Get Rid of Nextgeeker.com Policies
Some policy data lives in the Windows Registry, where broad edits can cause issues. Target only keys tied to Nextgeeker.com and avoid sweeping changes unless you’re comfortable with registry maintenance. This removes enforcement that survives normal browser resets while keeping Windows stable.
2. Delete Nextgeeker.com Policy Keys in the Registry
- 2.1Press Win + R, type regedit, and press Enter to open Registry Editor and start removing Nextgeeker.com policy traces.
Before editing, open File > Export to create a backup.
Choose All under Export range and save it to Documents or another easy location. - 2.2Use Ctrl + F or Edit > Find to search for recorded policy names or extension IDs.
Click Find Next and remove exact matches in relevant keys.
Press F3 repeatedly until nothing remains in the HKCU and HKLM hives. - 2.3
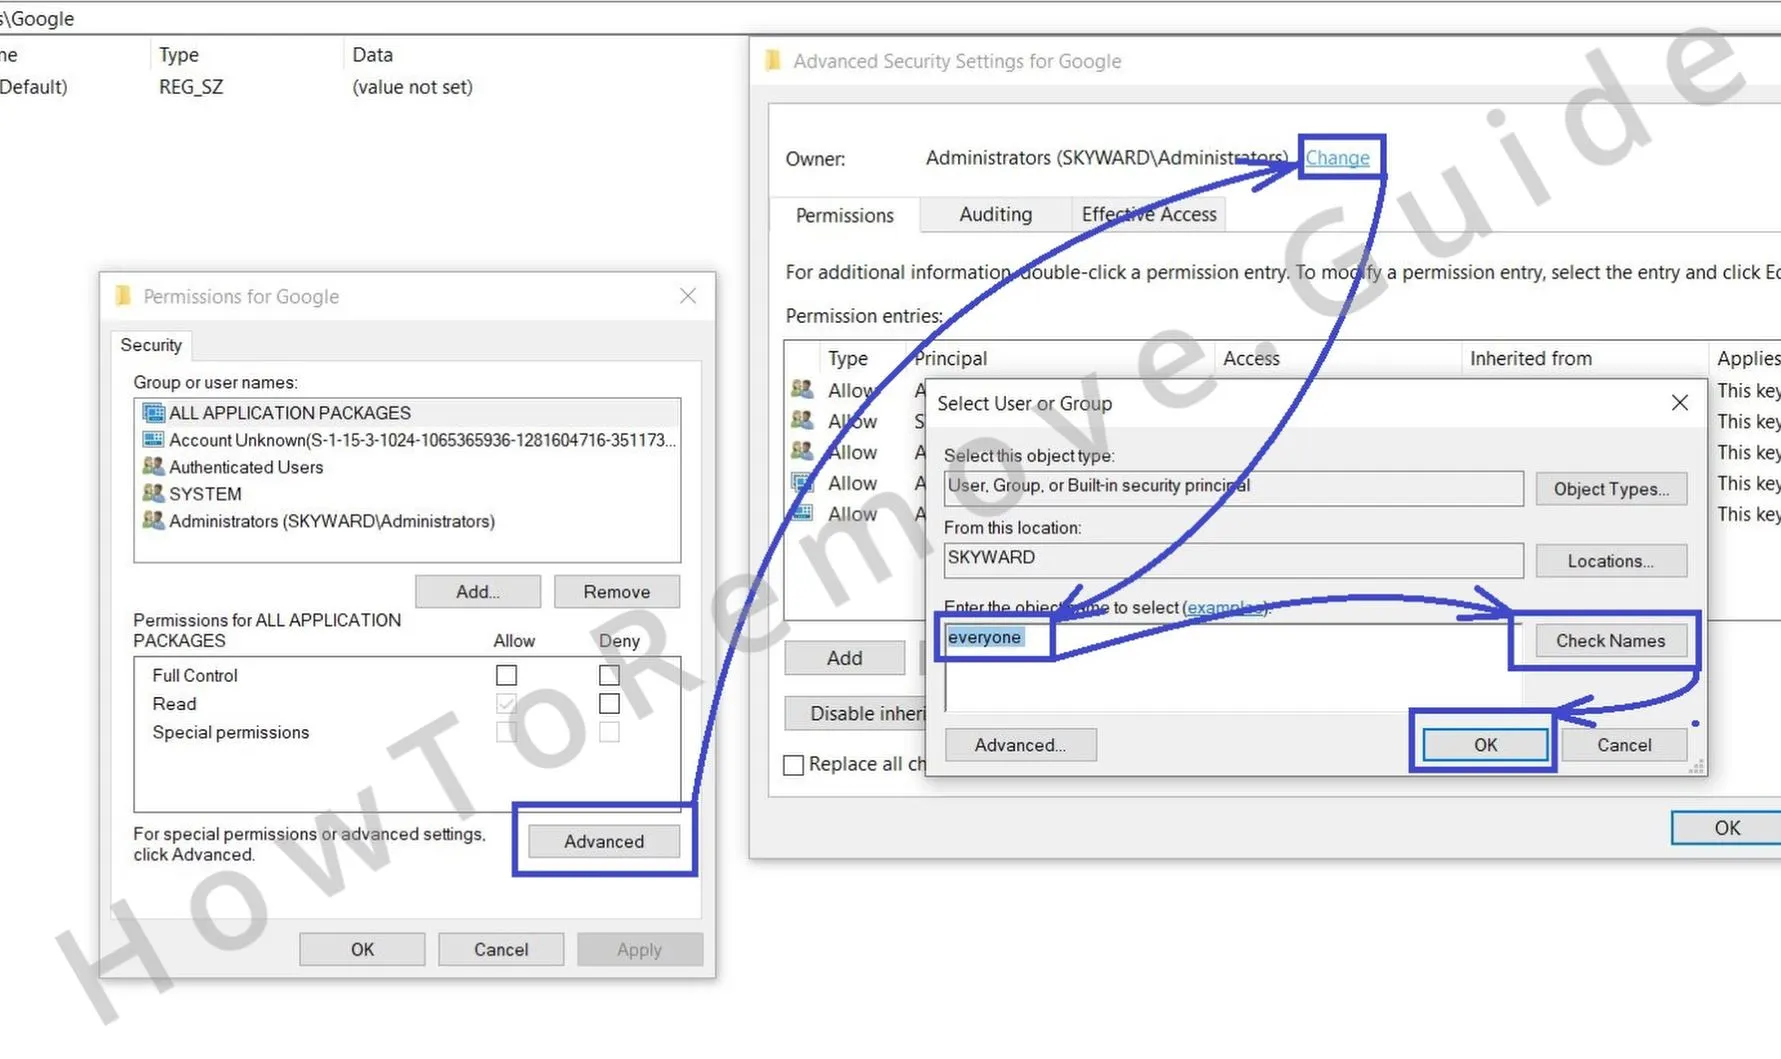 If a key can’t be deleted, right-click it and choose Permissions, then Advanced.
Under Owner, click Change, type Everyone, select Check Names, and confirm with OK.
Grant Full Control to Administrators and Users so the key and subkeys can be removed. - 2.4
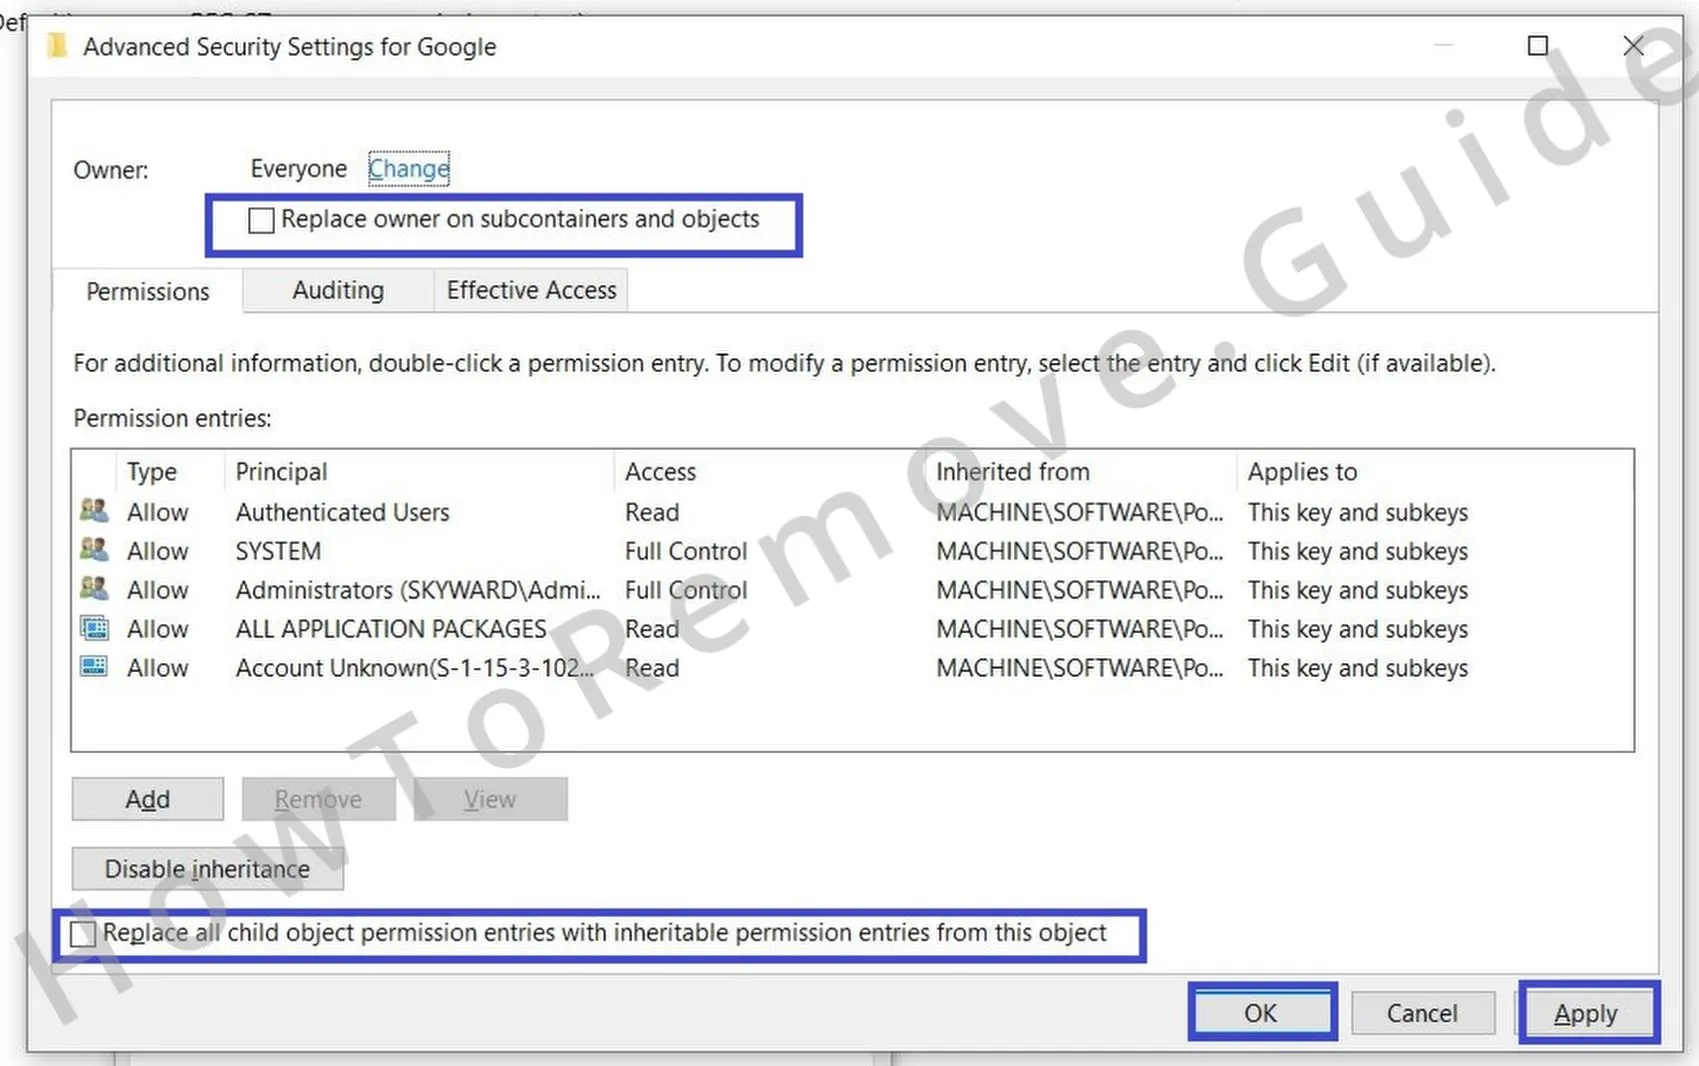 After taking ownership, enable Replace owner on subcontainers and objects and Replace all child object permission entries.
Click Apply, then OK. Reboot and check whether Managed by your organization still appears.
When clear, reopen regedit and repeat searches to confirm no policy values returned.
After you correct ownership and permissions, stubborn keys can be deleted cleanly. This lowers the chance of policy data returning at next boot and prevents settings from being reapplied without consent, reducing the window for Nextgeeker.com to influence your browser again.
Alternative Tools to Delete Nextgeeker.com Enforced Policies
Sometimes a leftover service or scheduled task reasserts configuration rules after cleanup. Use focused utilities and policy consoles to remove final traces connected to Nextgeeker.com without broad system changes. Apply these if the managed banner or forced settings come back following a restart.
3. Additional Ways to Remove Nextgeeker.com Enforced Policies
- 3.1
 Open Group Policy Editor with Win + S, search Edit Group Policy, and review entries that could enforce settings for Nextgeeker.com.
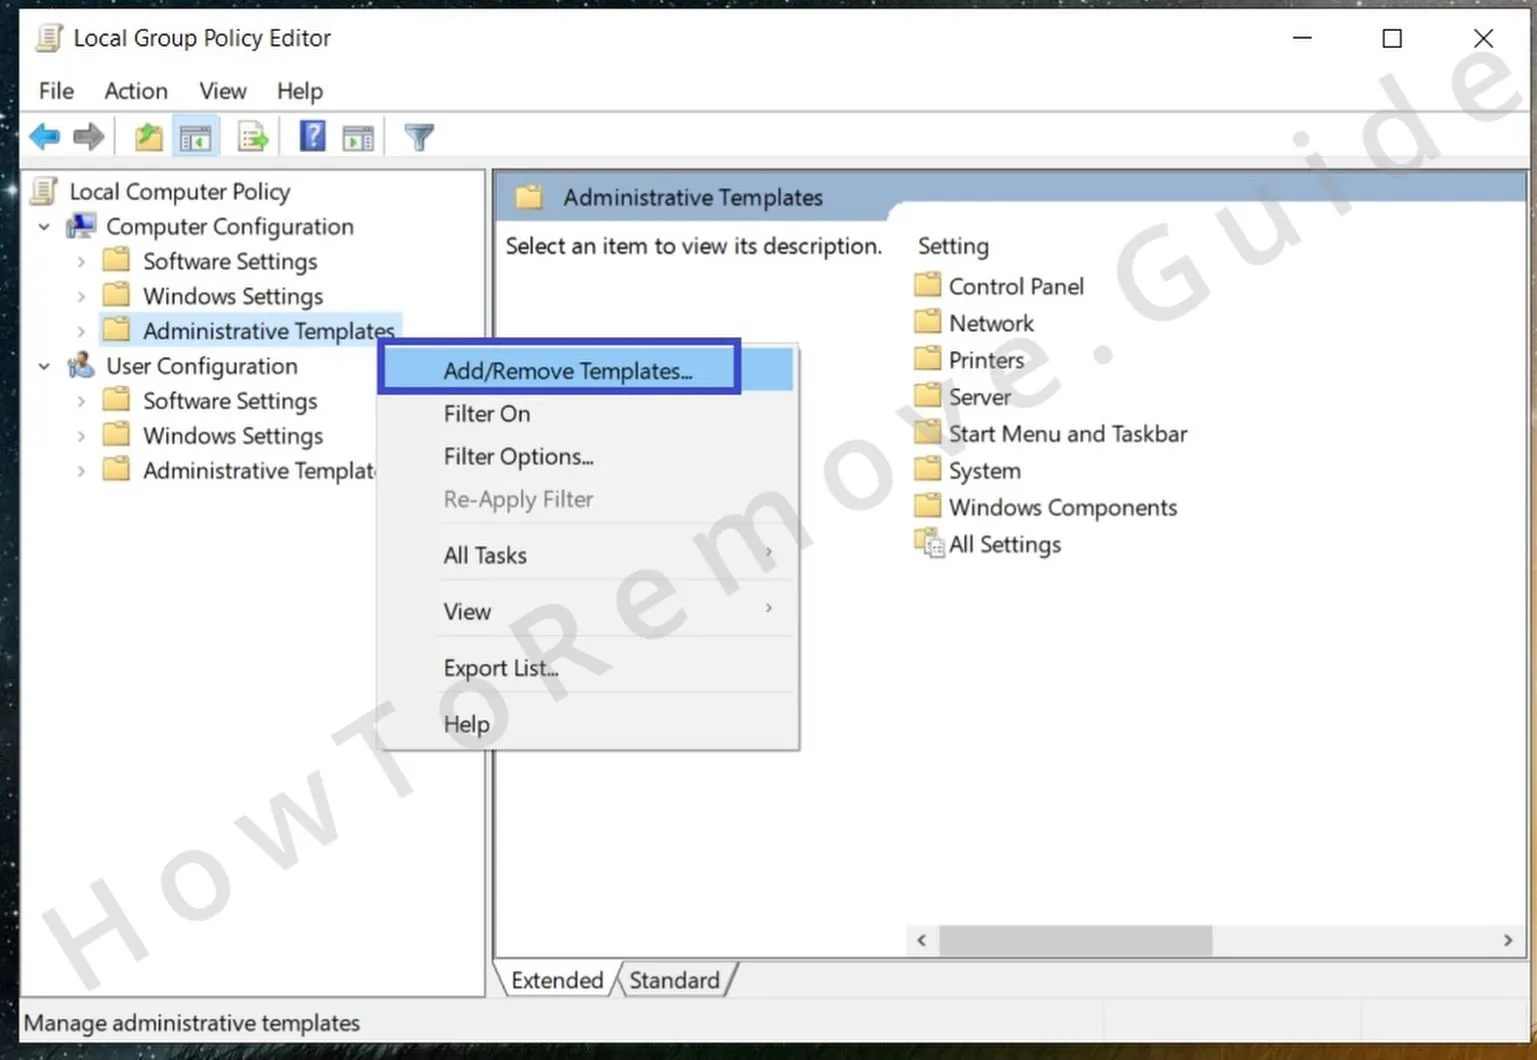
In the left pane, expand Administrative Templates where browser rules are often defined.
Check both Computer Configuration and User Configuration to cover device-wide and per-user scopes. - 3.2
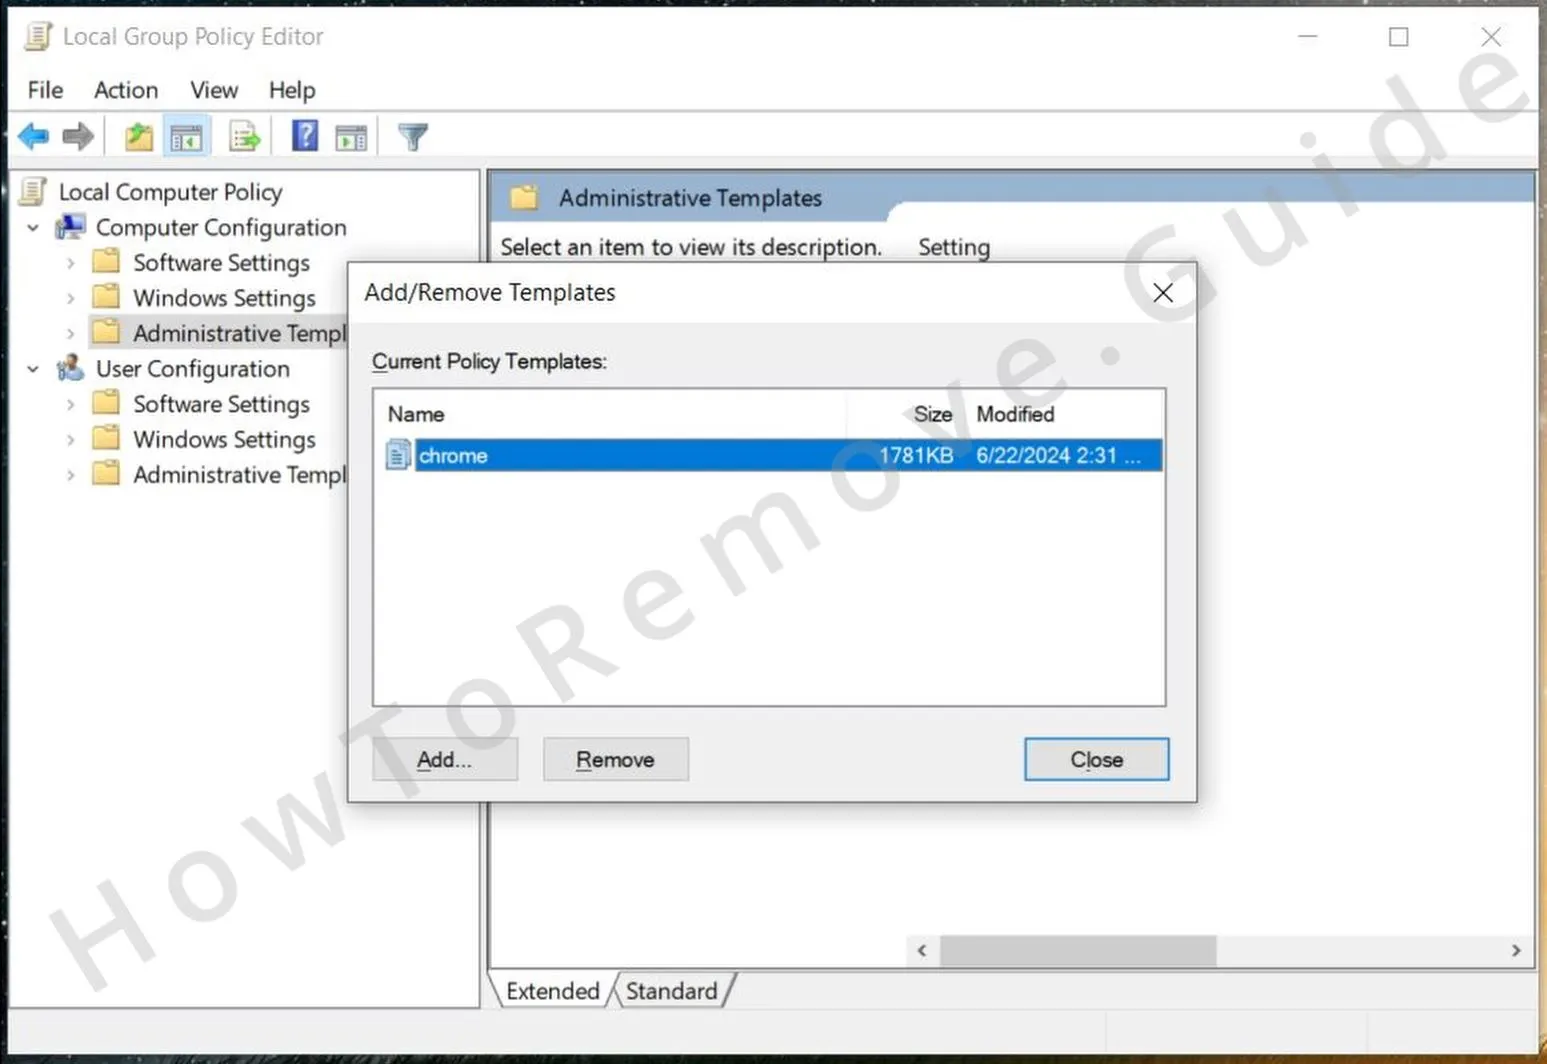 Right-click Administrative Templates and choose Add/Remove Templates.
Remove templates you didn’t add to roll back restrictions on browser or system behavior.
Then review Policy states under Windows Components for Microsoft Edge or Google Chrome and set unwanted entries to Not Configured. - 3.3For Chrome, the standalone Chrome Policy Remover can detect and delete hidden policy files.
Download from a trusted source, then right-click the executable and choose Run as administrator so it has the required rights.
Open chrome://policy afterward and press Reload policies to confirm only expected items remain. - 3.4If security software or Windows Defender warns about the utility, select More info then Run anyway only when you trust the source.
When the tool finishes, restart the system and review Group Policy Editor and Registry Editor again to ensure policies are gone.
Also check Task Scheduler under Task Scheduler Library for jobs that might restore settings automatically.
Uninstall Nextgeeker.com From Chrome, Edge, and Other Browsers
Sync, profiles, and cached items can quietly restore altered settings after sign-in or reboot. Confirm changes persist across sessions so Nextgeeker.com doesn’t return. Recheck defaults, permissions, and extensions for each profile to ensure nothing is being pulled from cloud sync or background tasks.
4. Clear Residual Browser Changes from Nextgeeker.com
- 4.1Open your browser’s Extensions or Add-ons page and rescan for items linked to Nextgeeker.com.
If something reappears or looks suspicious, click Remove – sync or a background script may reinstall components.
Open chrome://extensions or the equivalent page directly to avoid themed pages that could hide entries. - 4.2
 Open Clear browsing data from Settings. Set Time range to All time and select everything except Saved passwords.
Choose Clear data to remove cookies, cache, and other items that trigger pop-ups or redirects.
Repeat for each profile and enable Clear data on exit if quick reinfection attempts persist. - 4.3
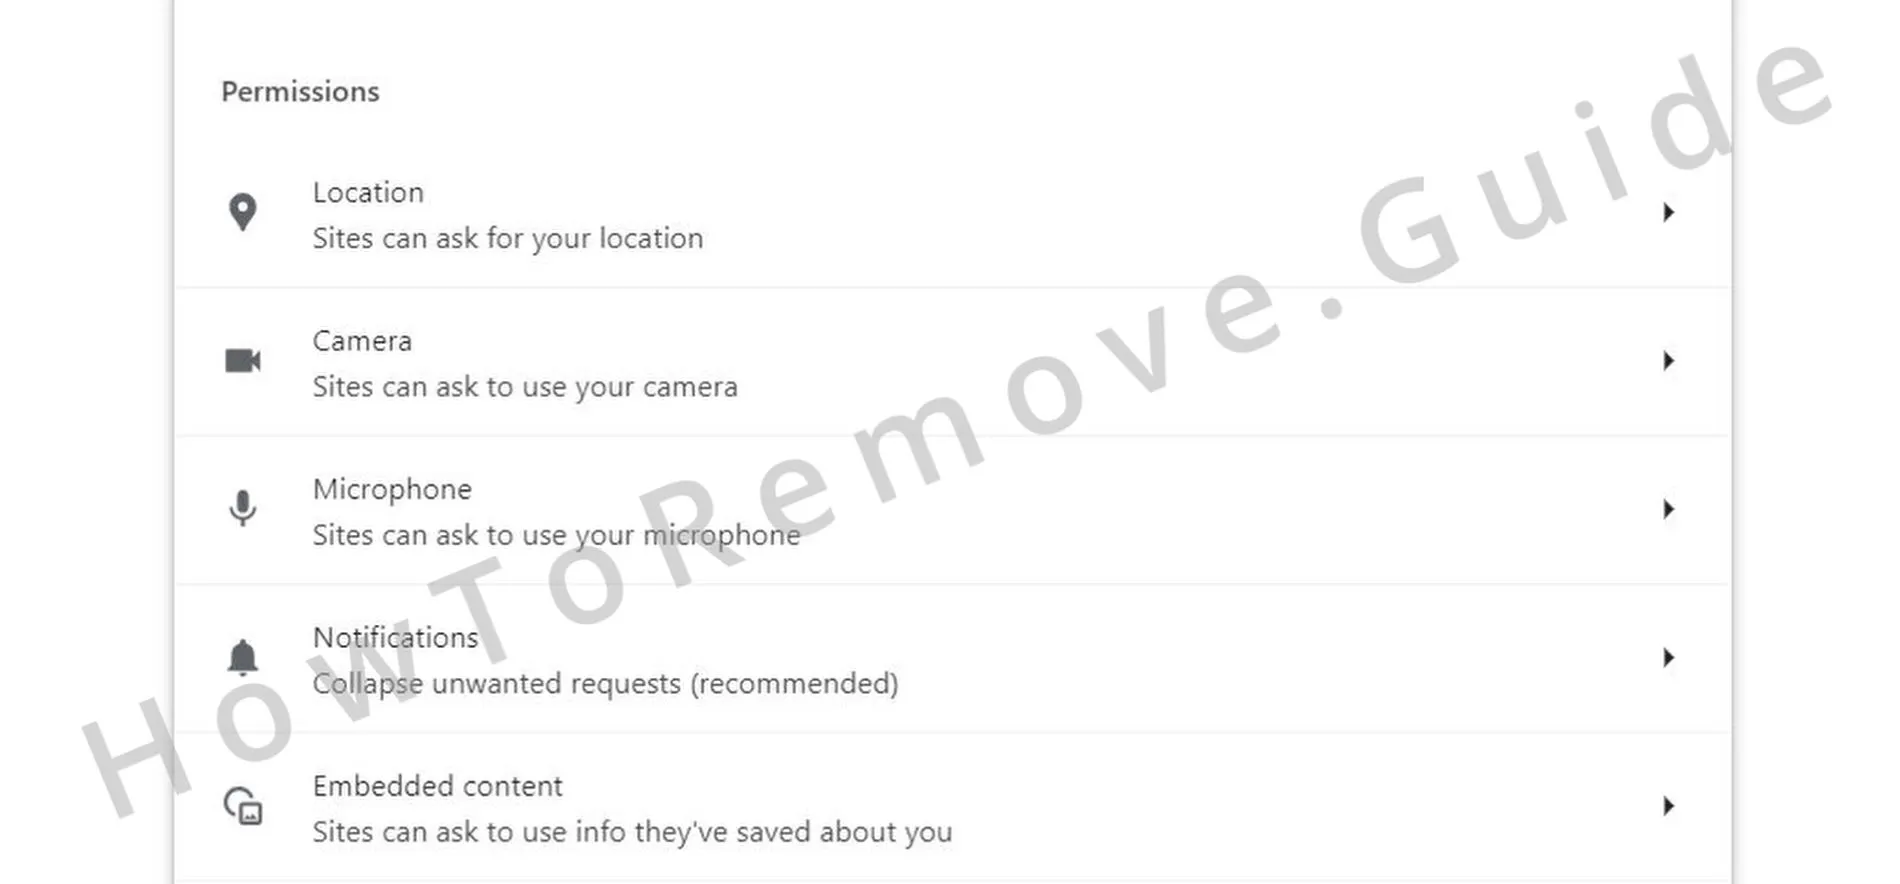 Go to Privacy and Security > Site settings.
Review permissions for camera, microphone, and notifications. Delete or Block any site you didn’t approve.
Open View permissions and data stored across sites to remove problematic origins in bulk. - 4.4
 Open Search engine settings and choose Manage search engines.
Remove unknown entries and ensure the default is Google, Bing, or DuckDuckGo.
Also review On-device search shortcuts or Site search where hijackers often add persistent custom entries. - 4.5Check On startup and Appearance.
Remove unfamiliar URLs set as your homepage or new tab page so the hijacker can’t reassert itself via custom pages.
Finally, disable unwanted themes and restore the Default theme to rule out theme-based script injections between sessions.
Want to harden the setup further? Enable 2FA for important accounts, keep browser and extension auto-update enabled, and export bookmarks before attempting a full Reset settings if symptoms return.