Why Windows 10 does not connect to Wi-Fi Automatically?
Many Windows 10 users are facing issues with their computers because they don’t connect to the saved Wi-Fi networks automatically despite that the “Connect automatically” option is enabled. The reason for this issue might be either a Windows 10 update, which may cause the computer to turn its Wi-Fi off, some power saver options, an unplugged LAN or a simple glitch, which may need a quick fix. Luckily, on this page, we can offer you some solutions, which can be used to fix the problem with your Windows 10 Wi-Fi not connecting automatically.
How to Make Your Wi-Fi Connect Automatically on Windows 10
Fix 1: Re-connect to your Wi-Fi network
A simple solution to the “Windows 10 Wi-Fi not connecting automatically” issue could be to forget the Wi-Fi network and reconnect again. For that click on the Wi-Fi icon in the taskbar, then select Network Settings. Navigate to Wireless Network Connection section and choose Manage Wi-Fi Settings. Then from Manage Known Networks, select the name of your wireless network and choose “Forget”. Next, restart your PC, click on the Wi-Fi icon from the taskbar, choose the name of your network and ensure that you check the “Connect automatically” checkbox. Then click “Connect” and add your password. The PC should then automatically connect to the Wi-Fi the next time you start it.
Fix 2: Adjust power saver options to stop your Windows 10 PC from turning off Wi-Fi adapter.
If after a Windows 10 update or some other system builds and power options the PC doesn’t connect automatically, give a try to this:
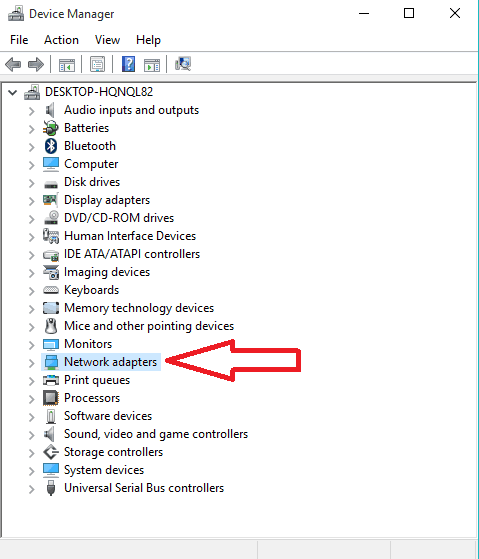
- Right click on the Start button and click on Device manager.

- Click twice on the Network adapters section to expand it.
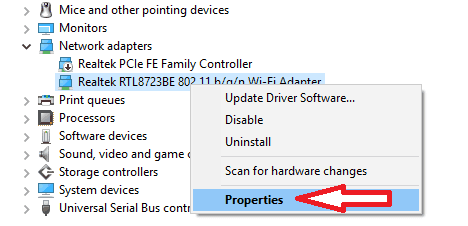
- Select your computer’s WiFi adapter from the list that appears and then right click on it. From the right click menu, select “Properties”.
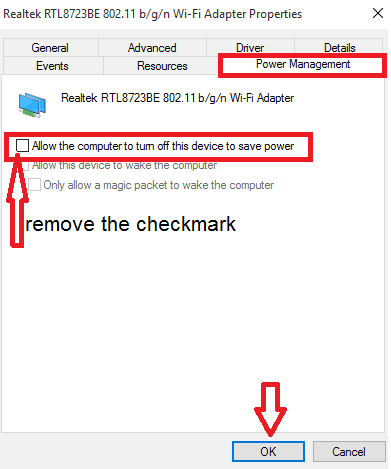
- A dialog box will appear where you have to click on the Power management and uncheck the “Allow this computer to turn off this device to save power”.
- Click on OK and when the changes are saved, your computer should start connecting automatically to Wi-Fi as soon as it wakes up from a sleep, a shutdown, r a restart.
Fix 3: Edit or create Group Policy via Registry Editor
This action works on both Windows 8/8.1 and 10 and allows you to connect automatically to wireless network, even when a LAN is plugged in. Here is how to do it:
- Hold the Windows Key and Press R.
- Type “regedit” in the “run” dialog and click OK.
- Navigate to the following path in Registry Editor –
HKLM\Software\Policies\Microsoft\Windows\WcmSvc\
- Check if a GroupPolicy subkey exists
- If not, right click on WcmSvc with WcmSvc highlighted and Choose New -> Key and name it GroupPolicy.
- Next, click GroupPolicy and then in the right pane, (right-click) and choose New -> DWORD (32-bit) and create value.
- Name it as fMinimizeConnections and Click OK.
- Finally restart the PC and see if the issue is fixed.
Fix 4: Run the Network Troubleshooter
The Windows Troubleshooter is a helpful tool, which analyzes your Wi-Fi hardware and checks the connectivity to the Internet by accessing the Microsoft’s servers. In case of issues, it will notify you and will offer to fix them automatically. In many cases, this solves the network connecting problem if the users were not able to connect to the Wi-Fi when they started their computer. To start the Troubleshoot, do the following:
- Right-click on your Wi-Fi icon and select “Troubleshoot problems”.
- Let the diagnostics complete and follow the suggested instructions.

Fix 5: Disable Microsoft Wi-Fi Direct Virtual Adapter
The Microsoft Wi-Fi Direct Virtual Adapter is a feature, designed and installed on your PC to support sharing of your Internet connection (such as a portable hotspot). By disabling this function, we can try to fix the problem with Windows 10 not connecting to Wi-Fi automatically.
- Hold the Windows button + R to launch the “Run” application.
- In the dialogue box type “msc” and press Enter.
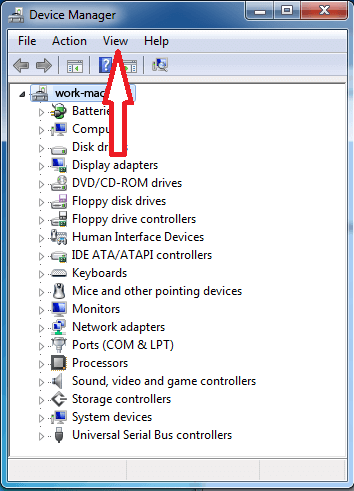
- The device manager will open where you have to click on “View” and select “Show hidden devices”.
- Open the category “Network adapters”.
- Navigate the entry “Microsoft Wi-Fi Direct Virtual Adapter”.
- Right-click it and then select “Disable device”.
- Finally, restart your computer and see if the problem is fixed.
Warning: Keep in mind that disabling this function may not let you use the mobile hotspot feature in Windows 10 by default. If his fix does not solve the problem with the Wi-Fi connection, then you can always enable the “Microsoft Wi-Fi Direct Virtual Adapter” back using the same steps.
I have a Toshiba laptop that got the same problem with auto wifi connect. Nothing I had read worked. But I found a old fix for a Dell not connecting via wifi that worked for me.
You right click on ‘start’ at the lower left of your screen. Then click on ‘device manager’. Under ‘device manager’ go to ‘network adapters’. Find the wifi driver, in my case Intel Dual Wireless. Right click on the wiri driver then click on ‘properties’ In ‘properties’ click on the ‘advanced tab’. This will give you a list under property. Find ‘Channel Width’, I have two one for 2.4GHz and the other for 5GHZ. Left click on ‘Channel Width’ and Value: to the right will say ‘auto’ Change it to ’20 MHz Only’ for 2.4GHz and 5GHz.
This fixed my auto wifi connect problem.
This worked for me on an HP Elitebook running Windows 10! Thanks!
Awesome.. My lenovo g500s with Win8.1 got fixed by this
This worked for my HP laptop too. The other stuff didn’t work at all.
Great, thanks.
holy moly, this works brilliantly. but i have to observe for a couple of days if this meant a cure for a long-term. thanks pat. i usually don’t believe these things being thrown in the internet, but this one rocks! all the way from Philippines!
Tried your solution PAT. Let’s see if it works.
Thanks the connection for wifi with Lan on Reboot was driving me crazy. The regedit Fix number 3. Worked for me.
WORK!
These suggestions did not work for me.
I tried all above, and nothing helped.
All of the above didn’t work until I investigated ‘Pat’ s contribution, cured the problem.
System/Device Manager/Network adapters/”The specific adapter to my network(Intel)”/Properties/Advanced/System Idle Power Saver/Enable.
By enabling the ‘System Idle Power Saver’ the automatic link to connecting to the web when powering-up was restored.
Update on the above. I still have to manually connect to the internet when the pc boots up from cold but the internet connecton remains when the pc wakes from sleep.
Thank you! Fix 2 did the trick.
my internet is not connected
Hi Ona Boyce,
can you be more specific? Did you go through the whole guide?