If you are getting an annoying error message on your Windows PC with a label Failed to connect to a windows service, there could be several different causes why this might be appearing on your screen. Depending on the exact problem responsible for the appearance of the error, there are a number of different methods you can try as means of solving it. Below, we will give you instructions for the most commonly used and most effective troubleshooting solutions that you can employ in order to resolve the error.
The fix methods below have been presented to you from the simplest to the most complicated so we advise you to complete them in that order so that, for example, you won’t have to go through the advanced and complicated fix that uses the Registry Editor if you can take care of the issue by simply running the Sfc /scannow command or by resetting your Winsock catalog.
Failed to Connect to а Windows Service Windows 7/10 Fix
Fix 1: Sfc /scannow
Many errors you could face in Windows including the Failed to connect to windows service might be caused by damaged or corrupted system files. In many of the cases, the sfc /scannow command should be able to repair any potentially damaged/corrupt system data:
- Open an elevated command prompt window by typing cmd in the Start Menu search box, right-clicking on the first icon and selecting the button labeled Run as Administrator.
- In the new window that opens, type this command: sfc /scannow. Make sure to type it exactly as shown.
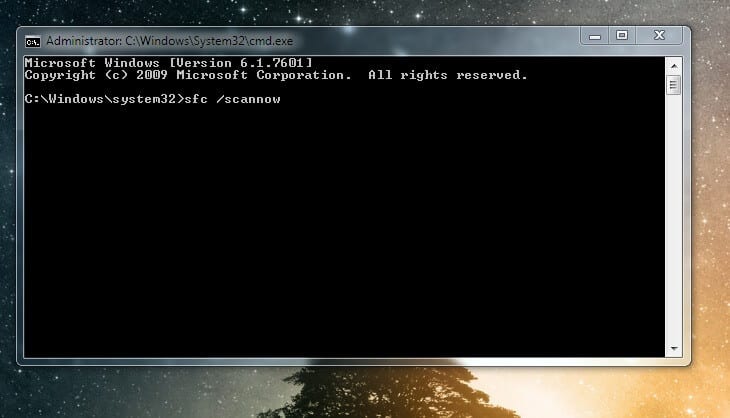
- Hit Enter and wait until the process is finished – make sure you do not interrupt the scan in any way.
- Restarts the computer – if the error still shows up, try any of the next methods.
Fix 2: Reset Winsock catalog
- Open an elevated command prompt. (see Step 1 from Fix 1: Sfc /scannow)
- Type in the netsh winsock reset command.
- Hit Enter and after the process completes, restart the computer to see if the error is fixed.
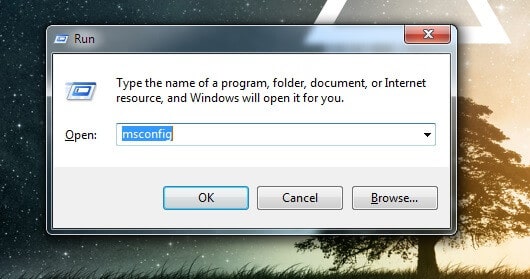
Fix 3: Clean boot up
- Open the Run search box through the use of the Winkey+R key combination.
- Type msconfig in the search field and press the Enter key.
- Click on the Service tab and then check the Hide all Microsoft services.
- Now, click on Disable all.
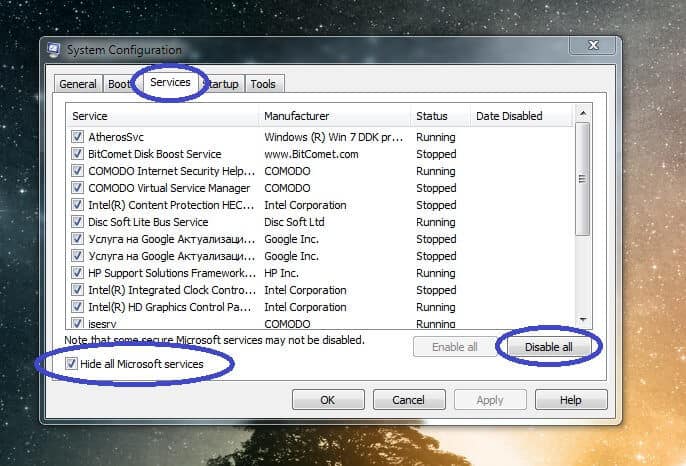
- Next, go to the Startup tab and disable all of the services there as well. For Windows 8/8.1/10 users, the Startup services can be found in the Task Manager (you can open the Task Manager through the Ctrl+Shift+Esc keyboard combination).

- Click on OK to apply and save the changes you’ve just made.
- Restart the machine – if the issue is gone, you can start re-enabling the services one-by-one, using the same steps in order to test which service might be responsible for the error.
- If the problem persists even with all non-Microsoft services disabled, then the issue is likely not coming from here and you can re-enable all services since it won’t make a difference if they are disabled.
Fix 4: Registry Editor
Usually, the main issue responsible for the Failed to connect to windows service error are missing Registry settings. Below, we will show you how to manually edit and add the necessary registry items that might be missing.
Warning: proceed with great caution – deleting or modifying a wrong registry key can lead to serious system issues!
- Press Winkey and R from the keyboard and type regedit in the search box that should open.
- Hit Enter and wait for the Registry Editor to load (Administrator permission might be required).
- In the Registry Editor, click on File and then select Export.
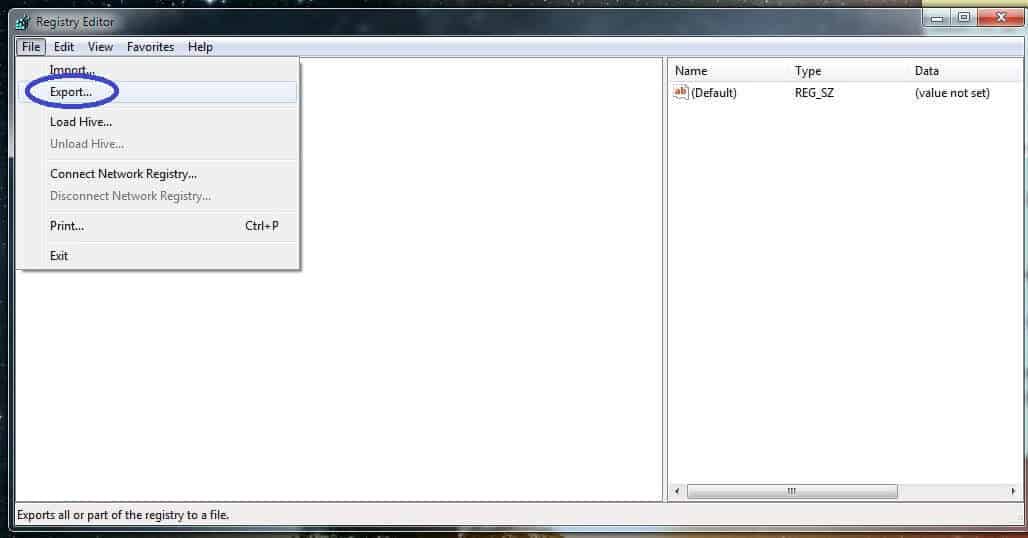
Type in a file name, for example Regedit Backup 1 since this file is going to be a backup of your registry settings in case anything goes wrong later and you need to restore your old registry settings. Select All at the Export range option and then save the file on your Desktop so that you remember where it’s located.

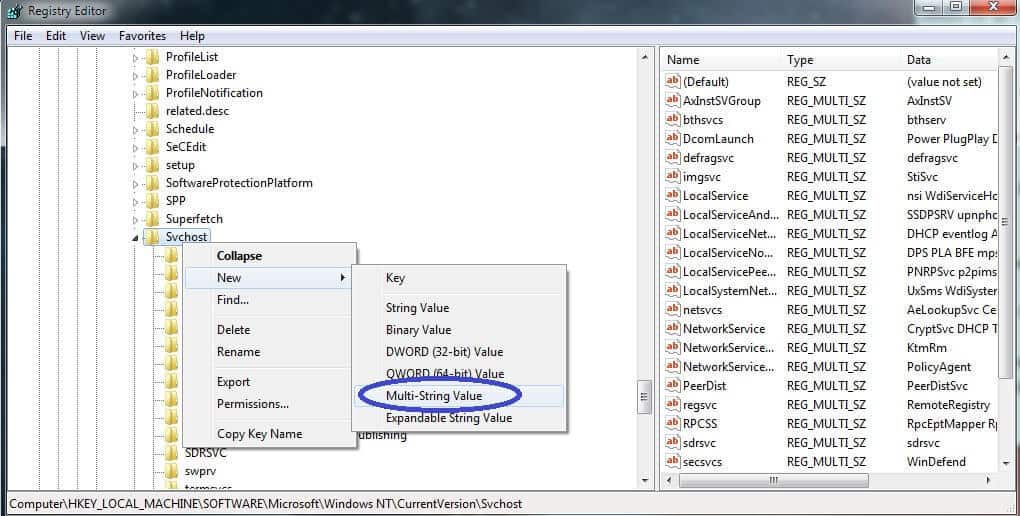
- In the left pane of the Registry Editor window, navigate to the following directory HKEY_LOCAL_MACHINE – SOFTWARE – Microsoft – Windows NT – CurrentVersion – SvcHost.
- Click on the SvcHost folder and look for an item (a string) in the right panel labeled GPSvcGroup. You will likely not find one – if that’s the case, continue with the remaining steps from this fix method.
- If you did not find GPSvcGroup, you will have to manually create it – right click on the SvcHost folder and hover the mouse over New. From the next menu, select the Multi-String Value option.
- A new string will appear in the list to the right – right-click on it and select Rename. Type in the name GPSvcGroup and hit the Enter button.
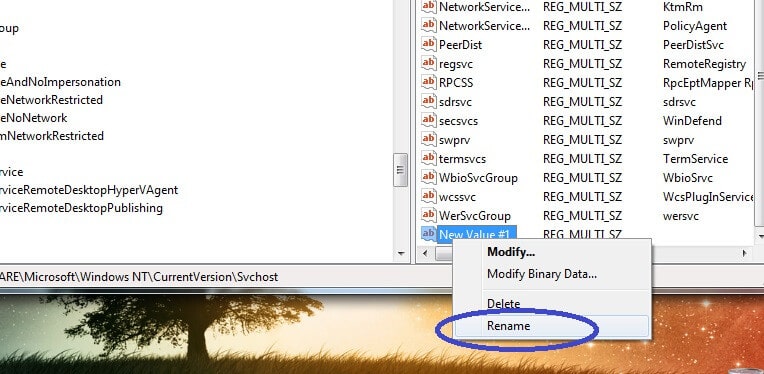
- Double-click on the GPSvcGroup string to modify it. Replace everything under Value data with GPSvc and select OK.

- Next, once again right-click on SvcHost folder and again go to New.
- From there, select Key to create a new key.
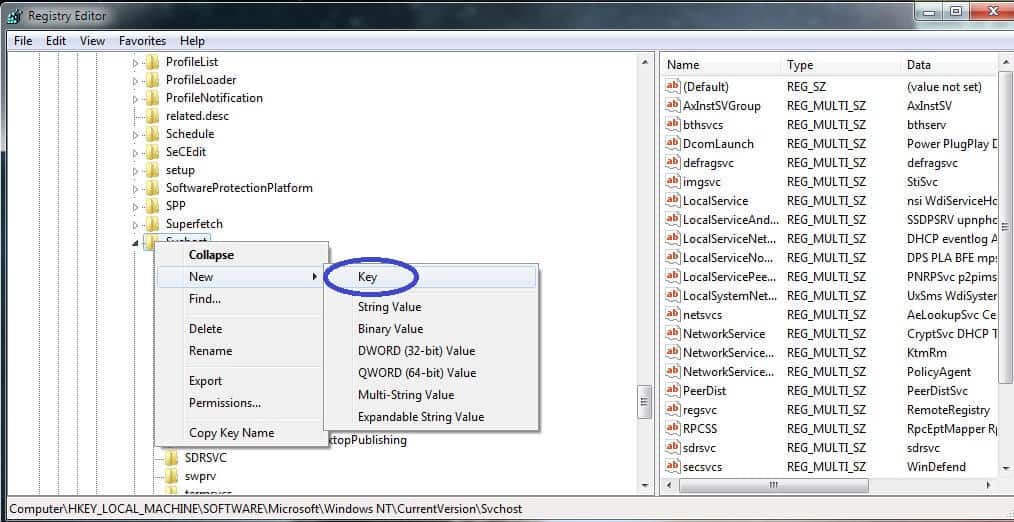
- Rename the key to GPSvcGroup.
- Click on the new key now named GPSvcGroup and right-click in the blank space in the right panel.
- Select New and then click on DWORD (32-bit) Value.
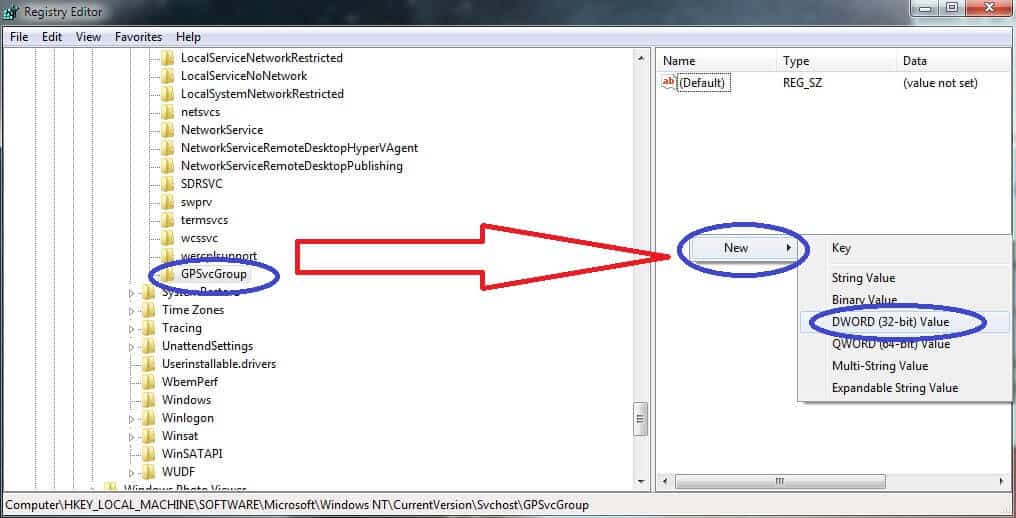
- Repeat Step 13 in order to create a second a second DWORD (32-bit) Value – there needs to be two of them in the GPSvcGroup key.
- Rename the first DWORD (32-bit) Value to AuthenticationCapabilities and set its Value data to 12320 (see Step 8). Also set its base to Decimal.
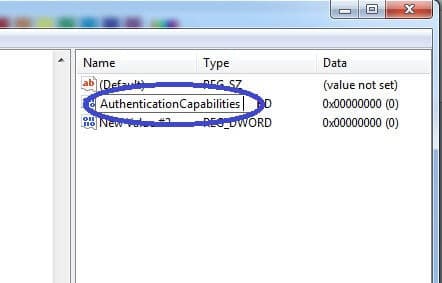
- Rename the second DWORD (32-bit) Value to CoInitializeSecurityParam – its Value data should be set to 1 and its base must be Decimal as well.
- Close the Registry Editor after you complete all of the previous steps and click OK on all the changes you’ve made.
- Restart the computer so that the changes could get applied and see if the error goes away. Try the following fix methods if the problem keeps occurring.
If you are having difficulty with any of the fixes (especially with the last one), we advise you to contact us through the comment section and tell us what you are unable to do. Once again, we must warn you that tinkering with the Registry Editor should only be done with the utmost care so that you do not accidentally delete or modify the wrong key or value as this could lead to all sorts of severe system issues which could only worsen the situation.
Leave a Reply