Introduction
This is a guide dedicated to helping users optimize and speed up their system in a (hopefully) dramatic fashion. All of the tweaks here are small nudges that pose no threat to the safety of your PC – they are 100% tested and safe. If you experience any problems at all with them, please feel free to contact us in the comment section below. We will respond to any issues as quickly as possible, because we want you to feel safe. There have been problems in the past with fake programs like PC Optimizer Pro, and we want to stray away from such things.
All of the tips from the guide below are basically windows functions that most people don’t know or don’t care about. You will not do anything that wasn’t already built in as an option. If I have to describe the picture in simple terms, basically you have a variety of functions that are turned on by default, but you don’t need some of them. Our aim here is to tell you which ones to turn off, and why.
Getting Ready
Now, just to make sure nothing goes wrong (and it shouldn’t) we will create a System Restore point. A System Restore point is a collection of settings and files that are saved so you can revert back to them if something happens to your system. Typically a restore point is made every time before Windows performs a major update. To create one yourself you need to do the following:
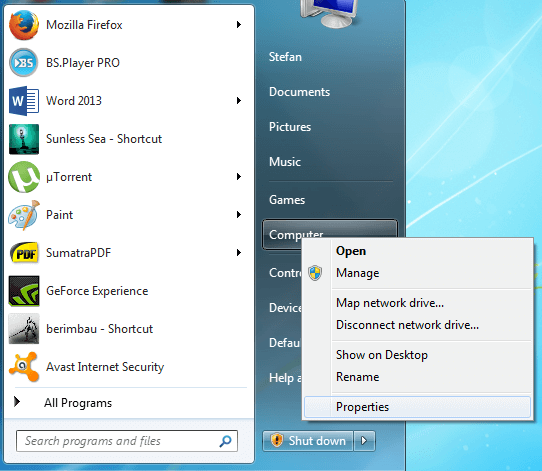
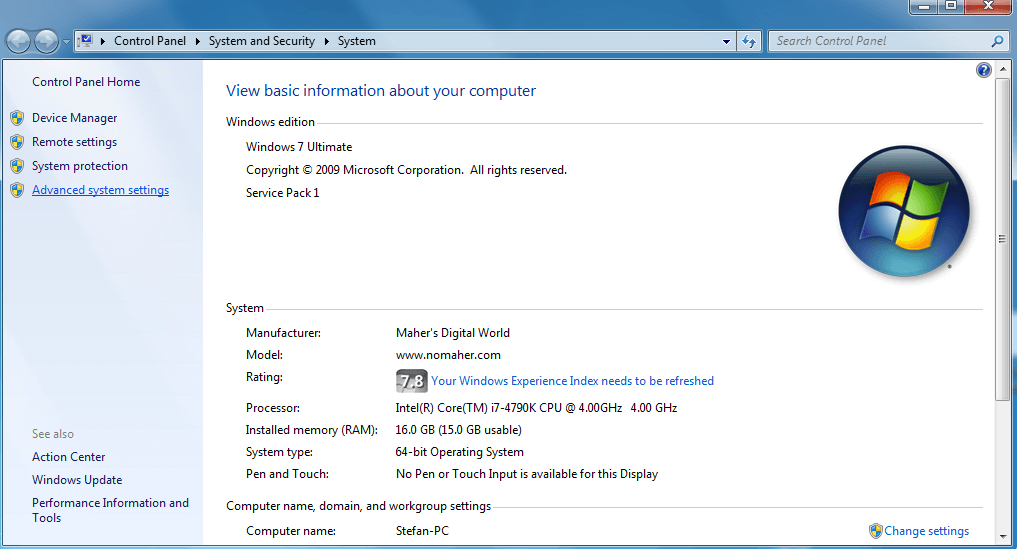
Click the ![]() key at the bottom left, then right click on Computer, then choose Properties.
key at the bottom left, then right click on Computer, then choose Properties.
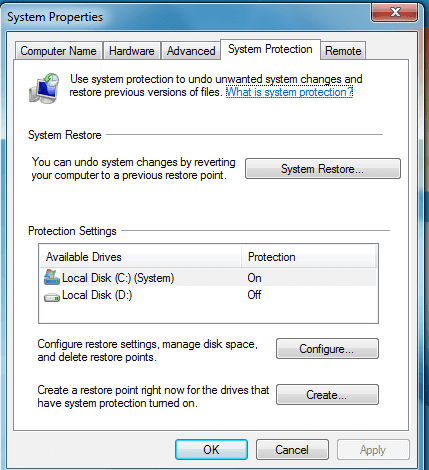
Once inside the Control Panel, there are 4 tabs on the upper left. Click on System Protection.

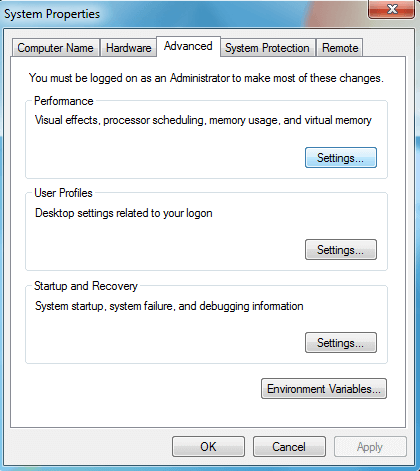
A new window called System Properties will pop-up, and it too has several tabs. You want System Protection. Once you’ve opened it, you will see a few options available. The one you need is a Create… button down the window. Click it, and type in whatever you want your restore point to be called (Before Optimization for example).
To access the restore point for later use, just click the ![]() key and type “System Restore” in the search field , then hit Enter. From then on it’s pretty easy, just click Next on the Setup, choose the restore point you created, continue, and voila, you’re done.
key and type “System Restore” in the search field , then hit Enter. From then on it’s pretty easy, just click Next on the Setup, choose the restore point you created, continue, and voila, you’re done.
The guide works for Windows XP, Windows 7, and Windows 8.
Optimization Guide
Tip Number 1:
First off, click the ![]() key at the bottom left, then type msconfig into the windows search box menu and hit Enter. In the new window that will appear, you should open the Boot tab, and click on Advanced Options directly below it.
key at the bottom left, then type msconfig into the windows search box menu and hit Enter. In the new window that will appear, you should open the Boot tab, and click on Advanced Options directly below it.
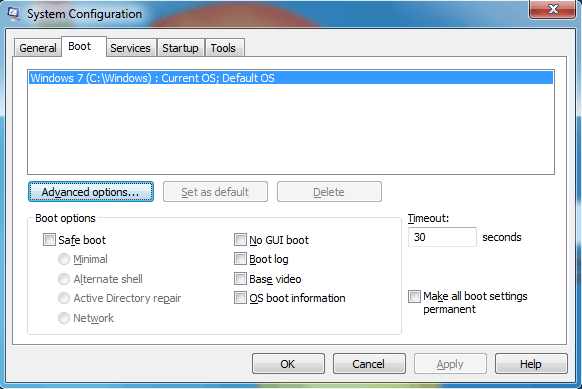
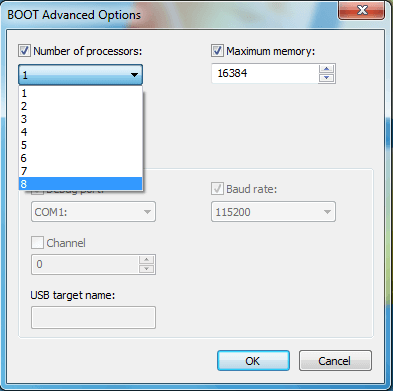
After you’ve opened Advanced Options, a smaller new window will appear. There are two checkboxes at the top – one for Number of Processors and One for Maximum Memory. You need to check both of them. Maximum Memory will automatically adjust – leave the number that will appear. Number of Processors however needs to be done manually – click on the number and a dropdown menu will appear. Choose the highest number available.
Once you are done click OK, and then back in the System Configuration menu, hit Apply.
Basically what you did just now is something I believe should be implemented in Windows by default. Windows doesn’t scan or keep track of how many processors or memory you PC has, so it uses a very low amount of each. If you have several cores on your PC (and let’s face it – as of 2015 everybody does) it will use just one for its normal everyday functions. With what you did, you tell Windows you’ve got more power and it’s okay to use it. Now, it will start walking on both legs, not just keep on jumping on one.
——————————————————————————–
Tip Number 2:
Click the ![]() key at the bottom left, then type msconfig into the windows search box menu and hit Enter. Thus far everything is the same as tip number 1. However, this time, choose Startup in the system configuration window. Restart when windows prompts you to do so.
key at the bottom left, then type msconfig into the windows search box menu and hit Enter. Thus far everything is the same as tip number 1. However, this time, choose Startup in the system configuration window. Restart when windows prompts you to do so.
In the checkbox menu that will appear, you should turn off any programs you are not actively using. Basically anything that doesn’t need to be started immediately after you turn on your PC. This is what the Startup menu does – mark the programs as ones that are not relevant enough to stay in the background all the time. If you have questions which programs are safe to turn off, feel free to leave a comment below. This should take a load off your system, since it doesn’t need to keep up with the activities of all your programs at all times.
——————————————————————————–
Tip Number 3:
Select the ![]() key at the bottom left, then once the menu appears right click on Computer, then choose Properties.
key at the bottom left, then once the menu appears right click on Computer, then choose Properties.
From there you need to click Advanced System Settings on the left, and then click on Settings at the side of Performance in the new window.
The default Settings for this new window should place you under “Adjust For Best Appearance.” What you need to do is first click “Adjust For Best Performance” then click Custom. Basically you needed to uncheck all the boxes, but a few, and when you choose “Adjust For Best Performance”, it unchecks everything. It’s too annoying to uncheck everything manually. Now, the next step is to check just a few of the functions. At the end your performance options should look like this:
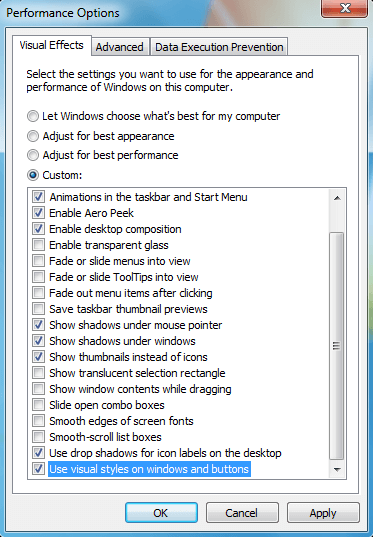
After that just click Apply.
What you did just now, is deactivate a bunch of small visual animations, because put together, they have a negative effect on your PC’s performance. If you don’t like the new settings, or if there isn’t much of an effect overall, experiment with the settings to find what suits you. Tweaking these is absolutely safe, practically nothing can go wrong.
——————————————————————————–
Tip Number 4:
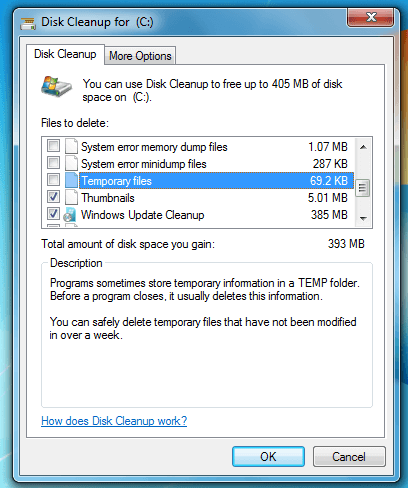
This one is pretty easy to do. Click the ![]() key at the bottom left, then click on Computer. Once My Computer opens up, right click on the disk your Windows is located on (probably C:), and hit Properties. There is something called Disk Cleanup in the window that will appear. Click it and wait for the computer to read all the data.
key at the bottom left, then click on Computer. Once My Computer opens up, right click on the disk your Windows is located on (probably C:), and hit Properties. There is something called Disk Cleanup in the window that will appear. Click it and wait for the computer to read all the data.
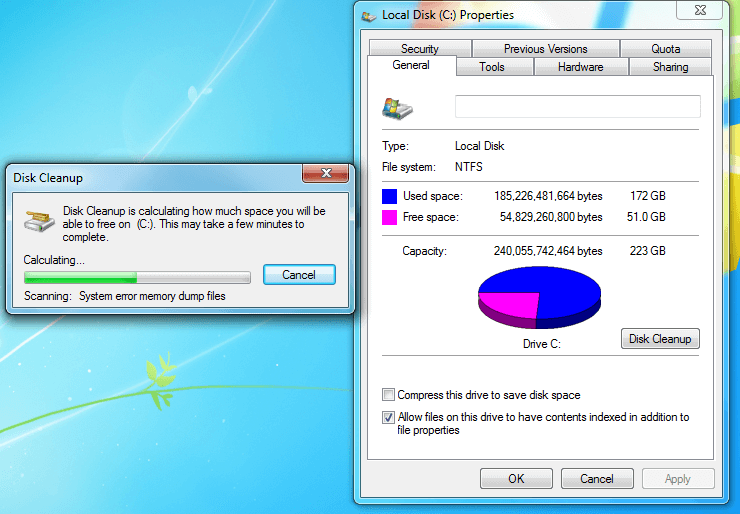
After that just choose the data that you want to clear up. This will not only speed up your PC a little, but also clear up some space. WARNING! There is one option that you should not delete, ever. That’s the option called Temporary Files. This is the Folder for temporary files itself; getting rid of it may lead to problems. Everything else is fair game.
Leave a Reply