Video Downloader Plus (Malware)
Video Downloader Plus (Malware) is a typical example of a browser-hijacking app that tries to earn advertising revenue by flooding users’ browsers with obstructive ads. Video Downloader Plus (Malware) is also known for causing the affected browser to automatically reroute users’ traffic to different promoted sites.
")
The ads and the page redirects that this undesirable app introduces to your browser are linked to remuneration models like Pay-Per-Click and Pay-Per-View, meaning that each time you get automatically redirected or click on an advert coming from Video Downloader Plus (Malware), you’d be basically generating money for the creators of the browser hijacker. Of course, a single redirect or ad-click won’t earn much but on a larger scale with a big number of users with Video Downloader Plus (Malware) in their browsers, the end profit can be quite considerable.
Symptoms such as search engine and homepage changes in Chrome, Firefox, Safari, and other popular and widely used browsing programs are almost a guarantee that there is a browser hijacker hiding somewhere in the system. Usually, users do not initially realize that such an app has been installed on their computer and this is understandable. The majority of apps that can be categorized as browser hijackers do not get distributed like regular software because, after all, nobody would willingly download such an app.
Instead, they are delivered to the computer via the help of other, more user-friendly apps. The hijackers are attached to these apps, hidden in them as bonus components that can only be seen before the installation if the user goes out of their way to look at the Custom setup menu during the installation of the carrier app (something we strongly advise you to do from now on when installing a new program). Most users, obviously, do not have the habit of paying attention to what is present in those settings, which is why, more often than not, they fail to notice the presence of the added browser hijacker component. This is how most of these apps find their way into users’ browsers and once they are already there, it could be particularly difficult and frustrating to have them uninstalled.
Need help removing Video Downloader Plus (Malware)?
You are likely here because you are one of the many users who are currently wondering how they can get rid of the unpleasant Video Downloader Plus (Malware) app. Well, as we said, this can be a rather tricky task but it is certainly manageable if you know what you are doing.
On this page, we can offer you a detailed explanation on how to get rid of Video Downloader Plus (Malware) in the form of a removal guide with manual steps as well as an automatic anti-malware tool linked in the guide that has been tested against similar undesirable apps.
Generally, the sooner you remove the hijacker, the better. And the main reason for that is the fact these apps, though not harmful by themselves, may sometimes cause weaknesses in the system, which could make your computer more exposed to attacks from Trojans, rootkits, ransomware, spyware, and other viruses. Because of this, if you don’t want to risk getting your files encrypted by some malicious ransomware virus or your system corrupted by a stealthy Trojan horse, we advise you to immediately take matters into your own hands and uninstall the Video Downloader Plus (Malware) hijacker ASAP.
SUMMARY:
| Name | Video Downloader Plus (Malware) |
| Type | Browser Hijacker |
| Detection Tool |
Some threats reinstall themselves if you don’t delete their core files. We recommend downloading SpyHunter to remove harmful programs for you. This may save you hours and ensure you don’t harm your system by deleting the wrong files. |
How To Remove Video Downloader Plus (Malware)
Since many browser hijackers add an extension to the browser which is responsible for the unwanted redirects, ads, and pop-up messages, you can try to remove this extension. If you are lucky, doing this would be enough to rid your browser of the hijacker and you won’t need to dig deeper to resolve the problem.
- To check your browser for hijacker extensions and remove them, first open the affected browser and open its main menu
- Depending on what your browser you are using, the next steps may vary a little but there should usually be a button in the browser’s main menu labeled Extensions, Add-ons, Plug-ins or something similar (for Chrome, you must first select More tools and then you will see the Extensions option). Click on that button to access the extensions manager of the browser.
- Once you open the extensions manager, you will see all of your browser’s extensions and if the hijacker has installed one to your browser, you should be able to see that one too. In there, look for Video Downloader Plus but know that you may not see an item with this exact name. It is possible that the hijacker has an extension with a different name. Therefore, if you notice any items in there that you haven’t installed yourself, it is possible that they are the ones responsible for the problems with your browser. If you aren’t certain about which extension you should delete, delete all of them – doing this won’t cause any problems with the functioning of your browser so its safe to do it.
- To delete/uninstall an extension, all you have to do is select the “Remove”/trashcan button next to the extension and it should be removed. If you can’t to that outright, try first clicking on the Disable button and then quickly selecting the Remove one.

One other thing you can try is revoking any unwanted permissions that certain sites have gained in your browser. You know how when you visit certain sites they ask you whether you want to allow them to show you notifications. You should click Block when prompted with such a request but sometimes users accidentally select the Allow option instead. This, too, is a way your browser could hijacked without the need for any specific extension getting installed on it. In such cases, here is what needs to be done:
- Again, open the browser’s menu and go to Settings.
- On the Settings page, click on the search box and type Permissions.
- Look through the settings that show up on your screen – under the Permissions settings, there should be a Notifications setting. Click on Notifications and you will be sent to a screen from where you can control which sites can show notifications inside you browser.
- Scroll down until you get to the Allow section – the sites that can show notifications in your browser should be listed there. If you see sites listed there that you don’t want to send you notifications, select the settings button for that site (for Chrome and Opera it is a three dot icon) and then click on Block. This will prevent the site from spamming you with notifications in the future.
- We also suggest that you block any site from requesting permission to show notifications. You can do that from the same Notifications screen you are on – just scroll back to the top of the page and you will see an option labeled Sites can ask to send notifications. Toggle off the button next to thsi option and sites will no longer be able to request notification permissions.
The steps you saw above are a quicker and less invasive method of dealing with a hijacker but they may not always resolve the problem, especially if the hijacker you are dealing with has files inside your system and/or has tampered with system settings. In this case, you should check out the rest of this guide and complete its steps. After you are done there, you can come back to this starting section of the guide and complete the steps from here once again for good measure.
![]()
Before we get any further, we suggest that you start your PC in Safe Mode so that any malware present on your computer won’t be able to interfere with what you do next. If you have never entered Safe Mode or have forgotten how to do it, you can find instructions on how to enter Safe Mode on this page.
![]()
Open the Task Manager using the Ctrl + Shift + Esc keyboard combination and select the Processes tab to see all processes running on your computer at the moment. Look for suspicious ones that consume unusually high amounts of system resources (CPU, RAM), especially if their names don’t seem familiar to you and don’t seem to be linked to any of the programs you are running at the moment. You may or may not see an item with the Video Downloader Plus name on it but don’t count on that. Malware apps typically disguise their processes by giving them different names so that users have harder time noticing them.

Next, if you think that a given process looks questionable, right-click on it and then Open its File Location. Now drag and drop the files located in the folder that opens to our free online malware scanner that you can see right below.


Scan the files one by one and see what results the scanner gives you. If it flags anything as malicious, go back to the Task Manager and right-click on the suspicious process again and this time select the End Process option to kill that process. Next, delete the file flagged as malicious from the folder or, better yet, delete the whole folder.
Important tip: It is always possible that the scanner doesn’t manage to detect malicious code in a file related to the malware – after all, no scanner is perfect. Therefore, if you are sure that a given process is related to the hijacker, kill the process and delete is folder even if the scanner doesn’t pick up anything malicious during the scans.
![]()
Next, you should check if the unwanted software is still in your system by using the computer’s Control Panel. To access it, simply type Control Panel in the Start Menu and hit Enter. Now look for an option labeled Uninstall a Program and select it to reveal a list of all apps and programs that you have on your computer at the moment.
If the hijacker is still on your computer, there could be an entry for it here. Look for any items installed just before you first remember experiencing browser disturbances. Again, it is unlikely you will see the name Video Downloader Plus in there but it is still possible. Even if you don’t, look for suspicious software that you haven’t installed on your own and if you think that any of the entries there cannot be trusted, select them and then click on the Uninstall option at the top of the list.
Follow the on-screen uninstallation instructions to remove the potentially unwanted software and if presented with the following prompt, remember to select NO instead of Yes. This is very important as it is one last attempt from the hijacker’s creator to get more unwanted apps on your PC.

![]()
The next step is to disable startup items that may be related to the hijacker and helping its actions. To do that, type System Configuration in the Start Menu and click on the first item to be shown. Then select the Startup Tab and, again, examine the entries, trying to figure out if one or more of them look connected to the hijacker.

If there are any items that have an Unknown manufacturer, uncheck them by removing the tick from their checkbox. Do the same with any other items you think are suspicious, unfamiliar, or simply unneeded. After you are finished, Apply the changes and click on OK.
Next, copy-paste this line in the Start Menu and press Enter: notepad %windir%/system32/Drivers/etc/hosts. This will get you to the Hosts file of your computer – this file usually gets hacked when malware enters the computer so its important to check it. Look at the bottom of the text and see if there are any odd-looking IP addresses listed below “Localhost“. If there are, copy them and send them to us through the comments section so we can tell them if they are likely to be related to the malware. Sometimes, regular and legitimate programs and apps add their own IPs to this file and deleting the latter IPs may interfere with the normal functioning of those programs/apps. Still, even if you delete IP addresses from legitimate software, it won’t cause problems with your system so it’s okay to do that if you are not sure.

If, after we take a look at the IPs you’ve send use, we tell you that they are not supposed to be in your Hosts file, delete them from the latter and then press Ctrl + S to save the made changes.
![]()
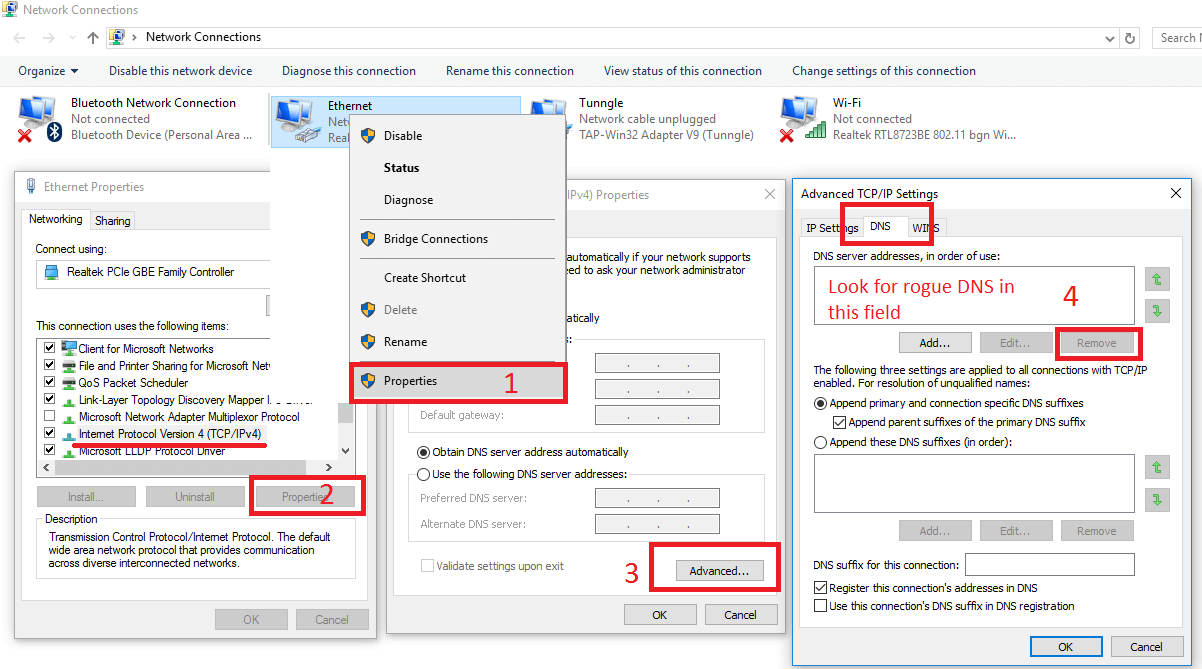
For this next step, type Network Connections in the Start Menu and click on the first icon. Then select the Internet connection that you are using at the moment, right-click on it, and go to Properties > Internet Protocol Version 4 (ICP/IP) > Properties. In there, make sure that the Obtain DNS server automatically option is checked and then select Advanced. Open the DNS tab and remove any entries listed below DNS server addresses by selecting them and clicking on Remove. After you are done with everything, click OK on all opened windows and proceed with the final step.
![]()
Open the Registry Editor of your computer by typing regedit in the Start Menu, hitting the Enter key, and giving your Admin permisson. Once there, open the Edit menu and select Find. Type the name of the hijacker (in this case Video Downloader Plus) in the search box and click on Ok. If the search finds anything, right-click on what gets found and select Delete. Rinse and repeat this until no more results that have the Video Downloader Plus name are left in the Registry Editor.
Next, go to these location in the Editor and look for any folders with suspicious names located in them. Mainly look for folders with names that are long strings of random characters that don’t seem to make any sense. If you see anything like that, delete it but if you aren’t certain, it’s better to first consult us in the comments section instead of risking to delete something you aren’t supposed to as doing so could sometimes have severe and unforeseen consequences for your system.
- HKEY_CURRENT_USER/Software/*Folder with suspicious name*
- HKEY_CURRENT_USER/Software/Microsoft/Windows/CurrentVersion/Run/ *Folder with suspicious name*
- HKEY_CURRENT_USER/Software/Microsoft/Internet Explorer/Main/*Folder with suspicious name*
Leave a Reply