Seeing persistent security pop-ups in your browser that insist your system is infected, especially when they come from antivirus tools you never installed, usually points to a browser hijacker like Globalsnn1-new.cc rather than a classic virus. Hijackers like it and others, such as Health-smooth-eu3.com and Alphazero1-endscape.cc, attach themselves to your browser and start changing how it behaves.
A browser hijacker isn’t a full-scale malware, but they do override browser preferences, inject fake alerts, and steer you toward phishing pages.
Globalsnn1-new.cc normally arrives bundled with other free programs, open source software, or game mods, but it can also slip in when you approve a misleading notification prompt on the Internet without reading it closely.
Once active inside the browser, the hijacker can swap out your homepage, replace the default search engine, and show ad-heavy or misleading results instead of the pages you expect. This influence can linger even when you are not actively browsing, hence the strange malware warnings from software you don’t even have on your PC.
If you suspect you’re dealing with Globalsnn1-new.cc or another hijacker, avoid clicking any warnings, update prompts, or fake scans triggered from the browser. Instead, try following the guide below or simply use Spy Hunter 5 to get rid of this annoyance in a matter of minutes.
We tested that SpyHunter successfully removes Globalsnn1-new.cc* and we recommend using it. It will block Globalsnn1-new.cc from reinstalling itself and it will make sure your device is clean from any malware.
Buy now15% OFF if you buy straight without trial.
Step-by-Step Guide to Removing Globalsnn1-new.cc
Work through each section in order, applying one change at a time and checking your browser after major steps. This methodical pace makes it easier to spot mistakes, helps prevent Globalsnn1-new.cc from silently restoring altered settings, and reduces the chance of new pop-ups or redirects appearing while you work.
Initial Actions to Undo Globalsnn1-new.cc Browser Changes
- 1.1Begin by opening the browser Settings page to inspect which preferences Globalsnn1-new.cc has altered.
In Chrome, use the ⋮ menu in the top-right; in Firefox, open the ≡ menu instead.
Go to Extensions or Add-ons, review each item, and mark anything you do not recognize. - 1.2Review every extension’s name, icon, requested permissions, and full description in detail.
Watch for subtle spelling changes or icons that look slightly wrong, then choose Remove for any entry that seems suspicious.
If you are unsure, look up the exact “extension name” online and compare the listed developer and user comments. - 1.3Open Privacy and security and then choose Site permissions.
Check which sites can use your microphone, camera, location, and notifications.
Remove permissions you do not recognize and keep a short list of sites you genuinely trust so you can restore them later if needed. - 1.4Delete site entries that were granted access without you deliberately approving them in Site permissions.
This reduces recurring notification loops, pop-ups, and redirects that trigger whenever the browser starts.
Afterward, restart the browser so the updated permissions take effect and confirm the entries do not return.
If pop-ups and redirects stop appearing after these quick checks, you may keep using the browser normally. If the symptoms continue, entries outside the browser interface are likely still forcing changes, so move on to the next sections to remove those deeper controls safely.
SUMMARY:
| Item | Globalsnn1-new.cc |
| Classification | Browser Hijacker |
| Detection Tool |
Some threats reinstall themselves if you don’t delete their core files. We recommend downloading SpyHunter to remove harmful programs for you. This may save you hours and ensure you don’t harm your system by deleting the wrong files. |
How to Remove the Globalsnn1-new.cc Browser Hijacker
When Chrome, Edge, or a similar browser shows a “Managed by your organization” message, it means policy files are telling the browser which settings to use regardless of your own choices. Follow the steps below to clear those rules so Globalsnn1-new.cc can no longer silently restore its configuration each time the browser or system starts.

1. Find Browser Policies Enforced by Globalsnn1-new.cc
- 1.1
 Open your browser’s policy page so you can see which rules are currently being enforced by Globalsnn1-new.cc.
In Chrome, type chrome://policy into the address bar.
In Edge, browse to edge://policy instead.
Wait for the list to populate, then scan for unexpected entries and use Reload policies if you need to refresh or export what you see. - 1.2Read through each policy item and watch for unfamiliar identifiers, random-looking names, or values that do not match your usual setup.
Write down every suspicious entry so you can match it later with folders and files on disk.
Record both the policy Name and Value, because they often point to locations or IDs that you will clean in the next steps. - 1.3Open your browser’s Extensions page and enable Developer mode using the switch at the top right.
This view reveals each extension’s ID and install path so you can relate them to entries you just saw on the policy page.
Copy any doubtful ID into a text file so you can reference it while examining folders. - 1.4If the Extensions page refuses to open or closes immediately, switch over to File Explorer instead.
Browse the browser’s profile directories directly so the interface cannot block access to installed components.
Turn on View > Show > Hidden items so the relevant AppData folders are visible. - 1.5
 Use File Explorer to browse to:
C:\Users[Your Username]\AppData\Local\Google\Chrome\User Data\Default\Extensions
Treat each folder name as an extension ID, compare them with your notes, and create a backup copy before permanently deleting any folder you consider unwanted. - 1.6
 If you use another Chromium-based browser such as Brave or Opera, its extensions are stored in a similar AppData directory.
Confirm that each extension ID and folder location matches your earlier notes before removing anything.
Check the browser’s About page to ensure it is fully closed so files are not locked during removal. - 1.7After deleting the suspect folder, return to Extensions with Developer mode still enabled.
Verify that the associated extension no longer appears; if it does, remove it again and look for any remaining folders tied to that ID.
Use Update in Developer mode to refresh the view and expose any attempt to reinstall automatically.
Remove Globalsnn1-new.cc Policies from the Windows Registry
Some browser policies are stored as keys inside the Windows Registry, where incorrect edits can affect how the system runs. Concentrate only on entries you can clearly link to Globalsnn1-new.cc and avoid wide deletions so that Windows remains stable while you strip away the policy layer that controls your browser.
2. Delete Globalsnn1-new.cc Policy Entries from the Registry
- 2.1Press Win + R, type regedit, and press Enter to open Registry Editor and remove policy entries created by Globalsnn1-new.cc.
Before editing anything, go to File > Export to create a backup of the current registry state.
Choose All under Export range and save the backup in Documents or another easy-to-find folder. - 2.2Use Ctrl + F or Edit > Find to search for the policy names or extension IDs you wrote down earlier.
Click Find Next and delete only exact matches that sit inside browser-related policy keys.
Press F3 to move through the remaining results in both HKCU and HKLM until no more entries are found. - 2.3
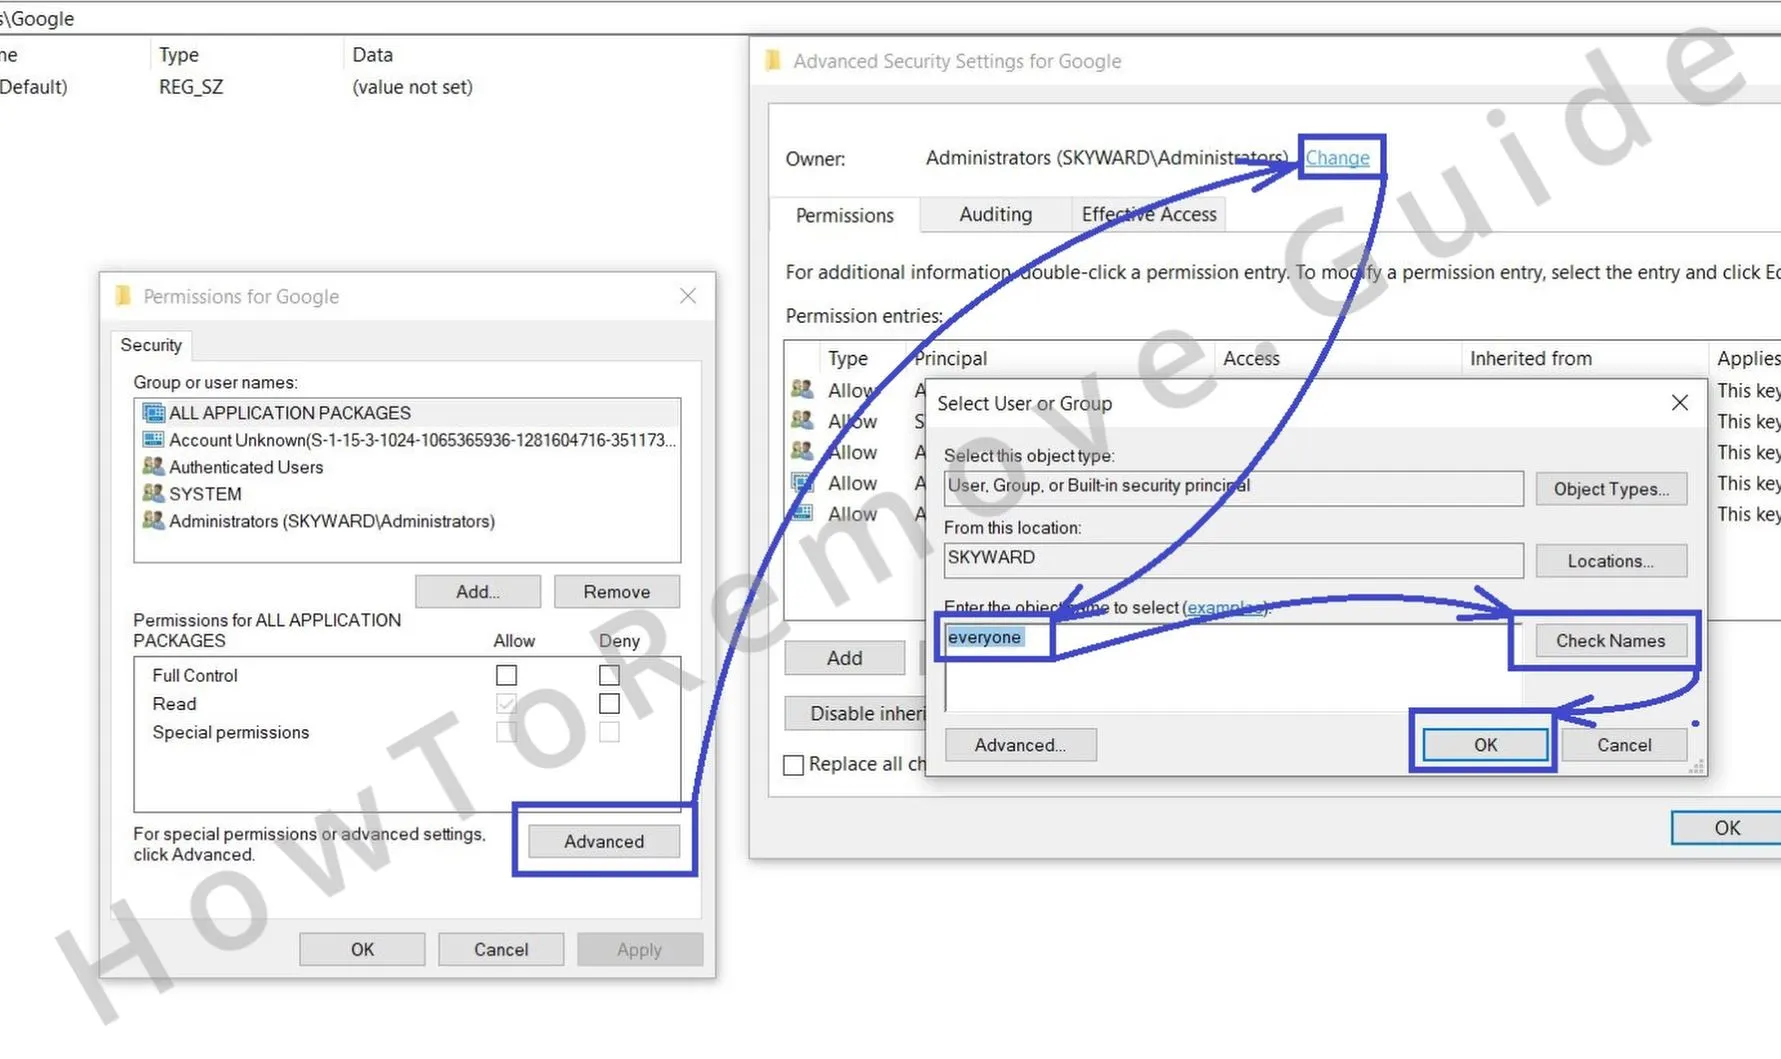 If a key refuses to be deleted, right-click it, select Permissions, and then choose Advanced.
In the Owner field, click Change, type Everyone, use Check Names, and confirm with OK.
Grant Full Control to both Administrators and Users so that the key and its subkeys can be removed. - 2.4
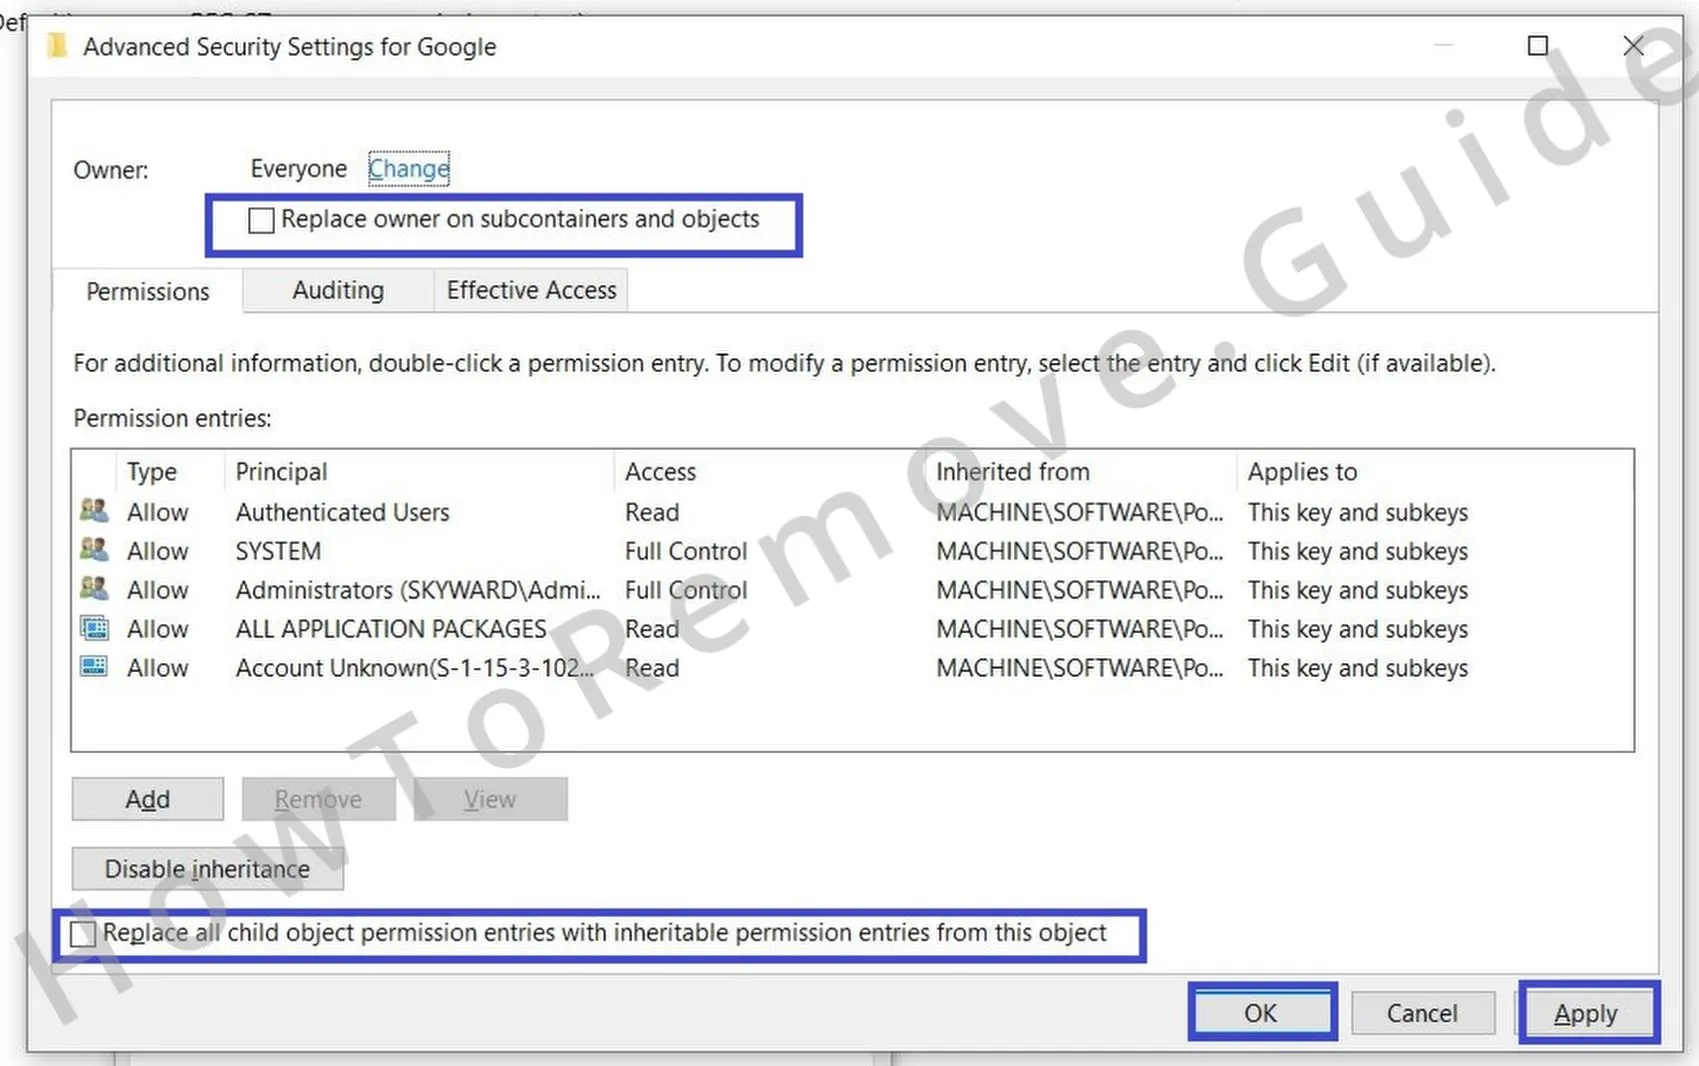 After changing the owner, enable Replace owner on subcontainers and objects and Replace all child object permission entries.
Click Apply, then OK, restart Windows, and check whether the “Managed by your organization” message has disappeared from the browser.
Once the banner is gone, open regedit again and repeat your searches to confirm that the policy values have not reappeared.
These permission changes make it possible to remove stubborn keys cleanly and reduce the chance that identical policy entries will return in future sessions, keeping your browser free from registry-level control linked to Globalsnn1-new.cc.
Alternative Tools to Clear Globalsnn1-new.cc Policy Enforcement
Background services, tasks, and local policy files can silently add new rules even after you tidy up the registry. Tools that manage policies directly help you remove leftovers tied to Globalsnn1-new.cc while leaving unrelated system settings alone, and they are useful when “managed” banners or policy entries keep reappearing after every restart.
3. Other Methods to Remove Globalsnn1-new.cc Policy Rules
- 3.1
 Launch Group Policy Editor with Win + S, typing Edit Group Policy, and opening the result so you can inspect rules linked to Globalsnn1-new.cc.
In the navigation pane, expand Administrative Templates, where most browser-related policies are defined.
Review both Computer Configuration and User Configuration to cover machine-wide and per-user settings. - 3.2
 Right-click Administrative Templates and choose Add/Remove Templates.
Remove policy templates that you did not configure yourself to roll back browser or system restrictions.
Next, open Windows Components, locate Microsoft Edge or Google Chrome, and change any unwanted items to Not Configured. - 3.3For Chrome, the standalone Chrome Policy Remover utility can detect and delete hidden policy files.
Download it from a trusted source, then right-click the executable and select Run as administrator so it has the required access.
When the scan finishes, open chrome://policy and use Reload policies to verify that only expected entries remain. - 3.4If your antivirus or Windows Defender flags the tool, choose More info and Run anyway only when you are confident the download is legitimate.
After the utility completes, restart the PC, then recheck Group Policy Editor and Registry Editor for any remaining traces.
Also open Task Scheduler under Task Scheduler Library and remove tasks that appear to recreate the same policy settings automatically.
Remove Globalsnn1-new.cc From Chrome, Edge, and Other Browsers
Browser sync, profile copies, and stored site data can quietly restore hijacked start pages or search engines even after policies are cleaned up. To stop Globalsnn1-new.cc from returning, keep an eye on your homepage and search provider after each restart and sign-in, and confirm that permissions and content settings stay as you left them.
4. Clean Up Browser Settings Still Affected by Globalsnn1-new.cc
- 4.1Open your browser’s Extensions or Add-ons page once more and look for entries that appeared around the time Globalsnn1-new.cc showed up.
If an extension keeps reinstalling itself or looks unfamiliar, click Remove so sync or background services cannot keep it active.
Go directly to chrome://extensions or the equivalent URL instead of relying on themed shortcuts that might hide problematic items. - 4.2
 From Settings, open Clear browsing data.
Set Time range to All time and select every category except Saved passwords.
Click Clear data to wipe cookies, cache, and stored items that might still trigger unwanted pop-ups or redirects, and repeat this for each profile you use. - 4.3
 Open Privacy and Security > Site settings.
Inspect permissions for your camera, microphone, and notifications, then Delete or Block any site you do not explicitly trust.
Use View permissions and data stored across sites to clear multiple unwanted origins in one place. - 4.4
 Open Search engine settings and choose Manage search engines.
Delete unknown providers and make sure your default is set to Google, Bing, or DuckDuckGo.
Also review entries under On-device search shortcuts or Site search where hijackers sometimes add custom shortcuts. - 4.5Check settings under both On startup and Appearance.
Remove unfamiliar URLs configured as your homepage or new tab page so the hijacker cannot relaunch its own sites automatically.
Disable unwanted themes and restore the Default theme to get rid of scripts bundled with custom themes.
To strengthen your setup after cleaning, turn on 2FA for important accounts, keep browser and extension auto-update enabled, and periodically export your bookmarks so you can safely use a full Reset settings option if similar hijacker symptoms reappear.